
This post is the marker for our 2016 challenge build. We started in an effort for the 2009 challenge. That effort didn't reach fruition for many reasons but the basic concept is being revived for 2016. The start include a 1979 fiat spider 2000 and a 90's ranger.
In working for the 2009 challenge we realized (too late) that the fiat chassis had serous flaws for the competition. The front suspension induced positive camber at load, the rear ws a very weak stick axel with limited gearing options, the engine had limited hp potential, and 4 x98 wheel options we non existent. So what to do?
Looking at swap donors for all of these issues the Mazda Miata checked a lot of boxes. Good front suspension geometry. Multiple rear end options, 4x100 wheel bolt on afternoon. AWESOME! Add in that the wheelbase is within .1 inch? Good lord what is not to like. Add in an easy fix to fiats "return to the earth floor pans? Deal done!
Motor? Um, we still have the ranger drivetrain. 200+ hp, get be of torque, a five sped RWD tranny.
A early miata donor chassis was procured and surgery begins in 2 weeks, stay tuned......

NOHOME
UberDork
11/26/15 6:20 a.m.
Looking forward to this.
If I were doing this again, I would consider a different cut where I kept the Miata outer sills and dropped the receiver car on top of the sills rather than slidding the Miata inside of the receiver car sills.
As to the drive-train, I would leave the Miata stuff in place until the new shell was done. Besides the fact that the body is a lot of work, the room required to deal with the engine and body all disassembled turned my four car shop into a one car shop.
In reply to NOHOME:
I haven't placed the two cars next to each other yet for measurements, so our plan for how they join definitely isn't baked. But my gut is telling me to keep the miata she'll as intact as possible including the rails. This is even more desirable on this surgery as the Fiat sills show rust inside the door jamb and I haven't been able to locate the margin for the rust inside the sill structure.
The more difficult issue I think will be the firewall as we want to put the v6 as far back as possible to avoid making it to nose heavy. Did you alter your firewall at all?
NOHOME
UberDork
11/26/15 3:34 p.m.
Keep in mind that I stretched the Miata by 7" in the engine bay. There is another item on the "Don't ever do that again" list. So, no, I did not alter the firewall.
I don't think that you should worry too much about having excess eight up front. Many V8 Miata manage to get around road courses quite well. The V6 will only make life easier.
A lot of how well this works has to do with where the ergonomics end up. If the seating position falls in a good place vis-a-vis the Fiat scuttle and windshield, then you are golden.
Your wheelbases are off by 1" the track by about 5". So you are going to be making flares of some sort. If you can cut the 124 just below the doors and set it on the Miata sills, that would be the way to go. The Miata is built like a tank, I would use as little of the 124 as I could get away with and attach it to the Miata structure. Leave as much of the Miata wiring in place as you can. Unless race-car, then get rid of everything!
finally the fiat made it back to the house. and call it serendipity, but it was 73 degrees in december! first task was to remove the ranger motor and transmission from the fiat chassis. this also served as a reminder of why the miata chassis seemed like a good idea. the steering box right where the exhaust manifolds should go was renewed inspiration for the plan change. 


once pulled, the engine and trans was ready to be mocked into the miata chassis... oh, did i forget to post a picture of the miata chassis?


here ya go.
NOHOME
UberDork
12/15/15 11:11 p.m.
Torn between telling you how I would do this based on my experience and just sitting back and watching the show!
I'm always up for advice , but in some ways the show already started. Pics are coming but photo bucked crashed out on me last night. Taking measurements on both vehicles I don't think I am going to need a stretcher section like you had. And seeing the work that took I'm happy. But the firewall and trans tunnel required some surgery and I will need to alter the pedal box to make room for the rear exhaust port on the drivers side. That will be fun!
NOHOME
UberDork
12/16/15 7:40 a.m.
How do the dimensions for the windshields side to side compare for each car?
If you line the cars up side to side with the front axles even, where does this put the Miata seat in relation to the Fiat windshield and dashboard. When I did this with the Volvo I was surprised to find out that it out me way to far forward.
What I learned is that the drivers area is key to making this a car you want to be in. If you can get a good ergonomic blend of the two firewalls, seating positions, view out the window and firewall structure, build around this. But then again, I am not building a race-car on a budget.
The starting point of the pillar is only 1" different from the front wheel centerline. I think I could work it out with some shifting and stretching, but ....The bigger issue is the degree of slope in the wind wild. I think it is goi g to look odd and will definitely keep the fiat window frame from working if I keep it.
Wheelbase is closer than 1" and side to side is exactly 5" as you predicted.
NOHOME
UberDork
12/16/15 9:23 a.m.
NOHOME said:
How do the dimensions for the windshields side to side compare for each car?
Not sure what happens to my brain when I try to type! I think auto-correct liked "windshield" better.
That was meant to read:
"How do the dimensions of the pinchwelds compare side to side?"
Assume you are keeping the Fiat cowl and windshield. You want to drape the Fiat over the Miata locating the Fiat fore or aft so that the driver is in a good position relative to the windshield.
Being 5" narrower than the Miata this could put the Fiat windshield post in the line of sight or just enough to be annoying.
Also, once you get the driver ergonomics just right, don't be surprised if the wheelbase is not exactly where you want it.
Using the front wheel location it looks like driver location will stay exactly as it is in the miata. Which is something I was really hoping for to minimize pedal and steering changes. The gear shifter is a little closer to the firewall than the stock one but feels workable for a short guy like me.
I have t measured the pinchwds yet. I know there will be some flexibility in that connection since the bottom panel joints on the fiat are rusty and will need some new metal grafted in. I'm hoping to do some layout work for this after Christmas.
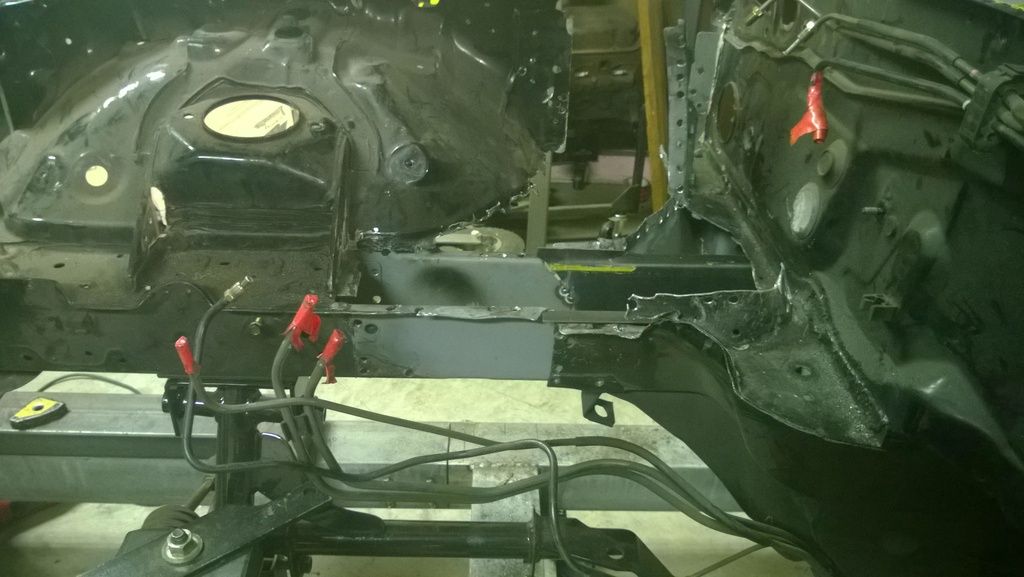
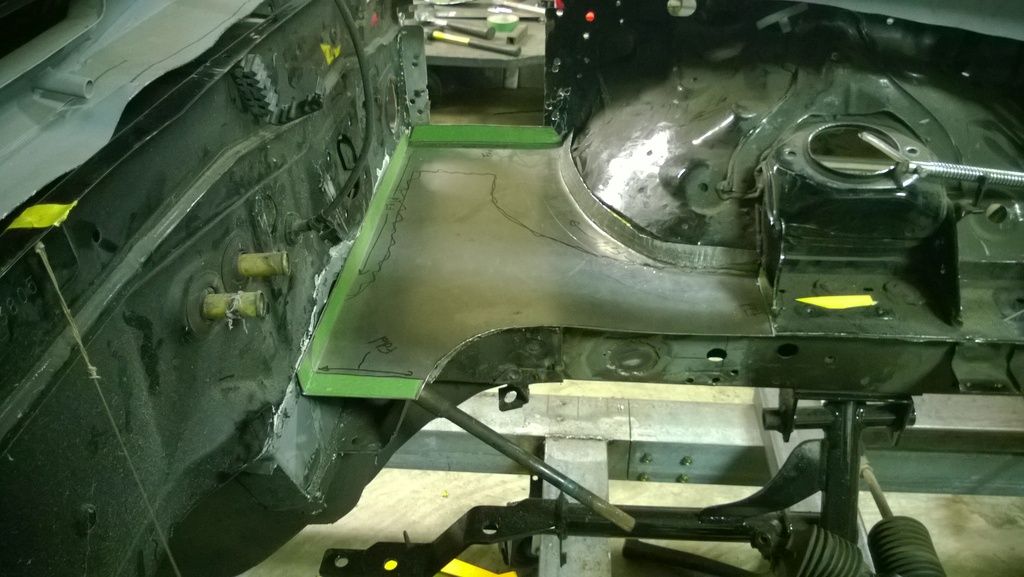
a few more pictures from last weekend. as i said the engine had fitment issues. the engine would either be in conflict with the firewall at the rear or with the crossmember and sway bar at the front. since the miata suspension was the key to using his chassis i didn't want to alter the front subframe and opted instead to free up some room behind the firewall. this was the first pass.... after another test fit it became clear they the bell housing needed some help at the front of the trans tunnel and the rear of the passenger side cylinder head was REALLY close to the remaining firewall so that was clearances a little more.


i found a picture of the engine before the firewall cuts.


note the conflict at the crank pulley....
after the additional clearancing here is the motor and trans in place

NOHOME
PowerDork
12/17/15 7:00 p.m.
Would it not have been easier to put blocks under the swaybar so that it moved down?
Good news is that rad and fans should have lots of room.
If I was able to get past the sway bar the oil pan started hitting the crossmember an inch or so later leaving the motor either very tilted or very high. I tried detaching the mounts to check that option before concluding the firewall was best clearanced.
this weekend's goal was to fabricate and mock in the motor and transmission mounts for the ford engine and transmission. it was a mildly productive weekend. i started with the trans mount as the mock up was currently hanging from a piece of nylon strap. the mount started life as a discarded bed frame i picked up a few years ago from the side of the road. i couldn't locate a good boss in the existing pan to attach to so i needed to make a support that could spread the load as far as possible around the floor pan. what i came up with was two square tube sections welded to two angle iron feet. the existing trans mount bushing from the truck would be cut up and welded between the two cross tubes. it is probably beefier than necessary, but i also need to mount the front end of the torque arm to it since i am not using the miata transmission. i figured a little more robust is better than a little weak. picture of the finished mount before installation...


next i started on the engine mounts. i continued using the bed frame for all but the angle connecting to the block. i started by welding two sections of angle together to form the "foot" of the mount and then i built down to that with angle shaped legs (tapered a little to make the weld areas and captured nuts accessible) from the angle bolted to the block. anyway. with all the back and forth cutting and trimming i forgot to take pictures during the assembly... but here is the passenger side mount in place. I'm still gabbing the drivers side so i will try to get better pictures then. the folded up accessory belt in the picture is making the gap between the bottom of the oil pan and the crossmember.


i noted a few posts ago about the shifter being a little closer to the firewall than the stock miata shifter was. the picture below shows the new location. the round hole to the lower left in the picture is the original location

I'm stupefied over here with this! (YES, that is highly complimentary)
wow. this thread is already down to page 4. either the rest of the forum members have been really busy or i have been slacking. likely a little of both. anyway. rain.... rain.... rain.... and still more rain conspired to float my project away before christmas and then a detour to visit the inlaws kept me away till new years. but i did manage to get some time in before returning to work today.. i started by finishing the engine mounts. i tried to do a better job documenting the process. this is the base plate.


