[Editor's Note: This article originally ran in the January 2008 issue of Classic Motorsports. Some information may be different today.]
Story and Photography by Tim Suddard
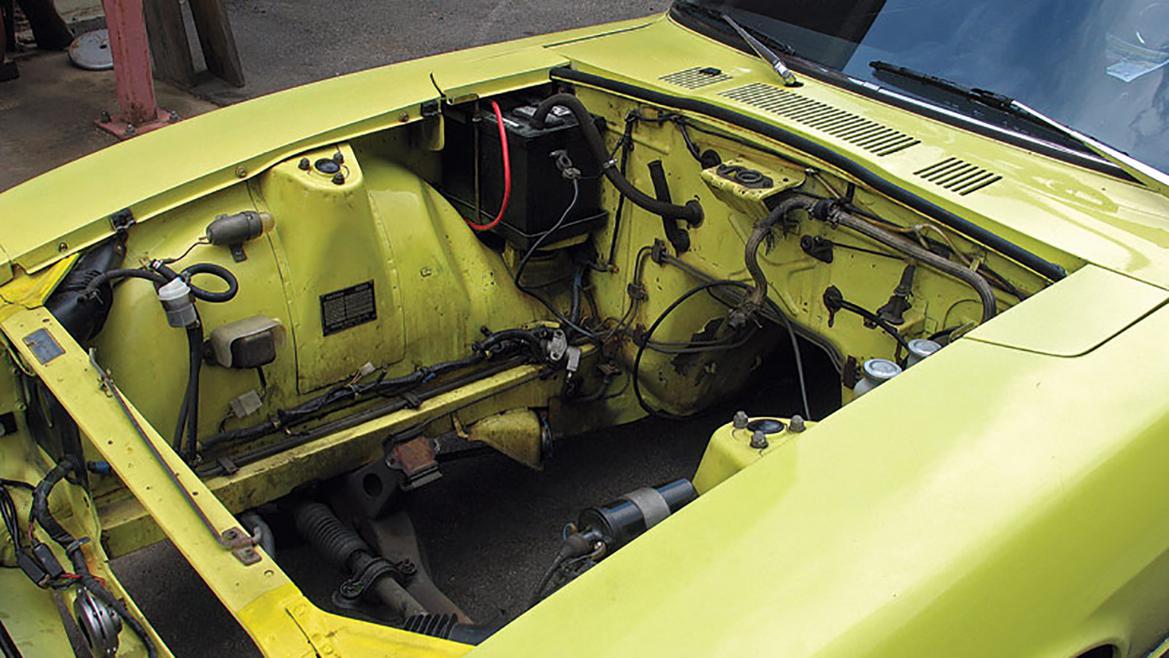
We’ve all been there: Walked up to an innocuous-looking vehicle needing some attention and popped the hood, only to be greeted with a filthy mess that would make even a trench-war veteran flinch. When the time comes to do any engine work, it’s a shame to be faced with a ratty engine compartment—especially when it’s your own car.
We recently faced this situation with our Datsun 240Z. Fortunately, the Z-car was due to get its engine rebuilt, so we’d have nearly unequaled access to its compartment. We didn’t have the time or desire to completely strip and repaint the engine bay, but we still managed to do a simple makeover without spending much time or money. Here’s what we did.
Step 1.

Clean, Clean. There are several ways to clean an engine compartment. In the old days, we would use an engine degreaser. As these products have gotten more environmentally friendly, however, they have also gotten weaker. At the same time, excellent alternatives like Simple Green and similar “purple” cleaners have evolved and work very well.
How you use these cleaners is up to you.
One option is to wet down the engine compartment, spray on the cleaner, let it soak, and then blast away the dirt with a pressure washer. This has a couple of drawbacks, though. First, you need to be careful with the pressure washer, as it can remove paint, obliterate old decals and even damage your skin or eyes. You also need to collect and dispose of the runoff, as it will contain petroleum products.
Here’s a better way: Spray the cleaner onto the buildup, then brush off the dirt and grime with some rags and long-bristled brushes. This makes it easy to collect the nasty residue, and it’s much gentler on you and your car.
Step 2.

Remove Components. You will need to move some things out of the way to effectively scrub the engine bay. For example, we unclipped our Z-car’s wiring harness so we could clean around and behind it.
Items like the battery, radiator, voltage regulator and such can all be removed to make the rest of this job easier. Make sure you carefully label all wires and mark where things go to make reassembly a snap.
Step 3.

Polishing. Once you’re finished with the cleaner, take some light polishing compound and go over the complete engine compartment. We used this trick on our Datsun, and the compound did an amazing job of shining and removing stains from the paint. (If your car’s engine bay is flat black, you can obviously skip this step.)
Step 4.

Touch-Up. Now take a brush and some touch-up paint—get paint that matches properly, not the generic stuff sold at the local auto parts store—and go over any nicks you might find under the hood. If you have larger areas to fix, you can get touchup paint custom-filled in a spray can, but you’d be surprised how much you can do with a brush, especially when it’s under the hood where most of us are less fussy.
Step 5.
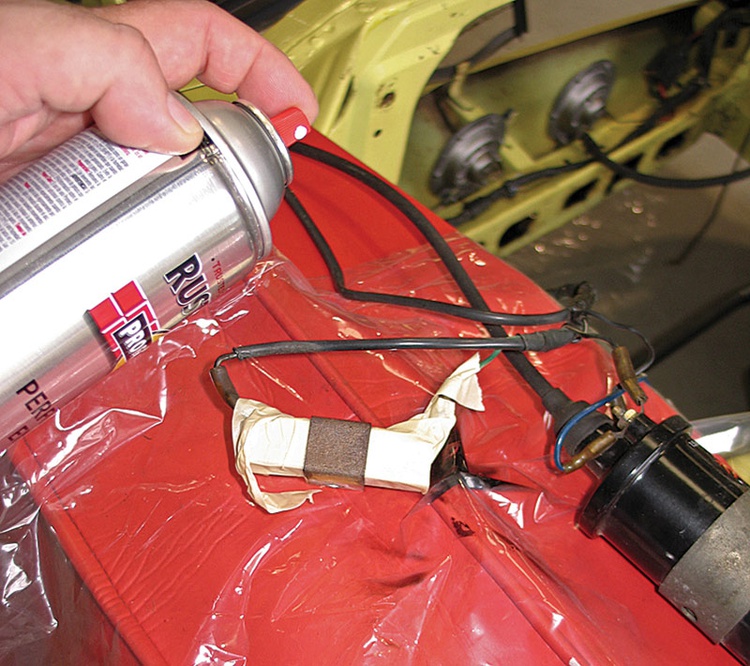
Detail the Accessories. Remember all of those accessories you unbolted? Now it’s time to spiff them up. Carefully clean and paint items like the starter, voltage regulator and battery tie-down hardware.
Take care not to paint areas that get hot or need to stay clean. A small brass brush, some masking tape, cleaning solvent and a lot of patience will make this step go better. Once it’s all clean, apply a clear finish in either gloss or satin.
Here’s another tip: Most parts were not originally black or bright silver. A lot of the pieces under your car’s hood were probably dull aluminum or clear anodized from the factory. While we’re not suggesting that you go get everything replated, specialists like Eastwood and even your local home improvement center do offer spray-on finishes that look natural and very period-correct. In the past, we have worked wonders with a $3 can of stainless steel paint from Lowe’s.
Another trick: Talk to the experts. After we spent some time trying to match the original orange paint on our Datsun 240Z’s air cleaner, a quick call to Classic Datsun Motorsports revealed they had done the research and had the exact paint on hand for just a few dollars.
Step 6.

Clean the Harness. Wires get dirty over time, fading from bright primary colors to something closer to dirt. Start by wiping down the entire engine wiring harness with a rag and some cleaning solvent—we’re partial to DuPont’s Prep-Sol.
Assuming the harness passes a visual inspection, we’ll then clear coat it. Some will say that the clear paint can make a harness brittle, but we have never had a problem and find the look and protection to be quite beneficial.
Step 7.

Put It Back Together. At this stage, your paint should be dry and you can start putting everything back together. New nuts, bolts and screws go a long way to improving the look. If you want to retain the original hardware, often it can be cleaned up with a wire brush before being dabbed with a little stainless steel or clear paint.
Step 8.

Details Make the Difference. There are places to spend money, and places not to bother. One good place to invest a few bucks is on hoses. A rotted hose can not only ruin your weekend, but it’s ugly, too. We were able to source new, period-correct coolant hoses for our Z through Classic Datsun Motorsports.
More like this
Comments
Did you guys run a short story not long ago about refinishing/painting a white TR6's engine compartment WITHOUT removing the engine? I recall having to remove the ancilliary items, but not the block. I have a 74' TR6 which just received a great new paint job, and I'd like to treat the engine bay to a re-spray without pulling the motor...
Erik S.
Hi Guys,
I never got a response from my comment above almost 10 years ago... My question still stands...
I’d like to see the article, (if I recall correctly) about respraying an engine bay WITHOUT removing the engine. It was a white TR6 if I recall.
Perhaps I’ll get a response this time. I still would like to paint the engine bay of my TR6 without removing the engine.
Erik S. aka Aktifspeed

Stefan
MegaDork
1/3/19 5:53 p.m.
Aktifspeed said:
Hi Guys,
I never got a response from my comment above almost 10 years ago... My question still stands...
I’d like to see the article, (if I recall correctly) about respraying an engine bay WITHOUT removing the engine. It was a white TR6 if I recall.
Perhaps I’ll get a response this time. I still would like to paint the engine bay of my TR6 without removing the engine.
Erik S. aka Aktifspeed
You do know that these are articles that are being scanned and posted, right? When they are posted, it crossposts to the forum.
They do have a search function for their back issues that could help answer the question about identifying which issues their TR6 build might have shown in.
Or better yet, ask over on the GRM forum directly as I've seen more than one person clean and paint their engine bay without completely removing the engine or major assemblies. This usually involves standard paint masking tricks along with aluminum foil for things like hoses and harnesses.
Hope this helps.
That was a sweet Z. The guy who bought it got an incredible car. You chaps do good work.
In reply to Stefan :
Thanks Stefan,
I knew they were scanning the older articles, however I did not know that they automatically cross posted to the forum. I’ll do a search there... Thanks for the tip.
Erik S.

Haywire
New Reader
1/29/22 12:13 p.m.

In the "reduce, reuse, recycle" department, here's something I learned about degreasing engine compartments, particularly on the kind of Hopelessly Shot Old British Sports Cars with which I've so often messed about.
If you usea trigger-type sprayer to apply degreaser, at least on a really grimy engine bay, you'll end up with carpal tunnel syndrome in like nine and a half minutes. So I came up with a neat hack:
1. Take an empty 2L soda bottle. (If it had something sticky in it, clean it out, or use an empty club soda bottle.) Reserve the plastic bottle cap.
2. With a finishing nail or a small awl, punch a small hole in the cap, about 1mm across.
3. Fill the 2L bottle with a mix of hot water and Simple Green cleaning concentrate. Adjust the proportion of concentrate to water depending on grime level; I used a ratio of about 3 parts water/1 part concentrate for the engine bay of an MGB.
4. Hold the soda bottle in one hand and apply light pressure to the middle of the bottle. This results in a constant stream of hot water-degreasing compound which you can direct right onto the area you're working on. To stop the stream, release your pressure on the bottle.
5. When the grease/cooked-on oil has started to soften, use a plastic Bondo spreader to scrape it off the sides of the engine bay, the crossmember, etc. (If you start off using a sponge, it will just get impregnated with grease and oil in the first pass.) Keep up a steady but light stream as you scrape, to soften each successive layer while you work.
6. Once you have removed the baked-on goo, THEN you can use shop rags or sponges to wipe the paint clean.
Simple Green works very well for this, as it's available in concentrate form, is biodegradable and non-toxic, and leaves your car's engine bay with the fresh scent of sassafras, the herb used to make filé powder for adding to your gumbo. Laissez les bons temps rouler!
In reply to Aktifspeed :
You can definitely tape off the engine, remove the ancillaries on the fender wells and firewall and accomplish nearly the same level job.
The engine compartment still looks great, occasional wipe down keeps thing neat and clean.
Current photo, attached.
Colin G.
1970 #2483

bencii
New Reader
6/24/22 5:49 p.m.
In reply to Aktifspeed :
A little late, but the article you were looking for
https://classicmotorsports.com/articles/repainting-engine-bay-8-easy-steps/
Displaying 1-10 of 10 commentsView all comments on the CMS forums
You'll need to log in to post.


 By Tim Suddard