The TR6 can climb from zero to 60 mph in 10 seconds. At least, that’s what Triumph claimed early in the car’s production history.
These numbers have always seemed pretty ambitious to us, as 12 to 14 seconds seems normal for TR6s in the real world. However, even if we give Triumph the benefit of the doubt, those acceleration numbers are pretty lackluster in these days of 10-second minivans. While the TR6 is a beautiful car, it can’t get by on looks and iffy claims alone. To return some street cred to the TR6, we set out to make some tried-and-true performance improvements on the car.
Our subject car is a very nice 1975 model that came to us with bone-stock running gear, including the engine, carbs and ignition. Before starting, we baselined its acceleration and horsepower figures. The car covered the zero-to-60 sprint in about 13.5 seconds—disappointing, but what we expected—while its engine produced a maximum of 74 horsepower at the rear wheels. That horsepower number was also right where we expected it to be.
Our goal was simple: We wanted to improve performance without sacrificing drivability. Additionally, we didn’t want to rebuild the engine or make overly expensive changes. To that end, we decided on some mild changes that would give our TR6 the desired performance boost while maintaining its docile street manners.
The meat of our recipe would be a ported and shaved cylinder head. To help get more air and fuel through that head, we’d also be adding a new camshaft, a pair of side-draft carburetors and a performance exhaust. Finally, we’d give the engine a good tune-up.
Out With the Old, in With the New

The stock engine setup included dual Zenith-Stromberg CD-175 carbs. These can be rebuilt, but we had other plans.
While people are often quick to swap carbs and cams, the cylinder head is usually the key to any performance modifications. Putting big carbs on a poorly flowing cylinder head is like increasing only the big end of a funnel; if the small end is left alone, the funnel isn’t going to flow any better. Likewise, a high-lift, long-duration camshaft won’t do much if the head can’t breathe well.
To get our project going, we pulled the cylinder head and sent it to CD’s Engine Service for some work. For about $800, they performed a three-angle valve job, opened the ports and shaved the face by 0.150 inch—that last move would raise the stock 7.5:1 compression ratio to 9.2:1.
This order sounds simple, but it’s not. CD’s has an experienced staff that has ported a lot of cylinder heads through the years, so we knew we were in good hands. We’ve seen a lot of “ported and polished” heads that were done by less experienced people; as a result, we found they didn’t offer what they claimed. Since this is the most important part of a performance upgrade, we highly recommend seeking out a good shop for the work.
Our test car’s camshaft was showing its age, so we decided to replace it. We turned to Good Parts for their $299 GP2 cam and $75 lifter set. While many people have found great increases with the Good Parts triple-carb setup, we stuck with just the cam and lifters.
After installing the cam and head, we moved to the ignition system and carbs. University Motors rebuilt the distributor and made sure its advance curve was suited for performance over emissions. (For more on ignition systems, see Issue 116 of Classic Motorsports.)
While the University Motors crew was working on the distributor, they upgraded it from points to electronic switching via a PerTronix Ignitor sourced from Moss Motors. The rebuild and electronic conversion setup set us back about $250.
The Zenith-Stromberg CD-175 carbs that came on the car were in decent shape, but had enough wear that they were ready for a rebuild. Our baseline dyno testing showed that they were running quite rich, which is usually a function of worn-out needles (easy to replace) and tired jets (more difficult to replace).
To see how our improvements were helping so far, we put the old Zenith-Stromberg carbs back on the engine and recorded some zero-to-60 runs. Our times had dropped from 13.5 seconds to 10 seconds flat. Our Innovate Motorsports LM-1 wide-band air/fuel meter confirmed that we were still running rich, but we were obviously making more power. It was time to finally address the worn-out carbs.
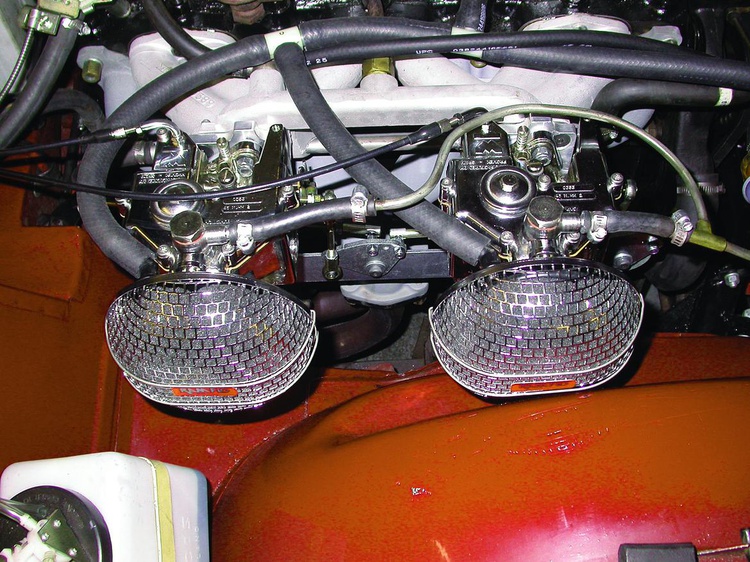
While Zentih-Strombergs can be rebuilt and tuned to work and perform quite well, we chose to switch to new Weber carbs. In fact, we installed the first 45MCHH kit made for the TR6. The 45MCHH is a new carburetor that is basically half of the tried-and-true DCOE. However, where the DCOE is a twin-choke carb, the 45MCHH features a single-choke setup. The DCOE and 45MCHH share many internal parts, meaning the setup and tuning procedures are nearly identical.
Why did we only go with two carbs instead of three? Our math showed that our two carbs would provide enough flow for our engine’s 2498cc displacement and 6000 rpm redline.

The 45MCHH kit is a slick, easy-to-install setup. A set of adapters join the Weber carbs to the stock TR6 intake manifold. A supplied linkage and choke cable mate the carbs to the stock throttle linkage. Two chrome-topped, foam-core air filters keep things clean—and looking good, too. Installation of the carbs was quick, taking only about an hour and a half. The price for the kit is about $749.95 from Interco Products or one of its dealers.
The carbs come with a baseline jetting that is pretty close, so we started there. Our air/fuel meter proved invaluable in quickly helping us get the carbs close to an ideal 12.5:1 air/fuel ratio when under acceleration. After some minor tuning, zero-to-60 times were down to about 9 seconds. The car’s transformation was well under way.
One Final Tune
Once installed, the Weber carbs were ready to do their work.
To really dial in everything, we headed back to the dyno one more time. A few pulls revealed that we were running a bit lean under load—more like 13:1 than our desired 12.5:1. Power was looking good—we were up to 94 peak horsepower at the wheels—but we knew we could do better.
Before correcting our air/fuel mixture, we wanted to make sure our ignition timing was as good as it could get. We always work this way: optimize ignition first, then work with mixture.
Our initial timing setting was 30 degrees BTDC at 4000 rpm. (This was with the vacuum retard disconnected.) Since the compression ratio was still on the low side, we figured the engine would take more advance. We were right.
Before each pull, we inched up the timing one degree. For a little while, each degree added about one more horsepower to the rear wheels, with engine output peaking at 38 degrees. Since we were making the same power from 35 to 38 degrees, we backed the timing down to 37 degrees.
Now that the timing was set, we finalized our jetting choices for the carburetors. Richer main jets and air correctors brought our peak power to a very respectable 100 horsepower at the wheels.
Back at our test site, we found that our zero-to-60 times had dropped quite nicely. We were now down to 8.4 seconds, only a fraction of a second behind the latest Mazda MX-5 Miata. The TR6 was performing very well and drivability was great, proving that well-planned performance modifications and a good tune can really feed a choked classic.
Devil Is in the Details

This dyno graph shows the strength of good parts selection and tuning.
People often ask us how one new engine part will improve a car’s performance. That’s usually a hard question to answer, since the engine is a system and not a set of independent parts.
We got our power increases by using the right combination of head work (porting and compression ratio increase), camshaft (one matched to compression ratio and desired power band), ignition work (timing and advance curve) and carbs (size and jetting). We knew from experience that head modifications made the biggest difference—about 15 horsepower at the wheels—but we were able to unlock even more power from the head through the other improvements we made.
Throwing parts at a car is fun. Tuning one takes a little more work, but the results are often quite impressive.
Keeping Track of Progress: Here’s how each modification improved our Triumph TR6’s performance
StockModifiedModified and TunedHorsepower at 3000 rpm. 546265Peak horsepower7494100Torque at 3000 rpm95 lb.-ft. 109 lb.-ft. 114 lb.-ft.Peak torque95 lb.-ft.109 lb.-ft.115 lb.-ft.0-60 time13.5 sec.9.1 sec.8.4 sec.
The Basics of Porting and Polishing

This cutaway MGB cylinder head shows the stock exhaust port (right) compared to a ported exhaust port. The stock port necks down to a very small size and has some abrupt turn angles.
Bench racers love to brag about radical cams, big carbs, and trick port and polish jobs. The poseurs will discuss the quality of the polishing job. Those in the know will talk about the port work, where serious performance starts.
The bottom line is that production cylinder heads are designed for a compromise between good performance and easy manufacturing. As a result, they almost always leave room for improvement on the performance side—it’s very hard to cast the perfect port in a high-volume production environment.
Enter the port and polish job. The key word here is port, not polish. Porting a cylinder head is a seemingly simple process of making air flow through it more easily. The trouble is, it’s not so simple. Some people will “port” a cylinder head by grinding away material to make the ports as big as possible. This will often hurt performance more than it helps; when it comes to head porting, flow path is more important than size.
Here’s a fact to remember when discussing cylinder heads: Air is lazy. It doesn’t like going around corners, squeezing into tight spaces, or expanding to fill larger spaces. Therefore, the best port jobs straighten out the bends as much as possible and keep the port size as consistent as possible throughout the airflow path. A good valve job also helps the air get into the combustion chamber.
Experienced head porters will know how to work the head to maximize flow, usually using a flow bench to measure the results along the way. They will also know how far to go without hitting water jackets and other areas that will ruin the head. The guy who has done hundreds of heads is going to do a better job than the one learning the ropes. It’s worth spending a few more bucks to have the job done right.
What about polishing? There are a few areas where polishing makes sense, mainly when it takes away unnecessarily rough spots or casting flash. But a little roughness around the edges of a port helps keep the fuel in suspension. For the most part, polishing is just bling that keeps the poseurs bragging.
We’ll be looking at cylinder heads and porting in much more detail in an upcoming story in Classic Motorsports—keep your subscriptions current.
More like this
Comments
If you have a pre 72 car you should look for a later Wide port circle B head, they are known to have better flow out of the box. There are plenty of late model engines around for short money.
FYI you will need a wide port intake manifold also; Exhaust is the same.
I picked up a wide port head for $125 (stalled project) that had a recent valve job for my 70 TR6 that I intend on installing.
Never heard of the new Weber, but they are much less expensive that DCOE's; bet they are not made in Italy either.
I installed SU HS6's on my TR250 and that was a nice upgrade.

The TR6 suffered from the same issue that the TR250 had - it was a car that was very little faster than the TR-4A, because there was only a scant few more horsepower in the emission gutted straight six than the old four banger. It was down 46 bhp on the injected home market version that did 0-60 in the 8 second range.
It also had some interesting design eccentricities that required eliminating for those wanting to race them. Like only half the thrust washer shims a regular engine had which lead to early end float issues, and rear driveshafts that had a tendency to lock the sliding shafts under hard acceleration and cornering. Racers changed the thrusts regularly and replaced the rear axle shafts with units that carried a much better design that would actually slide reliably when called on to do so.
Credit where credit is due, though. The cut-rate styling overhaul done on the TR4 shape transformed that car's looks and cost far less than a normal redesign normally did. It is a handsome car. If only it didn't look like a female dog squatting for a whizz when under hard acceleration, due to excessively soft rear springs being specified.
I'd like to have a word with the guy that considers head porting to be an "easy upgrade". Unless you consider writing the check to the mechanic to be the hard part.
It would be interesting to know the similarities and differences between this kit and the Weber 45MCHH kit that was put together a few years ago. Obviously, the air cleaners are a bit different with a KN type air filter being provided on the earlier 45MCHH. I have a set of these on my wife's TR6 and they have been bullet-proof - requiring no tuning in the eight years we have owned the car. We also have the GP2 cam - a great combination. BTW, although you mention the carb is 1/2 a Weber 45, I believe the MCHH refers to the fact that it is a Motor Cycle Half Height carb.
wspohn
Dork
1/18/20 11:59 a.m.
FWIW, a lot of Mikuni HSR carbs are being used on things like TRs and MGs as well.


murphmi
New Reader
1/20/22 10:17 a.m.
You can still get the performance competition manual that was written by Kas Kasner and published by British Leyland for only $12.95. https://trf.zeni.net/TR6-TR250GB/416.php#navbar
In it, he gives a very good description of how to port the head, as well as a LOT of other tricks to improve the TR6, even if you don't plan to race it.
I used their similar manual many years ago to prepare a Spifire for SCCA racing and ported my head using a a Dremel tool. Car went like stink, and the manual saved me a lot of $.
wspohn
SuperDork
1/20/22 1:34 p.m.
Wonder if you can get down to a 0-60 in the same range as the home market Stock TR6 PI (8.2 secs.)
I'll try to get a 0-60 time with mine sometime. It still needs some tuning towards the upper end.
My TR6 with ported (early) head, SU carbs., comparession ration in the 10:1 range and a mild cam does 0-60 in less than 10 seconds and is still 100% streetable.
Displaying 1-9 of 9 commentsView all comments on the CMS forums
You'll need to log in to post.


 By Carl Heideman


