


Kinda surprised you didn't add some capacity while you were down there.

Kinda surprised you didn't add some capacity while you were down there.

Mr_Asa said:Kinda surprised you didn't add some capacity while you were down there.
Didn't trust my welding skills enough.
Today, I welded in the lower baffle...

...and then the upper section.

These pictures should also answer any questions about why I didn't try to add any oil pan capacity while I was fooling around with the MIG. ![]()
I probably should have thought of the baffle before I painted the oil pan.

Not the biggest mistake I've made on the project by far, and it's easily corrected...

As long as I have the rattle can out, I might as well paint the cylinder head.


Matt, I would recommend Welding on Clean metal, Uncoated is best, but clean it up... even the backside with a roloc surface conditionitioning disc or something of the like.
I should have added a drainback line port to my pan for future turbo expansion possibility.
I could still do that but I will prolly wait until next go'round as this is Lou's block and I t will be coming back out in the next 1-5 years and then go back to Lou.
Keep on Slantin'
Greg
I did do some clean-up on the metal being added to remove the coating, but hadn't done any extra clean up on the pan - you're right that this could have been better.
Before I button up the crankcase, the engine needs a cam position sensor. The fuel pump eccentric looks like a good place to put one. Since it's tough to check clearance with the engine in the car, I would prefer something with a fixed depth - but it would have to be spot on. What are the odds the ones we keep on the shelf at work will just happen to be exactly the right length for this?

Wait, this actually looks spot on. Should be about 1 mm clearance with everything installed - which is what its spec sheet calls for.

So, I drilled out the fuel pump blockoff plate and tapped it for a mounting screw. Drill press is broken, so the big handheld Makita will have to do.

Test fit...


In reply to MadScientistMatt :
I'm quite impressed how well that cam position sensor worked.

Are there any issues with using the pump lobe for this? I would guess that it just needs to trigger the sensor at some point when the lobe is on the sensor side since the exact timing isn't critical. I would have tried the same thing if I wasn't already using the pump mount for a catch can return.
Follow up: I had a few misgivings about how it would work too, so I checked with a volt meter.
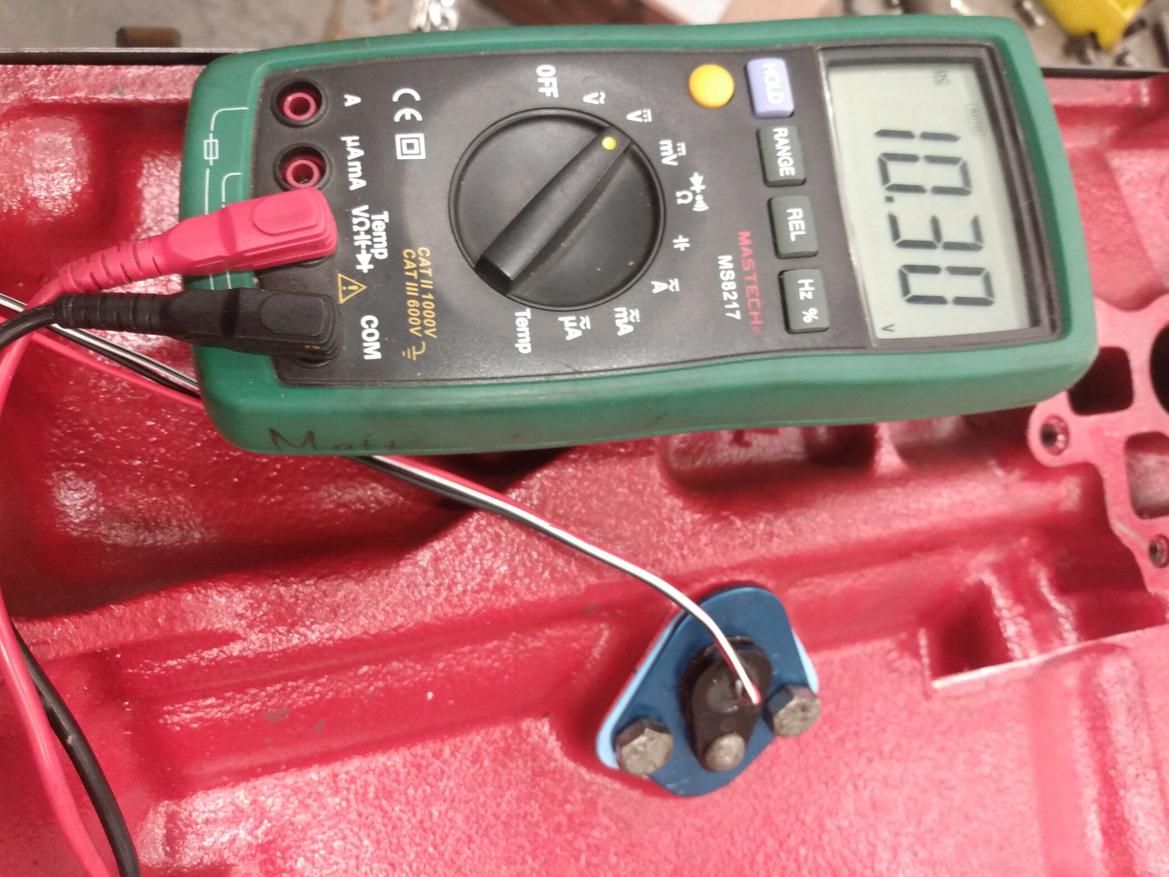
Sure enough, the sensor sends ground when the lobe is in front of the sensor and goes back to supply voltage when there is no lobe in front. The cam sensor doesn't need very precise timing. I was pleasantly surprised that the length and dimensions all worked out - I had expected to need a threaded body sensor instead.
That sure is a nice solution on the Fuel pump lobe.
I might have to recycle that Idea sometime.
Greg

In reply to slantsix :
Indeed! I would have assumed that I'd have to get all grindery at the lobe to turn it into a proper tooth shape, before even trying.
I'll be using a missing tooth type crank trigger. That pattern can tolerate a lot of variation in the cam sensor reading as long as you get one pulse per cam rotation. Some other arrangements can be pickier - for example, a crank trigger with 12 equally spaced points would require the cam signal to fit in a 30 degree wide range of crank rotation.
Getting the oil pan back on there is a lot easier when there isn't a car in the way. Checking the dipstick - we're good to go there:

Some pictures of the oddball four-piece gasket as that had a few people wondering about it earlier.


Almost completely on except a few bolts that are longer than the rest, and seem to have gone missing.

So if that fuel pump lobe high spot is not aligned with any particular spot it will see quite a bit of trigger offset in tuner studio to get the megasquirt happy on the input side of things,correct?
Greg
Doesn't it not care as long as the trigger point doesn't coincide with the missing teeth on the crankwheel?
I really, really am thinking of stealing this idea for the Quantum. It doesn't have a cam lobe driven fuel pump, but it did repurpose the fuel pump lobe for a vacuum pump, thanks to the Unintended Acceleration scare. So there is a handy predrilled hole, mounting boss, and lobe, and I won't have to hunt down a single tooth wheel distributor.

I imagine this is how Dusterbd13's eyes work:


In reply to AngryCorvair (Forum Supporter) :
Apparently yours too!
What are the billets in the background, and do they need a new home?
In reply to Dusterbd13-michael (Forum Supporter) :
I go through phases. I zoomed in because I thought I saw late C4 sawblade. At one point I had 14 of those. Currently have no sawblades, but 10 C5 magnesiums.
They're an American Racing design - I can't remember the exact model number, but they are no longer in production. The one circled has the center cap off, which makes it look a bit more like a Corvette sawblade than usual. Wasn't planning on selling them, but might consider it for an amount that would buy a different wheel / tire package, possibly a set of Minilites or Panasports, or something similar to the Halibrand Salt Flats Special. This picture shows them a bit better.

With a 36-1 crank trigger, the cam position sensor can be pretty much anywhere. I am a bit curious about how accurate it is, so I will see if I can track its accuracy using the VVT control code.

Izzat a US model Dart?
Or is the missing grill making it look strange?
Those look good on there! I forgot this was a mid 60s dart despiteit beingin the titleof the thread....
Ill be lurking and waiting to find a good deal for the trade!
In reply to bentwrench :
'66 Dart 270 4 Door Sedan. No front Grille.
You are missing the grille.. like this↓↓↓↓

In reply to MadScientistMatt :
Awesome. I am sure I will be bugging your inbix when I get to that part on one of my projects.
Thanks Matt!
Greg
slantsix said:In reply to bentwrench :
'66 Dart 270 4 Door Sedan. No front Grille.
You are missing the grille.. like this↓↓↓↓
Yep, took it out for a spin before I'd figured out a way to get the grille to clear the intercooler. The headlight surrounds were also off.
Some pictures from installing the damper.
Since everything that has been pressed onto the crank has taken a ton of force, I started by greasing the damper bore.

I'm using a bolt and washers to press the damper on.

And needed to clamp the other end of the crank in place...

Took a lot of torque, but I managed to get the damper on without breaking anything.
You'll need to log in to post.


