


Really terrific build! I just love what you've done. Great fab work on the chassis.
How were you managing to get the body on and off the chassis? I'll be pulling the body on my TVR soon, and would like to know how others are doing this.

Really terrific build! I just love what you've done. Great fab work on the chassis.
How were you managing to get the body on and off the chassis? I'll be pulling the body on my TVR soon, and would like to know how others are doing this.

In reply to USERNAMETAKEN :
Thanks for the compliments.
To completely remove the body of a Europa, you only need two people to lift. It's light enough that you don't need to do anything special. But, the trick to getting the body separated if you're on your own (or if it's stuck), jack the chassis and body up to a certain height (milk crate height works for me), support the chassis on jackstands and slide the milk crates under the body in places that are strong enough and not obstructed by the chassis, then provided all the chassis to body mount bolts are removed and all cables etc are undone, lower the chassis and hopefully it comes free from the body. But, you do need a helper at that point to raise the body high enough to either roll the chassis out or place some taller stands under the body.
In this pic you can see the support frame I made for the body so that I could roll the chassis out in order to work on it:

In reply to RoddyMac17 :
Thanks for that. Really good to see. I was afraid you'd have a fork-lift or something tucked behind that little garage.
Sure would like a fork lift...

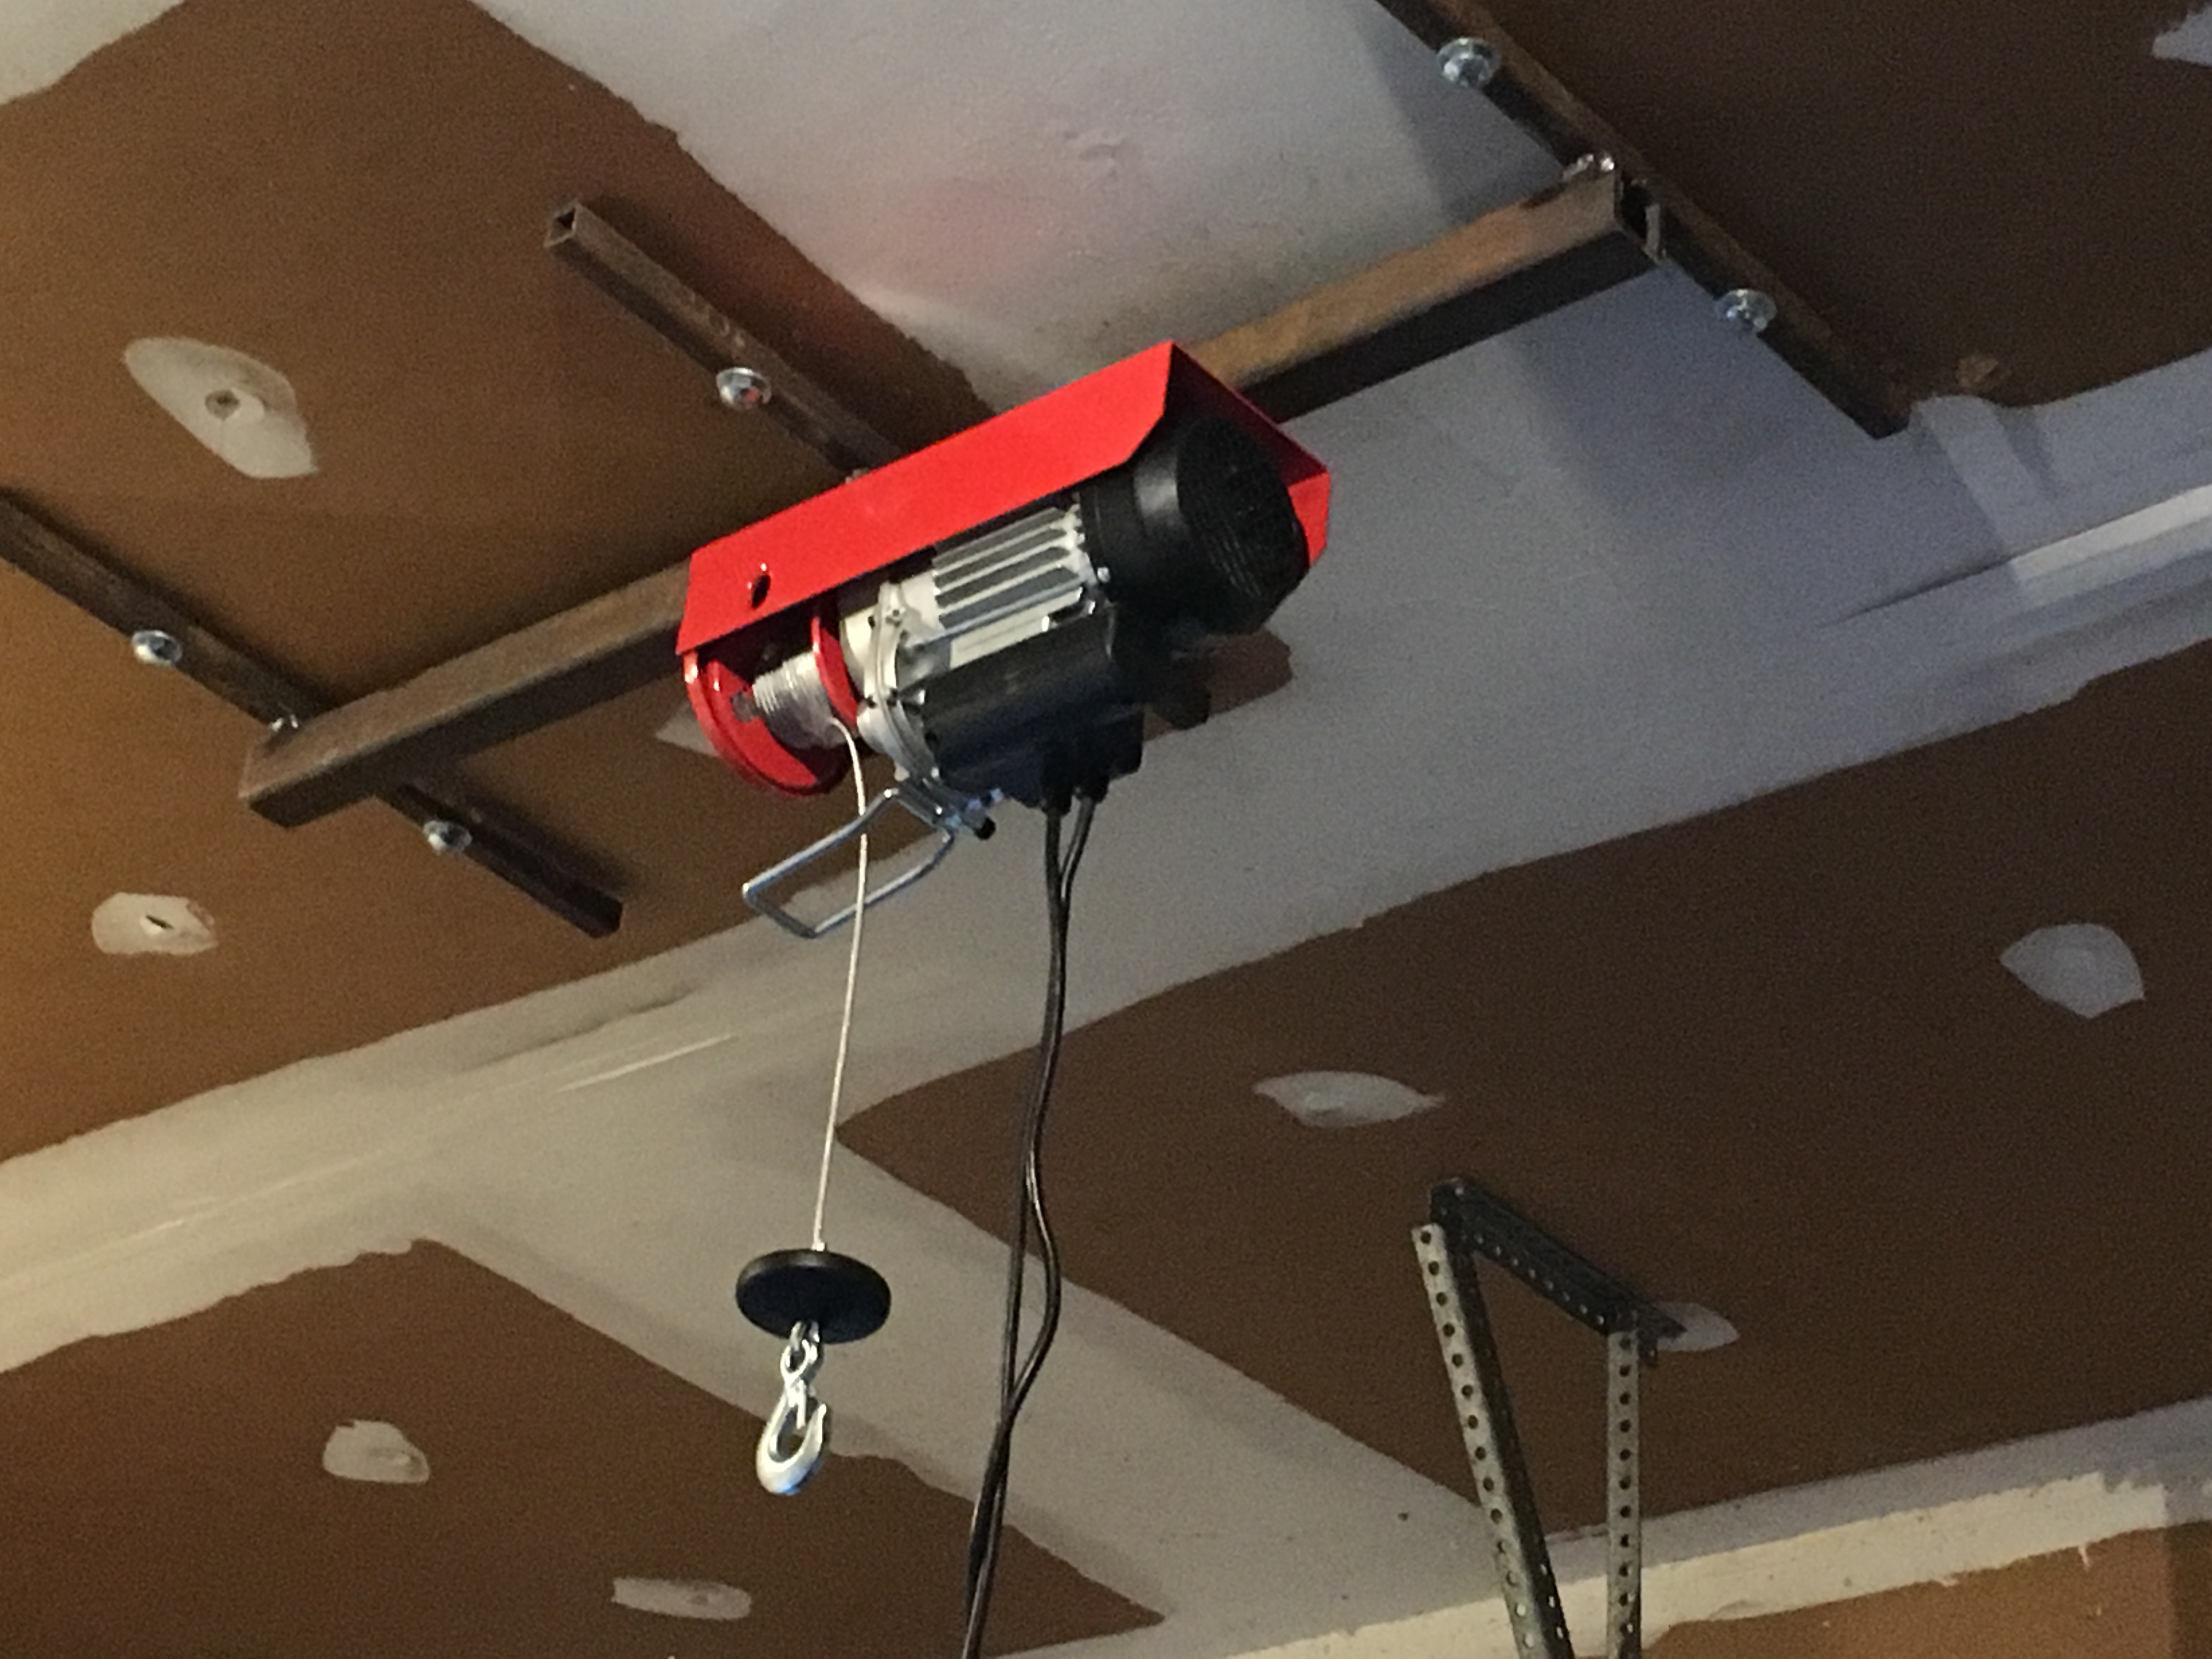
No need for a fork lift, I put in a electric hoist ($150 at Harbor Freight) and can lift the Spitfire body on and off the chassis at will. Makes it much easier to work on it since all the boys are in college now. That TVR body probably weighs the same or more than my Spitfire body shell, this should work well for you. I have a wooden cart as well as two engine stands that have been modified into a rotisserie so I can work on the body once it is off the chassis.
In reply to dherr :
I like it!
So do you just throw some straps under the body?
I always have vague visions of the entire garage collapsing. On days like that I should probably think about snow-load. A couple hundred pounds would be a drop in the bucket to that.

I think it depends on your access to the area above the garage. I would only use a set-up like that if I could through-bolt it into additional bracing that spans across multiple joists. For better or worse, possibly but not very practical in my garage. At least the way it is not. Granted, the crap I currently have stored in my attic likely far exceeds the weight of a Spitfire tub or Europa body.
Ian F said:I think it depends on your access to the area above the garage. I would only use a set-up like that if I could through-bolt it into additional bracing that spans across multiple joists. For better or worse, possibly but not very practical in my garage. At least the way it is not. Granted, the crap I currently have stored in my attic likely far exceeds the weight of a Spitfire tub or Europa body.
Totally. If I was so worried about weight on my garage rafters, I'd remove the 1000 lb of metal stock and other junk I've put up there!

This is how I lifted a TR6 shell onto the frame. While you may not have a structure like this to hang a chain hoist from, I've seen people use an engine hoist with a similar set of lift cables. The problem with the TVR would be the fixed roof. I'm not sure how you could safely hook cables up to the body without stressing the fiberglass. One guy on each corner may be your best bet unless you need to do this many times like I did.

I might just do a ratchet strap on each corner, and go straight up to the rafters. Nothing fancy.
In my case, I went up into the attic and ran two 2x10x10 boards across all the rafters and bolted it all together. so yes the load is being distributed.
As far as the body lifting points, I just used some tow strap and found points on the body to lift (seat belt mounting at the rear was a good location)
Worked great, will make it easy to get the body reinstalled once I finish my rust repair.
I spent some time this past weekend hanging the doors, which if you have ever seen a Europa door hinge you'll understand how difficult it can be, sometimes. Luckily, as I'm not using the power windows, the door shells are very light and easy to manipulate, so hanging and setting the gaps was quite easy. But, other than that, not a lot of other work was completed due to over indulging on Saturday night.


The next step is some reinforcing of the A-pillars as they've started to bow over the years of not having the windscreen in place. I have some carbon fiber tube that will get bonded in after the pillars get wedged into place.
Rod

I thought the old lore was that the electric windows were not a luxury, they were lighter than the manual setup?
I managed to get four straight days in the garage this past weekend, but I wasn't even close to getting what I planned done. I started the weekend off by fitting the door latches, which was quite easy and straight forward, then glued in some carbon fiber tube to the A-pillars in hopes that it would keep them straight. It appears that it didn't work, I now have to hope that installing the windscreen will pull them into shape.
I then fitted the front lamps and rad:


Then moved onto fabricating a cover plate for the firewall. I wish I had an english wheel to smooth out the walnuts, but as the cover is going to be carpeted, the lumps hopefully wont show:

Next up was mounting the air filter:


Other than that, I modified the rear body mount, made a coil mount (hidden under the intake manifold), mounted the wiring harness in the engine bay, and mocked up the coolant transfer pipes to the rad. Hopefully next weekend I'll check more off the list. The self imposed deadline for having the car running and able to drive up and down the street is the end of April.
Rod
Tell me what you did for paint prep on the body. Did you strip off the previous totally? Walnut shell or soda blast?
And primer - anything fiberglass-specific? Seems like you mentioned some kind of roll-on primer.
From a fellow glass-body restorer.
In reply to USERNAMETAKEN :
I spent months removing all the layers of paint (two, one factory and one PO) with an orbital sander and just plain old sand paper. It's very messy and time consuming but it did allow me to note all the stress cracks throughout the body. I looked into media blasting which would have been much easier, but it was a bit outside of the budget. Both procedures do create a metric s&^* ton of dust, but that's just something you'll have to live with when it comes to painting (mask every single hole, cavity, crevice).
As for repairing the fiberglass, surfacing veil or tissue is your friend. My method was go over the body with a trouble light in hand to see any cracks, circle them with a sharpie, and keep going until you find nearly all of them. Bevel the cracks out roughly an inch around the crack and lay in the tissue, then leave a resin rich coat on top. Sand it back till smooth or nearly smooth and use some polyester filler to smooth any imperfections. I really should have then given it a coat of Slick Sand or a similar product, but I opted to apply coat after coat of 2K high build (polyurethane primer). I rolled the first couple coats on, but that was very time consuming, so I sprayed the next few coats. This helped level the surface, but as it turned out it still needed a bit more prep. The guys at the paint shop spent some time fixing the various low spots, and now the car is dead straight.
And not to dissuade you from doing the bodywork yourself, but I spent nearly a year and a half of weekends prepping the Europa. That was partly due to the limited work space, but also because it was horrible to do (fiberglass is very very itchy).
Good luck!
In reply to RoddyMac17 :
Ok, so no special-sauce, just elbow grease. My paint is cracking pretty badly - to the point that I can remove the top-coat with a razor-scraper. The primer coat seems tied a little better to the fiberglass, but it is also cracking.
I've had good luck with citrus paint-stripper on some of the other parts - I'm going to try that on a hidden part of the hood and see how it does on the top-coat.
I've done body-work before, and fiberglass/carbon work as well. I've just not restored an old fiberglass car.
Thanks for the advice!
Time for an update... The past few weeks have been a blur, there were some high points and very low points. Back in January I had registered the car in the local All British Field Meet, so I had a deadline for the car being finished. To cut a long story short, it's still not finished. From where I left off with my last post, a center console was fabricate and covered:


The seats were finally covered and installed (note: the center pieces were originally perforated vinyl, but I opted to go a different route):


Quality Assurance (my niece) decided to inspect, and deemed the install and build was going ok:

Then the Thursday before the show the windscreen went in:

Friday night saw the car move under it's own power, unfortunately there was no time to take pics or video. The night ended at 12.30 am with me modifying some Dzus fasteners to keep the lids shut. I didn't get them quite right, so they will need some rectification, but I now have a better idea on how to do it, so it's not that big of a deal.
Saturday morning was a very early start, up at 5.30 and in the garage by 6 so get the last small things done. A flat deck arrived at 6.45 and by 7.30 this is what it looked like:


It sat amongst these cars for the day and managed to pick up 3rd in class. Not too bad for a not quite finished car.

There's still more work to do before it's road legal, but it's certainly come a long way.
Rod
Edit: I forgot about the low points, basically scratching the paint in various places, spending two evenings trying to get the rear window in, etc.
That's awesome! It really looks great - congrats!! ![]()
The car looks great. Looking forward to a report about how it drives. Good work.
My previous full restoration over 20 years ago ended with me taking a month off between jobs and working like mad to finish it before a local show. I barely made it by pulling several all-nighters. Worth it, but that was exhausting and I'm lucky to not have messed something up. I hate deadlines.

In reply to RoddyMac17 :
I really should have then given it a coat of Slick Sand or a similar product, but I opted to apply coat after coat of 2K high build (polyurethane primer). I rolled the first couple coats on, but that was very time consuming, so I sprayed the next few coats. This helped level the surface, but as it turned out it still needed a bit more prep. The guys at the paint shop spent some time fixing the various low spots, and now the car is dead straight.
And not to dissuade you from doing the bodywork yourself, but I spent nearly a year and a half of weekends prepping the Europa.
Funny, cause it is so true. And thanks for validating my decisin to stick with a feather-fill high build primer rather than go to the 2k urethane high build primer /sealer.
Until you go through this, it is hard to believe the number of hours it takes to do a nice paint job.
The Lotus looks outstanding and I don't say that just because the color is pretty much what the Molvo is getting painted!
Pete

Looks so amazing. Finishing a car is super hard. I'm tempted to set a semi-bogus deadline to get my Fiat done, but I know it's probably a horrible idea.
Where in BC are you? I'm in Vancouver, Burnaby, and the Kootenays for work quite often.
In reply to Mezzanine :
Are project cars ever finished? My typical deadline for all the cars I've built has been the ABFM, I've only missed the imposed deadline once when I discovered that the distributor on a Toyota 4AG rotates opposite to a standard (MG etc) Lucas distributor (I was building a 4AG powered Lotus Seven that in the end ran a Megajolt set up).
I'm in Kits, but the car is currently in Coquitlam and spent some time in New West. Eventually the car will be in Kits, I just need to get it running properly and have it go through an out of province inpsection. Then it's apply for the Modified Collector status and I should be on the road.

Am I wrong or is this the first instance of a GRM board member embarking on a Europa resto and actually finishing it so it moves again under its own power?

Very...very well done...excellent
Jerry From LA said:Am I wrong or is this the first instance of a GRM board member embarking on a Europa resto and actually finishing it so it moves again under its own power?
I wasn't sure if it qualified for that honour, as it's still not quite finished. But I'll gladly accept.
In other news, I found video evidence (skip to 2.04):
You'll need to log in to post.


