
JoeTR6
Reader
1/4/16 11:24 a.m.
Apexcarver wrote:
Hey Joe, does the rollbar you are going to use have bars that come down across the doors at all? Can it? If it can, it might be a good way to retain safety and add a bit more torsional rigidity. (and you can then use the beamless doors without worry)
Every bit still helps in a crash, but its how comfortable you are with the risk. (and knowing how people drive around here...)
It doesn't now, but could (see bottom of page 4). Adding forward bars would stiffen up the middle part of the frame. A TR6 is narrow enough that my arm and shoulder are brushing the door, so the forward bar would either need to be below the seat cushion or push into the door. That, and the added weight would be about the same as the door beams. If this were 100% an autocross car, I'd go with the reduced weight. But you're right, you need all the protection you can get in a car around here. I plan on driving the hell out of this car when it's done.
JoeTR6
Reader
1/8/16 9:26 a.m.
I just experienced one of the joys of taking on someone else's uncompleted project. I bought this TR6 as a pile of parts. There are some things missing, but also a lot of duplication since there was a mix of (at least) two different cars. One side of the front suspension was cleaned and powder coated by the previous owner, but the vertical link and trunnion were missing. I tore down three front suspension assemblies, and somehow ended up with all left-hand side parts. The previously powder coated parts were also from the left side (based upon the brake mounting). Somehow, one of the steering arms in the resulting pile of parts was for the right-hand side, but none of the other side-specific parts (vertical link, trunnion, brake mounting plate) were there. Maybe one of the assemblies had the wrong vertical link, but that would really screw with caster angle. I hate mysteries.
There was only one more assembly that I hadn't touched, and that turned out to be the right side. Fortunately, the parts I needed were in good shape. I now have 3 spare left front suspensions and 0 right.
JoeTR6
HalfDork
1/10/16 8:44 p.m.
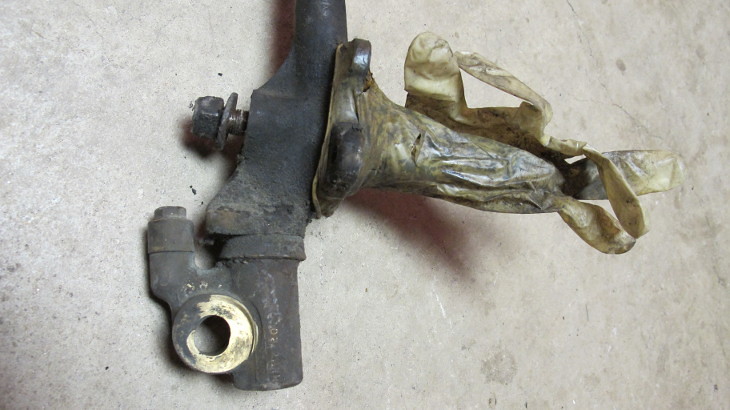
The box of right side front suspension parts turned up today. It was in a box that I hadn't opened since buying the car buried under some body panels. It even had the contents clearly marked on top, so I only have myself to blame for losing it.
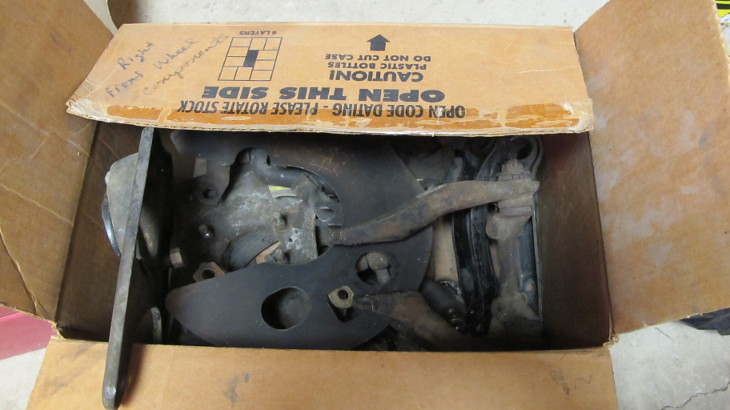
The stub axle was, er, protected. Unfortunately, the trunnion is toast.
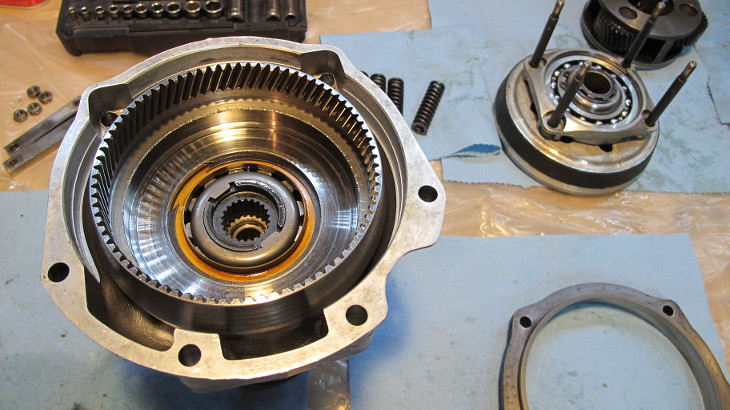
I managed to pull apart the J-Type overdrive and fix an internal issue. The circlip that holds the unidirectional clutch in place had popped loose and the thrust washer behind it fell out of it's indentation. I replaced the rear oil seal, checked the bearings, checked the clutch linings and cleaned all of the mating surfaces.
I couldn't put it back together for lack of a large piece of gasket paper (and nobody open on a Sunday had any). It seems like it's getting much harder to find simple stuff like this locally. I just made a large nuts/bolts/washers order from McMaster-Carr because all of the local real hardware stores have gone out of business.
Check old mom-and-pop hardware stores for gasket material. They usually have a piece of two floating around. They're also the last reliable local source for crocus cloth.
JoeTR6
Reader
1/14/16 9:47 p.m.
Jerry From LA wrote:
Check old mom-and-pop hardware stores for gasket material. They usually have a piece of two floating around. They're also the last reliable local source for crocus cloth.
All of the local hardware places are gone. Around here (NoVa), it's Lowes, Home Depot, and Ace. Even our nearest Ace that had a decent hardware aisle closed, and the Sears Hardware is now a Sears Outlet (appliances only). McMaster-Carr had everything I needed, but I had to order 10 of some bolts when I only needed 2. A NAPA store had 1/64" gasket material that worked, and the overdrive is back together.
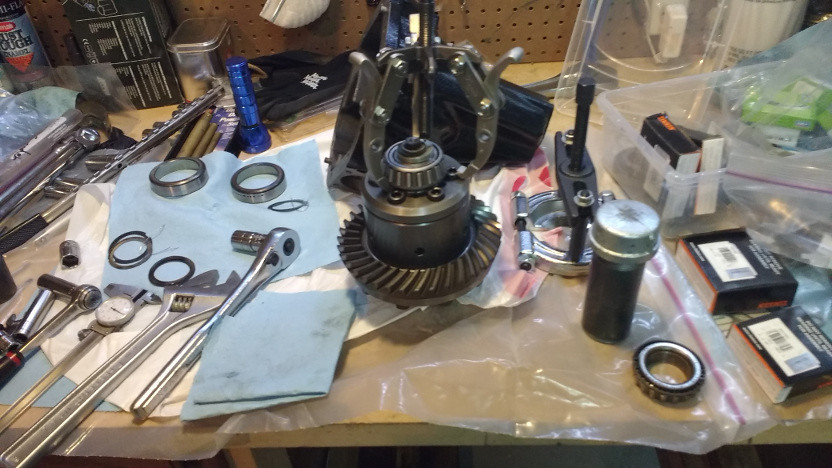
This week I've been tearing apart the differential for inspection/cleaning. My best one (I have 4) is good enough that it just needs new seals, but I wanted to drill it for a drain plug (which Triumph somehow didn't do). Rather than risk getting shavings in the bearings, I want to spread the case and remove the gears. That means I need to cobble together a spreader tool. I had considered adding a limited-slip differential to this car, but the best option is a Quaiffe, and just the Quaiffe unit goes for $1600 or so. If I go that route, I'd also want new bearings. So for now, I'm going with the good enough open diff. Once the car is done, it would be fairly easy to rebuild another diff and do a swap.
So I have all of the hardware for the entire suspension, the trailing arms are complete, and I have all of the front suspension components separated and ready for blasting/powder coating. I also got the front brake calipers, and the new brake lines are on the way. It's a good thing I have a three day weekend coming up.
JoeTR6 wrote:
... Rather than risk getting shavings in the bearings, I want to spread the case and remove the gears. ...
A trick I've seen is to use big blob of clay or play-dough on the inside.
It catches all of the swarf from drilling/tapping, is cheap and easy to place and to remove.
Sweep the area after machining with a strong magnet.
A drain plug with magnet tip is always good insurance.
JoeTR6
Reader
1/15/16 4:47 p.m.
erohslc wrote:
A trick I've seen is to use big blob of clay or play-dough on the inside.
It catches all of the swarf from drilling/tapping, is cheap and easy to place and to remove.
Sweep the area after machining with a strong magnet.
A drain plug with magnet tip is always good insurance.
I've used grease when drilling holes to pull the shavings out of a hole. I like you're idea better if you have access to the inside. I'd still like to pull the carrier to better check/clean the main bearings. I doubt I'll remove the pinion unless it feels rough once it's not meshed with the ring gear.
You can fangle a spreader using pair of big carriage bolts and a coupler nut in the middle.
The square section under the heads lets you use wrenches to expand/contract the length.
The rounded heads can bear against irregular interior surfaces without digging in.
Total cost from Loews: About $10
I went big budget and spent about $20 for stuff at Home Depot to make a diff case spreader. After remembering that I have a welder and mostly know how to use it, here's what I came up with.
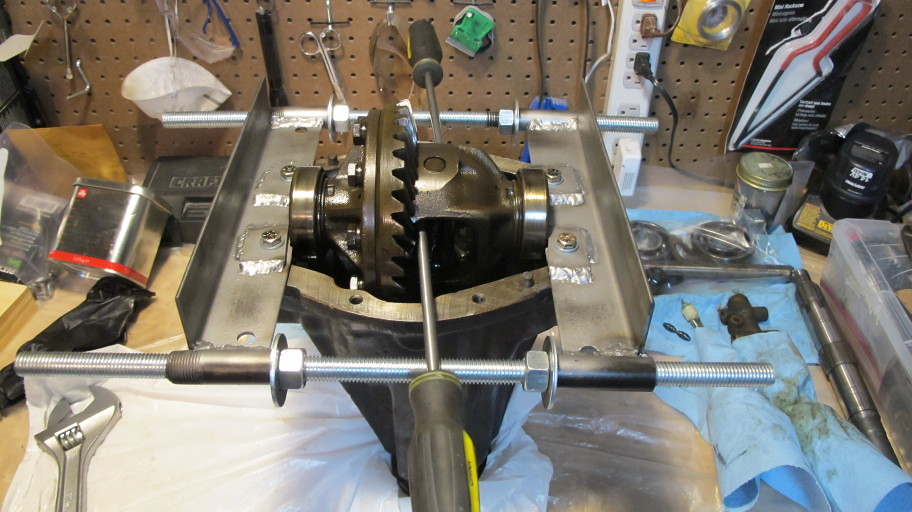
After grinding a little more clearance for the bearing races, it worked great. Now for the not-so-good news. Here's one of the outer main bearing races that I wanted to check.
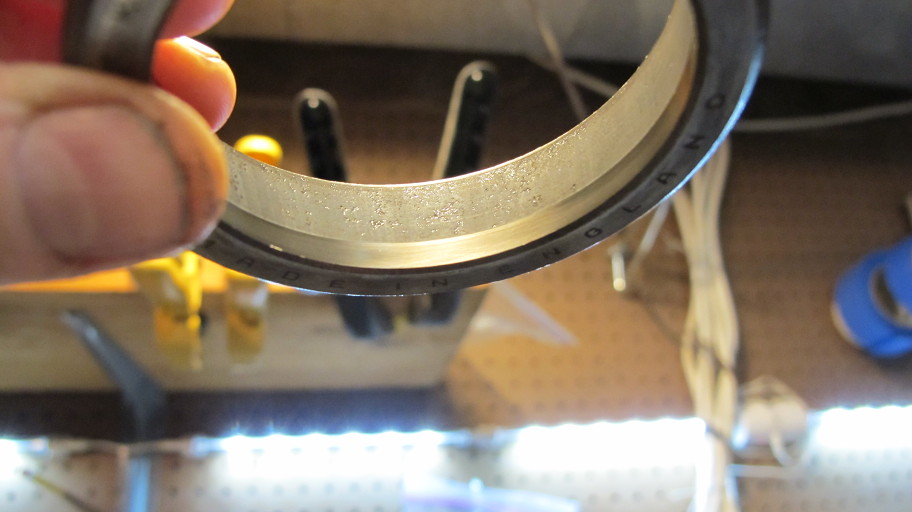
It's not quite dog chewed on it bad, but there's definitely pitting on both races. The gear faces look really good, so I might get by with putting it back together and seeing how long it lasts. OTOH, if the bearing disintegrates, it could take the ring and pinion with it. Now what I really want to do is buy a Quaife limited slip and rebuild the entire diff. That's about $550 in parts (if a reuse the ring and pinion) and at worst $1200-1600 for the Quaife. Does anyone know of a good place to buy Quaife units?
JoeTR6
Reader
1/17/16 9:16 p.m.
Oh, and I found the other right front suspension today in a box covered by an old greasy clutch. Never throw an old clutch in a box on top of other stuff, because you won't want to touch it to see what's there. So for those keeping track at home, the score is now left front suspension - 4, right front suspension - 3. Let's just say I'm flush with suspension parts.
JoeTR6
Reader
1/20/16 9:03 p.m.
It looks like I'm rebuilding the diff one way or another. I pulled the pinion, and both bearing races were pitted. The smaller stub axle bearings don't feel so smooth either. The case is empty, so it was easy to drill/tap for an oil drain plug. The only question left is do I plunk down money for the Quaife.
In spite of the three day weekend, not much was accomplished. I blasted some suspension parts, but the powder coat oven wouldn't heat up. Hey, it was made before Neil Armstrong stepped onto the moon, so that's pretty good service life. Then I was cleaning up brake line fittings and the light blew in the blast cabinet (and no spare bulbs). After finding that one of my prebent brake lines was wrong, I decided to take a hint and go home.
JoeTR6
Reader
1/28/16 4:52 p.m.
I just ordered a Quaife limited slip. If the differential needs to be completely rebuilt, may as well do it right the first time. The Timken bearings are going to cost enough. Oh well, at least I still have the other gonad.
Snow, work, and a lack of parts has put things on hold for now. And I still need to fix/replace the powder coating oven.
JoeTR6
Reader
2/9/16 8:25 p.m.
The powder coating oven is working again and I finished baking the left front suspension pieces. Assembly is next, and should be fun compared to all of the bead blasting and powder coating I've been doing. Lot's of other things (gearbox, diff, rear suspension) are still waiting on parts.
The differential is completely torn down. Getting it apart took some work. I pulled the carrier bearings with a two-legged puller, but had to clamp the arms to keep them from popping off. The shims behind the bearing kept the arms from getting a good grip, so I trimmed them down with a Dremel tool. The pinion bearing required a different tool, so I bought a bearing separator/puller from Harbor Freight. For a $50 tool, it worked great. Plus, that should be an easier way to pull the carrier bearings when I'm setting the backlash.
JoeTR6
HalfDork
2/14/16 12:02 p.m.
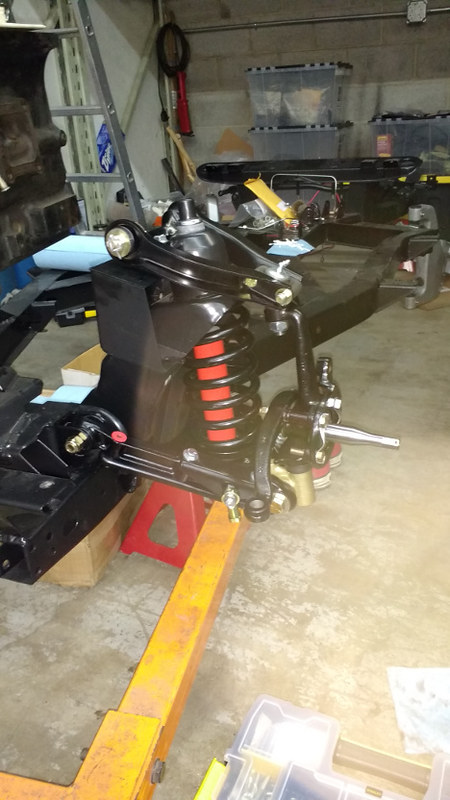
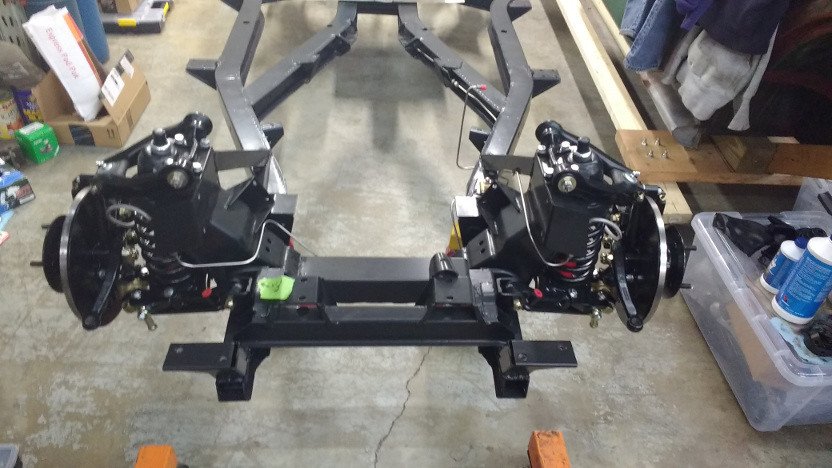
I spent yesterday finally putting some suspension on the frame.
I've been lazy/distracted and haven't had the front hubs tested for cracks. I want to change the studs to 3/16" longer ones, and don't have a press, so they need to go to a machine shop anyway.
Meanwhile, it started out at 12 F this morning, so no unheated shop for me today. I did some of the many smaller tasks that tend to pile up on a project, such as...
- Remove a stub axle.
- Clean a ring and pinion and check the threads on the ring gear.
- Fail to remove studs from some suspension arms after letting them soak in PB Blaster for a week.
- Drill out a washer to 9/16" for the upper ball joint.
- Find a bag of grease fittings.
It's amazing how much time gets chewed up doing simple stuff like this.
JoeTR6
Reader
2/19/16 8:00 p.m.
I took some time away from work today to drop off the front hubs at a machine shop. I think I've found the right place to build up a short block. These guys are across the street from a British car repair place and get much of their work, so they know British rusty iron. Then I did some more bead blasting and powder coating for the right side front suspension. While I was there, Classic Tube called to check the year of my TR6. One of the front lines was not quite right, so I sent them an original line to copy. They were trying to figure out whether their CNC patterns were correct. A new line is in progress.
My reward when I got home? A new pair of gearbox mainshaft bearings and new trailing arm brackets had arrived. After checking email, I learned the differential bearings have shipped as well. I should be able to bolt up the trailing arms this weekend. Woot.
I'm really digging this build and watching with a lot of interest. I recently acquired a '65 TR4 that's in a million pieces, so seeing you put this one together is kinda like a guide for me since the 4 and 6 are so similar.
JoeTR6
HalfDork
2/22/16 9:22 p.m.
In reply to IndyJoe:
It's good to know this is helpful in some way. I'm not going into a lot of detail about some of the things I'm doing, but was thinking I should better explain some of the improvements.
Yesterday I burned a few hours cleaning up the differential case. I tried wire brushing, but that just made the rust shiny. The case is empty, so into the bead blast cabinet it went. It took some time to clean the inside of the case of glass beads (and I'm not entirely done), but it turned out nice.
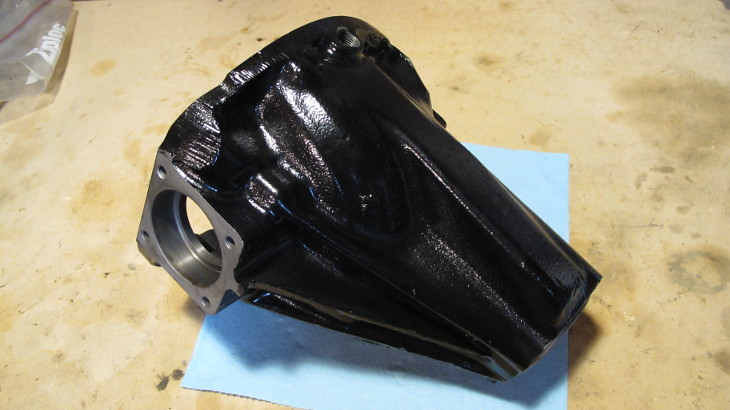
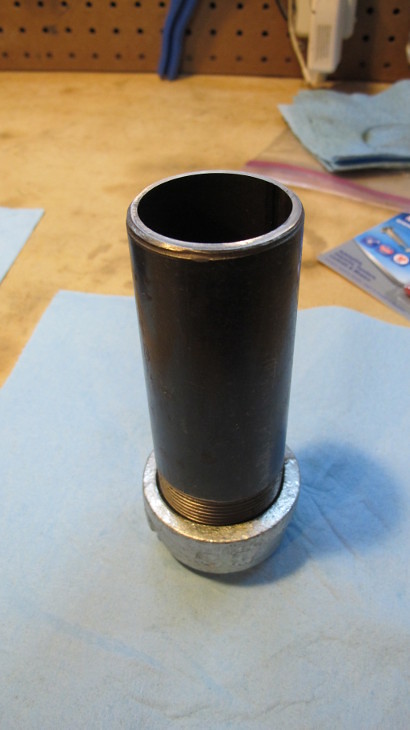
Yes, that's powder coat. I got a little anal. I also made a tool for driving on the bearings out of iron pipe and a cap. It needs to be 5" deep for the pinion head bearing.
JoeTR6
Reader
3/1/16 4:12 p.m.
The machine shop called today with some not-so-good news. The hubs I gave them have 0.040" and 0.070" of runout, so both are going into the junk pile. I have at least two others at home. If those are cracked or warped, I can either source some good used stock hubs or spend more money on new aluminum ones (that would violate SCCA FSP rules).
I sent the rear main bearing cap off today to have it machined for a second rearward facing thrust washer. Once that's back, the engine goes off for a rebuild.
JoeTR6
Reader
3/3/16 3:48 p.m.
I took four hubs to the machine shop this morning and ended up with two that have only a few mils of runout and are not cracked. They also checked the brake rotor runout. Those are now clean with new races and longer studs. $70 well spent.
JoeTR6
HalfDork
3/6/16 6:48 p.m.
Yesterday I finished cleaning/powdercoating suspension parts. It was a long day.
Today I started by cleaning up my work area. It was getting cluttered, and I was tired of tripping over what I had just spent an hour trying to find.
Next, I determined that the new front hubs will require a spacer to fit stock wheels. The new studs have a short shoulder that keeps even an open lug from seating. Fortunately, I have some nice 1/4" spacers.
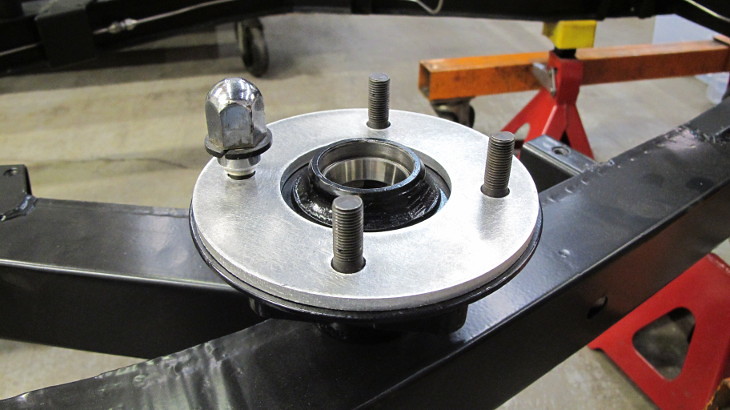
With the spacer, stock lugs will hold the stock steel rim with plenty of thread engaged. That's my plan for street rims.
I also sorted out engine parts into those I give the machine shop and those I don't.
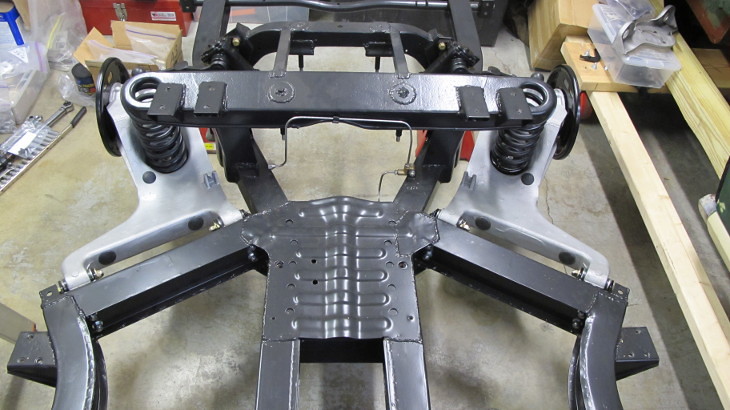
The last thing I did today was bolt up the other rear trailing arm. I'm using nylatron bushings, so this thing should be pretty well located. Here's what the trailing arm looks like.
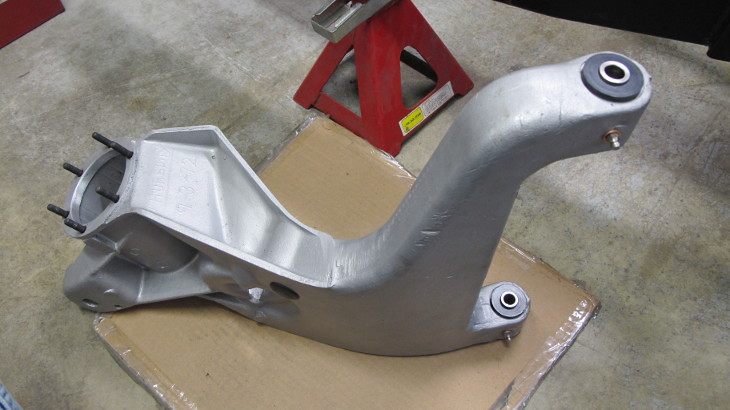
Grease fittings were added to lubricate the bushings without taking off the arms.
So with that bolted up, I have a rear suspension. I still need to install the hubs and brakes, but that requires the inner half-shafts and I don't have a differential to bolt those up to yet.
JoeTR6
Reader
3/8/16 11:16 a.m.
The last choice I need to make before rebuilding the engine is whether to line bore the block for Spitfire cam bearings. Generally, these are unnecessary for stock levels of power. Even a motor built for SCCA Street Prepared should be OK with the cam riding on the cast iron block. But, I imagine someday I will drop a hot cam and higher ratio rocker arms in, and then it can become a problem. Even with 140 HP or so, this car will spend a lot of time reving near 6200 RPM, so wear could be an issue over time.
Richard Good charges $300 to line bore the block. Seems like good insurance to do it now and not worry about not having done it later.
JoeTR6
Reader
3/12/16 8:30 p.m.
Today was pretty much a crappy day. I should have gotten both sides of front suspension on, but left the upper wishbone arms at home (where I fit the missing nylatron bushings). So I checked torque on the critical bolts on the left front and installed the hub. I have never used Richard Good's stub axles before. They have spacers between the bearings that need to be shimmed to reduce spindle flex. He also uses a real seal on the back hub face instead of the POS felt seal that Triumph used. The problem was that I forgot to include the spacer when I installed the rear bearing and seal. When I removed the seal to fix this, I damaged it and the aluminum adapter it fits in. The adapter can be cleaned up. The seal was bent and has a small chunk taken out of the outside part. Removing this seal will be a pain when it comes time to repack the bearings. On the plus side, it should keep grease in and water out much better then the felt ever would.
Also, my stock dust caps won't fit over the castle nut holding the hub on. Hopefully somebody sells oversized ones. At least I got the one hub/brake disk installed. But I just felt like a klutz in a bad mood all day long.
JoeTR6
Reader
3/19/16 6:28 p.m.
I got the right side front suspension on today. One thing that I'm waiting on is some different seals for the front hubs. I ordered some SKF seals that supposedly fit the the back face of the hubs to replace the stock felt ones. I also realized I forgot to loctite the brake disk bolts on the left side, so that hub needs to come off anyway.
This week should be interesting because I finally got the Quaife differential. Time to rebuild the diff. I picked up some Prussian Blue to check the ring and pinion mesh. The first step will be to measure the pinion depth and get the pinion bearing preload set correctly. If I just can't get everything to go together, the whole thing can go to the machine shop for assembly. But this is something I really wanted to learn how to do.
JoeTR6
Reader
3/23/16 10:37 a.m.
Last night I started on the diff. First up was installing the pinion bearing races. I decided to freeze the races and drive them into the case. The rear one was a struggle. In hindsight, I should have made up a tool with a piece of threaded rod to pull them together into the case. I also got the pinion head bearing driven on and torqued down the ring gear. Next is checking the pinion depth and bearing preload, but I didn't have the pinion flange.
The engine block is at the machine shop for cleaning and checking.
JoeTR6
HalfDork
3/26/16 6:27 p.m.
The diff rebuild continues. I had to pull all but 0.006" of shims out of the pinion to get any pre-load on the bearings. I suspect this means that I need to shim the rear race or pinion head bearing to get the pinion in the right place. I'm working on a tool to measure the pinion depth of a known good diff, and I'll start with it there. Of course, somebody (probably me) left the shield gas valve and regulator open on my welder for 2 weeks, so the gas rejoined the atmosphere. The tank was low anyway.
On to the Quaife. Having previously torqued/loctited the ring gear, I had to remove one of the bolts to add a tab for the dial indicator to contact. Then I drove on the bearings with no shims and dropped it into the case (Quaife units are surprisingly heavy, BTW). This was to measure maximum end float which turned out to be 0.040".
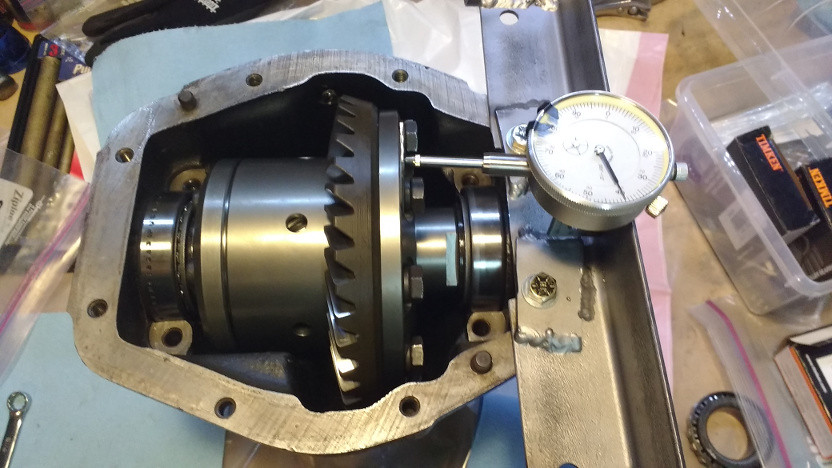
So now I know I need that plus a 0.003" shim for bearing pre-load. The bearing separator/puller worked great to pull the bearing back off one end of the Quaife, but the other end (with the gear housing) has much less clearance. The separator would put all of its force on the bearing cage and I'm afraid it would damage it. Next I tried the 3-jaw puller, but it won't quite fit behind the bearing race.
Notice that the jaws will fit behind the bearing, but at the wrong angle. So I wedged two jaws behind the bearing on opposite sides and pulled outward. The bearing gave enough that I can get the puller on. That's a good thing because unless I get really lucky, I'm going to be yanking these bearings off several times to get the lash set.
Not being able to weld my pinion depth gauge, I finished the front suspension.
The steering rack needs rebuilding at some point. I have three, so one of those should be in decent shape and just need a right side bushing and inner tie rod nylon joint pieces.


