


Calipers are cleaned up

Battery box got re-welded and a coat of POR. Someone had cut the corner and beat one side flat to fit a larger battery.

I stared at brake lines for awhile.....

Calipers are cleaned up
Battery box got re-welded and a coat of POR. Someone had cut the corner and beat one side flat to fit a larger battery.
I stared at brake lines for awhile.....
Calipers got all freshened up.

Wheel bearings got repacked, and installed. Calipers mounted. Flex lines are going to be tough, any reason not to safety wire them to the upper control arm?

Cut the cowl rust out, hosed the area down with rust converter.

In GRM fashion, cut a patch for the inner fender out of my old dishwasher skin.

My god do I remember how much chasing welds on rusty stuff SUCKS! Not pretty..... but solid.

A pillar fixed up

Made my first ever hard line, not too bad, but hard to get the ends lined up to thread in nicely. That flare too works great, IF you dont have a bend too close to the end.....

And got the whole rear axle plumbed! Everything is just finger tight, but it fits decent and has new everything!


Braided flex hose and safety wire should be fine. Make sure it has enough slack at all extremes of movement. Id probably do rubber adel clamps instead of safety wire, but thats me. I HAVE used zipties....

Use the adel clamps like duster suggests. This will work with a rubber hose as well, but I am surprised to see rubber in the back. Given the extra obstacles in the front making up -3 braided hose gives you more options. Do not use safety wire directly on a rubber hose.
In reply to Dusterbd13-michael :
Valid point.... They are rubber. had too Google adel clamps, P clamps! :D I have a assorted box.
In reply to TurnerX19 :
I have rubber for everywhere. I found some front hoses that should work for the front. The original design is NLA, its a banjo bolt, found some that were recommended by the IH guys, but they are not very long. I could use 4" more I think.
Hopefully this is the answer to dropped TRE! Will steering be funky only dropped on one side?


Steering should be no funk zone with that. The only important features are the joint locations. The rod that connects them can be any shape imaginable as long as it meets strength requirements.
In reply to AngryCorvair :
Prefect, thanks :) Its all steering parts from Speedway, so hopefully strong enough.
Brake lines are done! Long hard lines on the firewall are a huge pain with the engine in! Made tabs to hold the frame side of the flex lines, I think I got the routing pretty good.


New drag link installed. Just barely clears!! Sweet.

Is there enough slack at full steering lock and droop? Looks like there is, but having NOT checked before, with the resultant effect, i just have to ask.
Looks great!
In reply to Dusterbd13-michael :
Yes, but just barely! I tested full lock to lock at full droop and bump. I was honestly surprised, thought I was going to need longer flex lines.
Then I got one tack done before I ran out of shielding gas....
Flux core: ugly, messy, and bad for the lungs, but you never forget to close the bottle!
Im loving your progress on this. Youre hitting it HARD. hopefully im not being a dick.
In reply to Dusterbd13-michael :
I HATE flux LOL... I knew I was almost empty, but I guess the gauge doesn't really register well under 400 psi, it just went from 400 to empty.
Yeah trying to get this thing running and driving ASAP. Thinking I want to spray epoxy on it ASAP before fall and moisture levels come up. My garage isn't real dry (or heated). Not being a dick at all! I like eyes on ym projects, half this stuff I have never done before, all the input helps!
What's everyone's favorite body filler? Is Rage Gold still the go to?
Still open to body filler recommendations.... I grabbed some duraglass for the first coat on the welded patches.
Got the kiddo out to the garage to help pump brakes. Got fresh fluid in the master (after putting it in and sucking it back out since it instantly looks nasty...) and pumped the line going to the rear end. Flushed the old crap out, got one side bled, and promptly ran out of fluid.... I thought I had another can on the shelf.... Nope. I did find a few leaks, tightened those up, hopefully thats it. I have one suspect flare... I couldn't see what I was doing and may have over flared it.
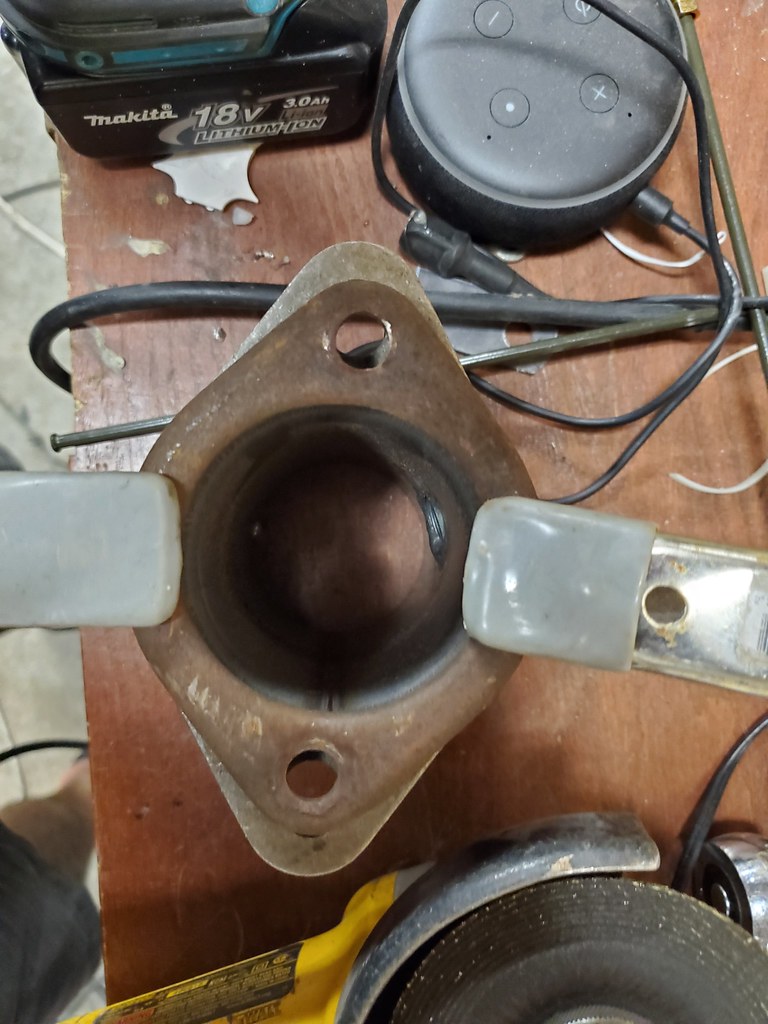
And in another IH is hard to find parts for segment..... Exhaust flanges aren't quite right.... Am I crazy to try to ream the holes to try to get it to match the OE flanges? There wont be much material left next to the pipe when done. The flanges are good and thick though? They are doughnut gasketed.

Assembled the battery box.

Dropped a battery in and looked at starter solenoid locations. This should work, using existing holes, otherwise I could probably sneak it in behind the battery.

And RockAuto's parts system didnt get this one right... One of these is not like the other! Luckily I could still just read the part number on the old one.
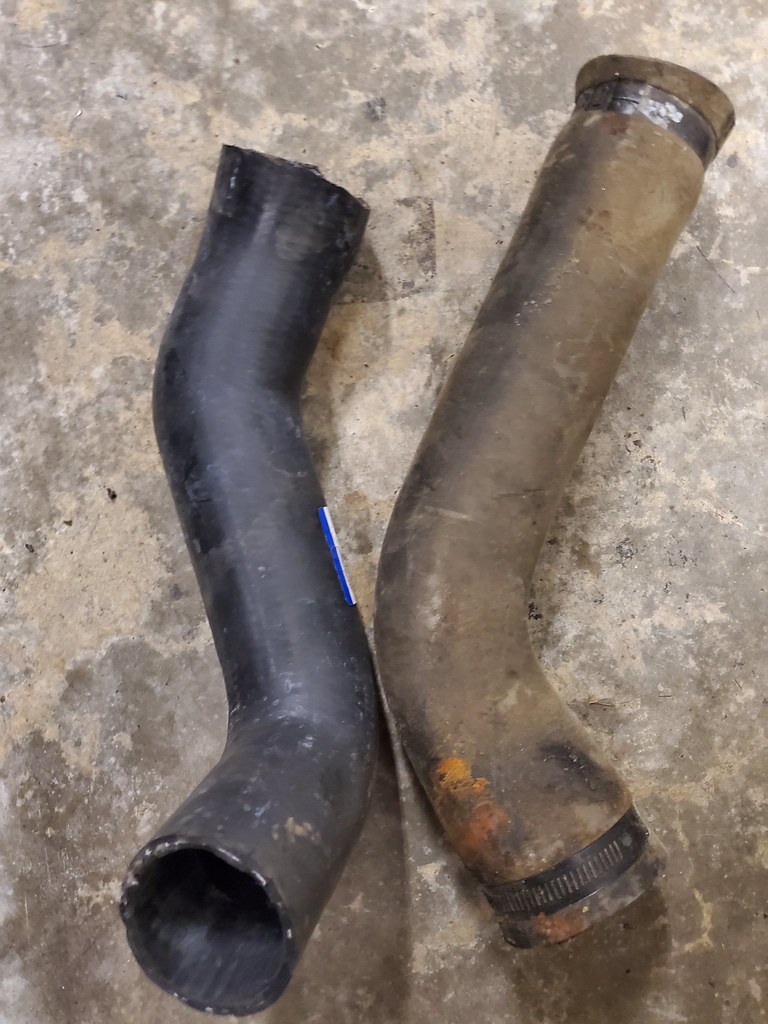
Got the intermediate pipe in, tried the ClampTite. Its neat, looks cool, but its kinda a pain to use, and definitely needs a bit of space around it. May not work for the lowers etc.

And finally, made a little aluminim tab to hold the broken fan shround.

Ive used rage gold before. Seemed to sand easier than bondo. But im NOT a bodyman or qualified to answer. Maybe look at what nohome bought?
Rest is looking fantastic!
In reply to Dusterbd13-michael :
Thanks! Looks like Nohome used Rage Gold.
Couple notes. You should be fine expanding the exhaust flange holes to an oval, but I would not ream them round oversize as far as you need. On the starter solenoid, be glad you did not tuck it in close to the battery, they don't like the fumes, and sometimes when failing they spark. It will live longer where you have it, which may not be really long, it looks the same as Ford![]()

Thanks to the separate valley cover and intake design, you'll find that a couple burritos, wrapped in foil and slid under the intake will be a nice hot lunch when you get to your destination.
In reply to TurnerX19 :
Cool, I'll leave it there. Yes very similar to the Ford design.... But better than IH and running constant power to the starter.
In reply to ShawnG :
Ha! I'll have to try that

Start with bare metal, wipe with metal prep and a give the car a good 80 grit scuff
Wax and grease remover wipe
Epoxy primer of your choice; at this point the car is weather tight
Rage Gold filler over the Epoxy after the epoxy is scuffed with 80 grit.
Feather fill polyester high fill after the body fill is sanded even with 80 grit finish the featherfill to 300 or so grit.
Urethane sealer After the polyester is sanded to 300ish. Finish the sealer to 400 -600 grit for paint.
Since you can wet sand the urethane you will get a very good indication of how good your bodywork is when you look at the car's wet reflection. You should not have many if any sand-throughs in the sealer coat if you have done your work properly to this stage.
I am so glad I work with small cars, that thing makes me weak in the knees thinking of all the block sanding. The only thing that kept me sane when doing the Molvo was telling myself that the body shop charges $100/hour to do the sanding and I mentally was "Paying" myself that rate..
In reply to NOHOME :
Thank you! That was pretty much my plan until I was doing some reading last night. It seemed to say that filler after epoxy primer was not as good as filler under the epoxy.
Thoughts?

My experience is that filler against bare metal is a recipe for rust. I've dug out enough terrible old filler from crappy cars over the years only to find rust tendrils underneath it, to know that I never want to apply filler that way. Filler traps any moisture against the bare steel and it rusts from the inside out. Epoxy primer first sounds like a good plan.
In reply to Duder :
Thanks for the input! That is a good point oh, I'm just worried about sanding through the epoxy with as many lumps as this truck has.
You'll need to log in to post.


