


I'm seriously considering taking this car ice racing in AMEC's street tire, non-contact class, but I'm having trouble finding tires in a size that will work.

I'm seriously considering taking this car ice racing in AMEC's street tire, non-contact class, but I'm having trouble finding tires in a size that will work.

Wow, very nice!
The valve cover is looking a little better than it did before. Citristrip and Rustoleum BBQ Black. I really like this paint. Thanks for the tip, Keith!
Here's a before-during-after sequence:
This is how it looked after Foamy Engine Brite and power washing the engine compartment:

Citristrip:

After two coats of Citristrip, along with a plastic scraper and a brass brush, then a rinse with hot water:

And, finally, three coats of Rustoleum BBQ Black:


Woody wrote: The valve cover is looking a little better than it did before. Citristrip and Rustoleum BBQ Black. Thanks for the tip, Keith!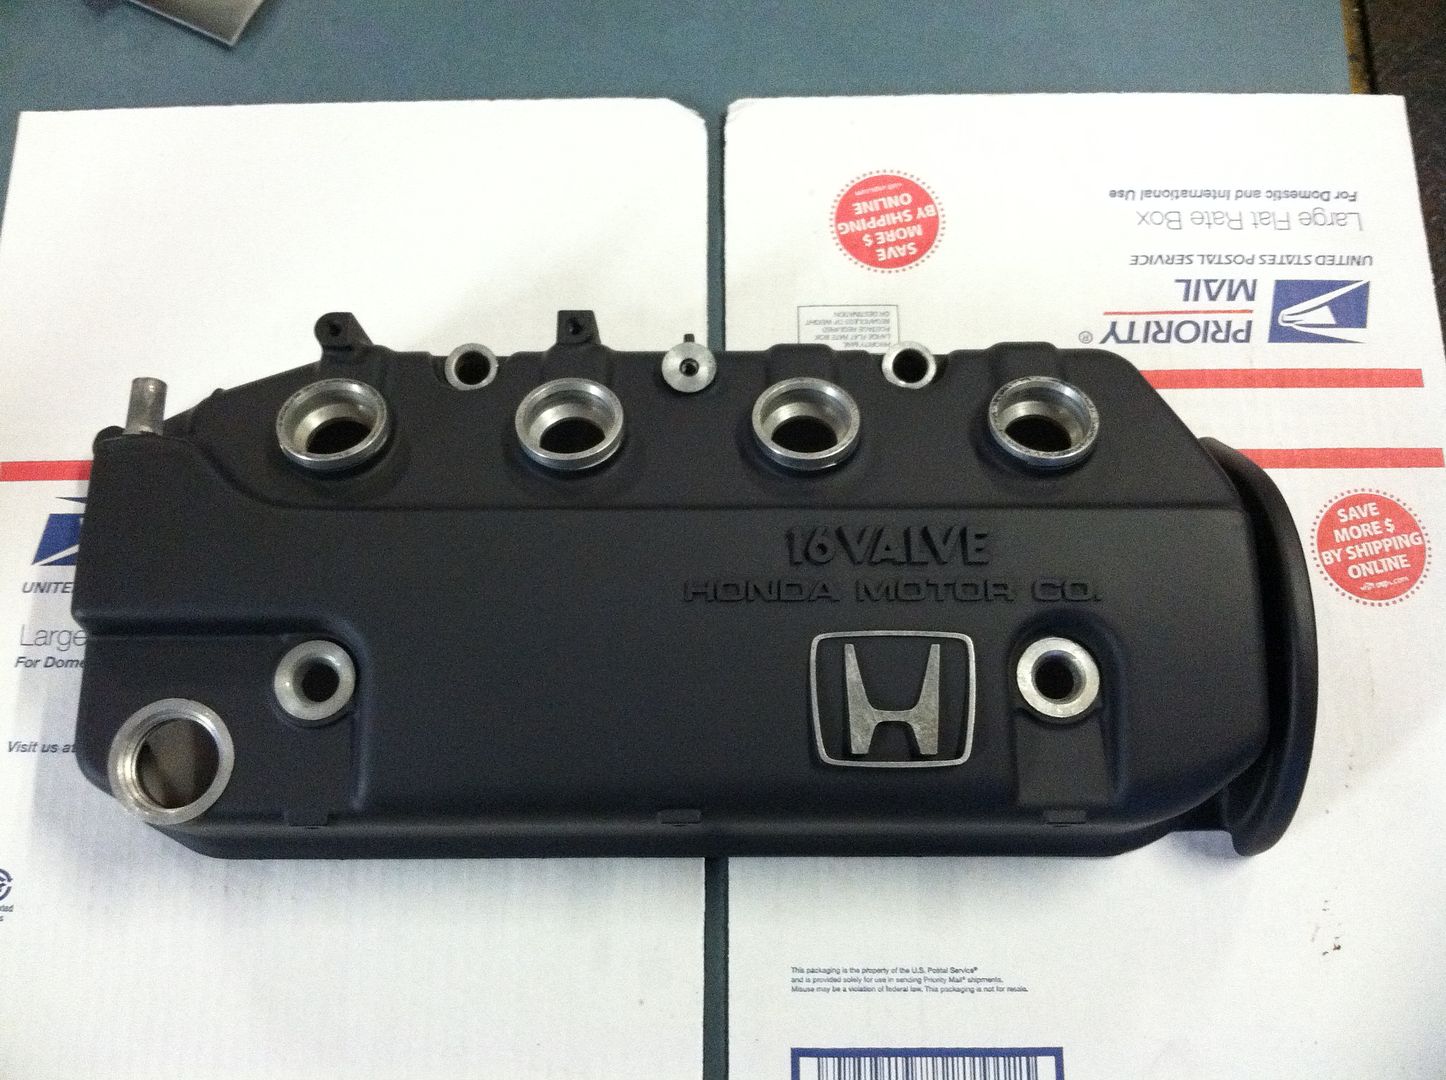
Holy crap that looks nice! My MR2 could use this tip.

my question is, how'd you mask off the H ?
I put blue masking tape across the whole thing and then cut off the excess with an Exacto knife. Originally, I was planning to do all of the letters, but the tape was thick and wasn't cutting well. I'm still thinking about stripping the paint off of the letters with a sanding block, but I kind of like it the way looks now.
I refinished a set of original Shelby valve covers once. I painted the whole cover black then sanded the paint off of the fins. They came out great, but I had a much larger surface to work with, so it was harder to make a mistake.


Love it, and the buffing came out nice, did you put some wax on there after? Some synthetic wax (easy on, easy off like Meguires NXT 2.0) will take that shine and add to it, alot!
One word on the Rustoleum BBQ paint, it's tough against marking, but it isn't gasoline resistant, and it will change color as it heats to an slightly greyish hue. That being said, for a low-buck refinish it looks great. I love how it's self-leveling and dries in 5 minutes.
Raze wrote: Love it, and the buffing came out nice, did you put some wax on there after? Some synthetic wax (easy on, easy off like Meguires NXT 2.0) will take that shine and add to it, alot!
Yes, I finished with a Meguires wax. I used three different Meguires products over the course of five or six steps.
Woody wrote: I put blue masking tape across the whole thing and then cut off the excess with an Exacto knife. Originally, I was planning to do all of the letters, but the tape was thick and wasn't cutting well. I'm still thinking about stripping the paint off of the letters with a sanding block, but I kind of like it the way looks now.
so, all the holes were masked off the same way ? by the way, in case no one has mentioned this, it looks great
Yup, same way. It took about ten minutes.

Awesome!
Since I had the valve cover off anyway, I decided to do a valve adjustment.  Back in the days before I started doing my own work, I used to fear valve adjustments because they were an expensive job that needed to be done every fifteen thousand miles.
I remember reading in the old book *How to Keep Your Honda (Civic, Accord, Prelude CVCC) Alive* that there is nothing nicer that you can do for your Honda than adjust the valves. This idea has always stuck with me and now, I actually enjoy doing them. As a nice bonus, Honda is considerate enough to put all the valves up on top and under a single valve cover, unlike the folks at Porsche, who make you work on your back under the car and force you to buy four separate valve cover gaskets. There are more valves to adjust on this car, but it's a fair trade for the added convenience. It's a fairly straightforward task and it pays to check the existing valve lash before you loosen the locknuts. I only had to adjust about six of the sixteen valves, as the rest were all right in spec.  The timing belt had been replaced within the last 25k miles and didn't show any signs of wear or dry rot.
  It was pretty clear that oil had been leaking from around the distributor for a long time, so I decided to replace the o-ring seal. I started by marking the position of the distributor relative to the head so I didn't change the timing.
  I pried off the old seal with a dental pick and it was so brittle that it broke. It was completely flat all around. I cleaned the distributor, put on the new o-ring and lined it back up with my mark.
  The cap and rotor were a mess, so I replaced them, along with the spark plugs. For a car that was once so common, I was surprised that I had to go to five places to find a cap and rotor. The Honda dealership even told me that it would take them five days to order them.
  With a new set of valve cover gaskets, I buttoned it all back up again.

wow, that is looking really good!
I was going to ask for a tutorial for those unfamiliar with checking/setting the valve lash on a Honda (myself) but, there it is.
I had no idea it was a regular maintenance procedure for a semi-modern Honda. I'm used to hearing about that sort of thing with 'Murican V8's that have big, nasty bumpsticks and solid lifters.![]()
Learn something every day!

Looks good! That red dust in the distributor cap has me a bit worried though. Looks like the bearing might be on it's way out.
Run_Away wrote: Looks good! That red dust in the distributor cap has me a bit worried though. Looks like the bearing might be on it's way out.
Thanks for the tip, I'll look into that. That should be a fairly easy fix.
The_Jed wrote: I was going to ask for a tutorial for those unfamiliar with checking/setting the valve lash on a Honda (myself) but, there it is. I had no idea it was a regular maintenance procedure for a semi-modern Honda. I'm used to hearing about that sort of thing with 'Murican V8's that have big, nasty bumpsticks and solid lifters.Learn something every day!
You're usually given a normal range for setting the valve lash. I take two gauges out of the feeler set and use those. I split the difference between the high and low number and use that gauge to set the lash. Then I use the gauge for the fat end of the range and check it. If it doesn't fit ("No-go"), then I'm happy that the valve has been adjusted to the middle of it's acceptable range. It's not much of a difference though. On this car, the fat gauge ("No-go) was only 0.01mm larger than the one that I used to set the gap. It's important that you don't change the setting when you tighten the lock nut, so you need to check it one last time after you are done with the valve.

Nice car. A buddy at work has one in white that I'll be given first chance to buy in the Spring when his Dodge truck is paid off.
I wish I still had our '90 HF my wife brought into the marriage, we used to see 50mpg on road trips. ![]()
My '89 Civic Si was routinely in the 40's after the engine was up over 200k miles.

If you need a new distributor, I have one that we bought for our 91 Civic Lemons car, and we then did an OBD1 conversion, so we have the OBD0 distributor around now with about 1200 miles on it, just sitting in a box.

Woody wrote: I'm seriously considering taking this car ice racing in AMEC's street tire, non-contact class, but I'm having trouble finding tires in a size that will work.
What size are you looking for? I am sure we can help.
Mark

Sonic wrote: If you need a new distributor, I have one that we bought for our 91 Civic Lemons car, and we then did an OBD1 conversion, so we have the OBD0 distributor around now with about 1200 miles on it, just sitting in a box.
Is your distributor from a Dx or an Si? I'm asking because they are different and because I might be interested in one from an Si.![]()

i loved the little 89 crx si i built. fun little car that my mom still drives every day, getting 42mpg. d16z6 swap with an underdrive pulley, aluminum flytwheel, d16y8 intake manifold with some unknown throttle body, ebay header and exhaust. hardrace bushings were the best money spent. never could figure out how to make the shifter feel better though.
she still has the car, and i might trade her back the camry for it....
michael

My brother used to have a '91 Si about 15 years ago when he was in high school. What a fun car to drive. This one looks fantastic for the age and mileage.
Dusterbd13 wrote: i loved the little 89 crx si i built. fun little car that my mom still drives every day, getting 42mpg. d16z6 swap with an underdrive pulley, aluminum flytwheel, d16y8 intake manifold with some unknown throttle body, ebay header and exhaust. hardrace bushings were the best money spent. never could figure out how to make the shifter feel better though. she still has the car, and i might trade her back the camry for it.... michael
I had a 89 crx it had a Y8 header, DC racing exhaust, DC CAI and ES bushings and the bushings where by far the best mod i ever did to the car
You'll need to log in to post.


