1 2 3
wae
wae Dork
3/24/16 1:19 p.m.

First, the backstory: The car is a 1997 Dodge Neon Sport with the 2.0 DOHC that I bought and built as a $2005 Challenge car (epic fail) and brought back as a $2012 Challenge car (good mid-pack finish). From about 2011, I've been campaigning it in regional RallyCross events and it's done pretty well for me the last couple years. As of right now, it's sitting on stock springs with KYB blacks in the front and oranges in the rear and that's the project I should be tackling first, but doing things that make sense is rarely as much fun!

As soon as I bought the car back in '05, I found an SRT-4 turbo setup as a take-off from an 04 model, so it's equipped with the SRT-4 injectors, turbofold, and intercooler and it's been making plenty of power running about 8 pounds of boost. I used MegaSquirt'n'Spark (now MSExtra/1) with an MS1 unit on a 2.2 board, so my upgrade options there are basically nonexistent.

Last year, I found a PT Cruiser in the local pick'n'pull with the turbo-lite motor -- it's the same engine as is found in the SRT-4 and PT Cruiser GT, but it's detuned at the ECU to run less advance and lower boost so that it doesn't require 93 octane fuel. Factory rating was about 180HP versus over 200 for the SRT-4, if I remember that right. The car wasn't beat up, so it was in there for a motor or trans problem more than likely, but the oil and coolant both looked good. The crank pulley bolt was completely gone, but the timing belt was still in place. It's a non-interference engine, though, so that didn't worry me too much. So, I spent a very cold St. Valentine's Day with a couple good friends pulling the engine out.

Rebuilding the motor and putting it in to the car was supposed to be my winter project, but I kind of procrastinated a bit and didn't start to take the motor apart until early Feb of this year. Oops. At any rate, I've got the whole motor torn down and I found the problems with the motor:

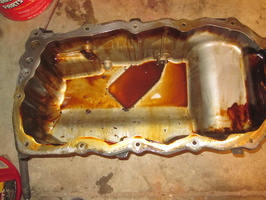
First off, the tops of the valves were just coated with oil and carbon. They were a total mess, but the intake tract was completely devoid of oil, so new guides and seals fixed that. All the oil went in to the cylinders, though, and left the pistons just caked in carbon. Once the head was off, there were literally sheets of carbon coming out of the engine. Total mess.

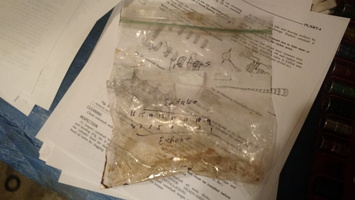
It's hard to make out, but this is the look through the intake ports:
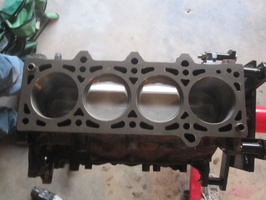
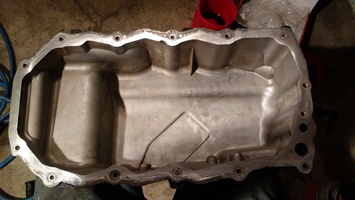
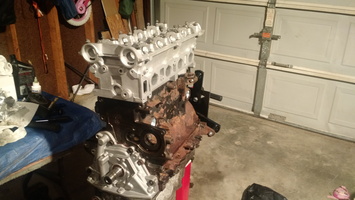
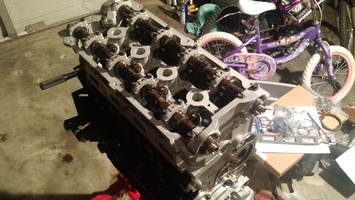
The block:

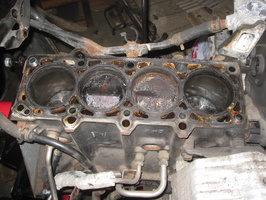
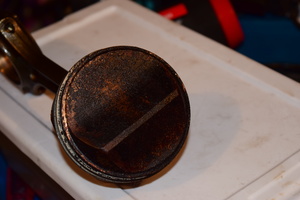
When I pulled the pistons out, they all pretty much looked like:

The car was in the junkyard, though, because of what I found on the timing belt:

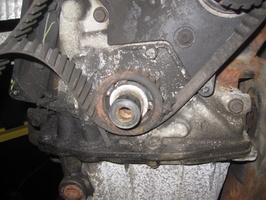
It looks like the timing belt was so old, that it basically started to disintegrate and the teeth were basically scraped off. Hooray for non-interference engines!

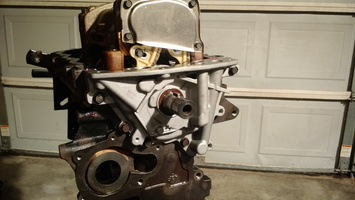
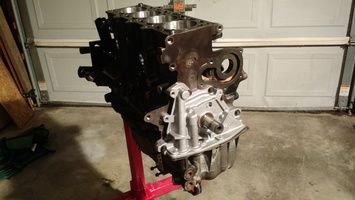
At this point, everything is back from the machine shop -- new guides and seals, .005" worth of decking, and honing of the cylinders, std/std/std, and cleaned up a bit. I've hung the block on the engine stand and tackled the job of cleaning up the pistons while I wait for the parts to arrive.

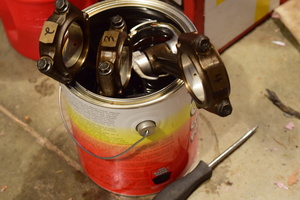
Internet suggestions ranged from ATF to acetone and a few other weird things inbetween. I finally bought a $20 can of Berryman's Chem-Dip and dropped the pistons in. They were cleaned up a lot after an hour, and I've left them in since yesterday evening with an occasional removal to wipe down and scrape the lands a bit. I'm thinking that I'll be able to pull them out tonight and they'll be ready to have a couple nicks taken out and then re-ringed.

Meanwhile, I've found rod bolts on eBay -- Ford Duratec 1.8L con rod bolts from ARP are apparently correct -- and I stopped in the local dealer yesterday and got some bedplate sealant. My concern on that is that I keep reading that the "red stuff" is no good because it will create a gap that throws off the mains clearance and that there exists some mythical "green stuff" that has a 0 gap cure. According to Mopar, the red stuff supersedes the part number for the green stuff and I can't find the green stuff anywhere. So, here's hoping.

Dusterbd13
Dusterbd13 PowerDork
3/24/16 1:27 p.m.

In.

Basically what I plan for a challenge car.

84FSP
84FSP HalfDork
3/24/16 2:06 p.m.

Always thought that would be a super cheap way to haul butt! Excited to see where you take this...

wae
wae Dork
3/25/16 10:49 a.m.

Thanks! So far, with just about $3k in to the car total running with just the boosted stock 2.0 DOHC, it's been a fun way to move fast. I'm hoping that this moves the needle to 11.

The pistons started off looking like:

After letting them sit in the Berryman's for basically two days with some rinsing and scraping in between...

I pulled them out and gave them a last rinse this morning and they're looking like:

That should be something I can work with. Rock auto got my gasket set and oil pump here yesterday, and I just got the call this morning that the new balance shaft guide and tensioner are at the Dodge dealer for me. The main bearings should arrive tomorrow along with the timing components. I think the rod bolts will arrive on monday.

About the balance shafts: I know most people cut the chain to remove the parasitic drag but the concerns seem to be when you're trying to make greater than 400hp or if the plastic guides age and break. I'm going with the new OEM plastic parts to reduce the chances of breakage and not planning to try to push that kind of power without opening the engine up again anyway.

Budget-wise, it's not the cheapest thing that I've done so far, and I know I've got more to spend:

Core engine: $260 (included the manifolds, turbo, TB, injectors, charge pipes, etc)

Machine work: $435

Bearings/gaskets/rings/headbolts/timing/oil pump: $435

Bedplate sealant/chain guides: $40

Rod bolts: $70

So, about $1,250 so far. Granted, I could have gotten away cheaper by putting in the guides and seals myself, and it didn't really need the bottom end work -- I could have just had the head done, cleaned up the tops of the pistons a bit, and done the timing service. The extra expense, though, should pay off in terms of a basically new motor that should last for quite a while. It's also not a bad deal, overall, since every "needs work" SRT-4 motor that I've seen for sale has been priced at around $800 and good runners with plenty of miles are $1,300+. And that usually doesn't include the manifolds, injectors, turbo, charge pipes, throttle body, and such.

EvanB
EvanB UltimaDork
3/25/16 10:58 a.m.

Did you find out what happened to the old engine last weekend?

ssswitch
ssswitch HalfDork
3/25/16 11:54 a.m.

Is the SRT4 transmission significantly more robust than the stock one?

I know some of them could get an LSD but I would imagine that's not going to be found in a PT Cruiser turbo. Any cheap options there?

Stefan (Not Bruce)
Stefan (Not Bruce) MegaDork
3/25/16 12:45 p.m.

OBX makes a Quaiffe knock off for about 1/2 the price of the real Quaiffe.

That Diff fits the A520/555/523/568 and the 1st Gen Neon, plus the A413 (with some work to space the ring gear and modify the stamped steel diff cover.

The SRT-4 transaxle is the strongest produced and after 2003 (I think?) all came with the factory LSD and I believe it is based on the diesel transaxle used in Europe. The PT GT uses a more or less stock 2nd Gen Neon transaxle I believe, which is the other reason for detuning the motor.

wae
wae Dork
3/25/16 1:34 p.m.

I'm going to use my existing trans which is a regular 1gn 5spd that I put an OBX in. I'm not a big fan of the OBX - even though mine is an Ed Peters modified one, the whole axle engagement thing is a freaking nightmare. I had to use a piece of rebar and a three pound sledge to get the passenger axle out and it shattered the c-clip in the process which meant a long relaxing fishing trip with a magnetic pickup followed by a jigsaw puzzle assembly to make sure I got it all out.

But then, the quaife units are all but impossible to come by anymore. And going to the srt4 trans with the factory LSD would involve a boatload of work to make fit. Maybe in the future, but not at this stage!

On the topic of the existing motor: I'm not 100% sure, but I'm assuming thrown rod. Number 1 doesn't go up and down anymore when you turn the starter and the crankshaft isn't broken so that narrows it down a bit.

Looks like this project has some urgency around it.

Stefan (Not Bruce)
Stefan (Not Bruce) MegaDork
3/25/16 2:11 p.m.

In reply to wae:

The Quaiffe is just as bad, except the c-clip arrangement isn't used on the earlier cars with the same differential. The springs inside the inner CV joints hold everything together.

EvanB
EvanB UltimaDork
3/25/16 4:05 p.m.

In reply to wae:

It's more obvious when the rod is thrown completely through the block.

wae
wae Dork
3/26/16 8:19 a.m.

Updated tracking information says that main bearings & timing kit should arrive today. Also moved up to a Saturday delivery are the ARP rod bolts.

I finished cleaning up the pistons last night and got the rings installed on them. The FSM gives a procedure for checking the ring gaps, so I followed that and everything was within spec out of the box. Nowhere in the manual does it specify that rings should be gapped in the cylinder that they'll be installed in, but I made sure to do that anyway. There were a couple tiny nicks in the tops of two of the pistons that I sanded down.

From what I can read, it sounds like the stock PT Cruiser manifold is going to have a hard time clearing the radiator and fans. The stock 2.0 DOHC intake, however, is supposed to work well after re-drilling the bolt holes so that's my tentative plan for that.

Engine management is still something I'm going to need to figure out. The MS1/Extra that I currently have will need to go, and I'm pretty sure that MS2 will do what I need it to do. And it looks like I can use an MS2 daughterboard on the 2.2 PCB that I already have, but I need to find out how bad of an idea that is.

So, today's projects: Clean up the garage a bit to give me some more room to work, research MS, and when and if parts arrive, check bearing clearances.

wae
wae Dork
3/26/16 9:24 p.m.

As the kids say these days: That escalated quickly.

Before:

After:

A friend came over and we kind of got on a roll. I checked the mains and each rod bearing clearance and they're all within spec and each journal is basically the same as the others. At this point, the pistons are all in and the balance shaft assembly is installed. I still have to put on the oil pump and then close up the bottom end before flipping it over and putting the head on, but the oil pan needs to be cleaned out a bit and I forgot that I need to source a new crank pulley bolt since the original one was missing.

Good progress today, though.

Stefan (Not Bruce)
Stefan (Not Bruce) MegaDork
3/26/16 10:51 p.m.

The MS2 is always a daughter board. Even the MS3 can be added as a daughter board of you wanted.

The v3.0 board gains you better injector flyback protection and a prototype area for different options. Not really worth the expense over a working v2.2 board, since I'm guessing you're already running low impedance injectors.

Nathan JansenvanDoorn
Nathan JansenvanDoorn Dork
3/27/16 4:16 a.m.

Fantastic build - it brings back some fond memories of my '96 ACR that had a similar swap. I ran ms1extra at the time: any particular reason that you're switching?

The car will be a RIOT. I was running an aftermarket WGA and high teens/low 20s psi boost. NO traction - it was hilarious fun.

Knurled
Knurled MegaDork
3/27/16 6:18 a.m.
wae wrote: On the topic of the existing motor: I'm not 100% sure, but I'm assuming thrown rod. Number 1 doesn't go up and down anymore when you turn the starter and the crankshaft isn't broken so that narrows it down a bit. Looks like this project has some urgency around it.

Uuuugghh. Sorry to hear that. I feel better about turning down your co-drive offer, at least. I'd have felt guilty forever if your engine let go while I was driving it.

Regarding the fancy schmancy magic bedplate sealing goop. I use Right Stuff. Yes I use it on everything. That is because it works No sealant should create a thickness gap, it is a liquid and you are torquing the mains to 50ft-lb or whatever. That said I do use a small bead (maybe 1/8-3/16") and give it a painter's smear all around to spread it and minimize the amount of squeezeout. Same way I assemble rotaries. Never a problem yet.

wae
wae Dork
3/27/16 6:22 a.m.

That's really good to know about the 3.0 vs 2.2 differences. I want to avoid trying to build something that is deprecated and not really supported right out of the gate, but if the 2.2 board is still viable and documented, I'd rather go with what I already have.

The main reason that I'm looking to get away from the ms1extra that I already have is that the NGC trigger code isn't part of the "official" firmware. Every post on the Internet that talks about it is from six or seven years ago and every link to "download the NGC firmware" is dead. My fear is that even if I can find it, getting any help with problems will be limited to "you need to upgrade and then try again".

I never had a chance to put the car on the dyno, but my estimate is that it was pushing something just under 200hp when it was just at 8 pounds on the 2.0 DOHC. Way more power than traction just at those levels and once I can double up the boost a bit, it should be fully ludicrous.

wae
wae Dork
3/27/16 9:30 a.m.
Knurled wrote:
wae wrote: On the topic of the existing motor: I'm not 100% sure, but I'm assuming thrown rod. Number 1 doesn't go up and down anymore when you turn the starter and the crankshaft isn't broken so that narrows it down a bit. Looks like this project has some urgency around it.
Uuuugghh. Sorry to hear that. I feel better about turning down your co-drive offer, at least. I'd have felt guilty forever if your engine let go while I was driving it. Regarding the fancy schmancy magic bedplate sealing goop. I use Right Stuff. Yes I use it on everything. That is because it works No sealant should create a thickness gap, it is a liquid and you are torquing the mains to 50ft-lb or whatever. That said I do use a small bead (maybe 1/8-3/16") and give it a painter's smear all around to spread it and minimize the amount of squeezeout. Same way I assemble rotaries. Never a problem yet.

Nah, there would have been no fault there last week. I'm pretty sure it was way overboosting for two events plus some street driving which is what killed it. The error was in not looking at all the gauges and data points when it was acting up.

Right Stuff, huh? I'll go pick up a tube. I stopped with the oil pump last night because I discovered that my RTV had dried up.

Knurled
Knurled MegaDork
3/27/16 10:06 a.m.

Right Stuff is awesome. I've been assembling engines with it since '05ish. The engine in the RX-7 now is, what, almost four years old now? and is JUUST starting to seep coolant into the combustion chambers. They say you can't use it for sealing combustion but they's lyin'.

I don't know if the data is available from Internet knowledge, but the service procedure for the crank pulley is "Install with special tool". It does NOT just get driven on until it stops! I don't have the tool, I just take a measurement before removing the pulley.

I'd like to say that there should be 1.032" from the face of the pulley to the end of the crank. I have it written down somewhere at work, hopefully hasn't been thrown out yet. I'd also like to say that you can get away with getting it almost there and then install the crank damper which will push it on the rest of the way, but I'm not fully confident with that.

wae
wae Dork
3/27/16 2:04 p.m.

If you happen to have that where it's easy to find, it'd be a good measurement to have handy!

The Internet provided a How-To that I was going to follow: http://www.srtconnection.com/forums/f152/how-crankshaft-timing-sprocket-install-7278/

wae
wae Dork
3/27/16 11:27 p.m.

More good progress tonight. The oil pan was pretty nasty, so I finished cleaning that out real well:

I also got the oil pump installed and put the front seal in. I used Mopar Special Tool Number 36mm socket for that job and it seemed to work pretty well. I filled the oil pump with oil in order to follow the FSM, but I'm not sure how much good that's going to do because the holes for the oil pump are on the bottom. So, I'm guessing all that oil drained down in to the oil pan once I flipped the motor over. For that matter, I'm not sure how you're supposed to keep the oil in the pump when you install it when the motor is on the car.

Anyway, the oil pump is on:

And so is the oil pan:

I realize that I'm up against a deadline for the next RallyCross event, so my wife pulled a totally awesome move and for easter bought me a new rally car just in case I don't have the Neon back together.

Jerry
Jerry UltraDork
3/28/16 6:53 a.m.
wae wrote: I realize that I'm up against a deadline for the next RallyCross event, so my wife pulled a totally awesome move and for easter bought me a new rally car just in case I don't have the Neon back together.

I must have this.

Knurled
Knurled MegaDork
3/28/16 11:22 a.m.

In reply to wae:

The info I had is long gone. The link you provided jibes well with my gut feeling.

wae
wae Dork
3/28/16 4:46 p.m.

I had some conference calls to sit on today, so I took a little time to get some things done while I was on the phone. First off, I wanted to make sure that I had my contingency in place:

You can see that I made sure to have the FSM handy before I went too far in to this project. I started by getting myself together (handsome devil, aren't I?):

Then I started out with the frame:

Once the base frame was assembled, I put it on the rotisserie to get the axles and rocker reinforcements installed:

Next, I installed the rear bumper and the fender flares. While I had it turned over, I got the gauges installed along with a non-removable steering wheel:

Here's the lightbar I fabbed up:

And installed on the car:

From the world's largest manufacturer of tires, I selected four new ones along with some white rims. I might Plasti-dip them in the future, but for now I like the white. The tread pattern on the tires doesn't seem very aggressive, but it is pretty soft so it should be good for the drier events:

I'm not happy with the lower front ground clearance. Later on, I may look to see if I can raise the front suspension a bit:

Finally, I added some vinyl number panels and other graphics to the car:

wae
wae Dork
3/28/16 4:57 p.m.

Okay, seriously, though, I did get out while I was on some calls and did a little more work. First stop was the Dodge parts counter where I picked up a new crank pulley bolt for about $7. That's still sitting on the work table, but I put on the headgasket and got the head bolted down to FSM spec:

When it came time to put the rocker arms on, I noticed in the FSM that it indicates that if they are re-used, they should be re-installed in their original locations. Well, poop, I don't remember if I knew that when I took them off. So I opened up the baggie and realized that I had written a little number on each one! Huzzah!

Except I have no idea where I would have started counting. So I hunted around and looked at all the old pictures and tried to see if I saved that anywhere, but I didn't have a picture. For about 15 minutes I tried to re-create in my head how I would have removed them and numbered them a couple months ago and I just wasn't coming up with anything. A closer look at the baggie revealed this gem:

Will you look at that! Past Bill finally did something that Present Bill can be proud of! So with those numbers in hand, I reinstalled the rocker arms and put the cams and cam caps in with tons of lube and oil:

Later on tonight, I'm going to try to get the timing components installed.

wae
wae Dork
3/29/16 9:07 a.m.

All my pictures are at home, so a text-only update on last night's activities:

The cam sprockets are installed and I got the water pump in along with the timing tensioner and idler pulleys. Using the crank pulley method of installing the crank sprocket, I was able to get that installed but now I need to go back to Autozone and re-rent the pulley remover. Derp.

Things to figure out: the valve cover I have is a regular DOHC one, not a turbo. Everything matches up except that the gaskets for the spark plug holes seem too thick and the edge gasket isn't shaped quite right in one little spot. I can either get the right gasket for the regular valve cover or I can find the right valve cover. I'm leaning towards getting the proper cover.

On the megasquirt front, I sent an email to the sales dept at a popular MS maker asking about upgrading my MS1/E on a 2.2 PCB to MS2 and they came back telling me to drop $460 on Microsquirt. As much as I hate to be the guy that asks advice from an expert and then questions it... I'm questioning that pretty heavily.

1 2 3

You'll need to log in to post.

Our Preferred Partners
tBnr9TDQHifjtmZefMw9YTmAgeYLwdzcEJQLG1RoQVKdgu8vXpAk5O2U2tzW3K8t