
NOHOME
MegaDork
9/18/21 7:29 p.m.
Hosting a new guest in the shop. An amazing example of a survivor that not only made it this far sporting its original paint and body, but is also in regular use. To prove the point, the car was driven from Montreal to London Ontario for some tin remediation.

Nothing serious is required and progressing on a restoration rather than wholesale panel replacement when possible. Starting at the front there is some rust damage from water trapped in the bump-stop support box structure. The good news is that the front fender ( aka wing) comes off pretty easily.

The initial thought was that I could drill out the spotwelds and reuse the original box panel. NOPE! This looked fine until I poked it with a chisel.
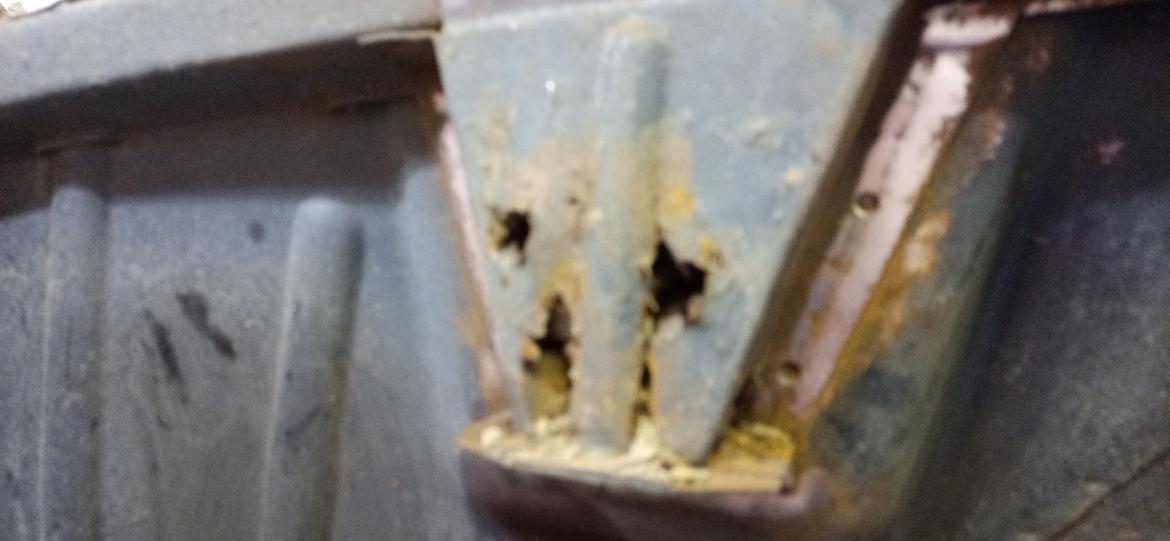
off it comes


Will cut out the brown bits and weld in some new tin then cap it with the repair panel. It is not as original as the original, but it will work. Should wrap this up tomorrow and move on to the sills. The PS will be an exact coy of the DS.
The DS sill suffers from some form of collision damage that will probably require an entire sill replacement. Shame because there is not that much rust and a graft from the repair sill might have been a better fix for a survivor like this.

NOHOME
MegaDork
9/19/21 6:17 p.m.
Bit more done today. Patch panel fitted and welded in on the DS and the PS fender is off for a repeat of the same repair.
Pics of the front and rear of the weld seam. Bit of time on the grinder and this should be good to go. Need to decide how to do some kind of paint match so that it does not highlight the repair from inside the engine bay.


In reply to NOHOME :
That's a cute little thing.
NOHOME
MegaDork
9/19/21 7:12 p.m.
In reply to Pete Gossett (Forum Supporter) :
Weird, but this might be the most "Chicks dig it" car I have ever had in the shop.
I want to stuff an 1800 in one of these. I have never been up close with one, is it really just a re-skinned Minor with a bigger engine?
NOHOME
MegaDork
9/20/21 7:45 a.m.
In reply to TurnerX19 :
Give or take yes. Which is interesting because I have both a Minor and this Riley in the shop at the same time. While the tubs have a lot in common, the sills are quite different.
The MGB engine is an easy fit but you need to keep the original gearbox since the bellhousing has a notch for the steering rack,
Is that rear wheel drive, or based on Mini running gear?
NOHOME
MegaDork
9/20/21 6:40 p.m.
MadScientistMatt said:
Is that rear wheel drive, or based on Mini running gear?
RWD for the win. Give it about 300 hp and it would be an awesome family drift car.
Got the DS engine bay/bump stop repairs done today. Aftermarket patch panels are always fun to fit and even something as simple as this takes a bit of trimming and beating. Some etch primer, some seam sealer and a bit of paint to keep the rust at bay should see this good for another 50 years or so.

On to the PS. Bit more work since stuff had to come off the engine bay side panel. Thankfully none of the fasteners put up much of a fight. The wiper motor is on the edge of being a PITA since the mounting surface is part of the repair zone

And I thought the DS had a lot of dirt inside the bump stop support. This was packed solid.

This pile of dirt? I did not dig this out; it is the result of the work done on the DS. Every hammer blow on this car results in a yard of Western Canada's finest topsoil landing in my shop!

Try to get the PS bumpstop/engine bay done tomorrow and move on to the DS sill.
NOHOME
MegaDork
9/21/21 8:03 p.m.
Well did not get the OS finished but got the bulk of the heavy lifting done. The old bumpstop is off and the engine bay rust is cut out with a patch formed to fit in the hole.

That wiper motor bracket needs to bolt to the new tin so holes will need to be located to match the captive nuts somehow. accurately even.

Bit if extra flavour on the flange. It would appear that this is the fist time the fender has ever been removed on this side. There was a gasket like roofing paper on the flanges where the fender bolted on to the chassis. Have to find a reasonable facsimile for reassembly time.
I think the plan is to scour the flange and surrounding area with a wire wheel and POR the area.

One of the reasons I might not have finished the bumpstop area is that I kept pondering about what was next. The DS sill is the most visible and largest area needing repair, but this little corner right behind the front tire and at the front of the sill might be the most complicated repair. Lucky for me it is solid on the DS

I think I will do the DS sill first.
NOHOME said:
MadScientistMatt said:
Is that rear wheel drive, or based on Mini running gear?
RWD for the win. Give it about 300 hp and it would be an awesome family drift car.
Any plans for that? Would a boosted Honda K series fit? 
NOHOME
MegaDork
9/22/21 8:21 a.m.
In reply to MadScientistMatt :
Nope!
This project is about preserving an original car for another 50 years or so. Other than the soft bits I am addressing, the rest of the car is incredibly solid. Paint is original for the most part except for the front DS wing and door that had to be replaced.
It might get an MGB engine at some point.

02Pilot
UltraDork
9/22/21 10:16 a.m.
So no plans for this then?

The title lured me in, but I stayed for the Riley.
NOHOME
MegaDork
9/22/21 8:26 p.m.
Finished the DS bumpstop. While the seam sealer did not lay down as smooth as I would want, I am pretty happy with how it came out.
Have to say that I am a bit surprised how little travel there is before you get into the bumpstop.

Opened up the DS sill. There is work ahead of me.


What amounts to the main frame C channel is toast from the A pillar to the B pillar.
NOHOME
MegaDork
9/23/21 6:03 p.m.
OK, I think I am settled into the traces now. Dear old Dad used to tell me that the more difficult of two choices would seldom be the wrong one, and I think he is again correct. Going to do a full sill and membrane replacement.
The original plan was to do a repair to the sill. Once I got into it, that started to look unlikely. So the entire sill and middle membrane is getting replaced with localized repairs to the side member that closes off the sill structure.
The a-post damage on the PS that sent me to this side first is also present on this side. Going to take a bit of picking but I think I have that sorta figured also.
Got stuck in and drilled out the front half of the sill. No drama, just work.
Best news is that when it comes to doing the PS there wont be any hesitation about how to go about it, just rinse and repeat.
By the way, I am wishing an extra warm corner of hell for the smartass who designed the door hinges on this car. You will not that the hing is still on the A-post. That is because, despite three bolts holding the hinge to the A-post, like a normal car would have....the hinge is also spotwelded to the side of the A-post. There is zero adjustment to the door fitment.


NOHOME
MegaDork
9/24/21 6:03 p.m.
More disassembly this morning. Got all of the old tin out of the way in the sill department to the point where I could start to put in new sill parts.

The reality is that the front half of the main chassis rail needs some repair. This car is built with a side chassis member that runs from the front firewall all the way to the back bumper. wrapping around the rear wheel tub.
The section marked out with tape needs to be cut out and replaced with new tin. The fun news is that it is not a simple structure with straight lines.


This should be fun.
NOHOME
MegaDork
9/24/21 6:39 p.m.
Forgot to add: The final piece of the puzzle is that the lower 7 inches of the a-post have to come of.f This is necessary to access the inner frame section and also because the a-post section is rotten. Bit tricky to cut out, but fabricating a new piece should not be too hard.

NOHOME
MegaDork
9/24/21 8:02 p.m.
In reply to oppositelocksmith :
Thanks. I always hope that someone gets something out of these post. Also a good way to show and motivate progress.
NOHOME
MegaDork
9/26/21 4:31 p.m.
Moving right along. Fabricated a repair section for the inner sill chassis member. The fun bit was the recess for the floorpan to fit into. Managed with the bead roller.
POR painted the chassis section that is staying. Also POR coated the PS inner wing since it was getting a bit brown. While the tin was open, went ahead and painted the inside of the new sills.


NOHOME said:
In reply to MadScientistMatt :
Nope!
This project is about preserving an original car for another 50 years or so. Other than the soft bits I am addressing, the rest of the car is incredibly solid. Paint is original for the most part except for the front DS wing and door that had to be replaced.
It might get an MGB engine at some point.
I'm not disappointed by going the preservation route - defeating a tinworm that's gone that far on a car with so few replacement options for sheet metal is in some ways more impressive than a wild engine swap.
NOHOME
MegaDork
9/27/21 5:15 p.m.
Bit more time on this today. The swage/rebate/bead-roll line was not deep enough to accommodate the floor panel that slots into the space. and allow the inner plane to align with the remains of the inner sill. So had to make a jig out of some scrap steel and beat the bejabers out of the tin in order to tease another 1/8" of depth. You can see where the swage is better defined than what I could do with just the bead roller as shown in the previous post.
Then I had to get the lower flange bent 90 degrees at the right spot to line up with the original panel.
Came out ok in the end. The floor spotwelds to the holes in the rebate. The rebate plane had to align with the floor panel flange and the insde of the panel had to align with the original inner sill plane. I will never again curse the task of fixing MGB sills.

The front bit is interesting. Going to sneak up on this one since it involves 3 separate panels. I have a plan...

Cool car, neat work! Thanks for taking us along for the ride!
NOHOME
MegaDork
9/28/21 5:22 p.m.
Turned the corner and stuff is starting to go together for good.
The bulk of the work was getting the front part of the inner sill fabricated and installed. I could have made the whole inner sill repair panel as one piece ( since they got welded into one piece eventually) but it is a busy part of the car and getting it wrong would have entailed redoing the larger repair panel. Might do the other side as one since I have it figured out.

The new inner sill repair panel is in to stay

After a bit of POR to protect it, it gets the middle membrane spotwelded on to close the structural box

Tomorrows job is to get the lower part of the A-pillar reconstructed and maybe installed.. It is kinda rough looking at the moment.


