


In reply to tuna55 :
Newer Jeep Wrangler.

In reply to tuna55 :
Newer Jeep Wrangler.

SkinnyG (Forum Supporter) said:An advance kit is like $10 from any auto parts store near you. Comes with a wack of springs and a couple weights to set the timing you want. Just use the springs, not the weights.
I added a weight limiter so mechanical advance actually "stops" where I want it, and I tailor the weights to set how quickly it comes in.
General rule of thumb for a SBC is to be around 36° all in by 2500.
Assuming I'm reading correctly what it is you are doing.
It has a weight kit in it from over a decade ago. I have zero memories other than I used light springs and didn't even own a timing light.
I have a kit here. Based on only getting ten degrees of mechanical advance with the current set, I'll replace them and try again.

I've had the weights catch on the underside of the rotor and mess up their advance, especially as the pins wear. Though I think the rotor itself also doubles to keep the weights in place. Perhaps your rotor needs even more clearancing love?
My dizzy gives me about 20° mechanical advance, and I think I'm running a light and a medium spring. I have had to re-weld the pins, and the top of the advance shaft, both of which had come off. Somebody's "blueprinted" HEI distributor, NOT a factory one.
I also have a limiter on the vacuum advance to restrict it to only 10° or 12° (Can't remember what I have in there now). I have 10.9:1 compression, so I'm a little wary of too much advance.
SkinnyG (Forum Supporter) said:I've had the weights catch on the underside of the rotor and mess up their advance, especially as the pins wear. Though I think the rotor itself also doubles to keep the weights in place. Perhaps your rotor needs even more clearancing love?
My dizzy gives me about 20° mechanical advance, and I think I'm running a light and a medium spring. I have had to re-weld the pins, and the top of the advance shaft, both of which had come off. Somebody's "blueprinted" HEI distributor, NOT a factory one.
I also have a limiter on the vacuum advance to restrict it to only 10° or 12° (Can't remember what I have in there now). I have 10.9:1 compression, so I'm a little wary of too much advance.
I have a lot of unknowns. Aftermarket distributor, aftermarket rotor, old weight kit. I checked briefly before life started today and found that the center plate looks strange. I'll start with the entire Jegs kit and see what it does with both light springs. This thing is a turd, so it needs all the help it can get.
The jegs weights and springs seem to work, but of course I broke / lost some of the e clips. They were not in the new kit, what size are they?
I have the new stuff on there with no clips and it seems okay. Honestly it's not wonderful, I think the spacers are a bit hokey, but it has good action it works well.
I found one that didn't quite reach escape velocity so I'll just measure
New weights from jegs and new springs are on, timings all in by about 2,400, and it adds about 20°. That's about what I'd like. I forgot how hard it is to work on the distributor cap in this thing, my knees hurt.
This clip worked by the way in case anybody needs the part number
https://www.mcmaster.com/97431A260/
Smoke Show!
Smoke Show!

I don't take enough pictures. I had to install the wiring for the bed from the firewall back. I bought premade, because it was easiest and not expensive. Tunakid 3 wanted to hang out.
He started being legitimately helpful. He was able to fish the cable up from the ground into my hand in the engine compartment. Then he was able to fish the passenger side cable up into the socket hole from the bottom. He was faster than I was on the driver's side.
Not huge progress, but a great day for him and I. I love those moments.
The pictures are terrible, Tunawife was experimenting with a new DSLR and she doesn't know how to use it yet.
I pulled the truck into the driveway to get pictures because I want to get the thing insured to take a test drive. That's not the exciting part. The exciting part is that, because backing up is hard with zero mirrors, I had my daughter help. She was in the truck when we pulled it out, and then she took the wheel while I pushed it back in.
For all of those saying power steering is a must, well, my eight year old handled it just fine.


I am seriously considering cutting the hood and adding a 2" section, maybe along with decreasing the angle of the bend, to get rid of this trim and make the front end look more like the 67.

Completely unrelated, I want a tunnel ram under the stock uncut hood when I am done.

In reply to tuna55 :
We all know how I feel about scope creep!
Scope Creep is my second most favourite kind of creep.

Couldn't you just use the hood off the earlier truck to get the look you're looking for?
NOHOME said:In reply to tuna55 :
We all know how I feel about scope creep!
Don't worry, not until it's on the road!
Dusterbd13-michael said:Couldn't you just use the hood off the earlier truck to get the look you're looking for?
Sort of. I don't like the early hood look either. I just want that existing hood to go to the grill.
Good news and bad news, the good news is that I got her running much better. I was setting the timing wrong, now it idles well and has reasonably snappy throttle response. It makes it far easier to drive around the yard. The bad news is that my all in timing seems low, I'm going to have to look at those weights again.
I took some pictures. They're not great. But they're taken in an interesting place I parked the truck next to a tree so I could straighten out one of the bed sides. Long long ago in the before time I was working on that fuel filler, and unbeknownst to me at the time I warped the bedside when I welded the filler in. Today I was able to drive the truck into the yard and run a ratchet strap around my maple tree. It worked splendidly along with a hammer and dolly, and now the bedside is straight. This is a big deal!
I'm going to have to figure out the pictures later, the forum is telling me it's an invalid file type.
 seat belts!!
This is AWESOME
The belts were from juliano's hot rod parts, and they are really great. Check out the backing plate vs GM (which I knocked off)

It came with hardware, GM buckles, even a retractor.
I had some issues getting room for the plates, and did have to remove some nuts intended for the gas tank.

Like that one. But I also had reasonable success.

The above is the outboard plate from under the truck. The plate is too large to fit where the old hole was. Since the new hardware came with a strong 90 degree bracket, I can handle that small amount of misalignment with rotation.

The above shows the belt in the center, looks nice.

And there is the outboard side.
Next time I'll spot weld those on, but it's nearly ready to drive.
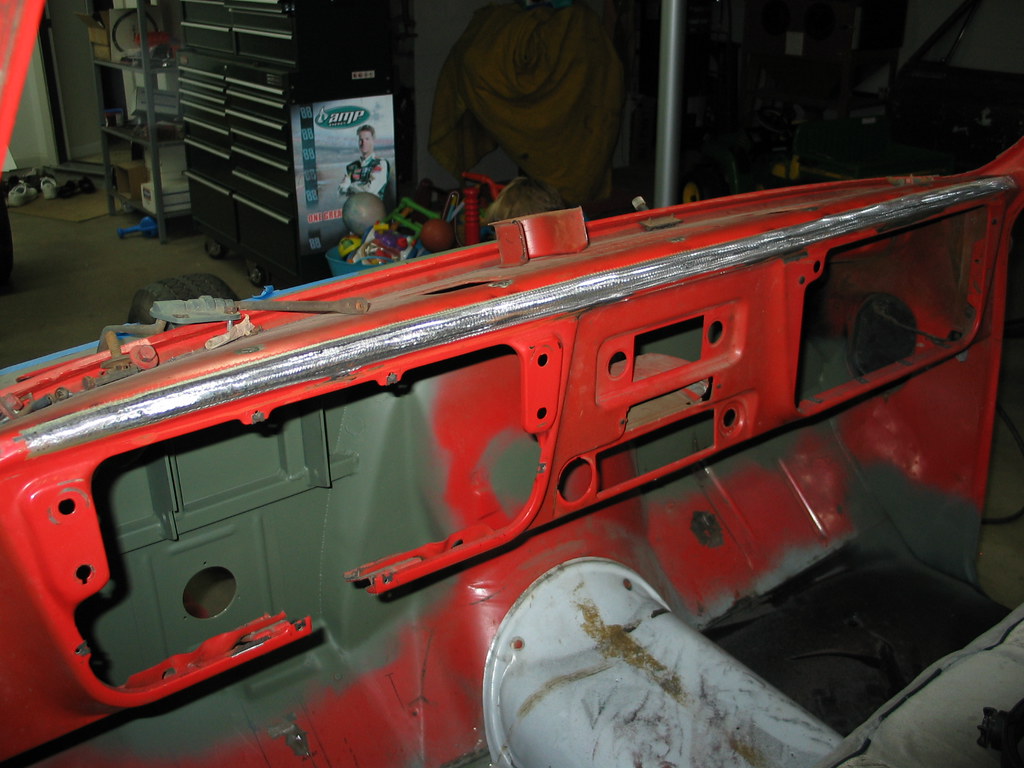
So I have a few things to button up before primer. Here is one, the dash board and pad. Right now the dashboard looks like this (not mine) with these slots:

Ugly.
GM covers that up with a vinyl covered pad like this

Which to me, also looks ugly.
The reason that I want to look at this before primer is because one option is to fill the holes, like this:
And that looks better, but also not perfect, and not a small amount of work, especially to get that curved panel looking straight with paint.
I am considering rolling a sheet metal panel on top, maybe an anodized aluminum or something in satin black. I can imagine a panel looking good here, but I don't have the artistic skill or the fab skill to make it.
Any thoughts?
You'll need to log in to post.


