1 2 3 4 5
Carl Heideman
Carl Heideman
2/2/20 8:04 p.m.

Here's a montage of making up the wiring harness.  I usually find it's less expensive to buy a kit than to buy everything individually.  I've liked the kits that Sacramento Vintage Ford puts together with period-correct terminals and lacquer insulation--about $500.   I took a lot of detailed pictures planning to write a story for a hot rod/street rod magazine, but Sacramento Vintage Ford stopped advertising and those magazines wouldn't feature products from non-advertisers (GRM isn't that way and is still in business--I think a lot of you know the fate of the other magazines).  So you guys get the pictures.

Each bag is a sub-section of the harness.  They've got wiring diagrams according to Ford standards and colors.  Very easy.

The kit also came with very nice uninsulated terminals and shrink wrap to insulate them.

I always rough out a wiring harness first:

Then I start tidying it up with zip ties:

As much as I like lacing, there are areas where I do like to use cable sheathing like the underbody.  I use shrink wrap on the unions.  The kit came with the all of that, plus period-correct clips to hold things in place.

So that's how far I got six years ago--all done except for the final lacing.  It'll take about two hours to get it done.  Stay tuned.


Carl Heideman
Carl Heideman
2/3/20 6:40 p.m.

My aging body has reminded me why I haven't replaced the zip ties with proper lacing for the past six years.  It's not that hard or time consuming to do the lacing, but it sure hurts to make the under dash contortions as I pull and tie the string.  I spent about 30 minutes and got about 1/3 of the under dash work done.  I'm sore now and think I'll rub some Jack Daniels on my neck, from the inside.   I'll keep picking away at the rest over a couple of nights.


AngryCorvair
AngryCorvair MegaDork
2/3/20 7:55 p.m.

In reply to Carl Heideman :

... from the inside...

Carl Heideman
Carl Heideman
1/19/21 9:17 p.m.

Well...this is embarrassing.  It's been nearly a year.  I have a rule:  I don't take cars that run and turn them into cars that don't run unless I'm sure I have time to make them run again.  I thought I had time to get this project finished last winter, but I didn't plan on working 12 hour days through most of March-August due to the pandemic.  Several other projects distracted me, plus this project kept having complications, so I've been procrastinating.

But I always get a nice break over the holidays, and my son Chris had an extra long break from college, so he helped me play catch up.  

And we started catching up by distracting ourselves with even more projects from the fleet, including two clutches (engine out, nothing is easy these days), several brake jobs, various minor repairs, and finally, two big wiring jobs.  Before COVID, we had planned to re-wire my 1938 Ford so that Chris could drive it to his last few months of high school.  We were going to start that job right after we got this one done.  So it didn't happen.  Plus it didn't matter much since he went online for his last few months of high school.  

Then, one wiring job turned into two because I bought a 1940 Ford this summer and it too was on its original harness.    Looking at the calendar and applying my rule, we felt we could take these two running but sketchy cars and turn them into two reliably running cars before his break ended.  

We parked them side by side and wired them side by side in the same style the 1932 is wired.

We also got seat belts in the cars, fixed some holes in the floors on the 1940, did some brake work on the 1940, and put Bigs and Littles on both of them for a rubber rake.

We also kept going back to the home shop to work on the 1932 for a few minutes from time to time, only to deal with hard problems that kept us procrastinating.

TL;DR  Thanks for reading my confession and excuses.

Carl Heideman
Carl Heideman
1/19/21 9:44 p.m.

Back to the pickup, the engine work has been frustrating.  We had four stripped head studs to get out of the block and didn't want to break them and have to drill.  We let them soak with penetrating oil for a few weeks and then worked on them carefully with heat.  It took about 15 minutes per stud in actual work time, but adding in the procrastination time, it took about two months.

I ordered Edelbrock aluminum heads and a two-carb Offy manifold (I'll post pictures in the next few days).  When I test fitted the heads, I discovered the bottom row of head studs weren't long enough.  That meant 16 more studs to replace and a lot more procrastination time.

Then, Chris adjusted all the valves and the #8 intake valve still didn't seat even though it had enough clearance at the cam.  Upon further inspection, we saw a lot of rust under the valve.  It must be that when the engine sat before we got it, that rust built up and created a ridge on the valve stem that kept it from closing all the way.  We realized that we'd have to pull the valve, clean everything up, and then lap it in.  In theory.

Google "flathead valve removal" and you'll see a lot of results that say how hard it is.  The internet is right.  In theory, flathead valves pull out of the block by removing a clip in the intake valley and then pulling the valve, guide, and spring assembly out as shown in the picture below.

80 years of rust and sludge make the job pretty hard.  The one saving grace is that you can either push the guide and assembly up and out through the valve seat or down into the intake valley.  If you go down, you're not fighting the rust built up above the valve guide, just the sludge below it.  And if you go down, you can use a big hammer.  So we sacrificed the valve and cut the top off so we could hammer the guide out.  Another 15 minute job with weeks of procrastination to figure out the best way to do it.

Here it is all laid out--not a great picture from my phone, but hopefully you get the idea.

And here's a comparison of the rusted valve guide to a good one--a lot of material is missing up at the top (sorry for another bad pic).

I've got a valve and a guide ordered and this project is back on the front burner.  I think I'm past all the hard parts, but I've been wrong before.

Carl Heideman
Carl Heideman
1/19/21 10:12 p.m.

By the way, I don't think I told the story of the free engine.  I'll risk boring you again since it's a meaningful story for me.  As you saw at the beginning of this thread, I built this truck with my son Jack who was 15 at the time.  When we realized the engine in it was cracked badly, a friend of mine (Bill) gave us a 1940 Ford flathead that had been given to him by a local-to-us hot rodding legend (Del Huyser) that had built a lot of famous hot rods.  He had pulled this engine out of a 1940 convertible that he put a small block in.  Just after we finished the truck, we heard that Del was really sick with cancer.  Every September, Bill has an exclusive party at his machine shop that brings out all the cool kids and their cars.  We knew Del was going to be there, so we took the truck and showed him how his engine was inspiring a 15-year-old kid.  He talked with Jack for about 45 minutes and was just glowing.  Del loved that Jack had done so much work on the truck, and with his engine.  Jack was so pleased to have an adult not talk down to him.  It was just great.  He invited us to his shop to see his last project and his photo albums and we went within a few days for another great two hours of conversation and inspiration.  He died about two weeks later.  I'm really glad we didn't procrastinate with Del.  

Jerry From LA
Jerry From LA SuperDork
1/19/21 11:50 p.m.

Improving the valve sealing and raising compression with the new heads will hasten the demise of the remaining bad cylinder.  If you're worried about sleeving the motor, perhaps Vern Tardell will let go of one of those French flathead blocks he has piled up on his property.  Modern metallurgy, ancient architecture, and a mix of first and second generation characteristics.

I love seeing flatheads brought back to life. The wiring is cool, too. Awesome stuff.

Carl Heideman
Carl Heideman
1/20/21 10:17 a.m.
Jerry From LA said:

Improving the valve sealing and raising compression with the new heads will hasten the demise of the remaining bad cylinder.  If you're worried about sleeving the motor, perhaps Vern Tardell will let go of one of those French flathead blocks he has piled up on his property.  Modern metallurgy, ancient architecture, and a mix of first and second generation characteristics.

I agree the compression etc. are going to accelerate the demise.  I wouldn't sleeve this block because it's got a lot of other issues.  We can see cracks in several places, but luckily none are into water jackets or other important areas.  I hate to admit it, but I've also sort of changed from a guy with too many cars to a collector and this truck will only see a few hundred miles per year, so that demise may take a long time.  The heads and dual carbs are more about being a poseur than really looking for performance.  To me, hot rods like this one are kinetic sculpture more than anything else.

As my confessions above indicate, this has been more frustrating than I expected.  But I've learned a lot more about flatheads than I expected, and that's been a lot of fun.  So many people in the hot rod community just throw money at their cars (I'm guilty myself sometimes) so it's fun to do this more grassroots and learn along the way.  I'll learn how long this engine lasts and when it dies, I'll likely just get another used engine and swap the speed parts over. 

Carl Heideman
Carl Heideman
1/21/21 11:58 a.m.

I put 6.00-16s on the front and 7.50-16s on the rear of each car, same sizes that are on the pickup.  This is the pretty common formula for rubber rake on traditional cars.   

I'm happy with the look, but both cars need to go down a few inches in the front and rear.  I'm promising to get the pickup back on the road before I dive into those distractions.

autocomman
autocomman New Reader
1/21/21 6:32 p.m.

It looks awesome dude.  Glad to see the young one into it.  The way of the traditional hotrod is defiantly being lost a bit.  And as far as that sick v8 lump goes, id run it just as your doing.  Make sure all the valves are adjusted and let it ride.  Only other thing you could do is lap the valves in to be sure they are sealing as well as you can without a valve job, but we all know what a mess it might be to get em all out after fighting that one.  It will probably run pretty damn well even with one at half compression.  And it may be one of those the more it runs the happier it is too.


Mark

jfryjfry (FS)
jfryjfry (FS) Dork
1/21/21 8:00 p.m.

What a great and touching story about Del and the flathead. (Sounds like a punk rock band). The laced wiring does indeed look fantastic

759NRNG (Forum Partidario)
759NRNG (Forum Partidario) UberDork
1/21/21 8:38 p.m.

Carl , thank you so much , ever since "Rod & Custom" vanished , I've been  'jonesing' for this very type of thread...thank you and stay safe.....peace out.

frenchyd
frenchyd PowerDork
1/21/21 9:48 p.m.

In reply to Carl Heideman :

I understand dropping the front axle.  I've actually done one ( under supervision ) that came out right. King pins at the right angle  and the same 4 inch drop on both sides.  What can you do to the rear (assuming stock rear spring)? 

Carl Heideman
Carl Heideman
1/22/21 7:10 a.m.

In reply to frenchyd :

For the fat fendered cars, a dropped front axle gets the almost too low (usually 4 inches) for good street manners (but a great stance!).  I'm going to go with a reverse-eye re-arched front spring, which will drop about 2-3 inches.  For the rear, the old-school trick is longer spring shackles, which gives 1-2".  

Carl Heideman
Carl Heideman
1/22/21 8:03 a.m.

Back to the '32:

Here's a picture of the block with the valves out.  We cleaned all of the rust out of the intake pocket and forgot to take a before picture--it was about half filled with rust and crud.  When the valves and guides arrive, they drop in through the top and get clipped in place from below.

He's the bling shot with a new head and dual carb manifold set in place:

These trucks originally came with 4 bangers since they made more torque than the V8 and someone before me swapped the V8.  The front mounts are fabricated and put the block really close to the steering box and column.  That became an  issue with the Edelbrock head as it's taller than the iron head.  I had to notch the column tube and it barely fits--missing the steering shaft by about 1/2".  

I'll make it prettier at some point and probably box it in.

The intake also barely fits, which surprised me.  The fuel pump standoff is rotated from stock to make room for the carbs and it is really tight to the firewall.  I measured the clearance with a feeler gauge--.010".  

If it's an issue, I'll put a small dent in the firewall.  I hate to do that since it's a pretty cherry firewall, but it would be easily reversed.  

Even with these old cars, packaging is an issue...

Carl Heideman
Carl Heideman
1/29/21 12:10 p.m.

I've mentioned my friend, Nick, in some of my hot rod posts over the years.  He stops around the shop several times a week and does little favors for us and uses our heat and tools for some of his own projects.  Today, he was rebuilding some old chromed Strombergs for his 1934 Ford 5 Window.

Nick has some of the coolest old parts and organizes them old-school, like with buckets and jars.

And he has a lot of cool period stuff, like these home-made jet holders with huge jets from alcohol cars.

noddaz
noddaz UltraDork
1/29/21 7:49 p.m.

Question, is the engine going to rock and hit the steering shaft?

Carl Heideman
Carl Heideman
1/29/21 8:27 p.m.

In reply to noddaz :

I'm hoping the frame will flex enough to keep it from happening. 
 

Seriously, it might. The motor mounts are pretty hard, so I hope not. But if it does I'll either shim or modify the mounting pads. 

frenchyd
frenchyd UltimaDork
1/30/21 10:39 a.m.

In reply to Carl Heideman :

How will that ever not rattle?  I'd find something like a cup shaped Freeze plug and a hole saw the right size then weld it in place.   Save the cut out if you ever want to return it to original ( I agree that would be not in your lifetime. But who knows?  ) 

frenchyd
frenchyd UltimaDork
1/30/21 10:43 a.m.

In reply to Carl Heideman :

I think you have a good shot at that working. I'd put a piece of aluminum Duct tape over the hole after I greased the shaft so it won't stick to the shaft. The goal will be to keep fumes and heat out of the steering shaft column but allowing you the maximum clearance before hitting. 

frenchyd
frenchyd UltimaDork
1/30/21 10:47 a.m.

In reply to Carl Heideman :

That is sooo cool!  I just hung my jets on a piece of aluminum wire in graduated sizes. 
I wish I'd of thought of something like that!! 

Carl Heideman
Carl Heideman
2/2/21 9:16 p.m.

I ordered two valves and two guides for the offending cylinder from California and waited about a week for them to arrive, only to find out they sent the wrong valves so I waited another week for the right ones to show up.  This project continues to have delays like that, but I guess it's okay since it's the double emergency backup truck and the regular truck and the emergency backup truck are doing fine.

I'm posting a lot of detail photos because I couldn't find good photos or videos on the internet.  There are a lot of decent books for flatheads, but most are pretty old and have poor photos.  So, maybe I can help the next guy doing this as the GRM message board comes up a lot in google searches.

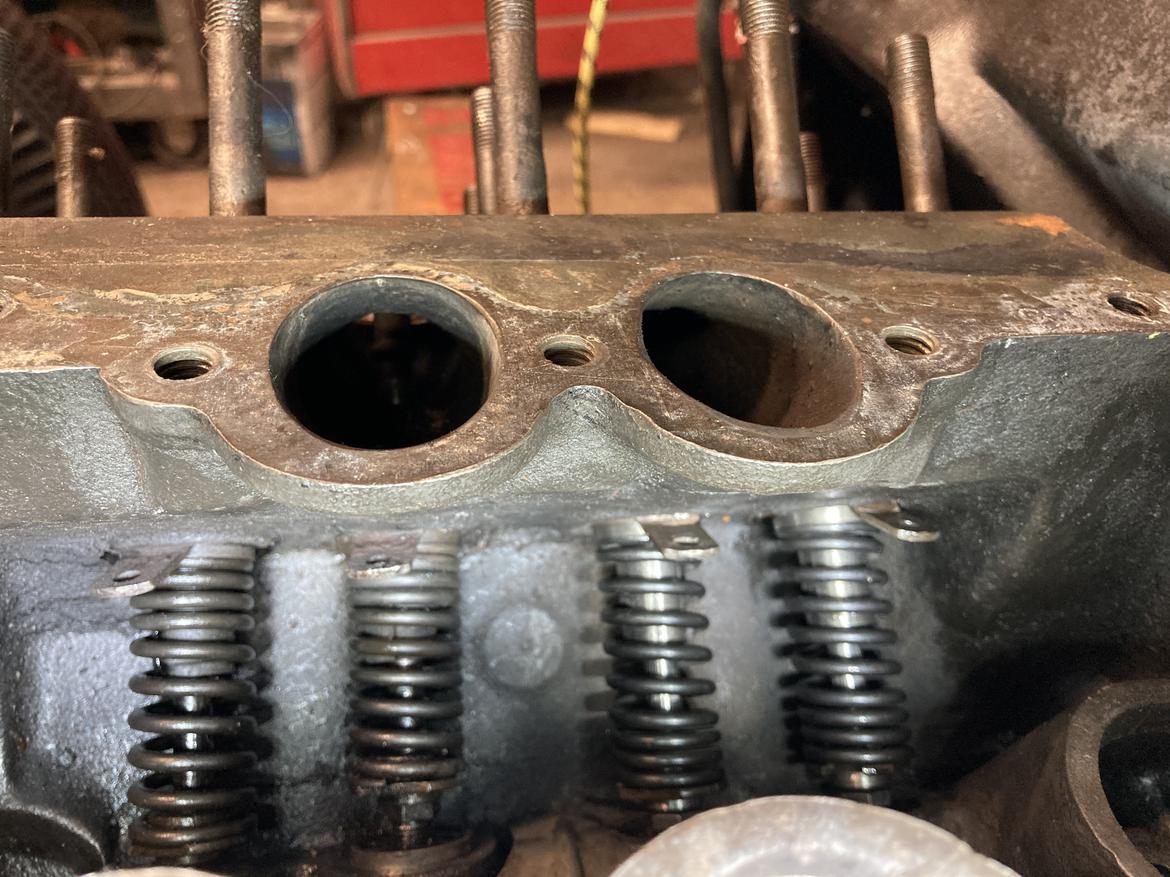
Anyway, I installed the valves and guides in the block without the springs and lapped them in using valve grinding compound and a suction cup tool.  

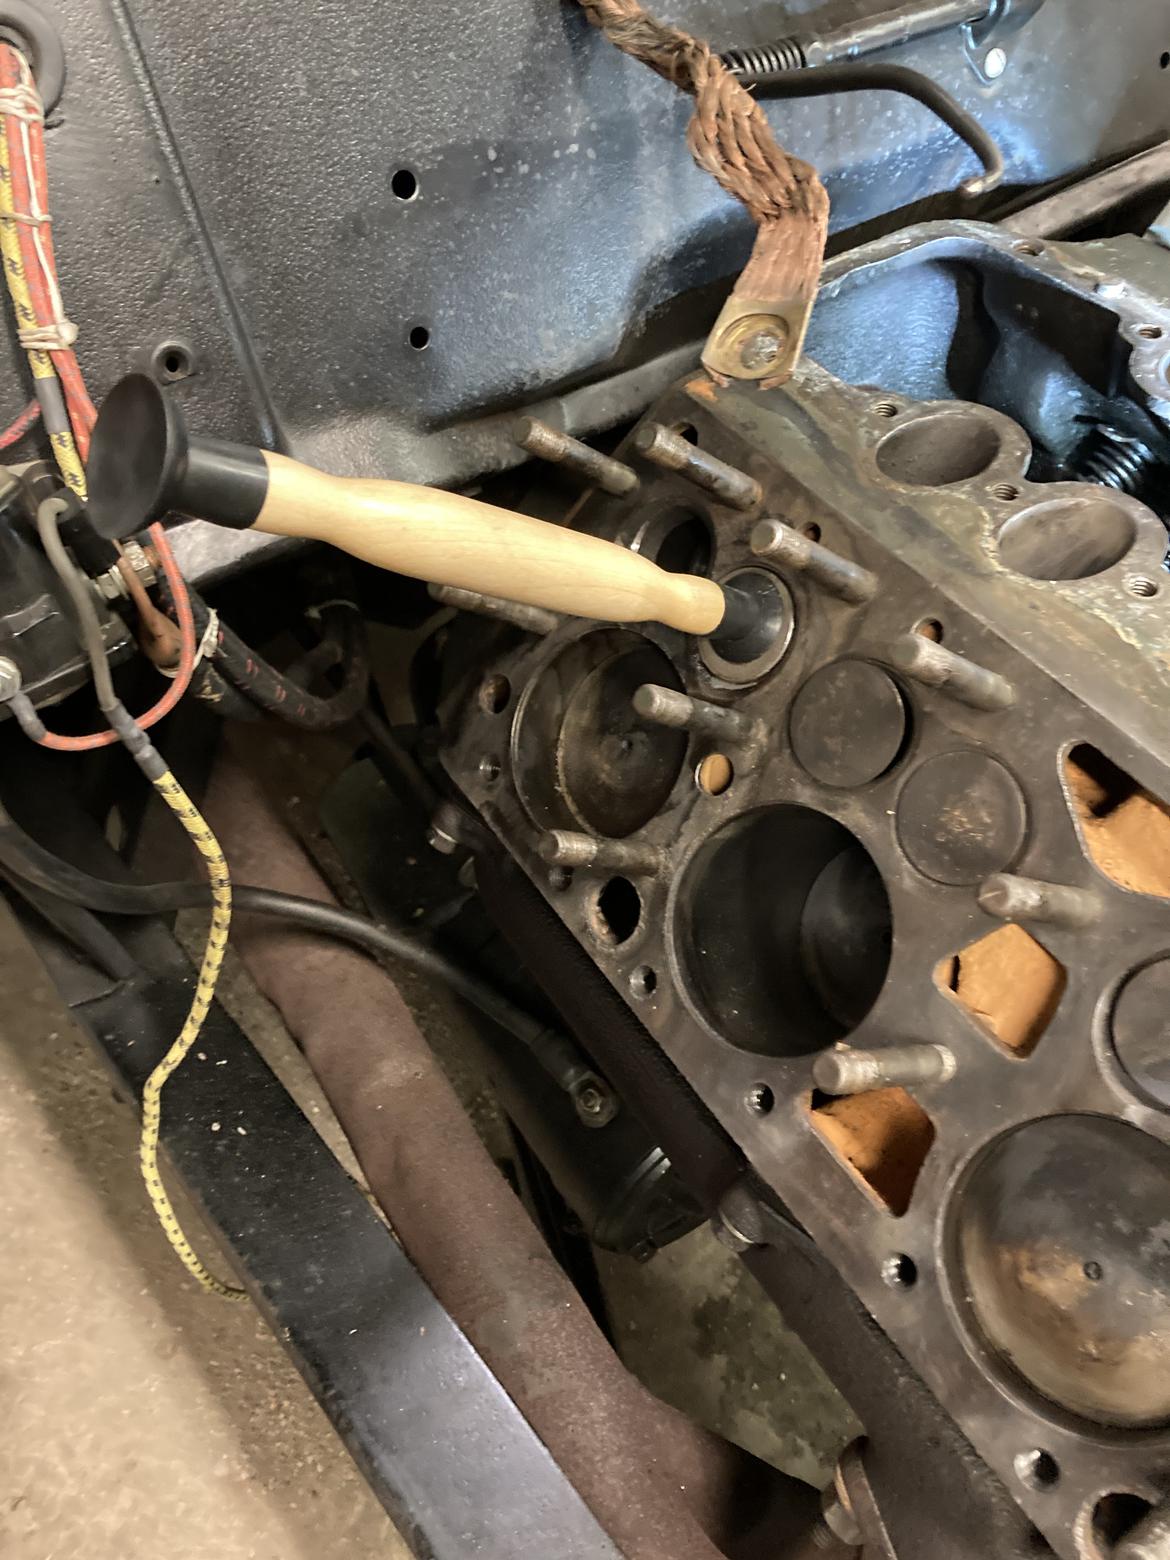
I would have liked to see a little more contact, but the seats aren't that good, so that's all I could get.  Lapped valve is on the left.  New, unlapped valve is on the right.

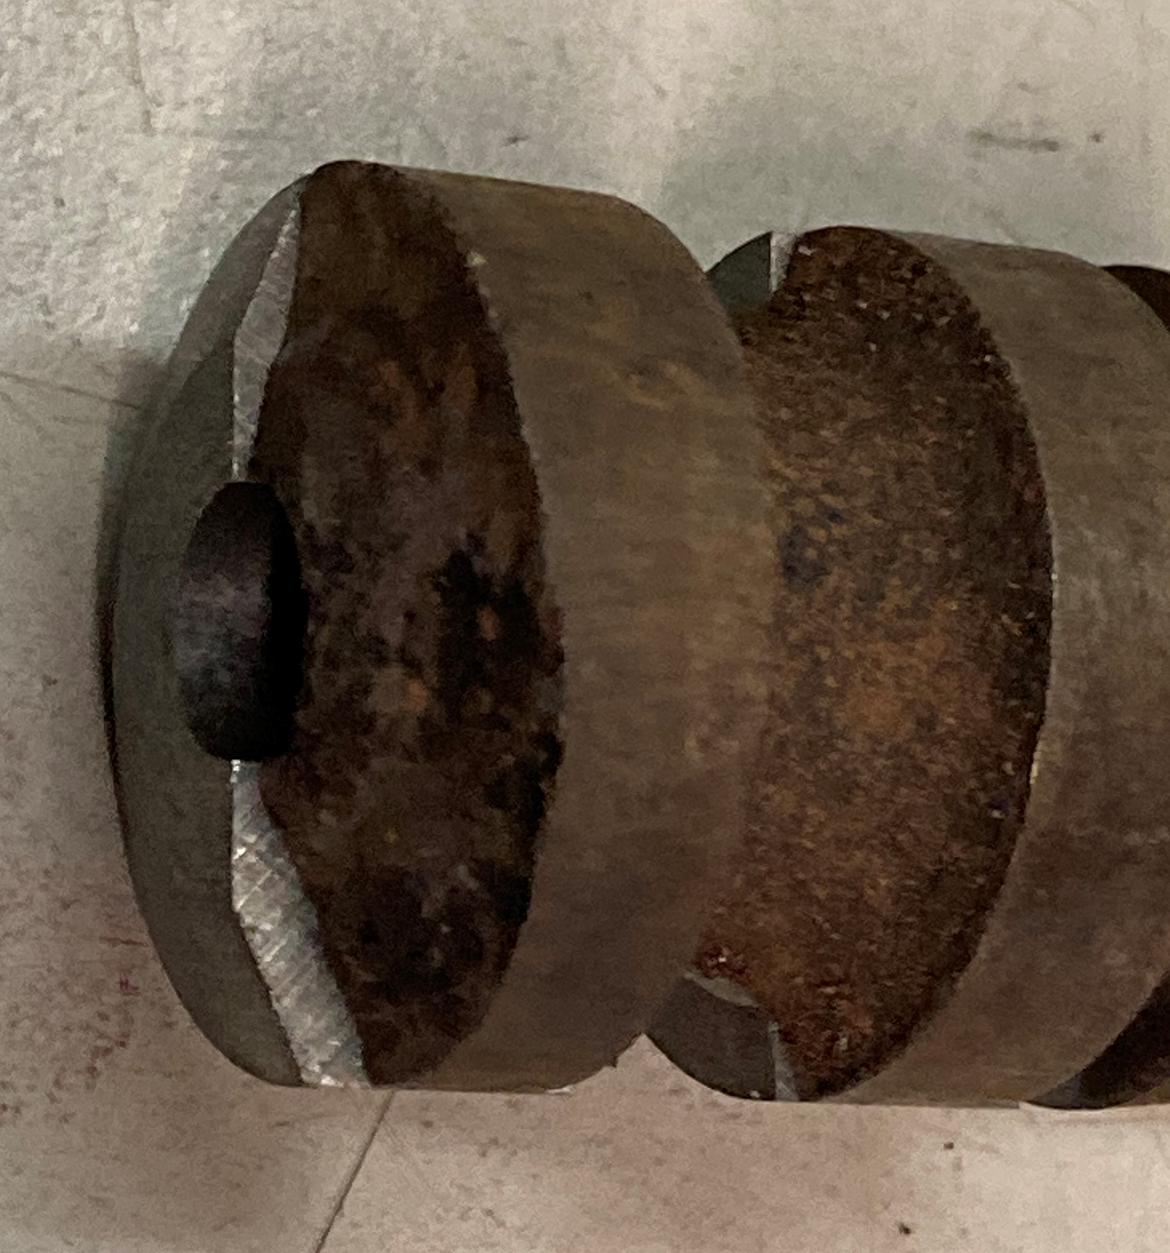
This is a pretty good comparison of the new guide half to the old one that had rusted away at the top.  Amazing.

Here are all the parts laid out.  The guides are split.  They get put together around the valve, then the spring and keeper go on.

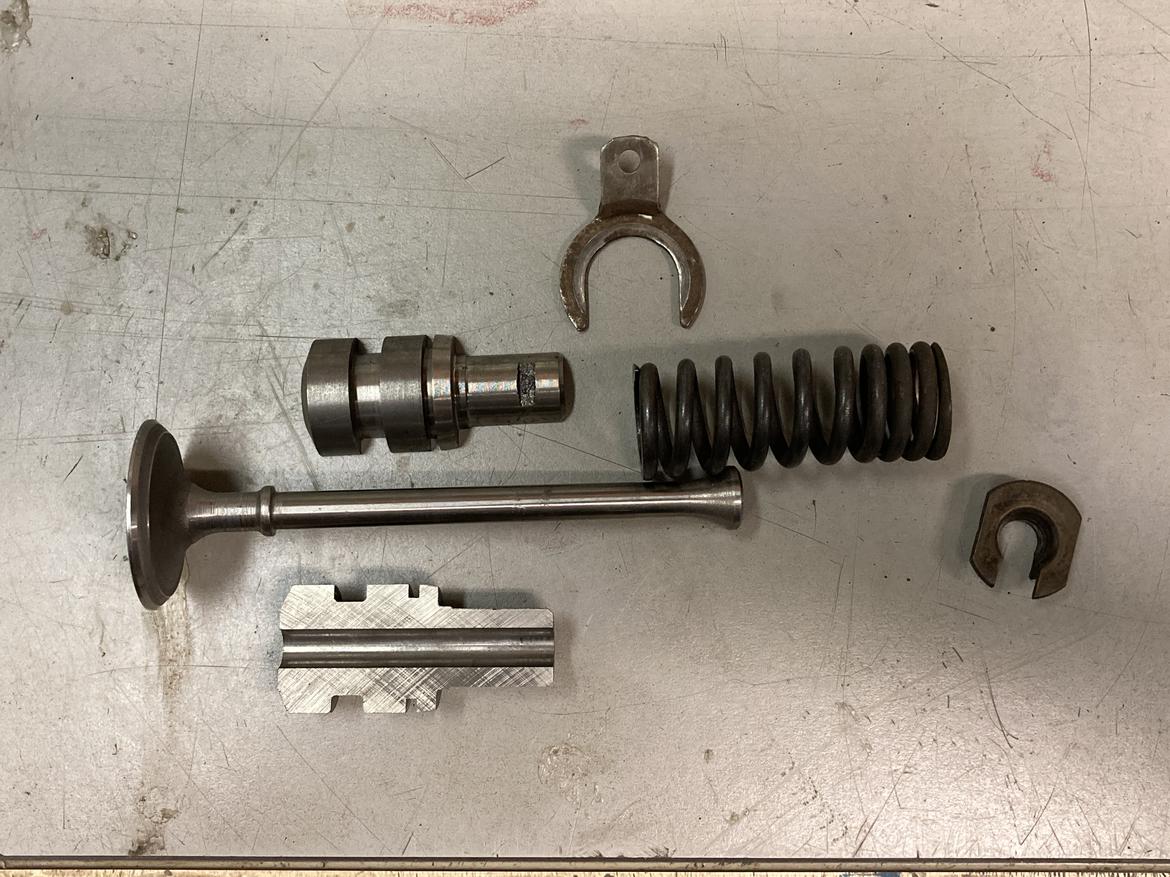
And it turns into something like a cartridge that installs from the top.  Once installed, the "C" clip with the tang on it holds everything in place.

The valve "cartridge" installs from the top of the block through the valve seats/ports.

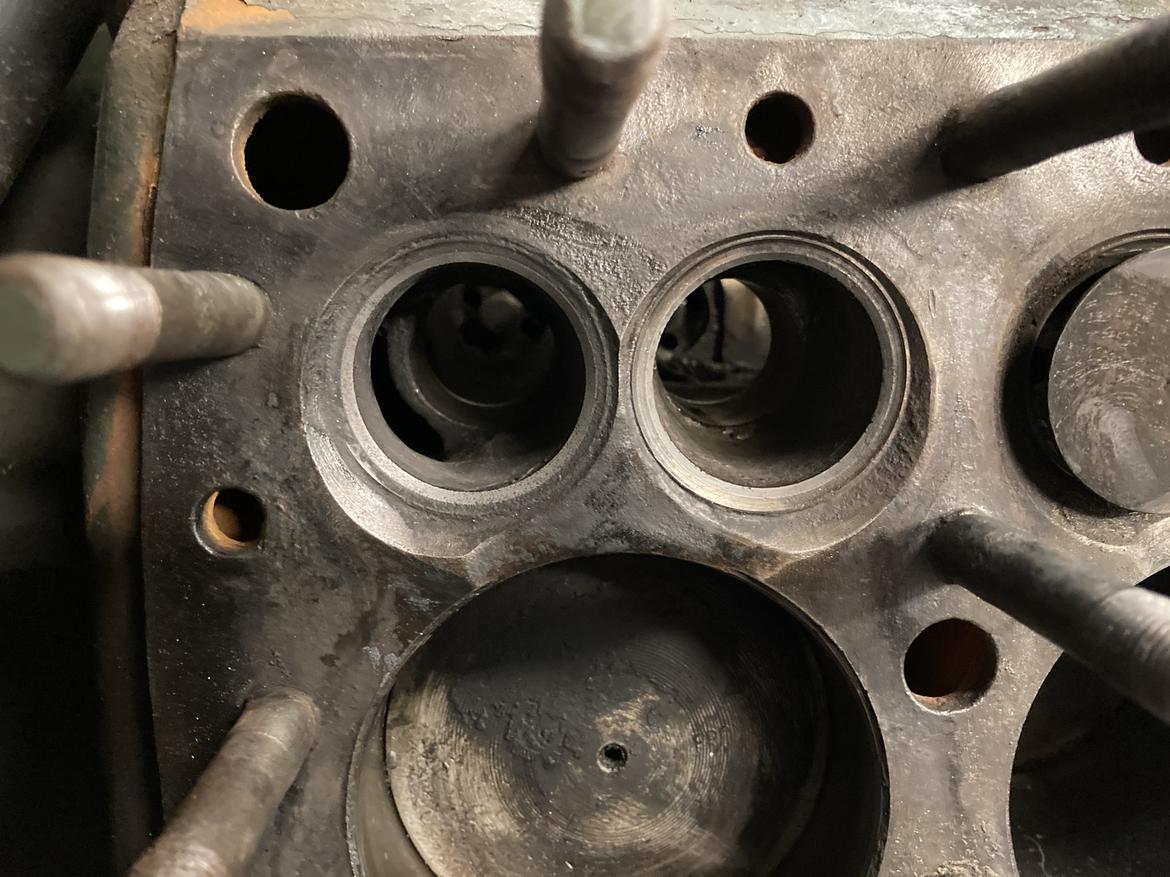
This Offenhauser tool was really helpful.   It's sort of like a pickle fork and locks into some grooves in the guides.  It's really long because it takes a lot of leverage to get the guides pried out.  It's also useful for installing the guides--pulling them down far enough to get the "C" clip installed.

Here's the business end of the tool, pulling down the valve guide to install the "C" clip.

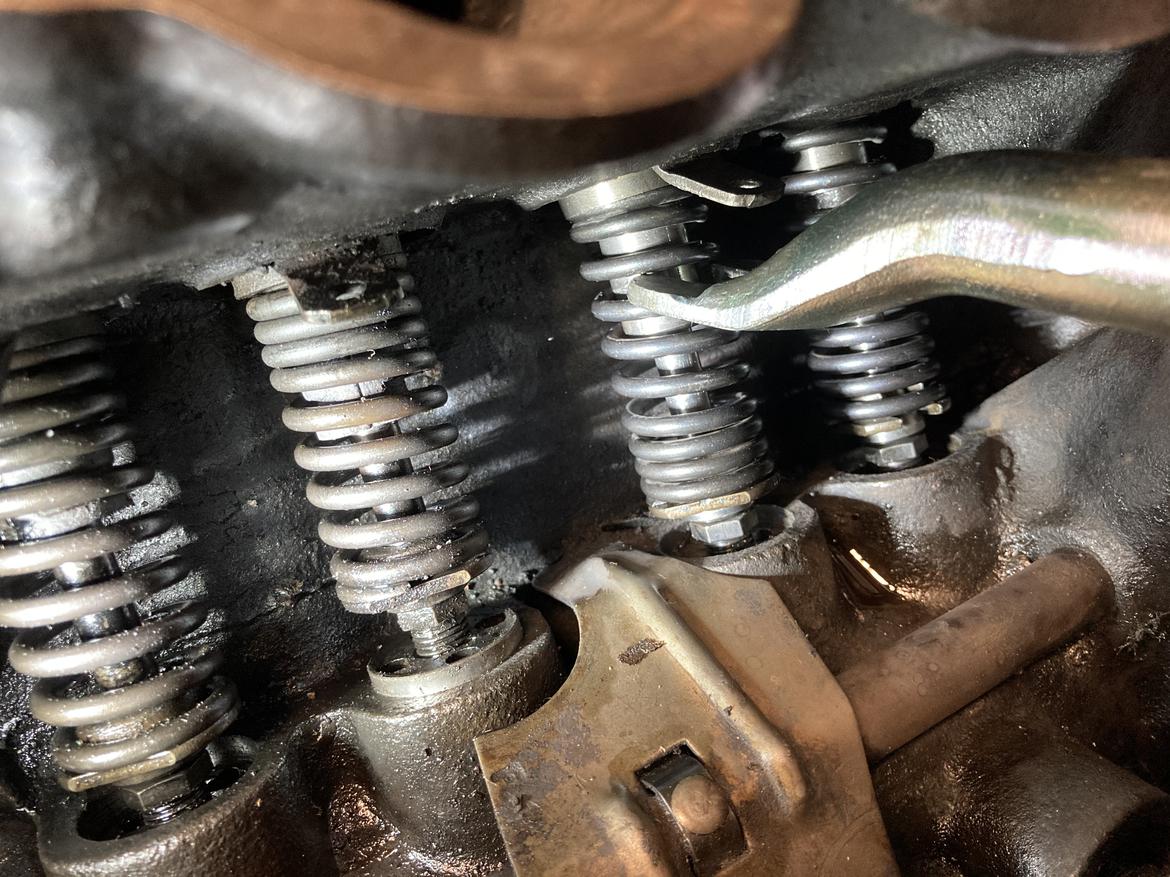
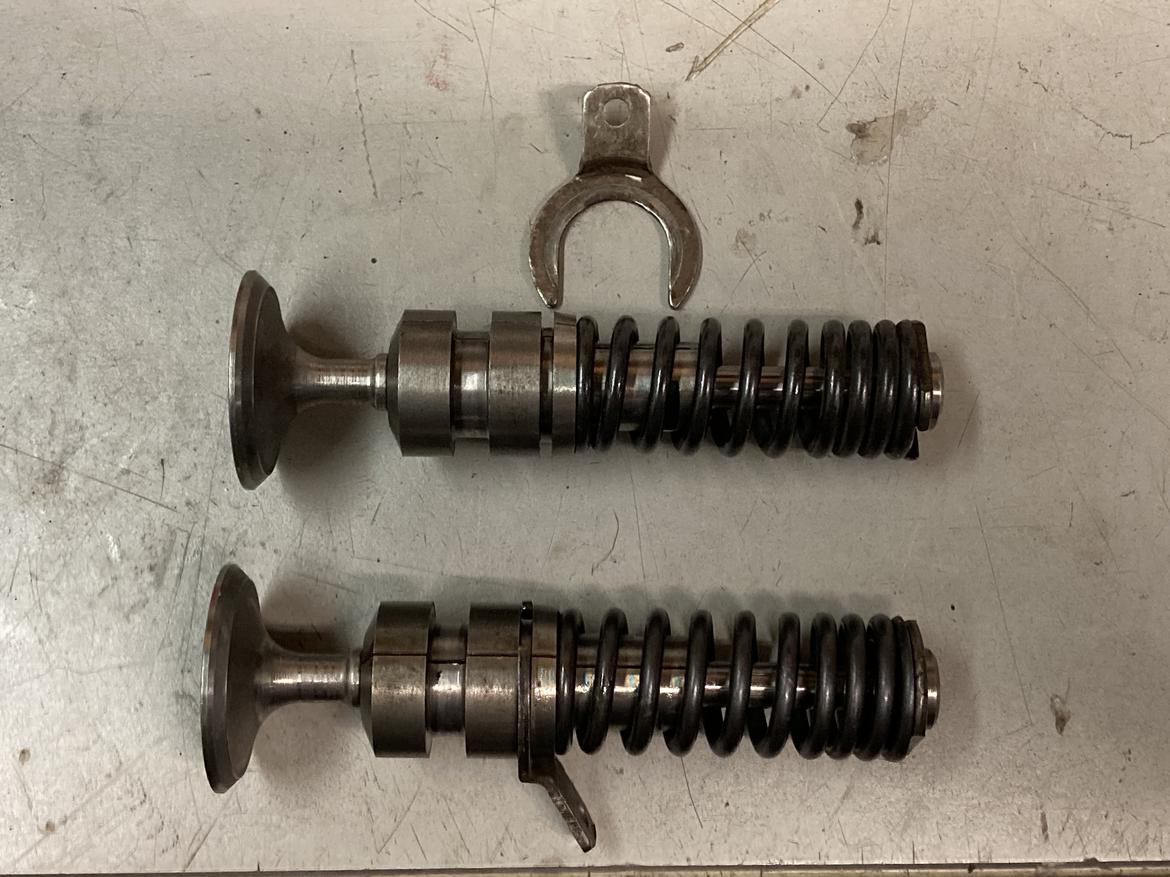
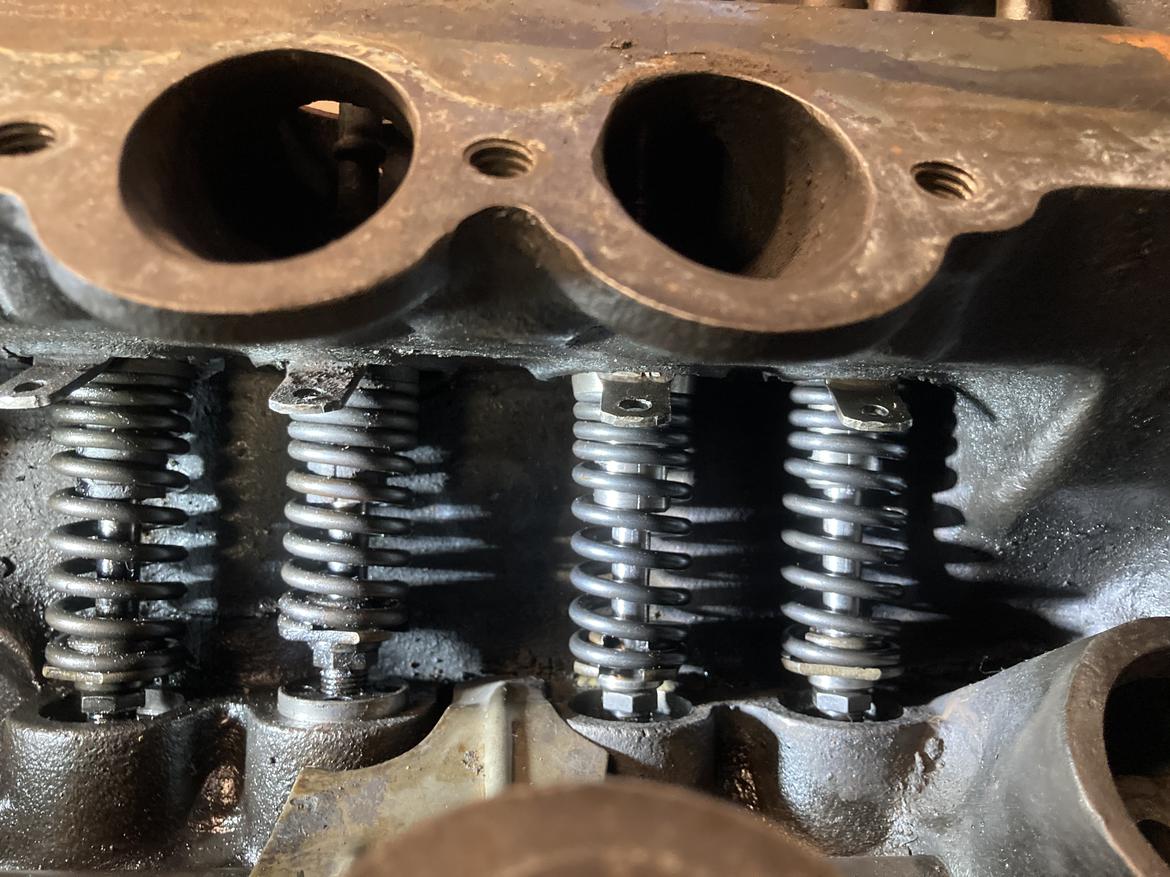
Another detail picture showing the "C" clips installed.  The valve spring pushes them up into the guide bore and keeps them from falling out.  One I installed the valves, I realized I installed the springs upside down.  I don't know if it makes a difference, but it was fast enough to take things apart and make them right.  Karma sure is funny with this project.  It went together so quickly when we built it, but it's going slowly for the maintenance.

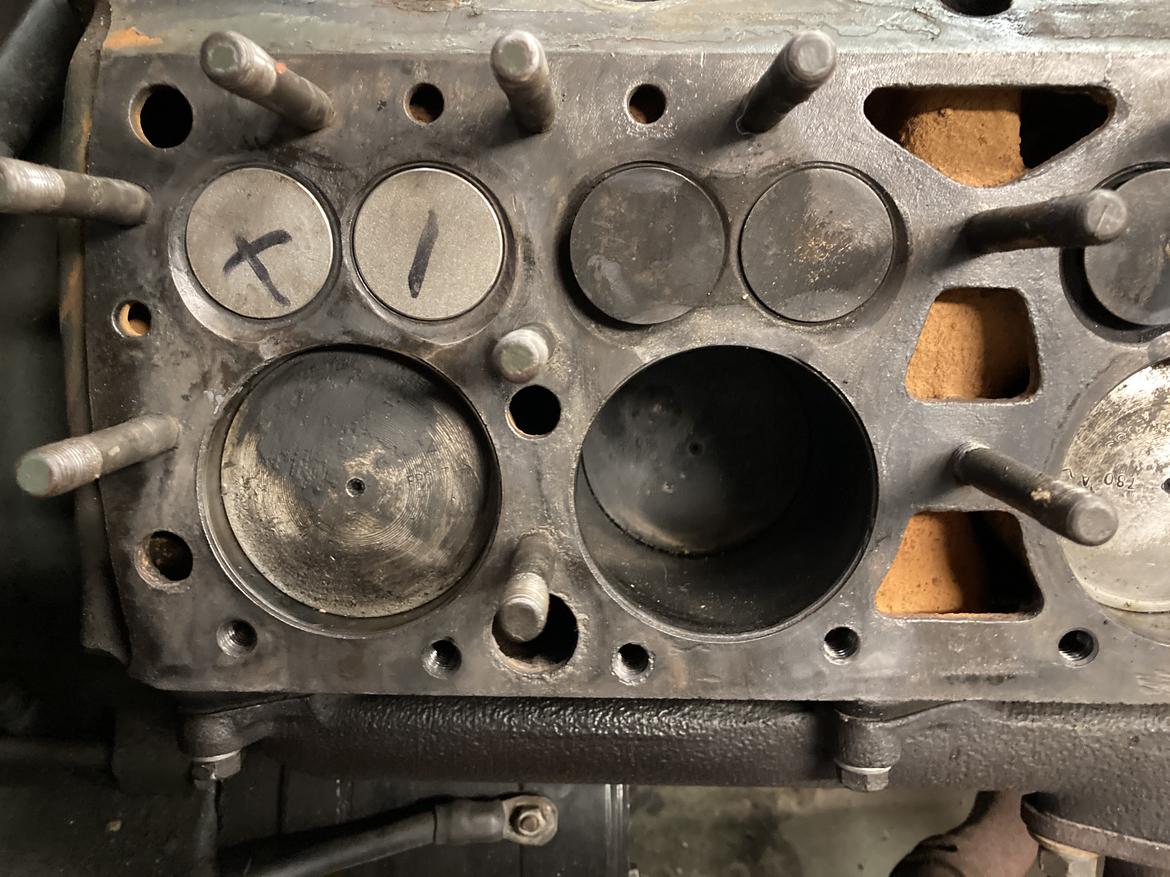
I've got it all ready for final cleanup, stud installation, and then the heads.  I'm sure that I'll have my share of leaks for the first 50 miles and 5-6 retorques, but that's hot rodding.  

frenchyd
frenchyd UltimaDork
2/4/21 9:38 a.m.

In reply to Carl Heideman :

Is it the acorn nuts that cause the problems?  Jaguars have acorn nuts and all those problems went away once I stopped using them and went to regular nuts. Yes I had previously run a tap through them. 

pres589 (djronnebaum)
pres589 (djronnebaum) PowerDork
2/4/21 9:55 a.m.

Interesting to see how they engineered these engines.  Thanks for sharing.

1 2 3 4 5

You'll need to log in to post.

Our Preferred Partners
ViXQoTMoTW4npSG7ONXOVWiqSW49OLGsve3GFhHtmtcAL9ybvmIlz9xlxM9PLZRa