


Tasty!

Tasty!

I quickly learned the anytime you cut holes in your valve cover oil baffles, there is a price to be paid. In my case it was pretty cool to be able to retain my stamped steel valve covers, but the cost for this became apparent after a few test drives, when I noticed my engine compartment was bathed in fine mist of oil. No bueno.
Aside from the mess in the engine compartment, a larger issue was the amount of oil I was getting in my intake via the PCV system, which started fouling plugs in short order. So I decided pretty quickly that I’d need to fab up a better breather system and stat! Rather than pay big bucks I grabbed a few cheap import catch cans as a starting point, thanks Amazon!

Straight out of the box these otherwise decent looking catch cans came with some chintzy 3/8” fittings. But after scoping thing out in the engine compartment I determined that I‘d need to run a few 90° elbows. I also wanted to enlarge the fresh air side to 1/2” fitting to match the fitting on the valve cover breather cap, so I broke out the NPT taps and went to town.
Turns out these catch cans were pretty meaty, so after some cursing and sweating I finally had the proper fittings in. I also added some rivet nuts to the firewall to help me mount the breathers in an empty spot behind my air cleaner.

Once I had that set I just had to work out my hose routing. I was doing my best to hide this system so it wouldn’t draw attention to itself, and the available space was a bit tight once I had the carburetor back in place, but I made it work.

Here it all buttoned up, catch cans in the upper right behind the carburetor. I also added a reproduction “oil change” breather label to help stealth thing up a bit. As with most improvements I’ve made to the wagon, I dig that the whole system is hiding in plain sight, drawing very little attention to itself. You really have to stare at it to realize it’s not factory system, again, just the way I like it.
How does it work? Thus far the new crankcase breather system has really done the trick I have to say! The engine runs happier, the engine compartment stays cleaner, and I’m less stinky after a cruise, which keeps Mrs. Sarcastic happy. A+++
Whelp, we’re at that point in the build thread where I’ve pretty much caught up to what I’m doing on the wagon in real-time. It’s humbling to have covered so many years of work on my car in such a short time, and I honestly thought I’d make it as far as page 3 before getting to this point.
Oh well! ¯\_(ツ)_/¯
Anyway, now we’re caught up I figure I have a bit of time to talk about my human flaws, which any project is gonna pull out of you. You see, I have developed something of a love/hate relationship with details when it come to my projects lately.
I used to not care about stuff like this, but now I openly admit I can sometimes spend an inordinate amount of time sweating the fasteners I plan to use, how I’m going to route wires and plumbing, making sure nothing looks out of place. Little things I doubt anyone will notice, or I outright try to make unnoticeable, which is it’s own sickness.
And for me, if there is one rabbit hole I fall deeply into when planning the details of a build, it is my recent obsession with custom spark plug wires. Which brings me to this:

This is how my engine bay looked previously and one thing that always bugged the heck out of me is how terribly the spark plug wires fit. According to the catalog description, this is a “custom wire set” designed for 1967 Ford small blocks, but in reality it’s 4 short wires of the same length, and 4 long wires of the same length. And honestly none of them were the right length as these thing often go.
So of course I wanted to make a set of custom wires some day (ignoring for a second my fear and ignorance of electricity) and while it’s taken a few iterations I think I’ve finally settled on something that works for me.

I kinda don’t like how most older v8 engines have spark plug wires laying about like spaghetti, and even most of the cool off-the-shelf wire separators seem a bit bulky to me. So I ordered a custom wire set from Summit, and a tool to make the crimps, and gave it a go.
Looking around the sides of the engine you can see I’ve tried to keep everything as short as possible, and tucked in tight.

Even though everything looks really close here, the bundles are pretty well separated by zip ties, and no wires are touching either one another or the engine, and I’ve not had any shorts or misfiring (fingers crossed) so far.

I also made up these tabs to mount to the lower valve cover bolts, to tuck the wires as close to the valve covers as possible. Just some bent metal and plastic tubing clamps from the local Lowe’s Depot, but they work pretty well.

And something you’d never notice (again, because no sane person should care about this stuff) is that I used 90° boots on one bank and 120° boots on the other. This helps everything sit closer to the block, accounting for the fact that the spark plugs come out of the head at a different angle on the drivers side than on the passenger side.

Here’s the passenger side with 120° plug boots. Also you can see my obsession with stainless hardware because Hawaii weather will turn anything else to rust.
Overall I dig how tidy these look (while also looking OEM enough to blend in) but I’ll also be the first to admit that they are a pain in the ass sometimes. For example the loom is so tight I can’t get a clean signal for my timing light. I actually have a spare spark plug wire in my tuneup kit to run to the #1 cylinder just so I can set timing. It’s kinda ridiculous…
If you have made it this far, I thank you for indulging me for putting my Type A personality on full display in this post. I fully expect these to stop working correctly one of these days and strand me on the side of the road, and I keep a standard set of wires in my parts stash just for such a day. I should probably get help. ;)

Your engine bay is inspiration for me to improve mine. I hate the look of the jumbled wires and hoses under the hood of my car and you've done a great job cleaning things up. It's really nice and tidy.

I appreciate that level of attention to detail - even on the small jobs. My latest obsession is cleaning and painting if needed any parts that get removed from the car for a given job. Some of that comes from easy access to a wash tank and sand blasting cabinet at work. But now I can't stand putting grimy parts back together if I've got the time to clean it as I fix it.

Bravo on the plug wires! I suffer a similar disdain for the situation, but have rarely gone to such length to deal with it. Your setup looks great!

Sorry for being so dense, but it's not clear to me how you bundled the plug wires together. Can you clarify?
Nitroracer (Forum Supporter) said:My latest obsession is cleaning and painting if needed any parts that get removed from the car for a given job.... now I can't stand putting grimy parts back together if I've got the time to clean it as I fix it.
This encapsulates my love/hate relationship with all the various Roadkill derived shows on MT on demand. I love how they rescue all this clapped out iron and get it on the road again. I marvel at how they can jerry rig their way out of most anything with some spare parts and a can-do attitude. I'll admit it, it's good TV.
But also I cringe hard when I see them bolting all those nice shiny speed parts onto an engine that is caked in 50 years of oil and grime... it's almost enough to drive me to drink!
twentyover said:Sorry for being so dense, but it's not clear to me how you bundled the plug wires together. Can you clarify?
sure thing, it’s not really clear in my photos. Basically I’m using a variation of zip-tie spark plug wire separators I’ve seen on the internet. I used this tutorial as a starting point:
How-To: Cut and Loom Your Own Spark Plug Wires to the Perfect Length - foureyedpride.com

This video also does a good job of showing how to lace this together: https://www.youtube.com/watch?v=xWO1Oes7oJw&feature=share
In my case, I was trying to avoid the “four wide ribbon of wires” look of the loom above, so I bundled them as a 2x2 group. Here’s a closer shot of mine which I hope shows it more clearly:

I also was pretty careful to tuck the chunky “zipper” parts inside the bundle of wires where I could, so the only one that shows is the zip tie that encircles the bundle, but it’s pretty unnoticeable. Hope this helps!
Ah, obviously ckear and bkatantly easy- onve you know the tip. Thanks
I’ve been busier than you’d imagine given all the staying at home, but I got a little time to fix something that has been bugging me, my badly squealing alternator belt!
Some background is in order here, as one of the things I did not cover when I my upgrade to electric fans is that I also installed a better alternator at the time to help power everything. The original spec 1G alternator was said to be good for 65 amps on paper, but in truth struggled to keep up when I switched to halogen headlights. Adding an electric fan with a 50 amp draw was definitely not going to help the situation.
Enter the 150 amp 3G alternator I picked up from the Summit of Jegs. Here’s the obligatory catalog shot because I seem incapable of taking pictures of things when the first come out of the box.

The beauty of the 3G alternator is that it’s truly a bolt in swap, capable of modern power output, and just take a bit of modification to the factory wiring to get it to do its job properly. I used this oft-shared wiring diagram (from the classic mustang world) I found on the internet, which worked nicely since Ford kept wiring consistent across their product line for much of the 60’s. Efficiencies of scale FTW!

This was totally a drama-free to install, and upgrading an alternator is not exactly exciting, so I did not take any pictures at the time. I mean it pretty much looks like the standard 65 amp alternator and uses the factory mounting brackets. Piece of cake, right? Well, not exactly.
so, let’s fast forward to today...
In retrospect one thing I overlooked (or maybe did not fully appreciate) is that it takes considerably more effort to spin an alternator with this kind of output. That is fine when you have a serpentine belt, which this kind of alternator would normally come with, but a bit too much for a v-belt to drive, even if the pulley bolts right up.
So it goes without saying that once I was actually back on the road after the install, the belt had a tendency to squeal like mad! It was fine most of the time, but the issue was when my fan would kick in and a load was applied to the alternator and then SQUEEEEEEEEE.... it was fierce, and the belt would get so hot I’m shocked it did not snap or catch fire. This was straight up bad times.
For now I’m not ready to commit to a serpentine system (I plan to, but I’m still weighing options) and also I kinda dig the stealthiness of using a factory belt. So I soldiered on and tried to get the factory belt adjustment bracket (you know, grab the alternator as hard as you can with one hand, tighten the lower mounting bolt with the other) adjusted as far as my strength allowed.
This showed some promise, but only sorta fixed it... the squeal would usually come back at inopportune times, and really just never worked right as a system. Finally I got fed up enough to do something about it recently, so time to level up.

Summit of Jegs to the rescue again, suddenly I have a shiny new adjustment arm assembly to put the spurs to my belt tension. We’re gonna fix it with maximum force and raise the sketch level to eleven, ‘Murcia!!!
Of course anytime you solve one problem by jerry-rigging it up (which I naturally excel at) it’s a good chance you’re doing so at the expense of creating another one. And those of you paying attention at home know this brute lacks the graceful curve of the stock adjustment bracket, shown here in some photo I found on the internet.

You can probably see where this is going…

Houston, we have contact!
Naturally this is a re-enactment on my bench (good luck getting this shot in the engine compartment) but I was making contact with the alternator case well before I could reach the belt tension I needed. Kind of a pain, but nothing some good old cardboard aided design couldn’t solve. It took a few prototypes to get the geometry right and make it work with the turnbuckle I had, but I finally arrived at this:

Kind of a mess of bolts, spacers, and scrap steel I had lying around. I still don’t have a welder (working on it!) so it’s not all that elegant but it gets the job done for sure. Here it is from the backside.

So far this has been a great success, and the belt no longer squeals. At most it makes a quick chirp upon cold startup, but not when running otherwise. I rationalize this is OK as it tells me I have just enough tension at operating temperature, and really I’m starting to bend the laws of physics (and alternator bearings) so I am hoping I won’t need to add more.
Truthfully this is a temporary fix at best, a ticking time bomb at worst. I won’t be too surprised if I snap a belt at some point or send the alternator to an early grave. For now though, we live to fight another day!

Been enjoying reading through your write up this evening. If you need access to a welder I have a 175 amp Harbor Freight mig welder. It's set up for flux core but might work for you. I'm over in Enchanted Lake.
That’s kind of you, thanks! I actually purchased a welder finally and I just need to get a tank of gas and I’m off to the races!
Also, where did you find a Harbor Freight in Oahu?
Asking for a friend... ;)

Nice to know other people have some OCD about wires and hoses as I do. Like the way this is going. My only thought would be to try going with a two belt system on the alternator. I remember vaguely seeing one on a old truck. That would keep it stock and stealthy looking.![]()
In reply to brad131a4 (Forum Supporter) :
Thanks, I’m happy to oblige, being OCD about that kind of stuff is the only way to fly! I had considered twin belts, which were used in the 60’s on passenger cars with high output alternators as well, but the again it’d dash my hopes of having a gilmer belt drive

OK I’m kidding (that looks a bit like the GMC 6-71 of alternators) but in all seriousness I’m still on the fence about power steering and AC so waiting to see if it makes sense to go with a serpentine drive system of some kind or commit to staying totally factory. \m/
In reply to jerrysarcastic (Forum Supporter) :
As you probably guessed, no Harbor Freight in Hawai'i. I can't remember if they shipped it or I used Ship to Hawaii. Either way it was cheaper than buying locally. It's the only store I go to when I'm on the mainland..
p.s. glad to hear you got your hands on a welder.
Lately I’ve been assigning myself with the boring task of tackling a bunch of small projects that I’ve been putting off. No better time covidpocalypse to get this kind of soul-crushing maintenance stuff done, right?!?
Anyway, tops on my list for some time now has been to re-check the alignment of my roller rockers. At the time I was installing them with the new heads, I checked the first few and they seemed fine, so I just assembled the rest of the drivetrain, and buttoned it up. But in the back of my mind it always bothered me. It was always something I wish I’d taken more care with at the time, you know?
Well, let’s say that I’m glad I did. Most of the rockers were just fine, but I clearly had a few that were in the danger zone. Here is exhibit A, exhaust on cylinder #8.

This was probably the worst of the bunch, but there were a few others as well. Here is its next door neighbor, intake on #7.
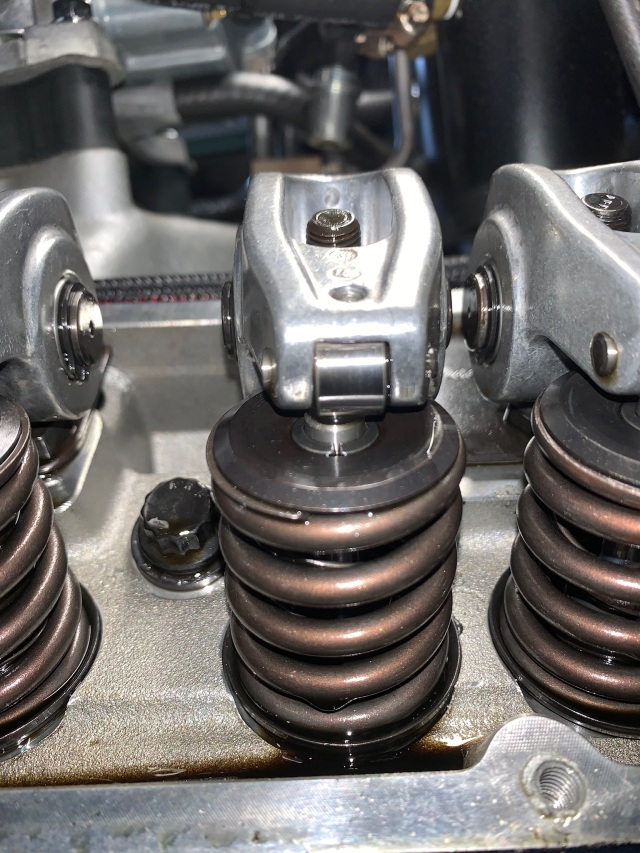
Luckily I caught these pretty early, maybe just a few hundred miles since I installed them. But also I drove a lot less this year because this was nagging and worrying me, so there’s that... The takeaway here is (of course) to do it right the first time, so you never have to lose any sleep.
Anyway, I went around loosening rocker studs and adjusting guide plates until things were lined up to my satisfaction. You can see the witness marks on the roller tell the tale, but the scuffing was very light and nothing you could catch a fingernail on. This is #4 exhaust I think.

For good measure I also went around checking lash on all rockers while I was in the neighborhood. Always time good time to brush up on your firing order! One last shot before it’s buttoned up.

It’s nice to see all this cool aluminum gear (normally hidden by my plain Jane valve covers) but I hope it’ll be a while before I need to look at this stuff again. A few more maintenance tasks and I’m ready to put this thing on the road for a while!
A supercharger belt for your high output alternator. Your brand of humor is subtle, but appreciated.
If you're willing to do some searching there are a good number of junkyard options for sepentine belt drives for a Ford 302 since it was made for so many years. I went with a 88-91 style crown vic accessory drive which nicely packaged the 3G alternator and power steering pump on the drivers side with a single belt. Now a days it might be easier to find an explorer or mountaineer to harvest parts from, including GT40 cylinder heads, and the intake manifold if you like the idea of factory style EFI.
So one of the things that has been concerning me lately is that the rear brakes seem to be grabbing or binding (both?) when rolling in reverse. It was mildly unsettling to here it clunking repeatedly when backing out of the driveway, and I was pretty sure there were some horrors lying inside.
You see, I have (horror of horrors) drum brakes in the rear still, and in all the years I’ve owned this car I’ve never dared touch them. I don’t know about you, but drum brakes are still one of those automotive mysteries I’ll never truly understand. I’ve had plenty of drum brake cars in my past, so I know the basics. And yet I still break out in a cold sweat over the though of dealing with them, because they’re such a pain in the ass.
But I’m also a bit of a cheapskate, and would really rather spend my money on other things on this project, so I figure no harm in trying to rebuild these throwbacks. I also read on the internet (this forum even!) that when properly set up, rear drum brakes are plenty good enough to run with. So I’m counting on that!

Jeebus just look at that, even a clean looking illustration makes my gut twist up inside. I’m already not looking forward to this, but I forge ahead. Wish me luck…

First signs seem friendly enough. These brakes have seen at least one rebuild in their life, but it’s been some time ago. Remember when “cheap import parts” came from a Canada? I assure you, the new parts on their way will be from a much more faraway place than that.

Sadly pulling off the drums reveals things that are less good. I had hoped the signs of leakage on the passenger side was from the wheel cylinder, but this is clearly from the axle seal. Wow what a greasy mess… shiny black brake shoes is a bad bad sign. No wonder the brake proportioning valve from my front disc upgrade seemed to have no effect.

The drivers side is less greasy but, shall we say, well worn. Anyway, I get to work stripping it down since it’s the “cleaner” side. Once I’m down to the backing plate though, I can see my hopes of a quick rebuild are dashed.

You can see the brake shoes have worn some deep grooves into the flats on backing plate over their years of service. This probably explains the binding, to say the least. Ლ(ಠ益ಠᲚ)
At this point it’s pretty clear that I’ll be pulling the axles and removing the backing plates to repair them. Also it looks like I’ll be using that welder sooner than I think to fill in those gouges. I decide to tempt fate further and tear down the passenger side, thus violating the first rule of drum brake rebuild club: ALWAYS LEAVE ONE SIDE ASSEMBLED!

Yep just as bad over here, with deep gouges on four of the six flats the brake shoes ride on. Looks like my fast brake rebuild has escalated pretty quickly, and I’m already wishing I’d hit the easy button and converted to disks.
Anyway, no turning back now. Replacement parts are on order (which in Hawaii adds more time than on the mainland) so I’ll be cooling my heels for a bit. Time to pick up a tank of mig gas, and get to those backing plates. To be continued…
I saw the same thing on my Cougar. Rear brakes were working poorly and backing plate was damp. As soon as I pulled the drum I saw it wasn’t the wheel cylinder. Both axles seals were gone. Replaced those and rebuilt the brakes. They performed better than before the rebuild.
Taking a closer look at the backing plates this morning and here are a few of the worst bits of wear. I'm guessing it's been like this for a long long time and I wonder if I ever had working brakes in the rear.


Not especially looking forward to fixing these. Drum brakes are already a pain and this is just some crappy icing on top. But I am definitely looking forward to some sweet (I mean working) rear brakes, so onward and upward!
wawazat said:...Both axles seals were gone. Replaced those and rebuilt the brakes. They performed better than before the rebuild.
Thanks, this gives me hope that this dumpster fire of a brake job will all be worth it!
To help offset the mundane, I had something new show up for some added inspiration. Call it a little light summer reading. ;)

Repeat after me:
There’s no school like old school. There’s no school like old school. There’s no school like old school…
You'll need to log in to post.


