I’m still waiting on brake parts to arrive from the mainland (the joys of living in Hawaii) so in the meantime a made a thing...
Yep it’s one of those wheel fitment gauges... I’m just about ready to step up my wheel/tire game, and I really want to make sure I get fit right. I like the idea of fancy tools like this one I found on google for example:
But of course like a cheapskate I figure surely I can make my own, and I can’t abide by all that plastic, so out come the saws! I even painted it grey to hide all the mismatched scrap wood and cardboard. And of course this totally makes it look like a pro tool and greatly increases my rip-off cred, so there’s that...
Truthfully though I have a pretty clear idea of what size wheel and tire I want to run, but offset I’m less sure on. Rather than pull out my credit card and pray it fits, I figure it makes sense to copy all the dimensions down and make a tool so I can get a go/no-go check on fit
I’ve set it up for 0 offset here, but cut some 1/2” hash marks in the tool so I can move the wheel/tire profile left/right to figure out my final offset. Hope this works out!
Since I already have the car apart in the rear, I tried out the wheel gauge just to see how it'd work out. No final measurements for now but this is looking promising!
This is the easy end of course. I expect fitment in the front will be much trickier but I'm not ready to deal with that until I get the rear brakes back together. For now I'll take a small victory and be good with that
I love the Wagon. Thanks for the thread! Your work is great. I'm also bothered by unkempt spark plug wires...but I procrastinate fixing them. Always happy when I get them done right.
I like your ingenuity on overcoming the alternator tension rod interference issue.
Just a quick update to say that I never thought I’d find an “easy button” for the rear drums on the wagon, but apparently such a thing exists. Just about the time I was fixing bite the bullet and weld up my backing plates I found this on my internet travels, from the good folks at Opentracker Racing:
Yep it seems you can order a drum "big brake" kit for 8" Fords, complete with pre-loaded backing plates and all the fixings! Turns out to be just a little bit more than the cost of rebuilding my existing drums and they come out of the box ready to install. For dinosaur-tech this deal was too good to pass up, and way less work than rebuilding my own. So I ordered some up, and today they arrived on my doorstep.
As a nice side benefit they are 1” larger diameter (11” vs 10”) and .25” wider, so this easy button comes with a smidge more stopping power to boot. If you squint you can see the size difference on the bench. Holding them in your hand they are visibly larger and make for a nice low buck upgrade.
This is about as excited as I think I’ll ever get about drum brakes to be honest, and really the appeal is mostly about how much easier it will be to slap them on! Being a bit larger, and the thrill of pulling them out of the box pre-assembled is a nice side benefit though. \m/
Along with the saga of the rear brakes, I’m starting to work my way through a longer list of things I’ve been putting off. You know, all those nagging things that aren’t working right (or never did!) which it seems all projects seem to accumulate. And one of those things that have always bugged me is my cranky neutral safety switch. See what I did there?!? :cough-cough:
Anyway, this I can file squarely under crap that has never worked right. Basically I could start if the car was in park, but not in neutral. And the reverse light circuit also never seemed to work, which annoyed the hell out of me… though apparently not enough to do anything about it.
In California it’s easy to let these things slide as they don’t have regular safety inspection , but Hawaii has a yearly safety check to keep me honest. The truth is, you can usually find someone who “knows a guy” at some such garage that is willing to look the other way, but I decided this year that I’d like to legitimately pass, so working reverse lights was high on my list. Which leads me to this…
Here is the Falcon neutral safety switch, hiding somewhere under the dash. This is apparently made of unobtanium.
Unlike Floor-shifted Fomoco cars of the era, which uses a cheap and readily available replacement part, the Falcon wagon is column-shifted (which I kinda dig) and has the NSS mounted on the column as well. And of course, this particular part is not reproduced, so out of superstition I’ve avoided touching it for many many years.
During that time I’ve just lived with it. Hey, at least it starts in one gear, right? Well, finally I decided I’d crack into it, and see if it can’t be rebuilt. I mean, how hard can it be?
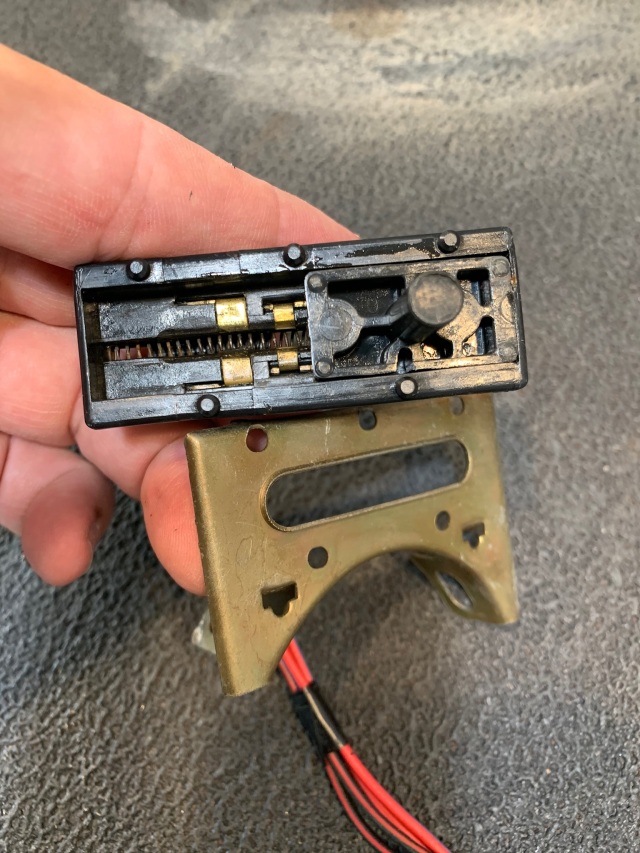
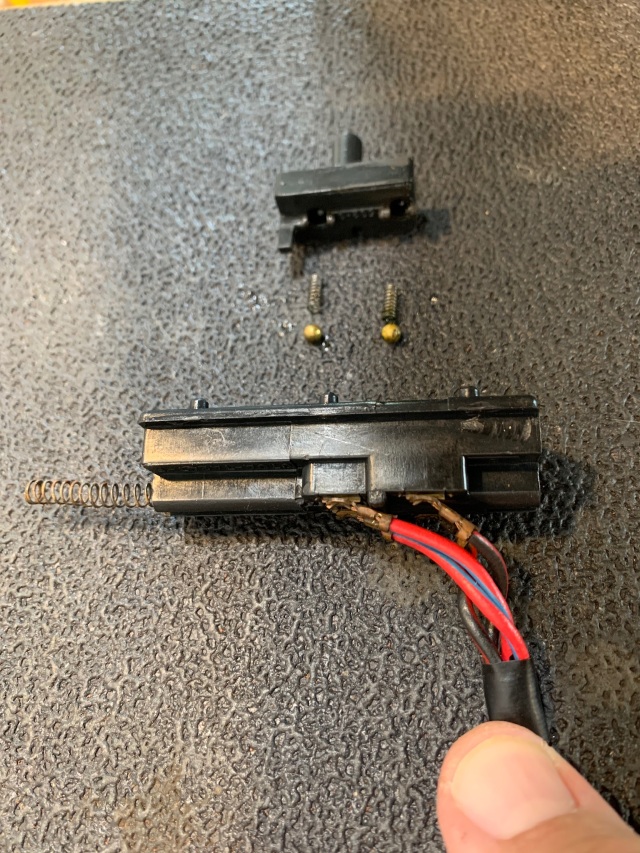
Once I had it on the bench, I started prying at tabs, and cracking it open. I took copious pictures along the way, as there is scarcely any info on rebuilding this part when I search online. I’ll admit it, I had no idea what to expect inside, but I figure at least I can try to clean things up and see if I get it going again. If that didn’t work, I had a Plan B sitting in the parts closet I can fall back on.
Here you can see there is a track that a spring loaded pin rides on. This engages a tab coming out of the column and makes the whole program do what it does. Something under there is no longer making contact… what horrors lie beneath?!?
Whoa, I gotta say I was not expecting spring loaded brass ball bearings! I’m glad I was taking some care taking this apart, as I would hate to have these shoot across the carport. Also I’m not seeing any broken plastic or missing parts. This is looking good
Sure enough, a little time cleaning the contacts, some dielectric grease to keep thing moving smoothly, and I had it back together again. I tested it out with my multimeter and I had continuity in all positions. A little more time fiddling with the shifter lever adjustment and I had it starting in neutral and park, and working reverse lights to boot!
To be honest, I had no idea if this would work out, but I’d seen a few videos of the general procedure and figured I had nothing to lose. In this case it worked out pretty well, so I’m pretty stoked to be seeing reverse lights on the wagon for the first time ever!
Those big drums look great. I have heard good things about Opentracker and their products.
Congrats on fixing the backup light switch. 50+ year old grease has less than optimal lubricating properties and is more like tar. I’ve got a bunch of little tasks like this that I need to dig in to fix too. It’s just an old car, right?
Whelp it’s been a minute since I posted but I’ve been steadily chipping away at the Flying Monkey Bus to get it back on the road again. I finally gathered all the parts I needed to put the rear brakes back together and I’m ready to get the wheels back on the ground.
Since I left off I have shiny new parts to bolt on, but first I had some cleanup and maintenance to do while I’m in the neighborhood. First up is to yank out the axles, which was easy enough. Turns out the bearings are a little unhappy on the passenger side, so these are bound to the machine shop to have new ones pressed on.
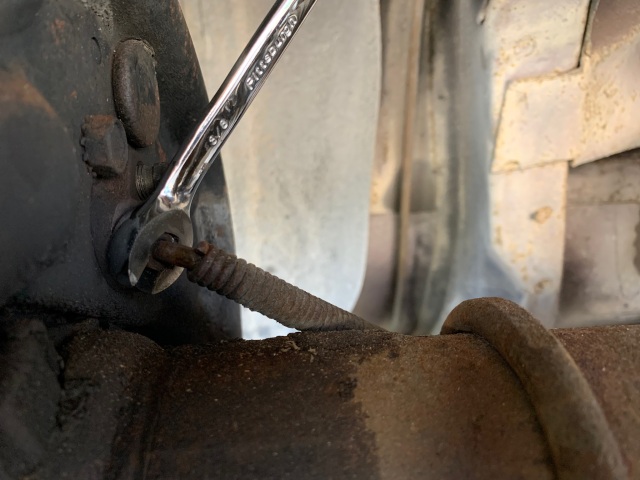
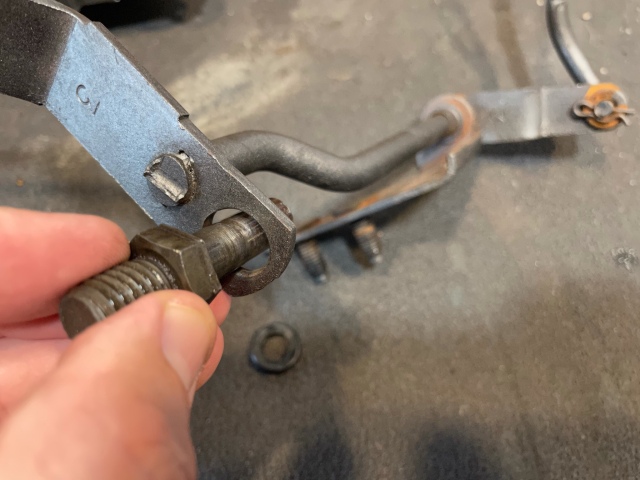
Getting the backing plates off turned out to be more of a pain. First a little surgery to one of my line wrenches to thin it down.
Which was necessary to allow me to disconnect the line on the drivers side. The spring wrap on the brake line would not let my cheapo (and very chunky) HF line wrench slip by.
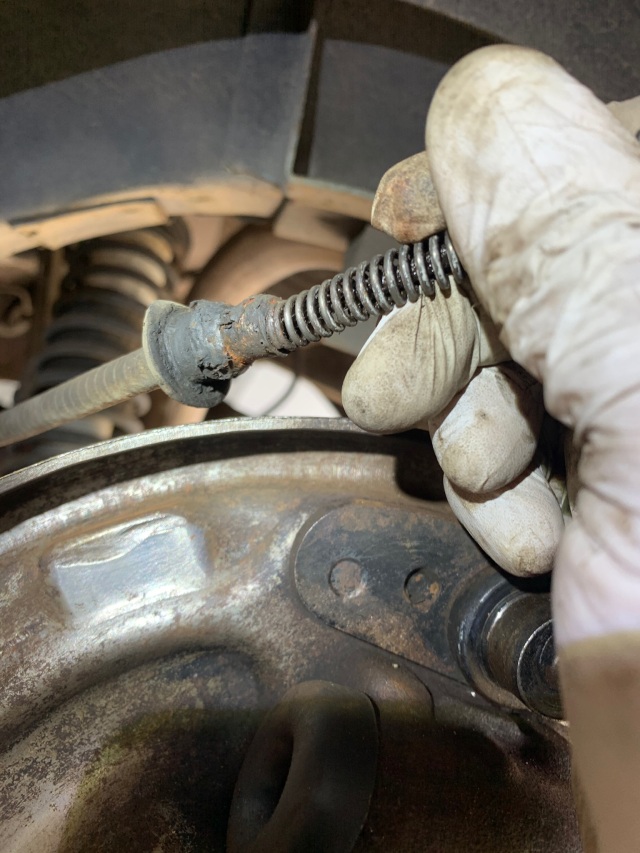
More challenging was getting the parking brake cables out of the backing plates. What a fricken pain these were to get out!
The axle seals were also a bit stubborn to get out and I was too lazy to rent a proper seal puller. Instead I Jerry-rigged my own setup using a gear puller and some extra scrap steel I had laying around. Did the trick!
Once I had them out I was surprised to find they are (I’m guessing) 1967 originals, based on the Ford logo stamped in the case.
I was also surprised to see how much more robust they were when compared to the replacements I picked up from the local O’Pep Boys. It’s true what they say, “they don’t make them like they used to.”
Of course while I was in there I couldn’t help but take the time to add a fresh brake hose (the original had a scary amount of dry rot) and shoot the hose bracket with a little rustoleum.
It pains me to bolt shiny parts on to this crusty looking chasssis, but I’m trying to battle scope creep here; I’m dying to cruise around in the the wagon so getting the wheels on the ground is the bigger priority for now.
I did also take time to get some of the caked on grease off of the axle housing, and unearthed these factory paint marks, which I thought was pretty cool.
Speaking of automotive archeology, I also was able to siphon off this ancient gear oil, which must also be from 1967 based on how dark and stinky it is. Once I got the oil flowing out of the hose I used a ratchet extension to hold it in place while gravity did the work.
It was barely a trickle but I let it run for a few hours and slowly but surely it filled the drain pan. I barely had to get my hands dirty, so Jerry-rigging again for the win! Next up, shiny new stuff!
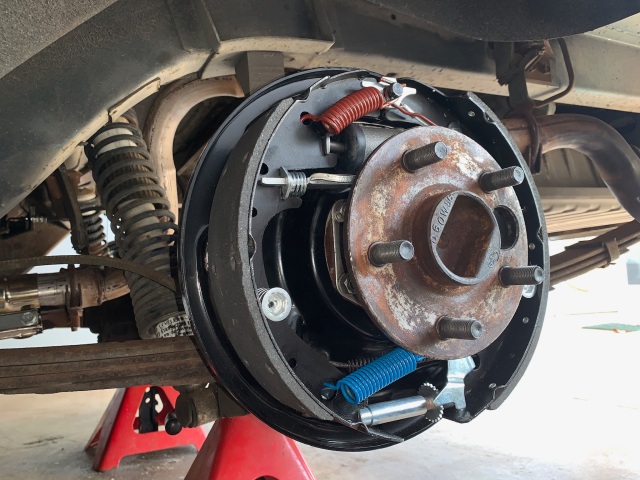
Now, on to reassembly. My first discovery of the day is that no matter how convenient it seems that the brakes come pre-assembled, there is no way to install the emergency brake cable since the arm it attaches to is buried behind the rear shoe. So, predictably, I had to disassemble my pre-assembled brakes just to hook this stupid cable up.
And then of course reassemble them again, good grief! This probably turns out to be a blessing in disguise since it gave me the chance to add a few dabs of high temp lube where the shoes ride on the backing plate, as well as the self-adjuster. It’s my fervent hope that I don’t have to crack these open again for a good long while, so I’m taking no chances.
While it was definitely a pain to end up building up and tearing down my brakes, I’m happy to say this cheapo HF tool drum brake tool set really did the trick, and made the process much easier. This turns out to make the job far less dangerous than my usual combination of vice grips and bloodletting, which is a win in anybody’s book.
And so after a little more “quality time” with the weird brake drum tools I put it all back together again, and this time the shiny stuff is bolted on for good.
And in an act of pure vanity (plus I had some exhaust manifold paint laying around) I painted the drums in cast iron paint. There is literally no difference in how these look compared to before they were painted, but I’m hoping they will keep the rust at bay.
And after some dry time the drums are slipped into place. Everything went on easy and no binding or other issues, which I am taking as a good sign for now.
Now that I have the brakes buttoned up, it’s time tackle my least favorite of tasks... bleeding the system. Only this time instead of conscripting a helper to pump the brakes while I shout instructions from under the car, I decided to level up and add a pressurized brake bleeder to my tool crib. Here it is, swaddled in my finest shop towels, waiting to break my heart.
As tools go, I’d have to give this a “4 out of 5 Ichiban Moto stickers” rating. Overall the system is sound, and it was nice to truly be able to do a proper “one person brake job” but the weak link for me is the master cylinder adapter, which you can see represented in this photo as the ill-fitting hunk of aluminum on the right.
No doubt this goes much smoother if you have an MC reservoir with a screw-on cap, but for my old-school master cylinder you are left to use an adapter plate that is a compromise at best. It took a Lot of fiddling to get a good seal, though once I did get the bleeder to hold pressure, the actual bleeding of the system was very painless.
I also discovered one more annoyance and it comes in the form of the brake bleeder screw on the new drums, which I have discovered is annoyingly metric. I have nothing against metric tools per se, but it is a little vexing to have a mix of metric and SAE hardware on one car. It’s just wrong I tell you!
The good news is that I do know where my 10mm wrench is, so there’s that. I’m posting this picture in the hopes I will refer to this post next time I attempt to bleed my brakes… but let’s be honest, I’m doomed to strip this with an SAE wrench some day. ಠ_ಠ
Anyway, for now I’ve got the sweet bottle of old brake fluid as my reward, and I bask in the realization that my journey to the dark heart of 60’s drum brakes is finally at an end.
Wheels are finally back on the ground, I’ve got a firm pedal and working parking brakes. Everything is checking out. Tomorrow we go for a little shakedown!
Test drive around the neighborhood went pretty well I’m happy to report. I don’t have all my stickers up to date yet, so I didn’t go more than a few blocks for now.
Brake pedal is not as firm as I had hoped so it looks like I’ll be bleeding the brakes again (oh joy!) but otherwise the wagon was running well, and with a little more TLC I’ll be cruising again! \m/
Ive been chipping away at my “stuff I’ve been putting this off” list in my off time, and waaay down at the bottom (below drum brakes an neutral safety switch) is the thing I’ve been dreading most: replacing the selector arm seal in my automatic trans. So naturally it’s time for an update!
I don’t know about you, but to me any kind of transmission is pure voodoo, but automatic transmissions are the darkest and blackest of majik. So for the time I’ve owned this car I’ve been happy to top it off with ATF and leave it at that. As long as it’s working I ain’t going to touch it, and that was fine for a number of years.
The problem is that over time I developed a pretty nasty leak around the gear selector arm, that had grown to the point I’ve needed a drain pan (or else break out the kitty litter) any time I parked it. Naturally it didn’t take long for that pan to fill with enough Type F to look like a crime scene, and I’d finally had enough. Time to get into it! \m/
Here’s the culprit, somewhere in there is a seal I need to replace. Sounds easy but of course to get to it you need to drop the pan…
And then harvest the C4’s tasty tasty brains…
and finally here we are, looking at the insides, where I can attack the nut that holds the gear selector and kick-down linkage in place
And at long last here we are, selector arm is on the bench and ready to receive the shiny new seals.
There’s nothing complicated about swapping in the new seals of course, just slip them on with the aid of a little ATF and make sure they’re seated. But dang it what a pain to get to this point, glad I’ll probably only be doing this once.
Assembly (not pictured) is obviously the reverse of disassembly, and the selector arm is back in the case!
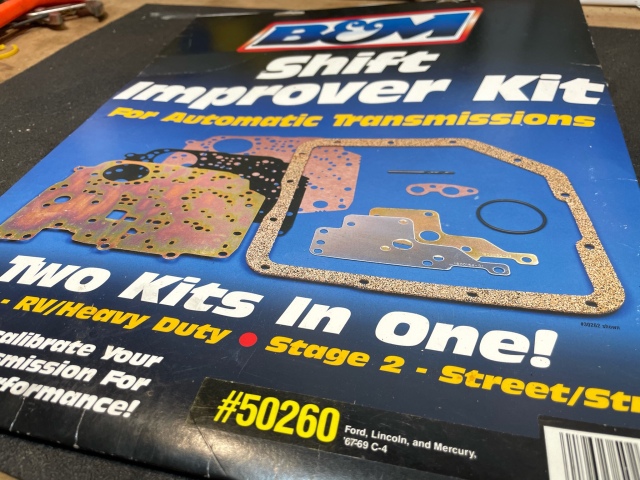
Naturally going through all that trouble for a few transmission seals is going to allow time for a small bout of whileyoureinthereitis to set in. And as it just so happened that I had this B&M shift improver kit sitting in my parts stash for years, all pretty and waiting to go in, so time to get busy!
Admittedly this feels a lot like brain surgery to me, this part right here. I’m guessing these bits haven’t seen the light of day since they left the factory.
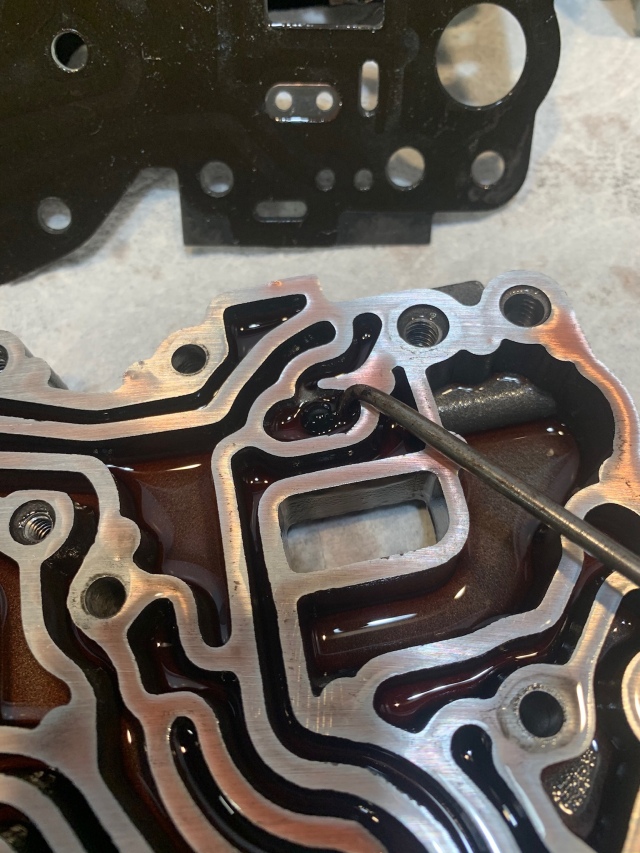
Here I am somewhere in the middle of the procedure, removing the rubber stopper Ford placed over the “fun valve” I guess.
And then apparently you upload your shiny new hellzyeah.php file to this primitive motherboard, and you’re all set!
All that’s left to do is bolt the metal heart back together, add a fresh filter, and say a little prayer. Jeez I hope I didn’t mess this up.
I also decided I couldn’t live with bolting the cruddy old pan on, so I put some fresh paint on it.
Once again, I’m completely underwhelmed by the Rust-Oleum “hammered” texture (or lack thereof) as it come out of the spray can. I don’t know what I’m doing wrong with this stuff, but I guess I’ll have to try out the brush-on kind one of these days.
For now though it’ll work, and it seems like a tough finish. Here it is holding the guts in. The job is almost done.
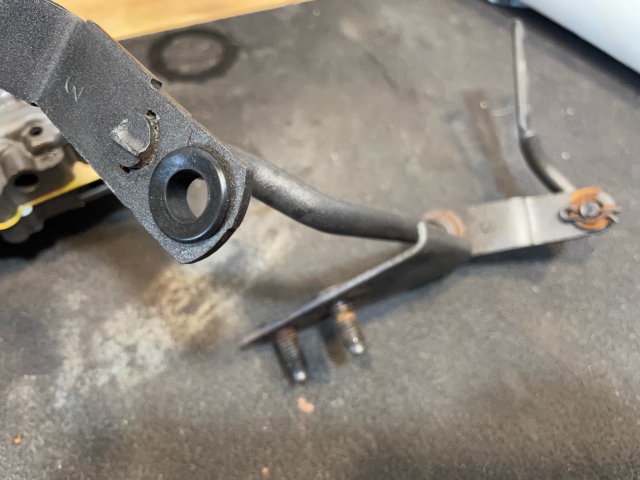
One last thing to take care of while I’m under the car, and that’s to deal with the extra play in the column shifter. One of the fulcrum points of the linkage has a ton of slop in it, and I imagine there’s a bushing of some kind that been missing for as long as I’ve owned this car. You can see, this doesn’t quite look right.
To be honest I’ve never seen (on the internet or it print manuals) what the factory bushing that normally goes here actually looks like, so I noodled on it for a while. I raided the local hardware store looking at bushings and sleeves of all kinds but couldn’t find anything that fit. Then I went home and raided my grommet stash, and whadyaknow I got lucky.
I have no idea how well this will hold up since it passes close to the exhaust, but I found a high-temp grommets on McMaster-Carr that I can try if these can’t take the heat.
Here it is looking up from under the car (steering box on the left, engine on the right) and you can see it might get a little toasty. Anyway, for now it’s a huge improvement, and good enough for 1.0 status. All that’s left to do is get the wheels on the ground and give the old wagon a shakedown.
Once again, I’m completely underwhelmed by the Rust-Oleum “hammered” texture (or lack thereof) as it come out of the spray can. I don’t know what I’m doing wrong with this stuff
I'm kinda with you on this. I've been using it a lot but my training with spray cans has always been "many light coats are better than fewer heavier coats" (how many times have I read THAT in the instructions?!) and I guess this stuff is the opposite. You almost have to pile the stuff on, I think to get it to work right.
Let me tell you, if I produce a run in a spray can paint job, I hang my head and feel shame. So the hammered paint is counter-intuitive for me.
And I have to say, the Hammered "black" is not black. I don't dislike the color, but it's not black.
Let me tell you, if I produce a run in a spray can paint job, I hang my head and feel shame. So the hammered paint is counter-intuitive for me.
Yep I’m right there with you! I have the same problem with wrinkle paint as well; I spray it on as heavily as I can stand and still it never comes out to my liking in the end.
One thing I will say about the hammered paint, it seems to be a very durable and hard-wearing finish even if it did not come out looking as advertised. Plus it’s under the car, so it won’t continue to annoy me by hanging out in plain sight! ¯\_(ツ)_/¯
I finally got some good looking black wrinkle finish this summer on my valve cover breather tubes by spraying it on HEAVY and and setting the parts in the sun on a 90 degree day.
Your work looks good Jerry!
Thanks for the encouragement! I’m just happy the general maintenance spree I’ve been on is finally at an end. I’m ready to get to the fun stuff (plus actually driving it more!)
Now that things are all buttoned up, I’ve had a little time to cruise around the neighborhood. The new rear brakes are working well, and the transmission is shifting nicely through all gears.
Also got it down to the shop for the annual safety check, which was drama-free.
Always feels good to get the sticker of approval! If you’re on windward Oahu and need a good mechanic I can’t recommend Clyde’s enough!
Since I’m up against the Thanksgiving holiday I have not had time for an extended cruise, but now that I’m fully legal I’m sure I’ll get that chance here in the next couple of days. Thankful for that! \m/
I’ve been laying low over the holidays and focusing on non-car stuffs, but I had some time recently to take the wagon out a cruise and I didn’t get far from home before I had a bit of a scare to start my new year. So let me tell you the story of how I had oil pressure but lost oil pressure at the same time...
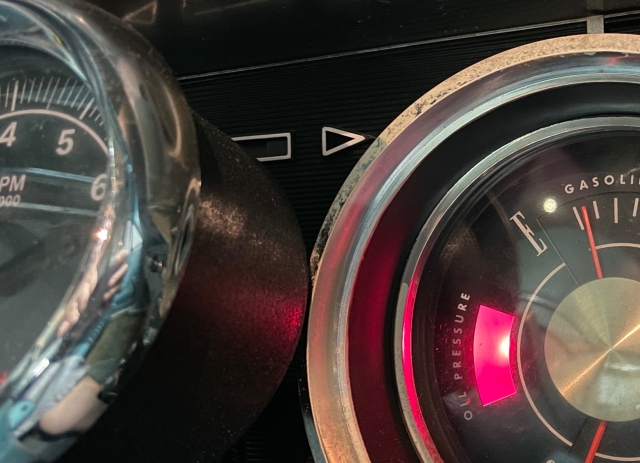
Things started out innocently enough, it was a nice sunny day (not too hot) and the car was running great. There was no real drama other than a little stumble off-idle that I still need to tune out. After a little time to warm up I drove out of the neighborhood and headed up Kalanianaʻole Hwy. toward the Ko’olau mountains. Open roads are hard to come by here on Oahu, but I’m close to H3 which is a nice place to run at freeway speeds and shake out the cobwebs, so I hung a right on Kamehameha Hwy. and headed that way. I was about half way there when the oil pressure light came on. Whomp whomp whomp...
That’s never a good sign but luckily I had also plumbed a mechanical oil pressure gauge as backup, and it was telling a different tale: it was showing good pressure in defiance of what the light was saying. What gives?!?
No strange noises and the car was acting fine so I thought to myself “it’s probably the stupid idiot light” and proceeded to turn back towards home to see what was going on. Part way back I started smelling a bit of burning oil and was getting pretty concerned, but the gauge was still showing oil pressure so I nursed it home, pulled back into the carport (too soon!) and cut the ignition.
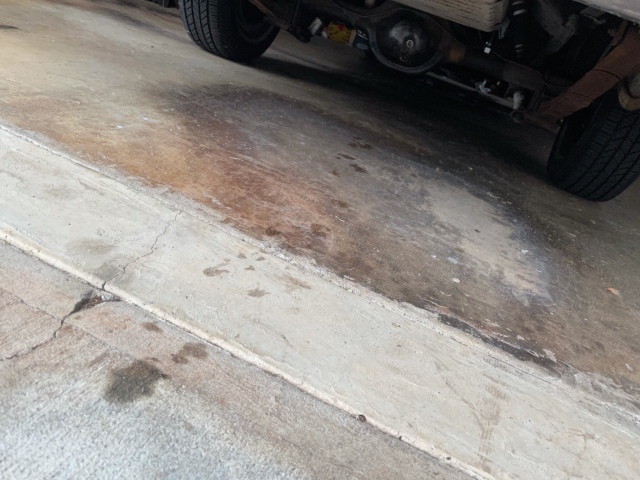
As I walked around the back of the wagon I finally saw the bad sign. I was leaking oil somehow, and had left a pretty frightening amount of it on the driveway as I pulled in.
It does not look to bad in the picture because it had time to soak in to the concrete but it was fresh shiny drops when I pulled in. I definitely left a trail of tears behind me for the past few miles, and checking under the hood confirmed it; I had a pretty bad oil leak low on the drivers side, near the oil filter.
The oil filter itself looked fine, but tucked up next to it is the sender for the factory oil pressure light, which shared a brass tee with the line for the oil pressure gauge. This was clearly looking like the source of the issue, but it was tough to see exactly where since oil had pretty much sprayed everywhere while under pressure.
Since I was still dripping oil when I pulled in I definitely didn’t run it dry, but when I checked the dipstick I was shocked to see how close I came to disaster; it was barely wet on the end. When I had left (30 minutes previous to this) it was totally full. Definitely not good.
At this point a smarter person would count their lucky stars, clean up the mess, and start carefully inspecting the oil pressure sender and brass tee it was connected to. Me on the other hand, I topped off the oil, and started it up. No better way to find the leak than catch it in the act, right? You can imagine my surprise when I saw this…
Yep, the picture is a little hard to make out but that is the lifeblood of my engine pouring out of the sender unit housing. Something you definitely never want to see. Here’s a close up… the horror!
Given a little more time I’m sure the oil gauge and the idiot light would have started agreeing with each other about the low pressure, so the moral of the story here: If you think “it’s just the stupid idiot light” it may be the case that the idiot in the equation is you.
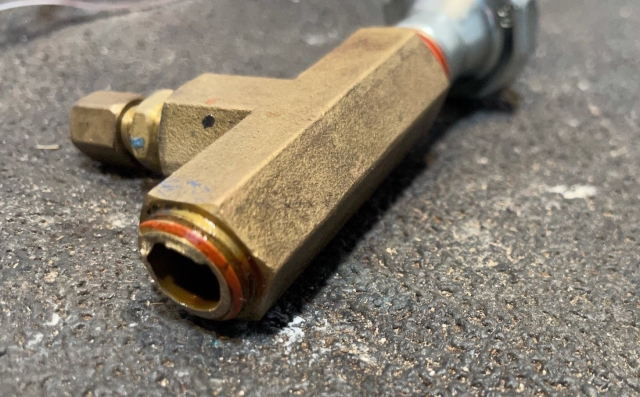
Anyway, I counted my lucky stars, picked up a $5 sender from the local Pepboys-Zone. This should be the end of the story, but clearly the project gods were not done with me yet. While trying to thread on the new sender, the brass tee it was attached to decided to give up the ghost.
To those of you following along at home, you may notice that there are some missing threads on the end. Here’s the rest of it, sitting inside the block. Well, that escalated quickly.
After a little “quality time” on Google figuring how how to get this out without adding metal shavings to my engine, I tripped down to the local hardware store to pick up what I hoped would be the correct extractor to save my bacon. I also picked up (via Amazon) this handy set of square drive sockets so you can run a tap through with a ratchet. Since I did not have room to swing a tap wrench I figured these would be handy, and I can tell already that these are going to be a welcome addition to my tool stash.
And after a little quality time clearing my power steering pump out of the way I finally had the room I needed, and was able to back the broken pipe nipple out of the block. Insert big sigh of relief.
With that out of the way I had a new tee back in place along with the new sender, and everything else ready to button up. Finally the job was done. This stupid joyless task of replacing a cheap little oil pressure sender that almost stabbed me in the back was finally finished. Time I will surely never get back.
Let’s hope the oil (and the smoke) stay inside from this point forward
I never did care for the length of pipe needed to setup pressure switches and senders on my 351 - All that weight hanging way out there has to make for some good vibration when the engine is running. Good thing you caught it before anything catastrophic happened!