1 2
dblagnt
dblagnt New Reader
11/30/18 11:07 a.m.

Hello all, this is my official build thread for the $2000 challenge so i hope :) I have always had a passion for the DC2 chassis and with this build being more nostalgic then i anticipated keeping it as a track only car may be harder then i thought. This car is a 1995 Acura Integra GSR, was purchased from Co-Part in July of 2018 and was salvaged due to severe hail damage. 

With a quick trip to Denver, i quickly realized how good of shape this car is mechanically and there was life left in her yet. First inspection was grim as there was glass shards everywhere. Motor started right up and gearing was great. No grinds or knocks when shifting. First after leaving the auction yard we took the car to a local car-wash to attempt to get the car road worthy to make the trip back home to Blue Springs, MO. A good inspection at a local Firestone with an oil change showed the car's suspension, wheels, and tires were in great shape. Motor was burning and leaking oil, transmission was encouraging fluid also. This put more concern on the drive back and more of a risk to either pay for the full tow back home or continue driving. I stocked up on Oil and Transmission fluid and pushed on, stopping every hour or 40 miles to give a good inspection and attempt to trend the leakage. After a few hours into the trip, i quickly fell in love with the motors low rpm response, i kept the motor under 4k, it was still very responsive and provided enough power to maintain a normal speed on the I-40 route. 13 Hours later we finally made it home!!

On to the diagnostics and attempting to get a baseline of what mechanically is wrong with the car. Over the course of the next few months i worked slow and steady taking time to research and discuss what symptoms the car had with other Honda Buddies ive acquired over the years. Aka OmieHomie(S2K Godfather)...


First thing i did was attempt to assess the health of the motor, opened the valve cover and found the seals to be horrid, spark plug galleys had tons of oil in them. This was for sure the cause of the oil leak as i found no external leak spots for oil.

3 out of the 4 cylinders showed decent Compression for its age and mileage, however piston 4 was rather low. Before i went any further, i pushed forward with the basic tune up. Spark plug removal and clean up of the galley. Piston 4 was the worse as far as oil in the galley.

The spark plugs that were in there had seen better days. Lots of oil burn off. Replaced the Spark plugs with the OEM recommended NGK IX. Two of the spark plug wires literally fell apart while removing them, so easy fix there too. New set of NGK RC-HE64. Valve cover seals were replaced properly and galleys fully cleaned with long qtips. For the valve cover seals, i went with a Oriely's brand, i figured spending the extra money on OEM seals would be a waste in terms i may have to be opening up the valve cover again and again for further troubleshooting.This was tedious as there was so much build up. Wish i could have gotten a picture of the galleys but they are bone dry and clean now.

After that work, i conducted another compression test and all cylinders are reading at or 1-2 less the same reading, 4 is no longer way below. From what ive researched so far the B18C motor should be around 220 for a healthy low mileage motor, however with the mileage of this motor being over 130k Im feeling good about the state of the block. Honda Guru's tell me im wrong lol.

It was time for a test drive.

https://youtu.be/Af7R1slZewY

Initial response up to 4k was good and an improvement, however once past 4k and the VTEC hit point, the tach goes nutty and the motor is struggling, not jolting but you can hear the struggling im talking about in the video. Before i started the initial work i purchased an Ebay Tune Up kit for the B18C GSR, really good deals for stuff like this on Ebay. It included new Plug wires, Distributor Cap, Rotor, both lower and upper VTEC seal's, and a replacement PCV valve.

First up was the distributor cap and rotor, and yea i found the problem with the tachometer going nutty pretty quick. Can  you tell which is the old/new?

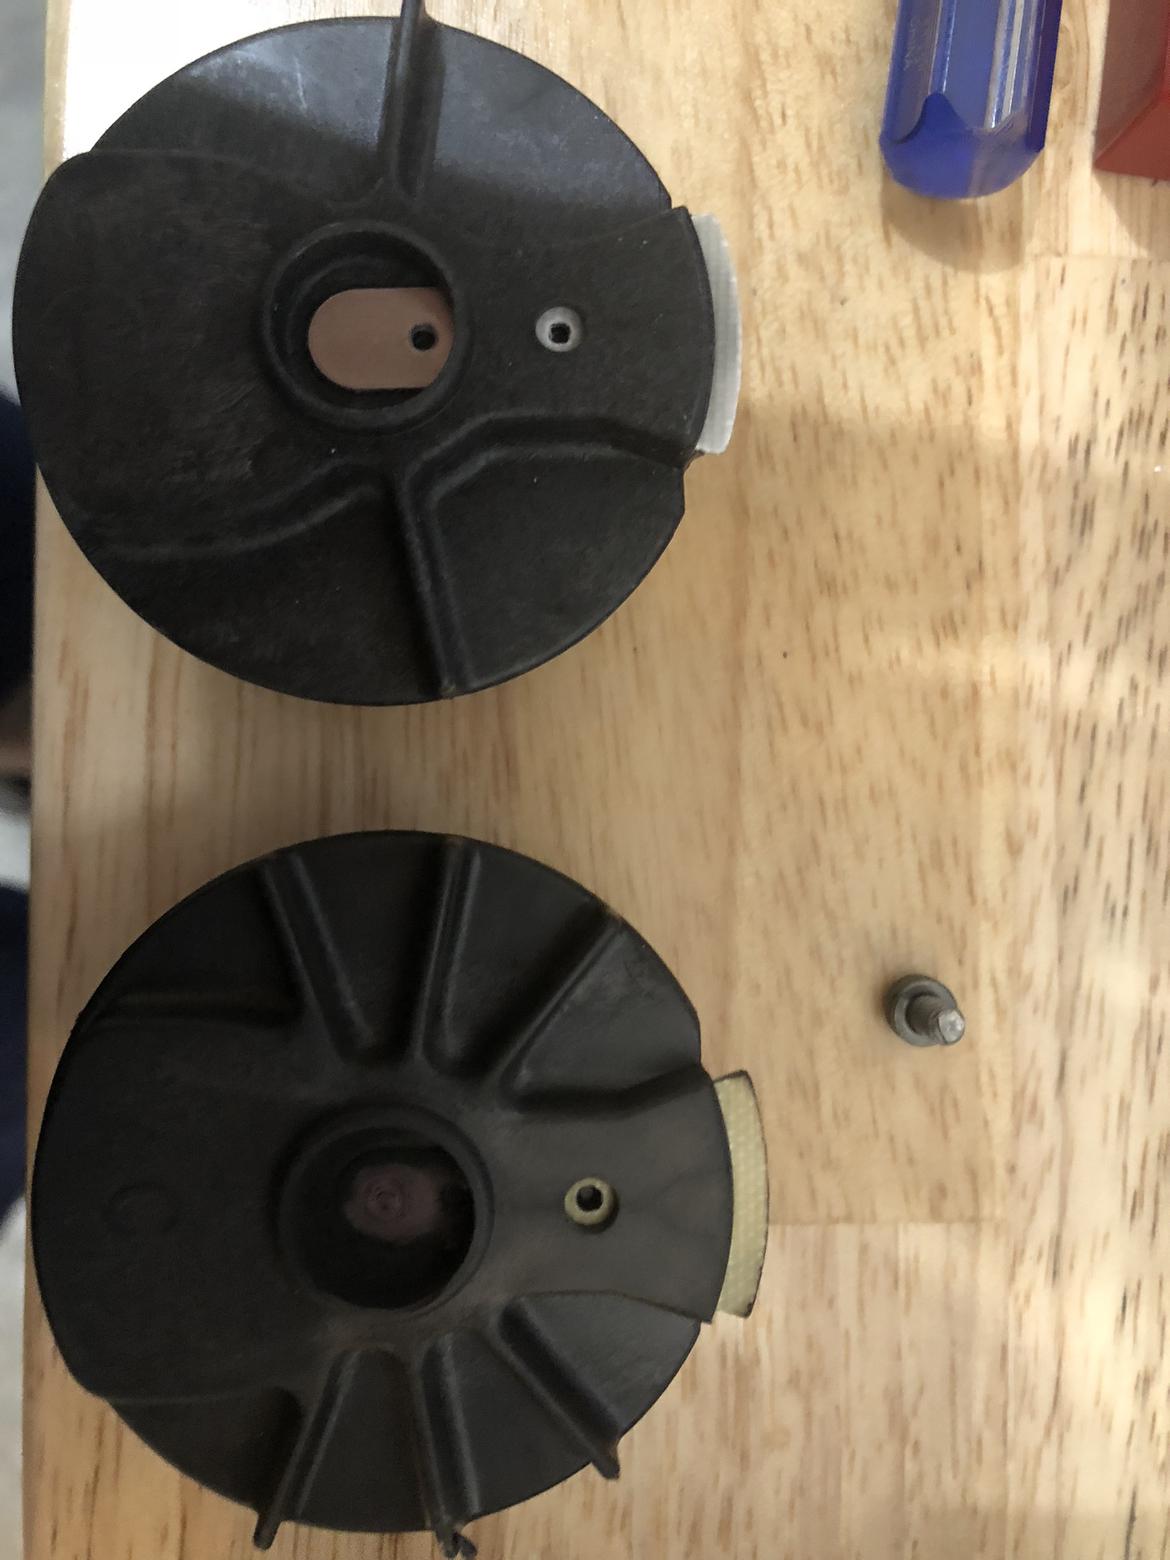
With the cap and rotor replaced, it was onto the VTEC solenoid, which is right next to the Rotor, thus perfect time to take it off the block and give it a good cleaning.


With the solenoid off the block and in my hands it was clear these seals have also failed, lots of oil build out around the housing and near on the block itself. Onto the cleaning and removing the old seal!!! Seal fell apart on removal.

All clean and shiny!!

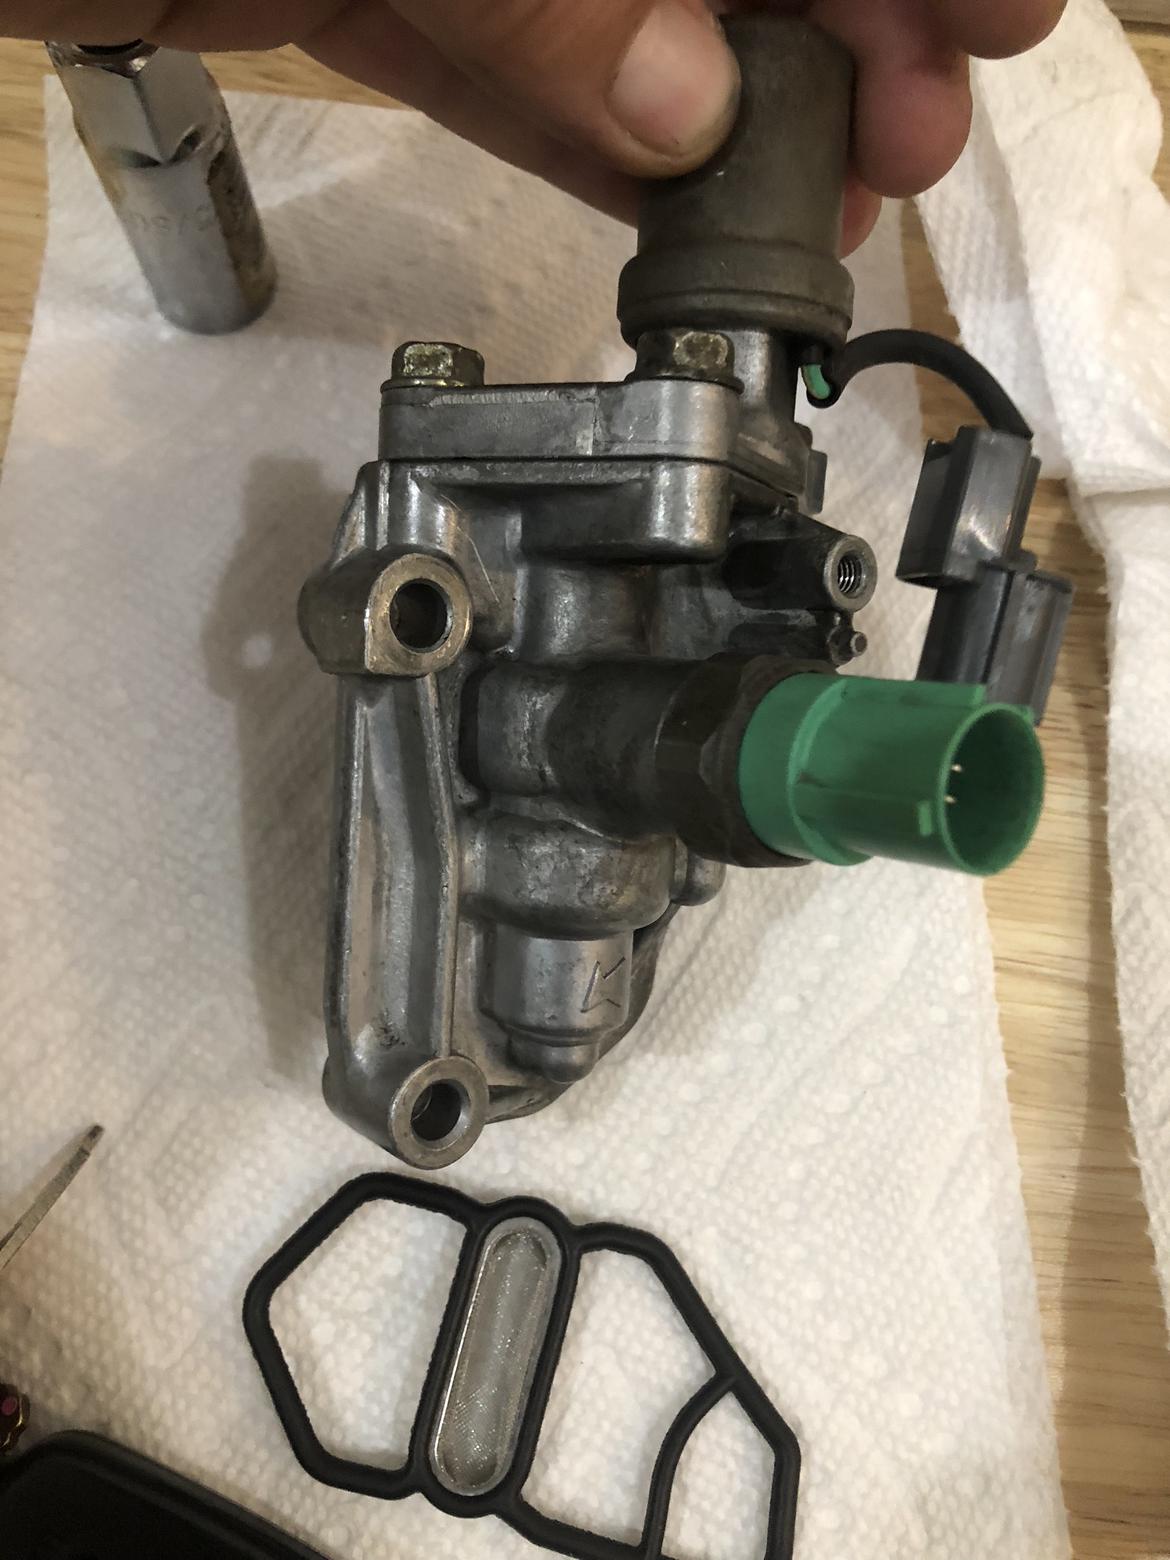
New seal with a little bit of old oil to lube went in with no issues, placement back on block required some cleaning also.

https://youtu.be/GBh-1k3jR3k

Tach issue resolved and VTEC engagement is working like a champ.

With my mind at ease on oil leakage i began to move onto the transmission fluid leak issue. I was able to narrow down the leak coming from either the Inner shaft seal or the passenger side axle seal. The drivers side was completely dry, however the passenger side had a thick film of transmission fluid all throughout the passenger side lower suspension and underbody. This was no good and limited my testing as i did not want to damage this transmission. After several thread reads and youtube videos i was dreading having to replace the inner seal, i started small and worked on the passenger side first, this was something i can do with minimal work and did not involve dropping or removing both side axles. 

With the passenger side suspension dropped from the  A arm i was able to keep the axle still connected to the hub and pull the inner axle end out of the transmission. This allowed me direct access to remove the axle seal. To my surprise i found right away where the issue was, there was a small tiny rock logged in between the seal and the housing, creating a small gap where fluid could rush out during drive. Its hard to see from the picture but this seal was very brittle and clearly re-used from the last time the Axles were replaced. The axle shaft boots on both end looked fairly new.

With the old seal removed, new seal installed and a fluid flush completed i was ready to get back on the road for a leak test. Success!!! no new leaks, i still have some cleaning to get the remaining fluid off the underbody.

At this point i began to start removing non-essentials. AC lines along with condenser have been removed. I have yet to remove the actual AC compressor as i need to source an Integra Type R non-ac Belt. 

Next step to really get road worthy is replacing the rear hatch glass. At first i hit the local glass shops, i debated trying to source a Lexan variant for light weight, however the cost was to high for what im shooting for. So i started looking at local Honda/Acura forums in the KC area. I found a great deal on a complete used hatch off of a 1996 LS Integra, glass complete. I was excited until i got to the guys house to find this hatch has been sitting in his back yard for the better part of 8 years. Needless to say the hatch itself had a decent amount of rust. At first i was thinking i would just replace the whole hatch, however with rust in mind and this car coming from Denver this car had very little rust. Only one spot on the car had rust and it was due to a shotty bondo job to replace what looks to be a quarter panel impact. 

This quarter panel will be a whole other project as i do intend on removing this cancer!

As far as the rear hatch i wrote of using the hatch itself and will just use the glass. I fully removed the old seal and any left over glass from the current rear hatch. It is clean and ready for a new piece of glass. I sourced a local glass shop in the KC area that quoted me $115 to remove the glass from the hatch i bought and install on the current hatch.


More to follow as the next ask is working my budget to have the glass replacement complete before i work on anything else. I want to get this car road worthy and on a track for some testing. Road worthy as in allowing my son(5 year old) to go for a ride with me :) He has been a huge component to building our "Race Car" very exciting times.


Robbie
Robbie UltimaDork
11/30/18 12:00 p.m.

awesome! is that an LS or GSR? 

I have always been a huge fan of these and got really close to trading my 240sx for a gsr at one point, before my dad convinced me otherwise. too bad that's the closest I have ever come to owning one. I should grab one sometime. 

dblagnt
dblagnt New Reader
11/30/18 12:47 p.m.

In reply to Robbie :

This is a GSR with still lots of love to give as im finding out :)

APEowner
APEowner Dork
11/30/18 3:15 p.m.

Welcome aboard!  I'm looking forward to seeing this project progress.  If you haven't already you might want to download the Challenge Budget Spreadsheet from Here and start filling it in now.

Matt B
Matt B UltraDork
11/30/18 3:23 p.m.

Awesome. I love integra projects.  Especially GSRs. 

dblagnt
dblagnt New Reader
11/30/18 3:46 p.m.

In reply to APEowner :

Will do thank you!

Ian F
Ian F MegaDork
11/30/18 4:26 p.m.

Welcome!  I'm enjoying the "wheeler dealers" diagnosis and repairs.  Is there supposed to be a picture after the paragraph about the hatch?

pimpm3
pimpm3 SuperDork
11/30/18 7:14 p.m.

These are great cars.  I had one in college as did several of my friends.  A cold air intake, and advanced timing really wakes them up.  With those two things and no passenger seat I ran a 14.4 at Gainesville in mine.

I am in the process of getting a stock low mileage 1996 ready to put on bring a trailer.

dblagnt
dblagnt New Reader
11/30/18 9:00 p.m.

In reply to Ian F :

Thank You! Yeah i left a blank spot for when i go to work on the hatch this coming week. Ill post pictures of the Hatch i purchased and the install of the used glass. 

Lof8
Lof8 Dork
11/30/18 9:31 p.m.

This is cool. I’m looking for the right Integra to pick up for the Challenge as well. A GSR would be wonderful!

clutchsmoke
clutchsmoke SuperDork
12/1/18 1:02 p.m.

GSRs are excellent. I had a sedan. Kinda wish I had gone with a coupe instead, but I like sleepers too much. Good work so far!

mr2s2000elise
mr2s2000elise Reader
12/1/18 1:09 p.m.

Sadly around here unless you have garage, gsr sedan/coupe will be stolen 

clutchsmoke
clutchsmoke SuperDork
12/2/18 6:21 p.m.
mr2s2000elise said:

Sadly around here unless you have garage, gsr sedan/coupe will be stolen 

Truth! In Chicago suburbs. Have had 2 Civics stolen.

Nitroracer
Nitroracer UltraDork
12/2/18 9:41 p.m.

Is theft really still a problem?  I know they were a hot commodity 15 years ago, but today?

spacecadet
spacecadet Reader
12/2/18 10:20 p.m.

In reply to Nitroracer :

Yes, easy to steal and parts, especially engines and transmissions are still sought after. so easy to part out. 

mr2s2000elise
mr2s2000elise Reader
12/2/18 11:24 p.m.

15 years ago due to parts they were being stolen 


these days with BAT, desire for Hondas people had  as teenagers are through the roof , theft is back in the rise again .... 

dblagnt
dblagnt New Reader
12/30/18 6:52 p.m.

*Update*

Had some time over the holidays to work on the rust spot on the passenger side quarter panel. First started to chip away any severe rust and old bondo, then started with sanding down to what metal i could. Used an orbital sander and 40 grit paper.

For my first attempt i was satisfied with removing the frail pieces and decided to use some Bondo Mesh to fill the hole.


With the mesh on and surface to a point i was happy with, i was ready to start on my first bondo usage attempt. 

My first attempt was a bit sloppy, i wasn't mixing the best and used too much hardening cream. The mixture only left me about maybe 10mins to work with it before hardening to a point where i couldn't smooth it out anymore.

Once done with the first batch was in place i let it cure for 24 hours and went back at it with a sander to try and smooth it out. Spent a good amount of time sanding with 40grit and 80grit.

As you can see, i had several air holes from not mixing properly. Back to sanding.....

Still some shaping to be done, and i plan to sand down even more before i put another layer on for the final shaping. This first attempt was a good learning experience and look forward to the next round of body work. For now i put off the body work and went to the engine bay to remove some addtional un-needed parts. Removed the AC Pump Compressor and the Bracket for the AC Compressor with Tensioner. Both items weighed about 15lbs. Both are still in decent shape, so off to the facebook market place to try and yield some recoup funds.

Till next time......Any comments or thoughts on the body work are welcomed. Any advice on how i can do a better job at mixing or smoothing out the mixture once on the body would be greatly appreciated. Thanks!

dblagnt
dblagnt New Reader
1/31/19 11:19 p.m.

Had a great breakthrough tonight chasing down a bouncy tachometer issue. Thought i had it fixed, but after giving it a test drive on Saturday the issue came back :(

https://youtu.be/Af7R1slZewY

Before attempting to start looking for a used Distributor, decided to start taking apart the current one. Wasn't adding up that the distributor would be bad, acceleration felt fine, no misfires, no cels, just the one issue of the tach bouncing. When inspecting the Ignition Control Module within the distributor i found that two connectors had weak connections on their clamping connector, one Black and the other Blue. After carefully re-crimping both connectors..See Pic Below. Closed the distributor back up and took it out for a quick test drive. Viola!! Tach is steady and smooth! Was dreading the cost of a new distributor, ICM or Igniter.

Meant to post these updates on Sunday but was a little busy. On spent the day Saturday, gutting the rear and prepping the hatch for a glass install. 

Once the rear was gutted, I installed a Rear Upper Strut Bar, B-Pillar Bar, and C-Pillar Bar. Repainted with Black Wrinkle Paint

Rear hatch was damaged from hail damage, main reason why the car was salvaged out due to the extensive hail damage taken. Sourced a replacement hatch with the glass intact, was originally just going to swap the hatch, but due to the hatch body having a decent amount of rust me and a friend decided to give it a try to just swap the glass. Outcome came out great!

On Sunday, me and my son Brenden took a drive East of Kansas City to Columbia, MO to source a used Front and Rear bumper with perfect tabs and in Black! Goal is to get rid of this green spray paint, smooth out the hail damage, and finish off with a flat black color. Both of the current bumpers have several broken tabs with cracks.

This weekend i plan to spend some more time and either start on replacing the body panels(Fender, bumpers) or work on the rattling exhaust, pretty sure there's a broken hangar or either the canister itself is shot.

artur1808
artur1808 Reader
2/1/19 6:37 a.m.

Love the detailed work to bring this car back to its former glory. Keep it up!

Run_Away
Run_Away Dork
2/1/19 7:19 a.m.

You probably want to keep the ac compressor mount, that lower torque mount does a fair bit. Without them the timing belt side mount snaps either the studs between the mount and bracket, or the bolts holding the bracket to the block.

dblagnt
dblagnt New Reader
2/1/19 9:23 a.m.

In reply to Run_Away :

Interesting, Did not know this. Will definitely put this back on. I can remove the pulley portion thought right? Thank You!

Mezzanine
Mezzanine Dork
2/1/19 11:22 a.m.
dblagnt said:


Once the rear was gutted, I installed a Rear Upper Strut Bar, B-Pillar Bar, and C-Pillar Bar. Repainted with Black Wrinkle Paint


ALL THE BARS! cheeky

Nice work bringing this one back from the dead. I'd be pretty happy with those compression numbers, even with the one cylinder down around 150.


David S. Wallens
David S. Wallens Editorial Director
2/1/19 11:36 a.m.

Such a great chassis. Congrats. 

dblagnt
dblagnt New Reader
2/1/19 12:21 p.m.

In reply to Mezzanine :

That was from a cold compression test, for whatever reason after the tune up and seal replacement. 150 cylinder came back up to the same as the others :). I still need to do a warm compression test to see if those 180 numbers go up or not. Will do that soon.

dblagnt
dblagnt New Reader
2/9/19 10:11 p.m.

*Updates*

Worked on body panel replacements this weekend with the parts that could be found used and inexpensive. Fenders(Ebay dirt cheap), hood, front and rear bumper. Color scheme is to attempt for a Matte Black or OEM Acura Granda Black if budget permits. 

With the front bumper off, took the time to repair the headlights. Neglected for many years, but they came back looking sparkling new!

Used a Meguair's kit with polishing wheel. 

Previous front bumper had several broken tabs, was cracked at the bottom, and missing the grill. Although prices aren't the best i was in need of a couple of grommets for the replacement bumper and decided to source them from a local Acura Dealership. Bonus was what we saw in the showroom. Glorious Machine! Still would prefer a 2003-2005 NSX, but I have much respect for the new model.

Replacement bumper went on smooth and fit snug.

Next step was replacing the Red/Green hail damaged hood.  When i picked up the hood, everything looked good. However when i brought it home i noticed there was a bolt broken off on one side.

First attempted to drill out the bolt, but i ended up drilling to big and stripped the threads.

Luckily i didn't drill with a bit bigger then the bolt and thus a 6mm tap was able to rethread the hole just fine. Really liking the color scheme with the engine bay being red and exterior black.

With the hood, fenders, and front bumper on moved onto the rear bumper replacement. With the rear bumper off and the rear jacked up. Worked on removing a horrible rattle with the rear exhaust. First driving the car i though the muffler was shot and was needing to be replaced. After further inspection I found one of the hangars on the mid pipe was far too long and wasn't trimmed properly, thus it was tapping against the mid pipe itself.

45 mins later with the use of a mini-hacksaw, no more rattle :)

One of the other suspension mods i had planned was to utilize a Stock OEM rear Trunk Brace from the Integra Type R. The GSR does not come with the female fastener holes ready for it. Few searches on honda-tech.com and teamintegra.com yield some good write ups on how to install it.

I could have gone about 2 inches shorter on the bolts, but they clear the bumper so i left them in place. Painted the ITR Trunk Brace Wrinkle Black to coincide with the color scheme. Paint finish didn't come out as well as id like but budget is tight and not worth buying more wrinkle paint at this point.

Original rear bumper was not OEM(missing Integra engraving) and had several cracks and broken tabs.  The used bumper i found fit flawlessly.

With the body panel replacement complete, moved onto Run_Away's suggestion to put the A/C Torque Mount back on. Did some more research on this, and he was spot on. This not just serves as the A/C Bracket but it also serves as a Torque mount(Good thing i didn't sell this off lol). Cleaned it up and re-installed without the pulley and tensioner.

At this point with the body panels my budget can permit im going to start working on smoothing out whats left of the hail damage from the quarter panels, trunk and A pillars. Until Missouri gets some warm weather and less ice/snow won't be able to take any test drives anytime soon. Ill be ready for the local KC SCCA Starting Line to start getting in seat time with autocross and getting used to the car.

1 2

You'll need to log in to post.

Our Preferred Partners
57B0gPnkQqWQ9D2AYvxBJNpgpNFAqBS27uP6w0cRcFGj4q3YNzOe2vFw6tS5WcHY