Previous budget was 4776.02 with 415 recoup
new money:
remove les radiator -20
add ron davis radiator 140
piece dom tube bent at welding shop: 25
piece 1/8x3x36 steel 29.99
kirkey seat back braces 51
new total: 4912.02 with 415 recoup
if you've notices, by build style resembles a ping pong ball in a blender, so I frequently don't really have a coherent narrative, but I give a fair whack at trying to create one with some revisionist history. All timelines are subject to fuzzy math and poor recollection as always.
I think I will start this one with the oddesy of the soul that ergonomics has become. Its making me rethink everything, and think through the long term stresses, accident stresses, weight, and conflicts with service and usage. Really making me stretch my brain in new and different shapes...
when we left off, I had the tubes in, and the seats mocked up. I didn't like it. Just couldn't find the sweet spot with my helmet, roll bar padding, and pedals connected to master cylinders. I really needed to find a few more inches of legroom.
 20220727_191035 by Michael Crawford, on Flickr
 20220727_191038 by Michael Crawford, on Flickr
So I did. I chopped out the firewall right around the ¼ plate the pedals mount to and pushed them forward a bit. I liked it. But needed to make it a little better. I don't have a box brake, so I have to get creative.
I went to dollar tree and walmart and found cake pans.
First attempt proved my concept, but the pan was too small and the pedals hit the firewall. It was a banana bread pan, and I didn't have a picture. But the next size up was a brownie sheet, and nailed the spacing with a little grinding and clearancing.
 20220731_111159 by Michael Crawford, on Flickr
 20220807_092136 by Michael Crawford, on Flickr
then it was time to make structure. The pan has all the rigidity of a wet paper towel. So I built off the ¼ plate with ½ inch tubes and gussets. I tied the plate to the dash bar, and the pedals to the dash bar as well. Then gusseted it. Its solid as hell. Ignore the first coat of paint. Its crappy, but the first coat to keep it from rusting while I do other stuff. It'll get better. Promise.
 20220810_175457 by Michael Crawford, on Flickr
 20220813_150357 by Michael Crawford, on Flickr
 20220905_143212 by Michael Crawford, on Flickr
 20220905_143238 by Michael Crawford, on Flickr
so, with the pedals finally and totally sorted, I could go back to seat mounting. Its still in progress, so feedback is still welcome.
I started with the vertical front mounts. Decided to use c channel, as it made the most sense to me. Two 5/16 bolts on wither side with fender washers had it pretty secure. I then ordered kirkey seat back braces after failing miserably to make my own. Sent pictures for review to Steve, and he recommended I cut down the top of the c channel, and add gussets to box the remaining c channel to increase weld area. Additionally, he wanted to see rear seat mounts at the base of the seat at the rear. So today I spent all day doing that. I also added a leg down to a pad on the floor for extra resistance to flexing over time. That corner only being supported by the riveted in heat shield made me nervous for longevity. Now im ok. Still have to tie in the bottom of the seat though. The harnesses wrap around the side tubes and have a really nice pull angle. Im super happy with that.
 20220827_124218 by Michael Crawford, on Flickr
 20220905_143222 by Michael Crawford, on Flickr
we then went to the other side. First we filled holes. Lots of holes.
 20220814_141718 by Michael Crawford, on Flickr
then created the seat frame again. This is all still in process, but will get the same treatment as the other side.
 20220827_130325 by Michael Crawford, on Flickr
the lowest door bar has taken a hell of a beating over the years, having jack points ripped off and repairs scabbed on. So I ground it smooth and welded a cap of roll bar tubing over it as a reinforcement.
 20220827_122158 by Michael Crawford, on Flickr
so, while im in the seating area, lets talk about the stub of rollbar bracing sticking up from the trans tunnel. I decided that a piece of tube inserted in the stub, bent to meet the dash bar. Simple, light, strong. I added some rosette welds to spread the load.
 20220905_143310 by Michael Crawford, on Flickr
lastly, lets talk about the steering column. The mount was cracked and bent, the wheel was about three inches into my gut, the quick release was work slap out, and the lower bearing was missing. So, step one was cutting the housing down till it was close. Step two was repairing the new quick release io was given via drilling out and helicoiling the buggered threads. I mounted up the grant steering wheel that I sold to brother Dustin in the 10th grade after dad made me pull it from the duster. Honestly, this steering wheel is the reason I have brother Dustin in my life. Its special.
 20220827_135637 by Michael Crawford, on Flickr
regardless, I chopped about 8 inches out of it to fit my seating position and comically proportioned fat ass. The smaller wheel really helps as well. Then, I used the anvil and beat the mounting plate back into shape. Welded up the cracks. Added some 1x1 angle to reinforce things and square up the mounting pattern. Made sure that it would mount up square and easy. Then, we solved he lack of lower bearing with a bit of ash wood turned down into a bushing in the finest British tradition. We even cut grease channels in it to reduce turning friction. Seems like as good a solution as any, and was free due to dad being a woodworker. And lets be honest, if the wood is on fire, im already completely and irredeemably berkeleyed. So, ill run it.
 20220827_124212 by Michael Crawford, on Flickr
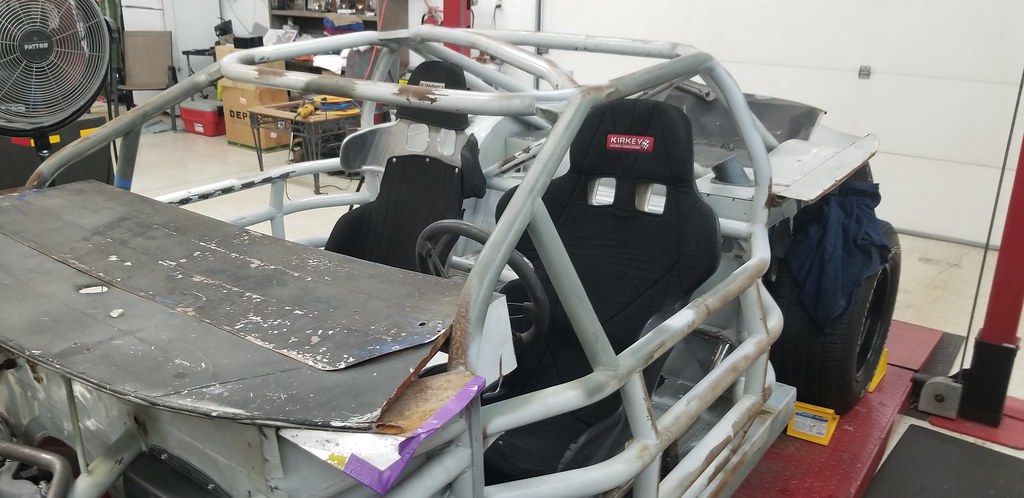
leaves the compartment looking kinda like this when I walked out of the shop today. Still more to do, such as the passengers seat boxing, a kick plate and heat shield on the passengers floor, kick panel padding mounts, some more holes, fab a gas pedal.....
 20220827_135632 by Michael Crawford, on Flickr
20220827_135637 by Michael Crawford, on Flickr
in progress is rust repair. On the nascar. Rust repair.
Well, and making the new cell fit, and fixing damage, etc.
I cut out the whole old fuel cell enclosure and painted up the metal that has never been painted to prevent it from rusting.
 20220905_143252 by Michael Crawford, on Flickr
I then went to my metal pile, and pulled out some galvanized sheet metal from what Dallas called a water heater shed. It had fiberglass insulation glued inside, and was originally a giant enclosure. I got all the fiberglass off, and discovered the guy spraying the glue was bored.
 20220831_090455 by Michael Crawford, on Flickr
made a cut sheet, cut it up with tin snips, and took it to my scenic sheet metal brake that lives in a nice quiet corner of the woods. Now, this isn't a box brake. Or a finger brake. Or a good brake. But its what I got to work with, so we made it work. I also used flanging pliers for the bottom piece.
 20220829_152031 by Michael Crawford, on Flickr
 20220831_090544 by Michael Crawford, on Flickr
 20220903_092627 by Michael Crawford, on Flickr
 20220903_093711 by Michael Crawford, on Flickr
welding galvanized sucks. But its almost done. Next is finish it to the trunk floor.
 20220903_121034 by Michael Crawford, on Flickr
in the process, I swapped on the f body pan. To do so, I had to modify the truck windage tray. When I dropped it, I found surface rust in the cylinders and on the crank weights. I'm not hopeful about the health of this one, but its what I have for now. The f body pan is so much better for ground clearance. I'm debating cutting the flat bottom piece off the frame that's the lowest point, and replacing with a piece of tubing. It would make the lowest point an inch and a half higher, and round which would be less likely to dig in.
 20220809_190223 by Michael Crawford, on Flickr
 20220809_190232 by Michael Crawford, on Flickr
I also picked up a new radiator. The $20 one I picked up had the wrong outlets and dimensions. I scored a brand new ron davis dual pass for $125 from facebook, and bought a hans 20L from the same guy for another $125. the radiator is EXACTLY what I needed.
 20220831_153642 by Michael Crawford, on Flickr
ill leave with a picture of the finally finished calipers.
 20220810_152554 by Michael Crawford, on Flickr


 crappy pictures. I was dirty, hot, and smelly from the parts washer.
  this morning before work i finally finished the caliper rebuild project.

 ghis is the master cylinder firewall plate. Its 1/4 steel. I think I want to tie it to the top corners with 1x1 angle iron that runs back to the dash bar, amd a piece of 1/2 square tube from the bottom center to the dash bar.
 sure doesn't look like a weekends worth of work.

 sure doesn't look like six hours of straight fab work


 more gussets made and holes filled. Both seats actually bolted in!


