


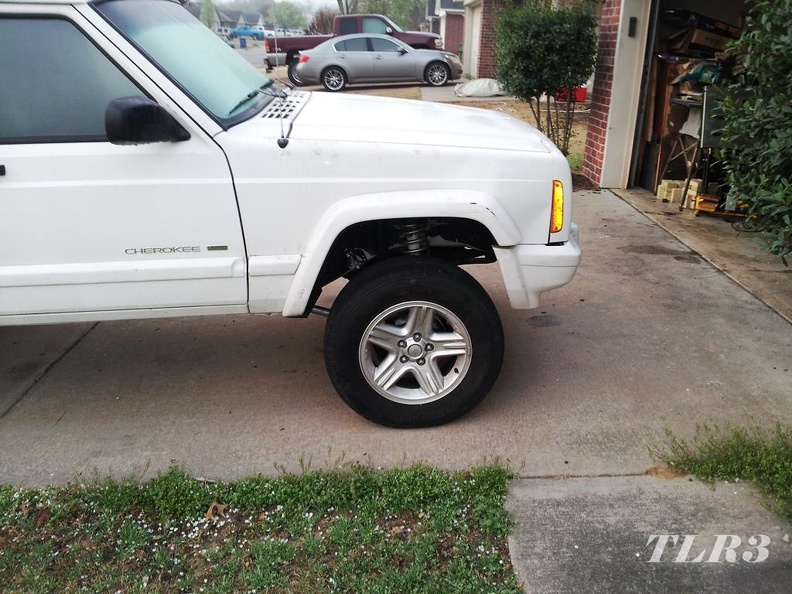
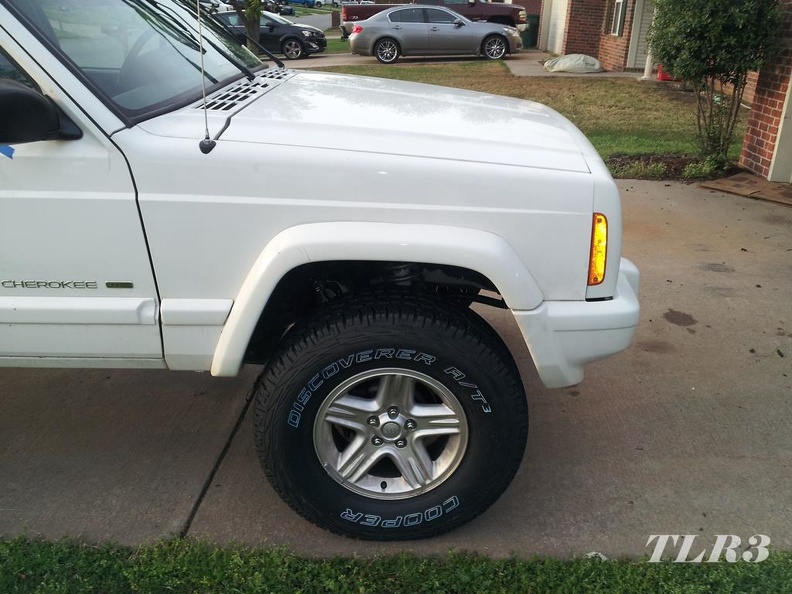
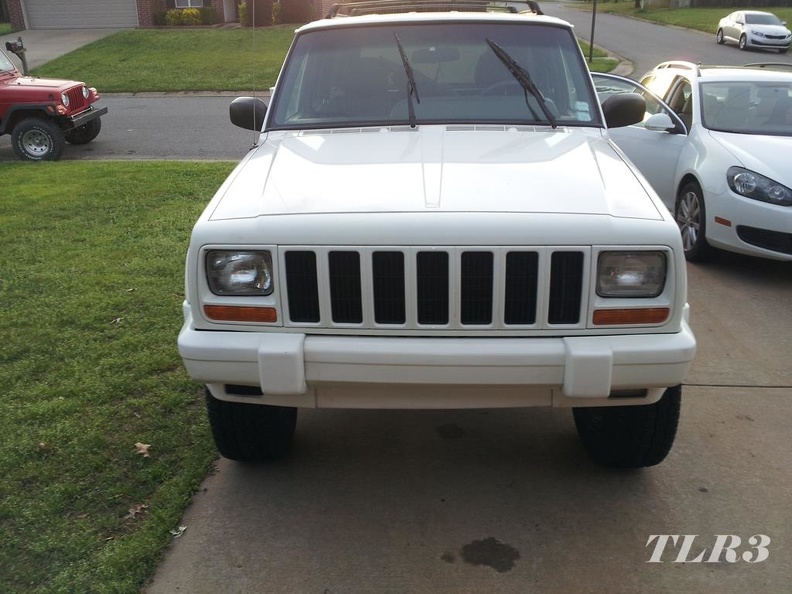
Header panel and bumper "fixed" and installed.
Before:
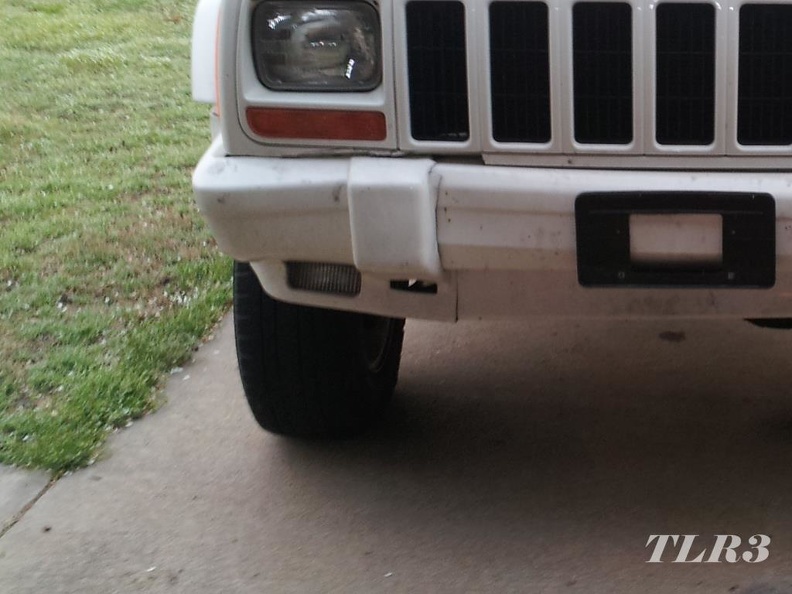
After:
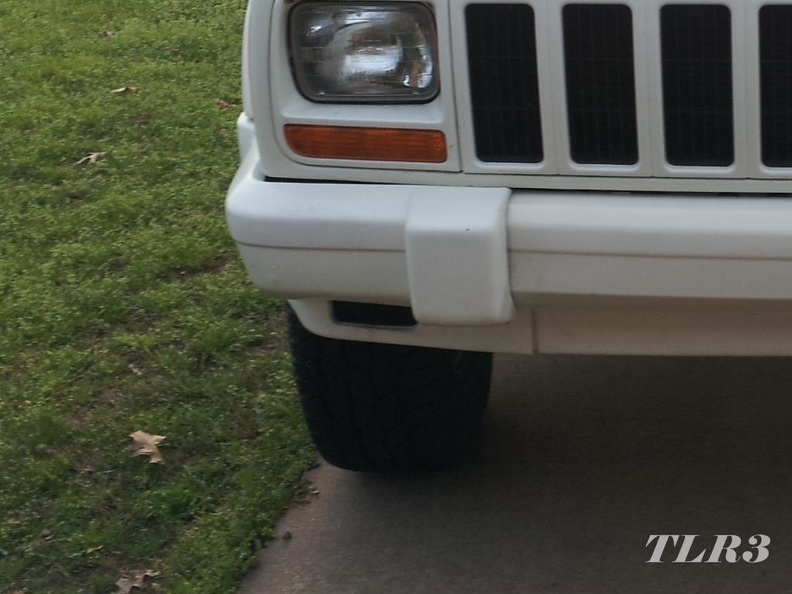
Front right tire no longer rubs!
Before:
After:

Header panel and bumper "fixed" and installed.
Before:
After:
Front right tire no longer rubs!
Before:
After:
So this is Moby as of this morning.
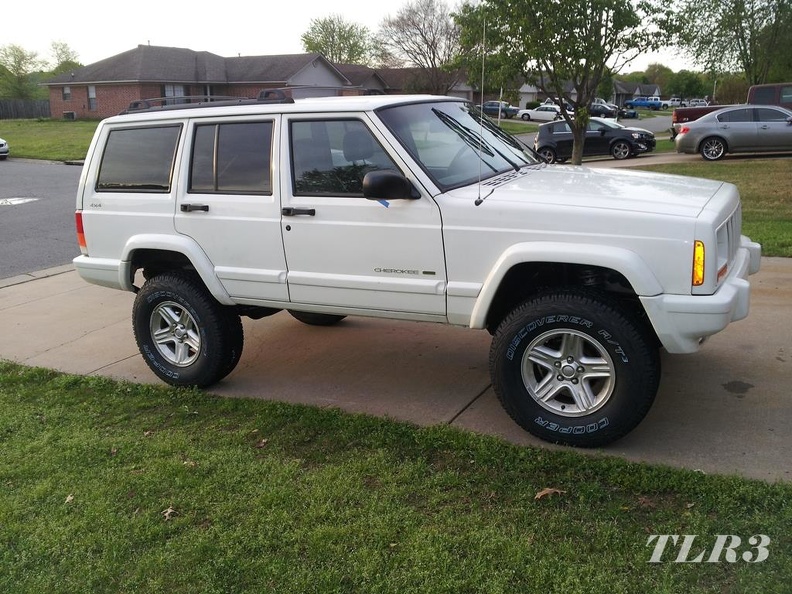
Needs some maintenance stuff still.
Valve cover gasket is leaking. Came with a new one, haven't installed it.
Fan belt is old and cracked. Came with an new one, but I bought a Goodyear Gator Back.
Rear Wiper doesn't work, switch is broken too.
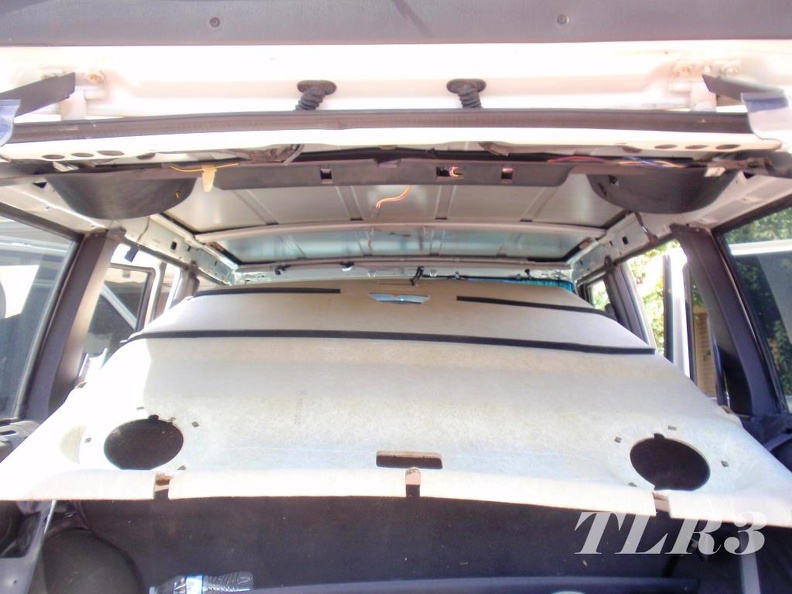
Headliner is sagging, surprise, and XJ with a saggy headliner.
Power steering fluid looks like something from La Brea.
Tare/crack in drivers seat bottom leather, I got some Bish's to try and fix it.
Rear power lock has recently quit working, may be related to rear wiper not working.
Needs some exhaust work, I want to replace the hack job Catalytic converter the PO had done.
Both rear fenders need some rust patching.
The BIG ONE, that I may wind up eating my words and hiring out... The A/C evaporator needs replaced.
I may try and tackle the headliner this weekend. I've got fabric and adhesive, all I need is time and motivation.
Eventually, bumpers (hitch and winch), power cables and battery terminals, 8.8 rear, LSDs in both ends, etc.
For the time being, it's mobile and usable again, so we're just going to drive it as needed.
bigdaddylee82 wrote: Whirring noise, seems like it's coming from the rear, I had attributed it to the hard as nails, old, weather cracked, and separating tires, but it's still there with the new tires. May need to pull the drums and have a look-see.
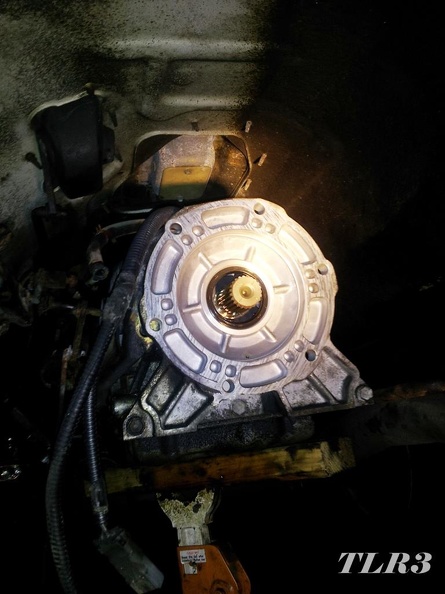
Well I tracked the Whirring noise down, looks like I'm going to be swapping that NP242 in sooner than I thought. 90%+ of the noise is from the transfer case, internal. I pulled the drain plug for Moby's transfer case. Not. A. Drop. ![]() Bone dry.
Bone dry.
The manual says the NP231 holds 1.5 Quarts, of fluid, it took 1.75, there was literally no fluid in it. I should have checked long ago, but incorrectly ASSumed the noise was from the junk tires that were on it.
The new fluid helped a little, but it was already too far gone.
Stay tuned for a NP242 swap in the not too distant future.
Hmm, something appears to be missing.
R&Ring the transfer case isn't the most difficult automotive job I've done, but unless you've got at least a transmission jack it's not the easiest one man job. Pro tip: when pulling the transfer case off the transmission, don't catch it with your face when removing it. It's only about 80 lbs, figured I could just He-Man it out of the Jeep, it slid off of the transmission way easier than I was expecting. Earned myself a busted lip and mashed schnoz. ![]() Could have been much, much worse, but I had both hands on it when it came loose and I was able to guide it and adsorb some of the mass with my arms and chest.
Could have been much, much worse, but I had both hands on it when it came loose and I was able to guide it and adsorb some of the mass with my arms and chest.
Needless to say, I built a cradle out of some scrap lumber for the replacement transfer case and used my floor jack to put it on the transmission.
After I pulled the NP231, I didn't bother to open it and investigate. However, spinning either output by had with it in 4x4 you could hear the chain slapping the inside of the case. It's toast.
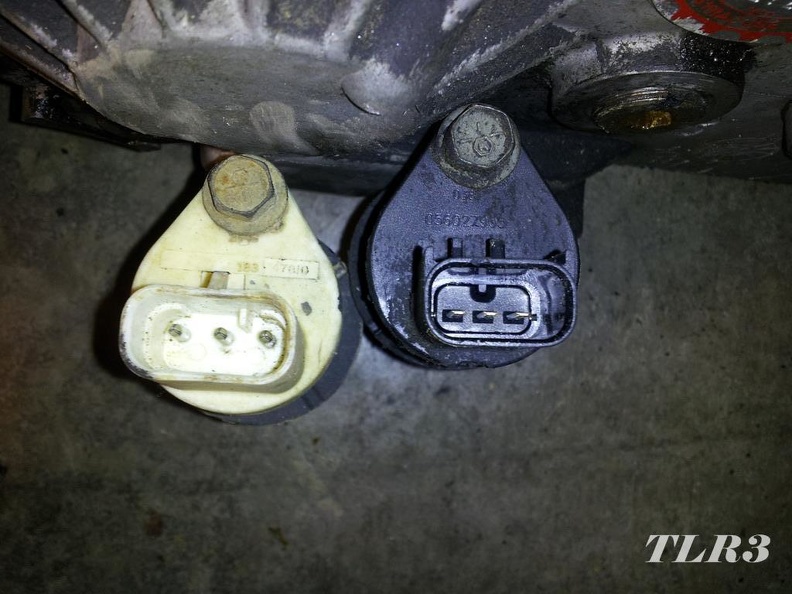
♫ ♪ ♫ ♪ One of these things is not like the other. One of these things just doesn't belong. ♫ ♪ ♫ ♪
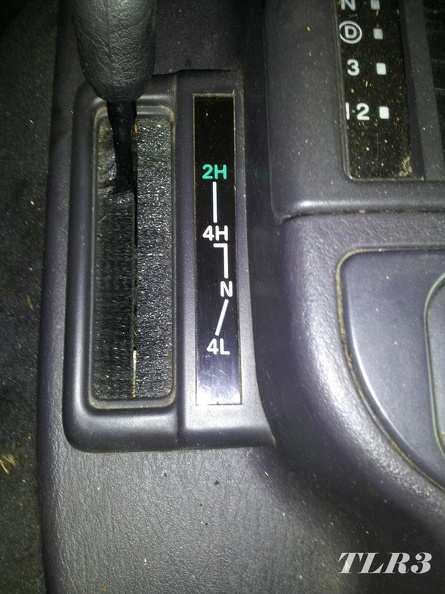
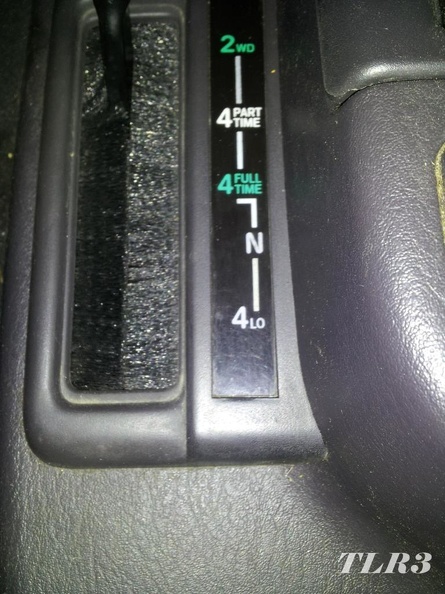
231 that was in the XJ on the left, 242 from a ZJ on the right.
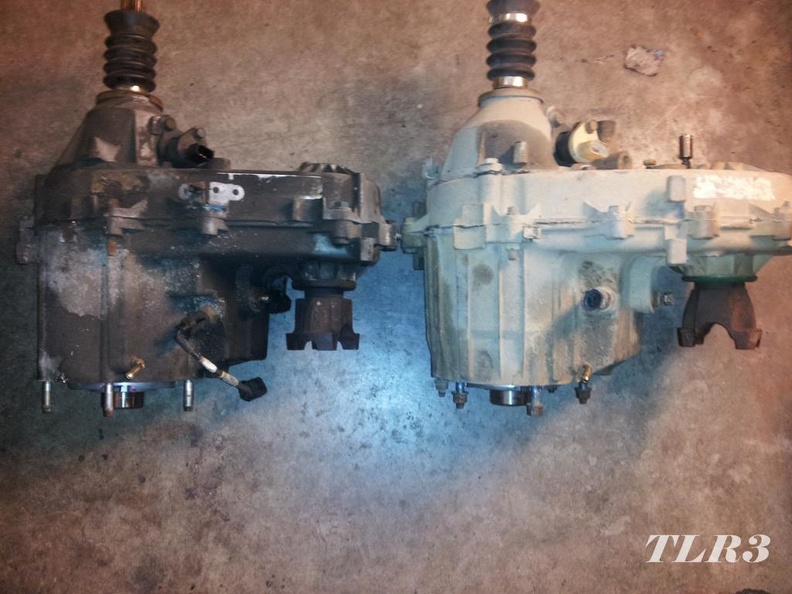
ZJ 242 on the left, XJ 231 on the right.
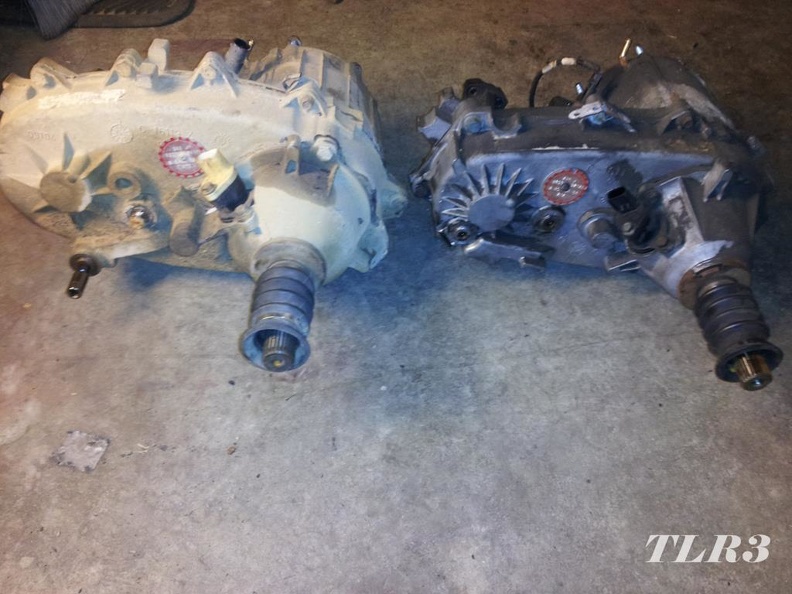
ID Tags.
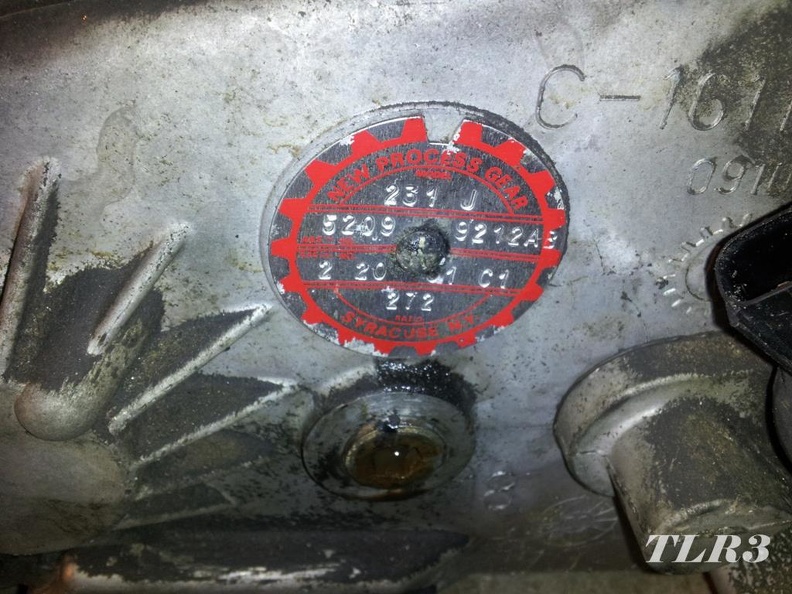
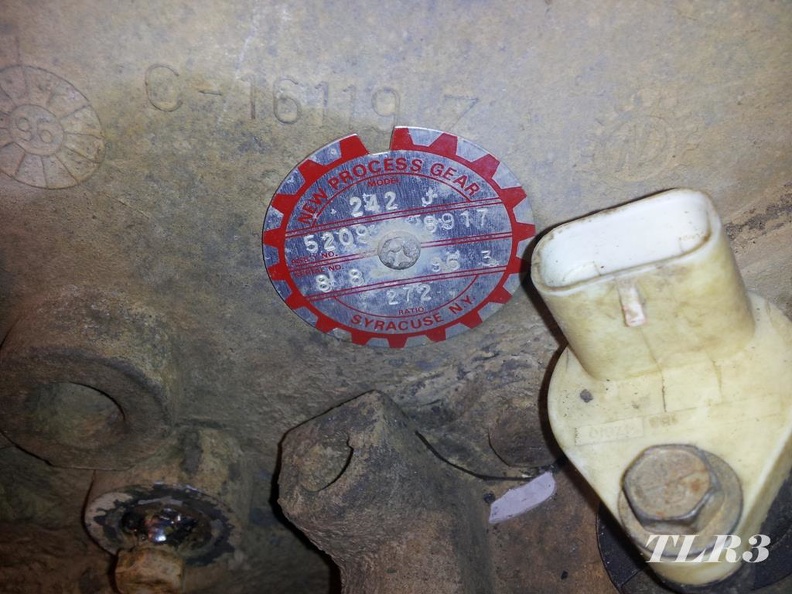
So, the NP242 was a factory option for XJs. The late model '97+ XJs either had an NP231 or NP242. The ZJ Grand Cherokees ('93-'98) had a few options, NP249, NP231, and NP242. Thanks to Jeep's parts bin engineering, a lot of things are direct swaps, and a NP242 from a ZJ bolts right in place of most XJ's transfer cases. There's some minor incongruities with some years and transmission options, but for the most part they're direct swaps.
One minor issue I had was the speed sensor. While the ZJ NP242 I got has way fewer miles on it, 78K vs. 230K on the NP231, it's an older model with an older speed sensor.
Physically they're almost identical.
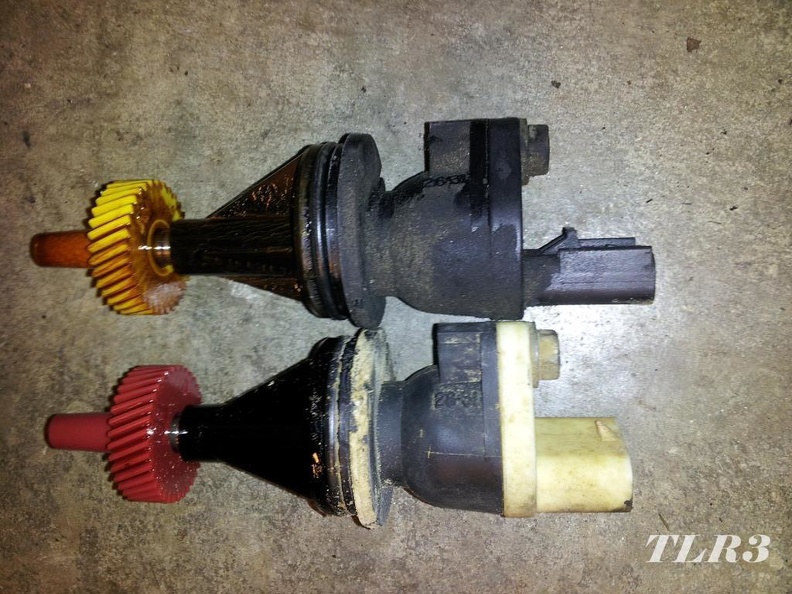
However, the plugs are a little different. The 242 plug is the white top with round pins, the 231 is the black top with flat pins. Simple solution, just swap the 231 speed sensor into the 242's tail housing, it's that simple.
Well, this is inaccurate, and not much use anymore.
That's better. ![]()
I've got something up my sleeve to make the 4wd indicator lights on the dash work. Simple solution would be to get a 4x4 indicator switch (mode switch) and pigtail harness from an XJ's NP242, but a new switch is $60+ and the pigtail has proven difficult to source. The ZJ's 4x4 indicator switch is still in the 242 I put in the XJ, but when comparing wiring diagrams, I believe the pin out for the ZJ switch is different from the XJ switch. I'm confident I can make it work, but I'll have to make my own pigtail.
It's not like you can't still use it with out the indicator lights.
While I was at it, I changed the transmission fluid and filter. Whatever shiny happy person that last serviced it, used red RTV instead of a pan gasket. That made significantly more work for me. I cleaned the RTV off and used the rubber gasket that came with the WIX filter. I drank the Kool-Aid a few years ago, and have been using AMSOIL in a lot of things, the transmission and "new" transfer case both got fresh new AMSOIL ATF.
The first shakedown run, wound up with Moby, doing more Moby things.
That solved the worst of the noise, the loud growl/whirring noise on deceleration is gone, but there's still rear end noise. ![]() I'm back to either brakes or bearings, if it turns out to be bearings, I'll be accelerating the 8.8 swap plans. I can't bring myself to put money into the D35.
I'm back to either brakes or bearings, if it turns out to be bearings, I'll be accelerating the 8.8 swap plans. I can't bring myself to put money into the D35.
Minor update. I finally fixed the leaky valve cover gasket. Good news, no sludge, everything looks good. No surprise, I didn't expect issues, I have a file folder full of service receipts from the previous owner, and I poured ~1/3 a can of Seafoam in the crank case about 150 miles before I drained the oil.
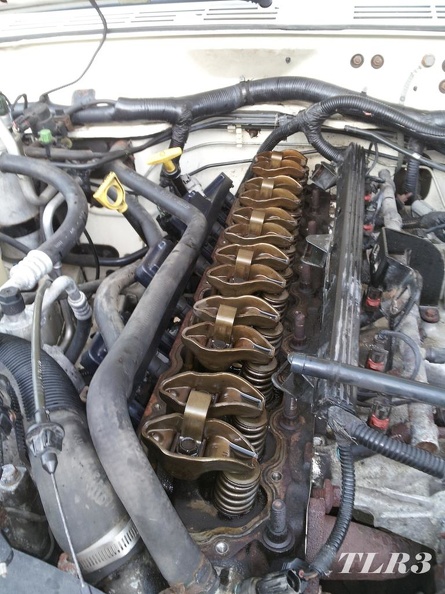
So the valve cover gasket had been leaking for long before I got the Jeep. The previous owner had even purchased a gasket with some delusion of maybe, potentially, someday, possibly, when he got to it, fixing it before he sold the Jeep. So the Jeep came with a new gasket, just not installed. I never bothered to actually open the box and check it out, it said Fel-Pro on the box, and I was told it was a valve cover gasket. When I finally pulled the valve cover off and got ready to put the new one on I discovered a slight difference.
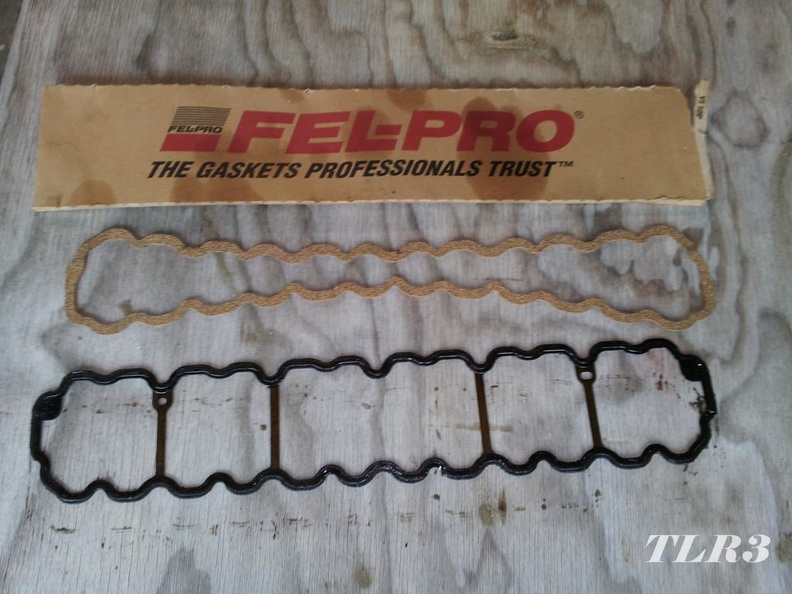
The original was a steel and rubber gasket, the new one that came with the Jeep was cork. It's a 4.0l gasket, and I could have made it work if I took the time to glue it in place with some RTV, but there was no way it was staying in place while I positioned the valve cover. I made one futile attempt, then called Advance and confirmed they had the "right" one in stock.
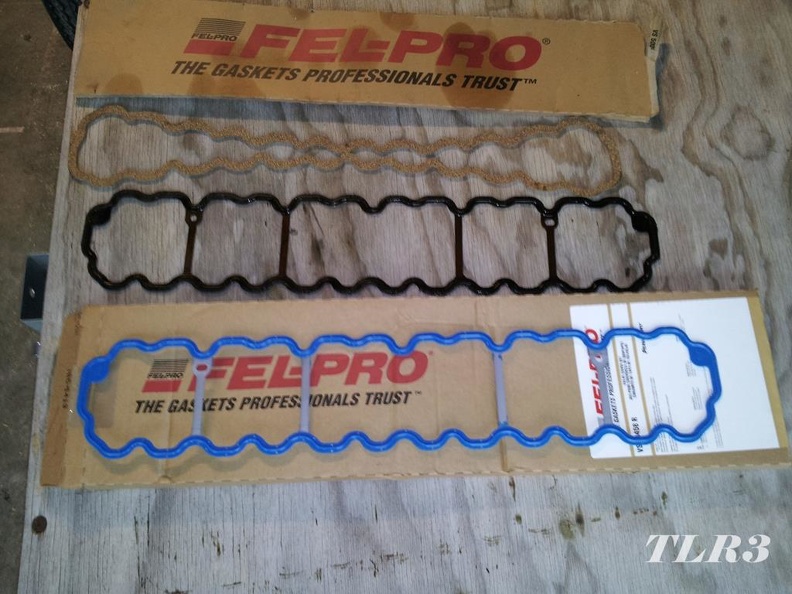
The new gasket came with new rubber washers for the bolts too, which was great because the old ones were rock hard, and would have probably leaked.
A thin film of black RTV on the new metal and rubber gasket just for extra peace of mind, torqued all the bolts, and no more leak.
I changed the oil, 6 qts of Rotella T6, a can of BG MOA snake oil, and a new Mann oil filter, got a new air filter too. Only fluids I haven't replaced yet is the power steering, it's on the list.
I used pretty much an entire bottle of Zep degreaser, and my new-to-me Craftsman pressure washer, which was a whole other project of its own, and you could just about eat off of the engine bay now.

Nice write up on a transfer case swap. I've always been curious about that.
Did you need different driveshafts? Looks like the yoke is different on the right side of that 242.
ssswitch wrote: Nice write up on a transfer case swap. I've always been curious about that. Did you need different driveshafts? Looks like the yoke is different on the right side of that 242.
No need for any different driveshafts yet. Front outputs on both cases are a 1310 CV yoke, and the slip yoke that was on the rear driveshaft for the NP231 slid right on the rear output of the NP242. If there's any length difference between the transfer cases it's negligible, within 1/4". I'm still using the same front and rear driveshafts that were attached to the NP231 on the NP242.
The NP242 is a little bigger around than the NP231, but inputs, outputs, spline counts, bolt patterns, etc. are all the same for both transfer cases. Only differences are the mode switch/wiring harness, and speed sensor, though I imagine if I had gotten a later model the speed sensors would likely have been the same.
I'm speaking in generalities here, but usually the only thing to watch out for is the year model and/or transmission the donor transfer case was bolted to, because there were at least 3 different input shaft lengths and and a couple spline counts used over the years. Most modern Jeeps all use 23 spline outputs/inputs on their transmissions and transfer cases, exception being the manual transmission 4 cylinder Jeeps, they're usually 21 spline, and older XJs/MJs (~'91 or older) are 21 spline too. Generally, if it's '96 or newer Jeep with more than 4 cylinders, or 4 cylinder with an automatic, it's got the same length 23 spline input/output on the transfer case, and transmission. Before '96 there's a bit more variability, but if you're so inclined (I don't know why you would be?) the inputs on the transfer case can be swapped to match whatever other Jeep transmission you're attaching it to.
Now when I swap the 8.8 rear in, I'll likely have to do something about the rear driveshaft length, I won't know for sure until I get it hung under the Jeep, and break out the tape measure though.

you might be ok with the lift offsetting the extra length of the 8.8
solfly wrote: you might be ok with the lift offsetting the extra length of the 8.8
I hope you're right, I'm looking at all options. The 8.8 I've got lived under the rear of another XJ for part of its life before I got it. Still has the spring perches located for an XJ on it. I'm not sure what kind of pinion angle it's going to have, and I really don't want to have to cut the spring perches to adjust the angle if I can keep from it.
I considered sending the back half of the NP242 and its main shaft off to Tom Woods to have them make a SYE and new driveshaft for it. That'd be awesome, they make great stuff, but I just can't justify the cost for a pavement pounder XJ. Plus I really don't want to pull the transfer case again.
I think even with the lift, after putting a 1310 flange adapter on the 8.8, I'm going to have a rear shaft that needs trimmed down. Angles are a concern too.
I think since I've ruled out Tom Woods, and I've generally been anti "hack & tap" SYEs, I'll likely wind up sourcing a 3103-27CV slip yoke and either splicing another XJ's front driveshaft's CV joint onto my current rear driveshaft, or just using another XJ front shaft as is.
Maybe I can adjust the slip joint of an XJ's front driveshaft the correct length and weld it in place?
Maybe I need to get over myself, and do a "hack and tap," SYE on the NP242?
Maybe all the stars will align, and everything will work with the stock rear driveshaft? Yeah... maybe.
Charged the A/C for a little trip to the farm over the weekend, it'll all leak out again in about a week. First time Moby has moved in over a month. Everything went okay.... Burning plastic/rubber smell and smoke is supposed to come from the HVAC vents right?
Just more to add to the list of things to do.
Cold air, and no more smoke!
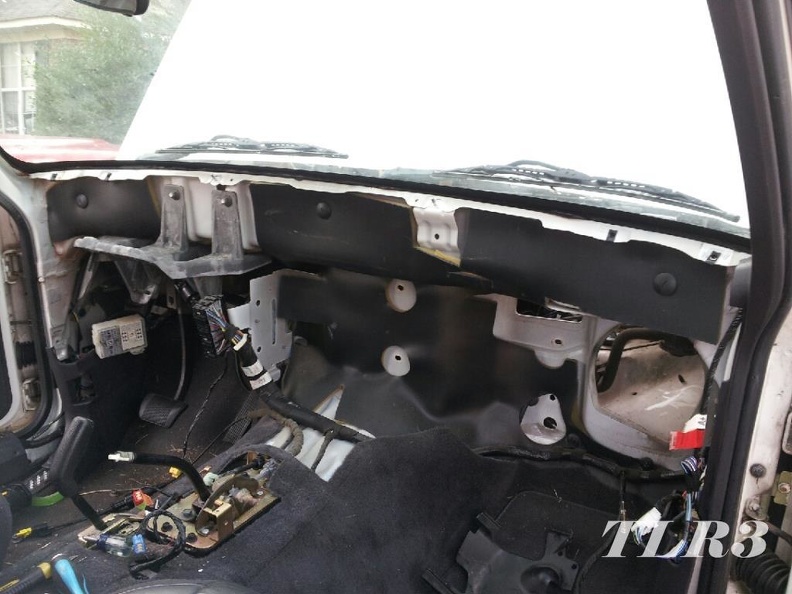
New evaporator core, receiver/dryer, orifice tube (hard line), heater core, heater hoses, blower motor resistor, replacement heavy duty resistor wiring harness, and various and sundry O-rings and/or gaskets.
A lot of work, the entire dash must be removed to access the HVAC box, the steering wheel must be removed to remove the dash, the center console must also be removed to remove the dash. Then you've got to remember what order all the dash pieces and bezels have to be put back together in.
I used some A/C specific solvent to flush all the lines I was reusing and the condenser, fresh PAG, some of Dupont's finest R134a, and it's blowing cold.
I did the heater core too while I was at it, the evaporator is what was actually leaking, but I figured since I was already doing all the work to get to the evaporator, and had the HVAC box apart already, I might as well put a new heater core in while I was at it. With my luck I'd get it all together and lose the heater core a week later.
I'm a little disgusted, I took a ton of pictures of the whole procedure, but the SD card on my phone decided to E36 M3 the bed, and I've lost almost everything since June, when I put the new card in... technology. ![]()
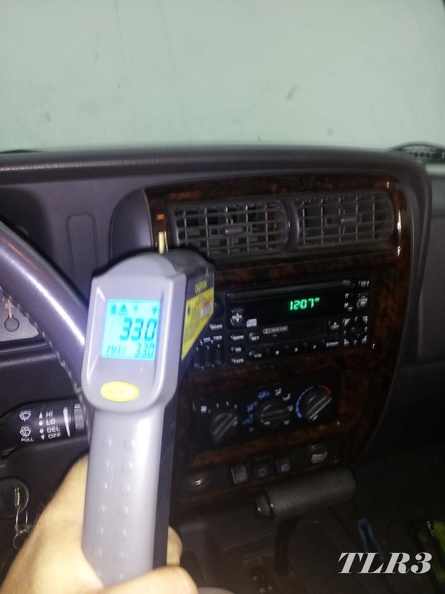
My HF infrared thermometer says my center vents are 33° F after running the A/C on max for a bit. Ambient was low 90s with what felt like 180% humidity, just had a rain shower this afternoon, so it's MUGGY out.
Bonus points, no smoke blowing out the vents!
That's one huge hurdle that'd been looming since we bought Moby, finally over and done with. ![]() The leaky evaporator core was the primary reason we got it so cheap, the previous owner had gotten estimates on having it fixed, and decided to part ways with it instead.
The leaky evaporator core was the primary reason we got it so cheap, the previous owner had gotten estimates on having it fixed, and decided to part ways with it instead.
I don't have pictures on my SD card anymore, but I did still have a couple in my text history from sending pictures to a friend.
Dash removed, all that work just to get to this.
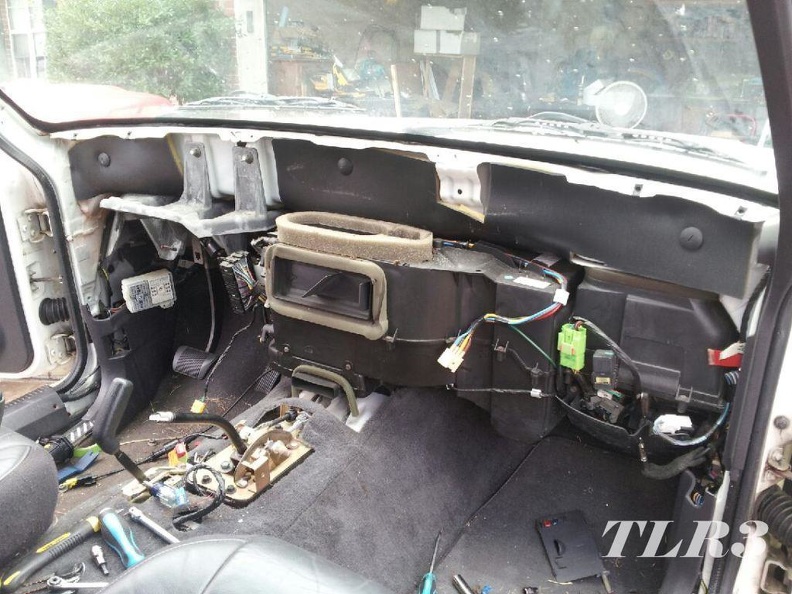
HVAC box removed.

![]()
I would have just rolled down the windows. ![]()
Continued rust remediation.
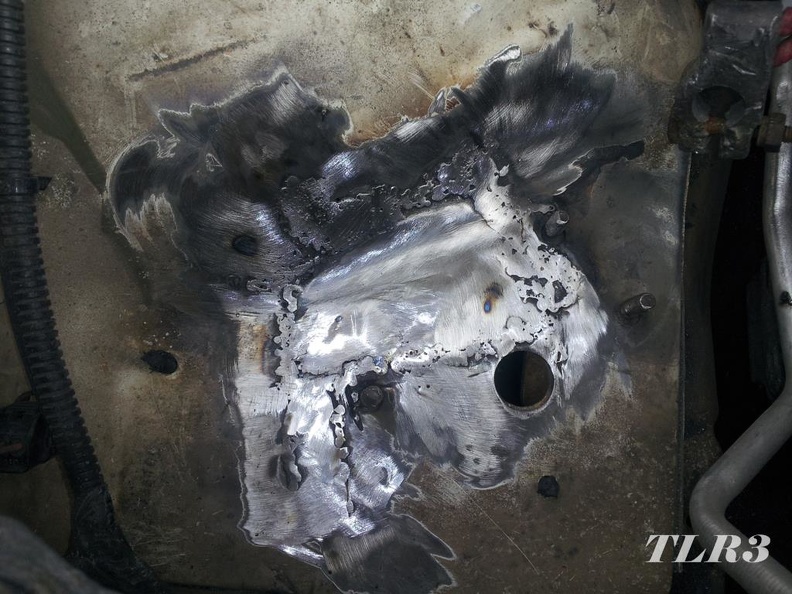
When installing the lift kit last fall I discovered a rusty spot in the front right wheel well. I picked at it a bit and quickly discovered it wasn't just surface rust. I pulled the battery tray out and discovered this lovely little iron oxide induced hole.
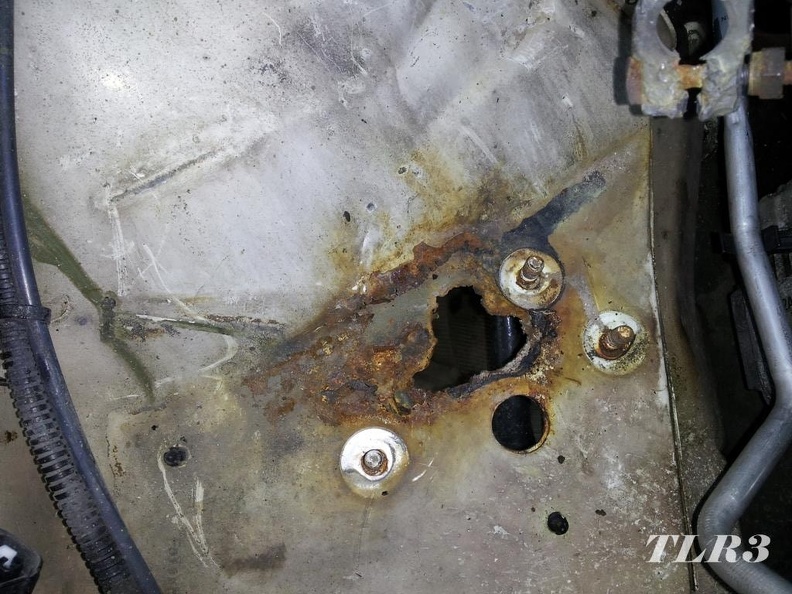
So I cut out the offending area, and made a template for a patch panel with some painters tape, and exacto knife. I bought the HF electric body saw specifically for this and a couple other areas that need patched, the saw might be okay with some decent blades, but the two that came with it, are, to put it nicely, junk. After I destroyed both body saw blades I stuck a cutoff wheel on the 4-1/2" angel grinder and went to town. Using the cutoff wheel made a little more work, since I had to make a lot bigger cuts than I would have with the body saw. I covered what would become internal panels again with weld through primer.
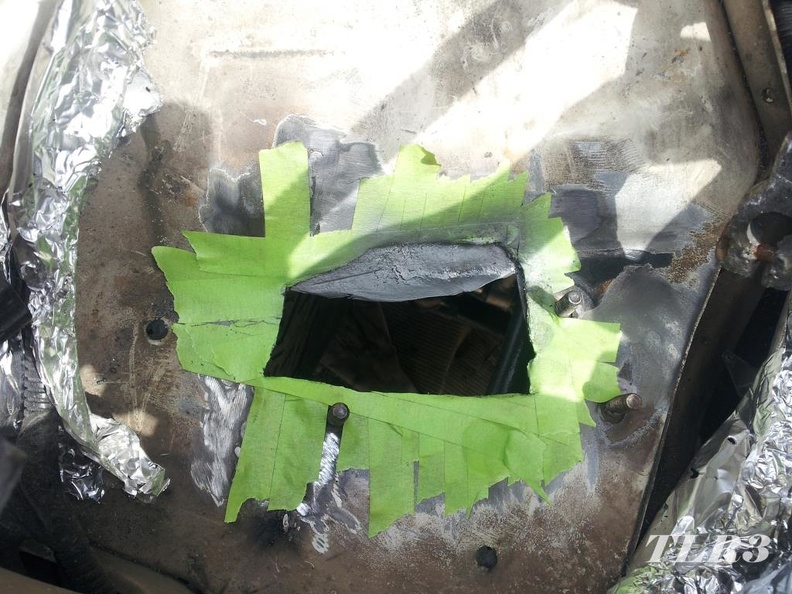
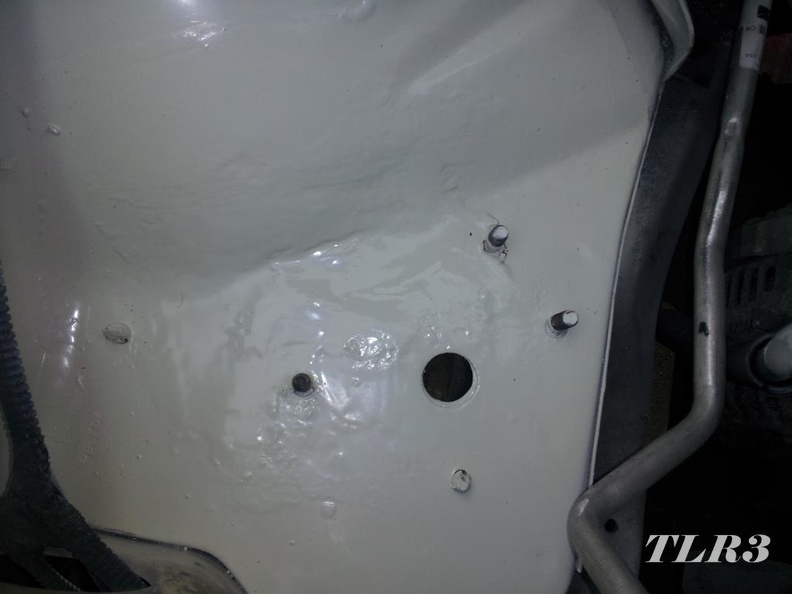
I made the patch panel out of some 22 gauge mild steel, stuck the tape template to the sheet, and cut it out on the band saw. I stuck it in the vise to bend it to match the contour of the fender.
I am not a body guy, I have a wire welder, and I can stick stuff together, but this was a challenge. Awkward position, thin metal, and fitting my 4-1/2" angle grinder with a flap wheel in there was an exercise in futility. I eventually had a new piece of metal stuck in there and smooth-ish.
There are parts that are now more welding wire than original Jeep metal or patch panel, since I was chasing burn through holes and filling them in. That 22 Ga got real thin, real quick, after hitting it with the flap wheel. If I had to do it over I'd use thicker steel for a patch, 18, or 16 Ga, and some .023 wire instead of .030.
Anyway, the rust is gone, the hole is patched from top and bottom, primed and painted on top, and I primed the under side of the fender, and hit it with some Bondo rubberized under coating. The repair definitely has some cellulite, but it's hidden under the battery tray, so no one will ever see it.
There's at least two other patches I need to do, they're a lot easier to get to spots, so this was good practice. I think I'm for sure going to get some .023 wire and tips before I attempt them though. I need to hunt down some decent blades for the body saw too.

bigdaddylee82 wrote: There are parts that are now more welding wire than original Jeep metal or patch panel, since I was chasing burn through holes and filling them in.
I was howling with laughter when reading this. VERY accurate description of my recent floor repair escapades on my own XJ ![]()
Furious_E wrote:bigdaddylee82 wrote: There are parts that are now more welding wire than original Jeep metal or patch panel, since I was chasing burn through holes and filling them in.I was howling with laughter when reading this. VERY accurate description of my recent floor repair escapades on my own XJ
Hey, at least it's new metal.
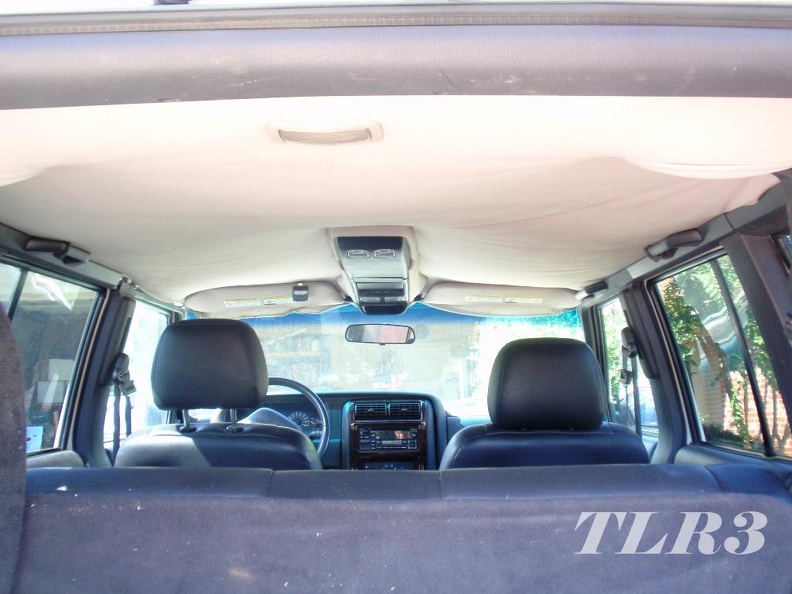
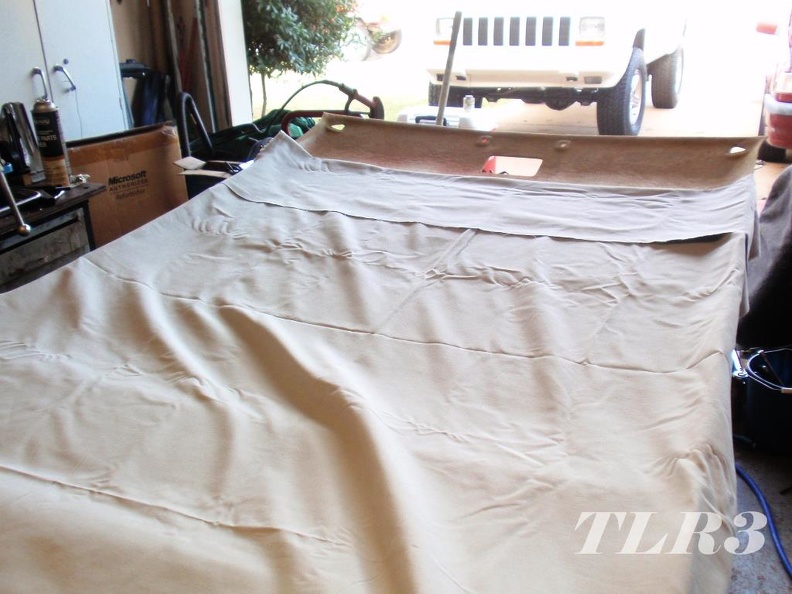
So I finally replaced the headliner, SWMBO hasn't seen it yet but she did pick out the fabric. I was campaigning for a cool plaid/tartan pattern, a loud paisley, or a cool treasure map pattern I found, alas I didn't win. Plain old boring gray cotton duck cloth, roughly the same shade as the original fabric won out.
I'll add pictures later, after losing all the pictures on my phone I switched to our old point and shoot digital camera. My work laptop has an SD card slot but apparently an XD card won't fit, I don't know where the USB cord for the camera is, and of course a regular mini USB won't fit. Thanks Olympus for all of your proprietary bullE36 M3, shiny happy people. My personal laptop's card slot does accept XD cards so I can eventually retrieve the images.
Now a question.
The 8.8 will eventually find its way under the back end of Moby. That phase is looming on the horizon. There're a few things I need to do yet. When I bought the 8.8 it had a mini spool in it, so I need to replace the mini spool. I had been set on picking up a rebuilt Trac Lok from ECGS, I can get one rebuilt from them cheaper than I can buy a questionable used one and clutches for, plus I don't have to rebuild it myself.
The Trac Lok will likely require new shims, so carrier replacement kit (new shims and bearings), plus rebuilt Trac Lok, plus friction modifier, is withing +/- $5 of what I can get an Spartan drop in "lunch box" locker for. The Spartan wouldn't require pulling the carrier and swapping the ring gear onto a new one either, so less work.
My goal all along has been to maintain functioning ABS, I'm hesitant to use a locker for this reason. However I emailed Randy's Ring & Pinion's tech folks, asking their thoughts, and they seem to think the ABS should still function fine.
I know ABS with Trac Lok was a factory option on Cherokees, so that's comforting.
Any thoughts, or prognostications of ABS vs. traction aiding device options?
Maybe a lunch box locker would be fine, I guess I'm just a worrier...

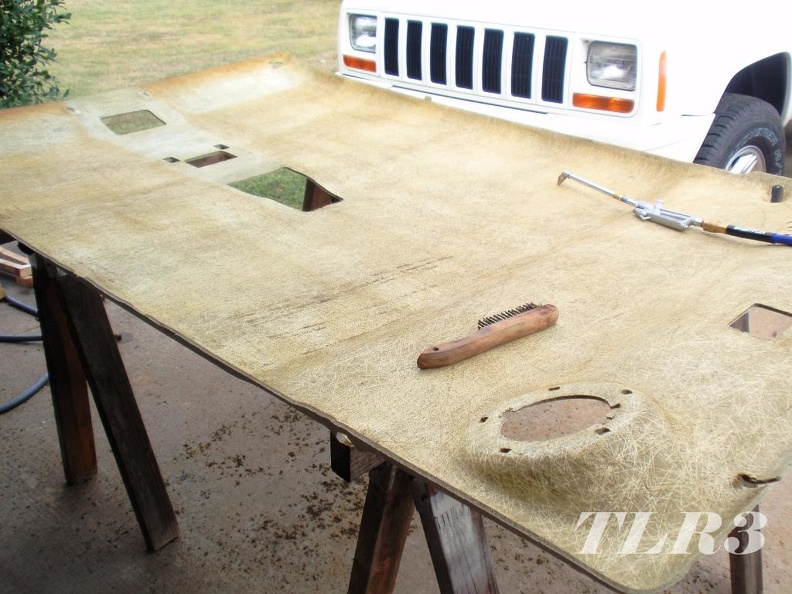
So the headliner, like most all other XJs, Moby's headliner was sagging, the front edge was completely loose, and stuffed under the sun visors. As such it rained little flakes of crusty headliner foam every time you moved the sun visor.
Saggy.
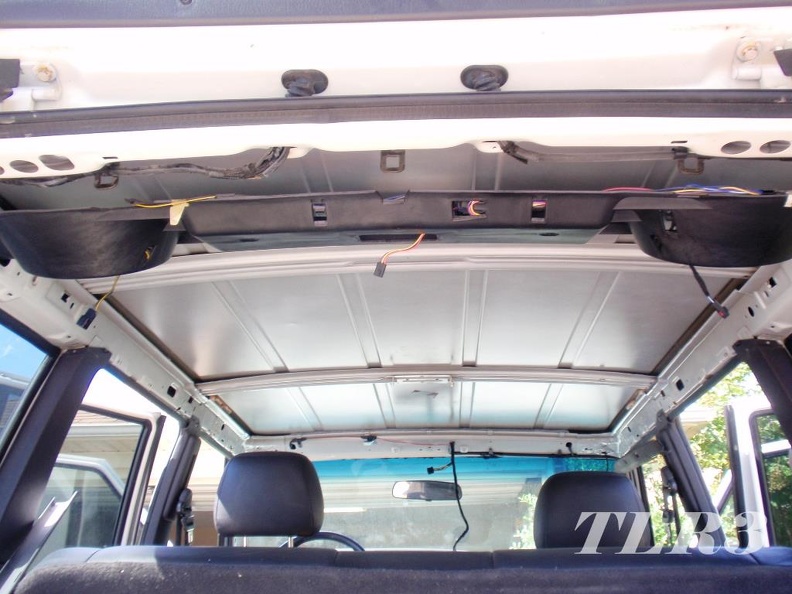
Pulling the headliner panel isn't that difficult, the trim around the the sides and rear hold most of the perimeter in place, while the overhead console and sun visors fix the front in place. Remove the rear speakers, rear over head light, and a handful of wires, then you're ready to pull the headliner panel out.
Bare roof.
Panel ready to peel the fabric off.
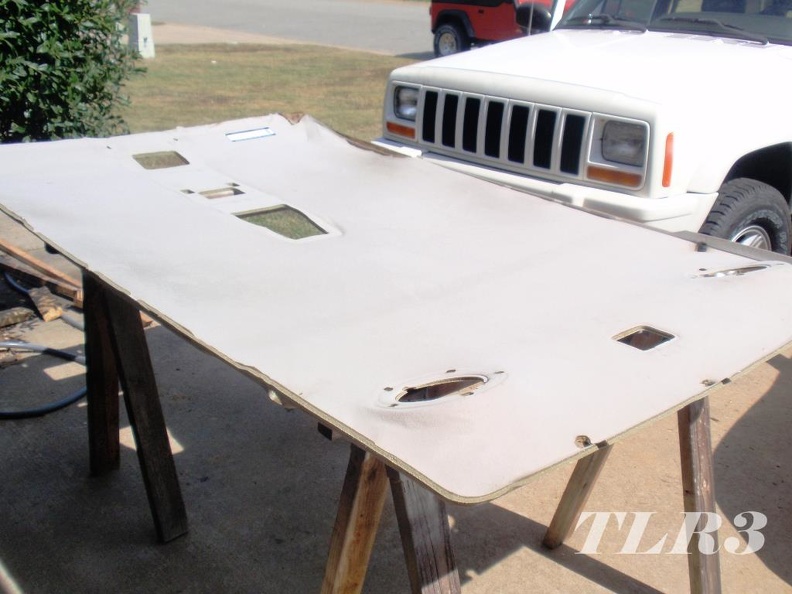
SWMBO has a fondness for peeling and picking at things, so she gladly jumped at the opportunity to peel the fabric off of Moby's headliner. Of course after the fabric was off, she had to rub her hand in the foam.
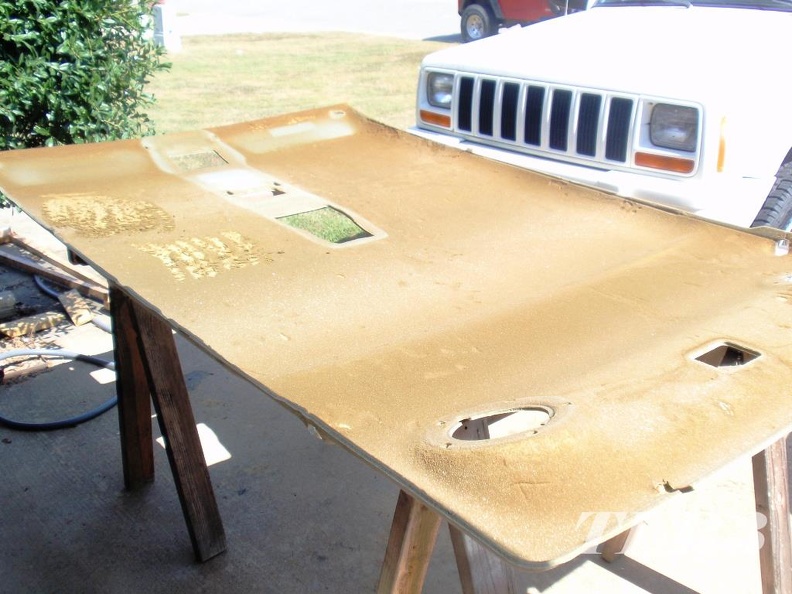
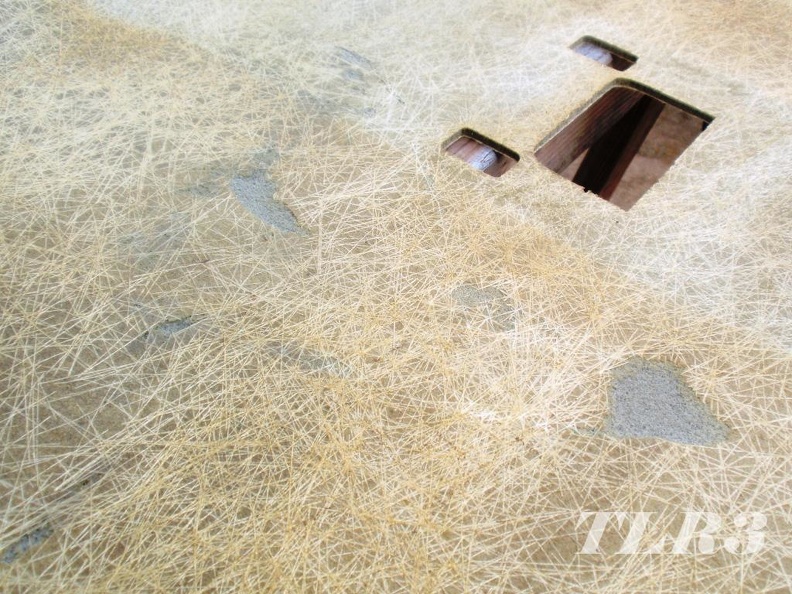
Most of the foam was crusty and easy to remove with a wire brush. The random few spots that hadn't degraded yet took a little more elbow grease, but still came off with the wire brush. I used the shopvac to suck up the bulk of my mess, and blew the rest of the sticky little balls of adhesive and foam off with compressed air.
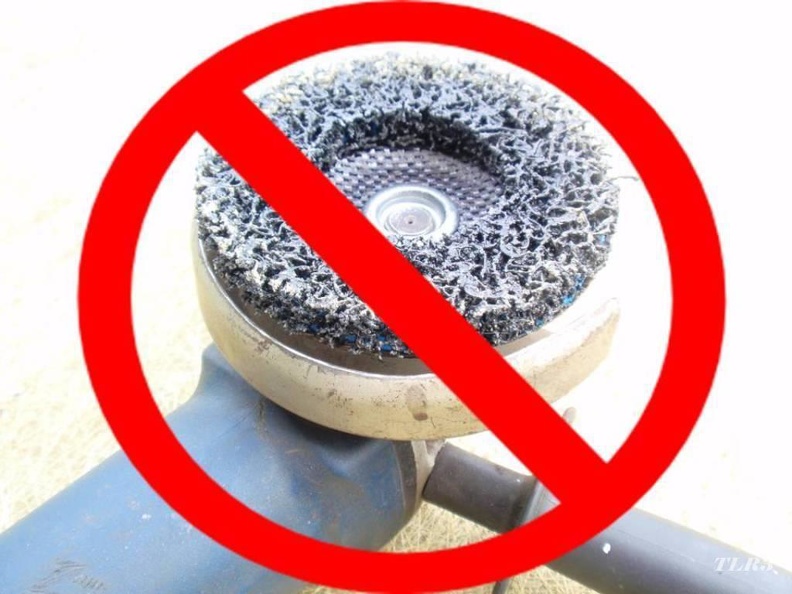
After this I was left with a foamless headliner, but there was still a sticky film of old adhesive over the entire surface. I didn't have anything on hand to deal with the sticky, so I headed to the hardware store and picked up a gallon of denatured alcohol. While there I came across one of those paint stripping disks for a grinder. I thought better of it, but the directions said it was safe for fiberglass. I thought, "well the headliner panel has fiberglass in it," so I decided I'd try it. You can pretty much guess what happened.
It took WAY too much off, and since I seem to like making more work for myself, I had to try it more than once.
After massive failure with the grinder, I stuck with a green Brillo pad and denatured alcohol for sticky removal.
Just say no to paint stripper disks for headliner repair.
I now had giant divots to fill in. Bondo to the rescue.
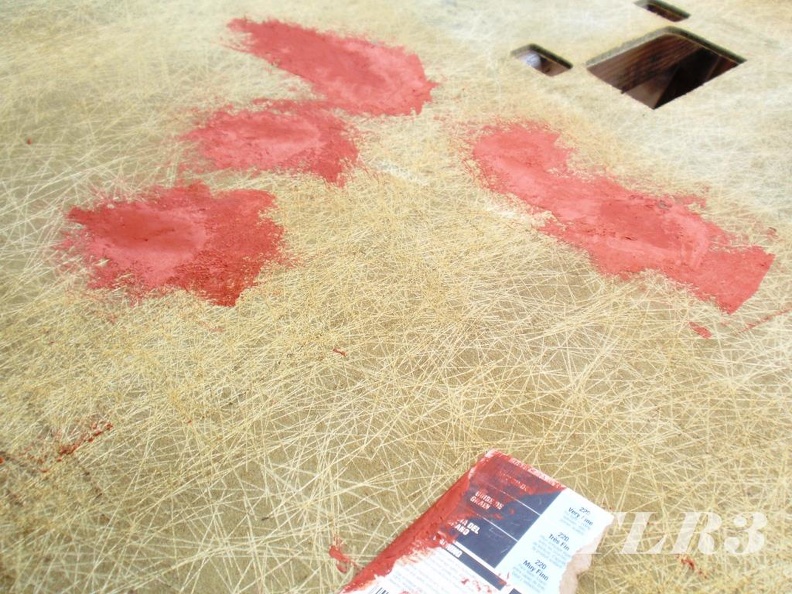
It took a long time to get the divots filled and a smooth-ish level surface.

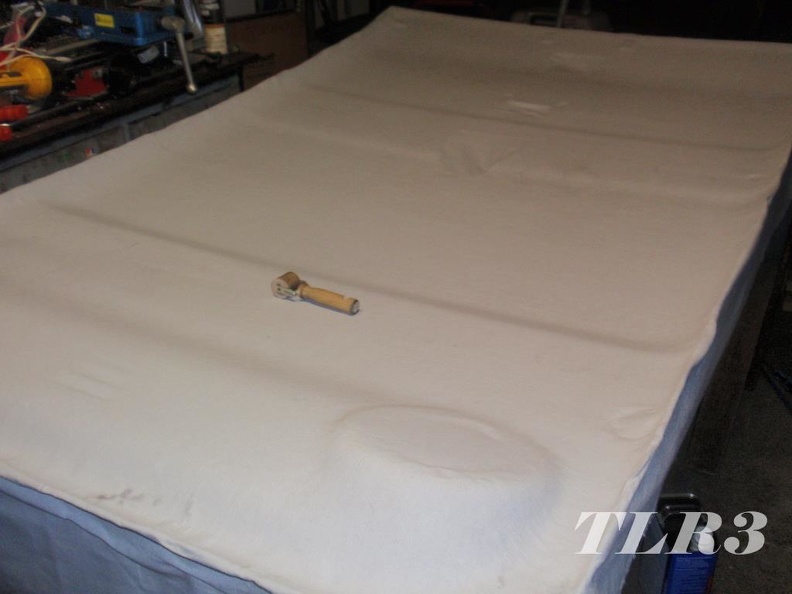
All sticky gone and divots filled, it was now time for fabric. I wanted something "fun" but SWMBO was a stick in the mud, and said no to every suggestion I made. I had no intention of putting a foam backed headliner back in Moby, the foam is what failed and caused the original headliner to sag in the first place. Instead I stuck fabric directly to the headliner panel, so I worked real hard to get as uniform of a surface as I could, since I wouldn't have foam to hide imperfections. The fabric we settled on was some of Hobby Lobby's finest, gray, cotton, duck cloth. Duck cloth is like a fine weave canvas, so it's got a slightly course texture to it.
It was stuck in place with some 3M 38808 Headliner Adhesive. I followed the directions to the letter, and stuck down about 10" of fabric at a time starting at the front and working to the rear. That 3M adhesive really sticks, you apply three coats of glue to the fabric and to the surface you're sticking it too, wait five minutes after spraying, and then stick them together. Basically as soon as each side with glue touch each other they don't want to let go, so you've got to be careful, plus the fabric wants to stick to itself too which adds an extra layer of difficulty. This would be so much easier with an extra set of hands, but I found myself doing this part solo, since SWMBO was out of town. I used my wood roller tool thingy that came with some adhesive backed sound deadener I bought long ago, to make sure the fabric was firmly stuck to the panel.
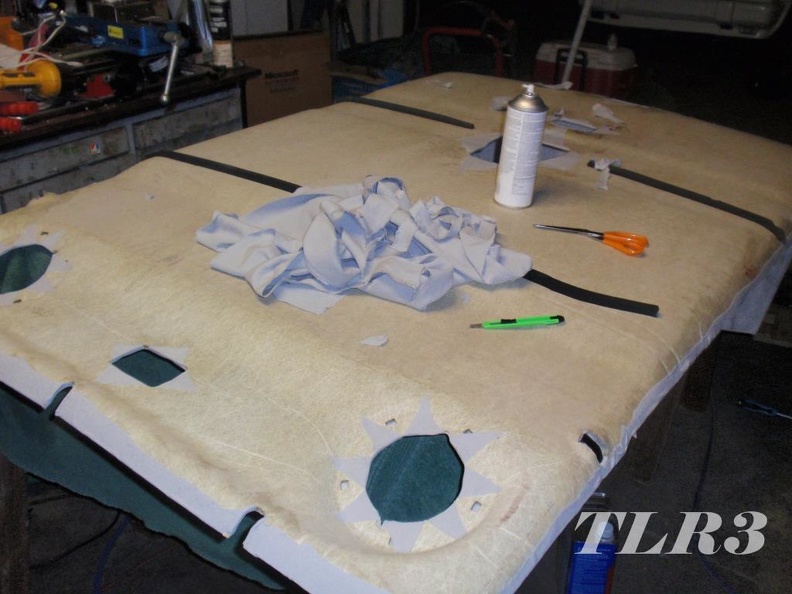
Then it was time to flip it over and start cutting the openings. I cut an X with an Exacto knife in most openings, sprayed some adhesive, and folded the fabric back on to the top side of the panel. I left about a 2" of extra fabric around the entire border of the panel that I glued and folded over on to the top side of the panel too.
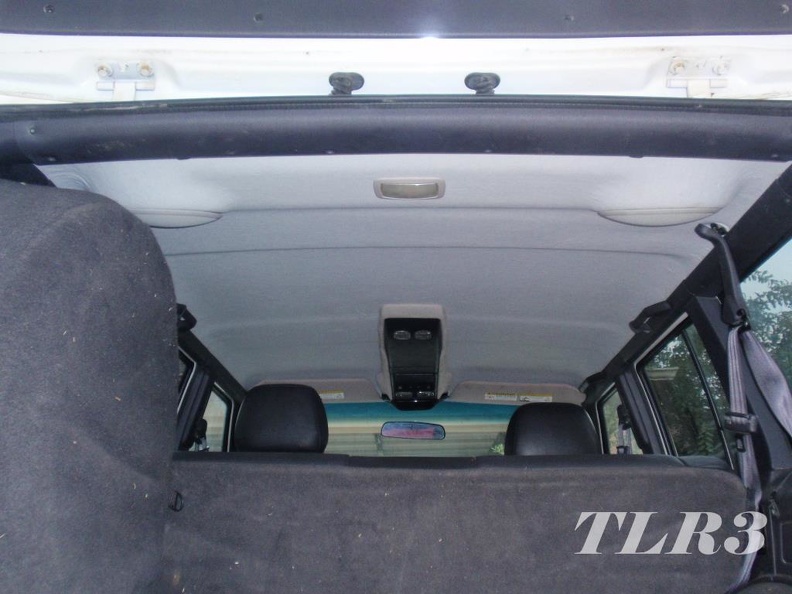
Then it was ready to stick back in. Install was reverse of removal, this would have been a lot easier with another pair of hands too. Thankfully I've got a big head that I could hold the panel up against the roof with. The new headliner looks a lot better in pictures than in person, it definitely has its flaws, and I got some dirty hand print smudges in a couple spots, but it looks a whole lot better than it did. I've got enough leftover fabric, eventually I'll pull the overhead console down, and reupholster it too, it's color is a pretty close match though so it doesn't stand out too bad. For now, I'm happy that the headliner isn't static clinging to my head, and it doesn't rain crusty foam every time I move the sun visor anymore.
Whoa, nice headliner. I would also have been tempted to do something fun, but that looks downright classy. Taking your time paid off.
In reply to ssswitch:
Thanks!
I guess I didn't take any pictures of it, but while I had the headliner out I stuck some 50 mil Fatmat sound deadener/insulation (cheaper competitor of Dynamat) I had left over from a long ago project on to Moby's roof. I had enough to cover roughly 2/3rds of the roof, with a 3" gap on both sides. I figured some was better than none, and that giant roof panel with some sound deadener would maybe cut back some of the NVH.
I removed the rear speaker holder thingy to do the Fatmat install, it simply has a tab on each side that fit into a slot that hold it in place. I assume it's key function is to support the weight of the rear speakers, so that the headliner isn't carrying all of the load. You can see it in the 2nd and 3rd picture in my previous post.
Well while attempting to remove it, I snapped one of the tabs off. You're noticing a trend right? I continuously wind up making more work for myself.
Not only did the tab snap off, but it vanished, no clue where it went, I wasted 30 minutes looking for it, pulled everything out of the Jeep, all around outside and under the Jeep. My best guess is that, there must have been a wormhole open in the rear cargo area at the exact moment it broke off, and now there's an extra piece of broken ABS plastic in a parallel universe, with a really confused parallel Lee, because I can only assume that Parallel Universe Lee never breaks things, and would be wracking his brain trying to figure out where that little piece of plastic could have come from.
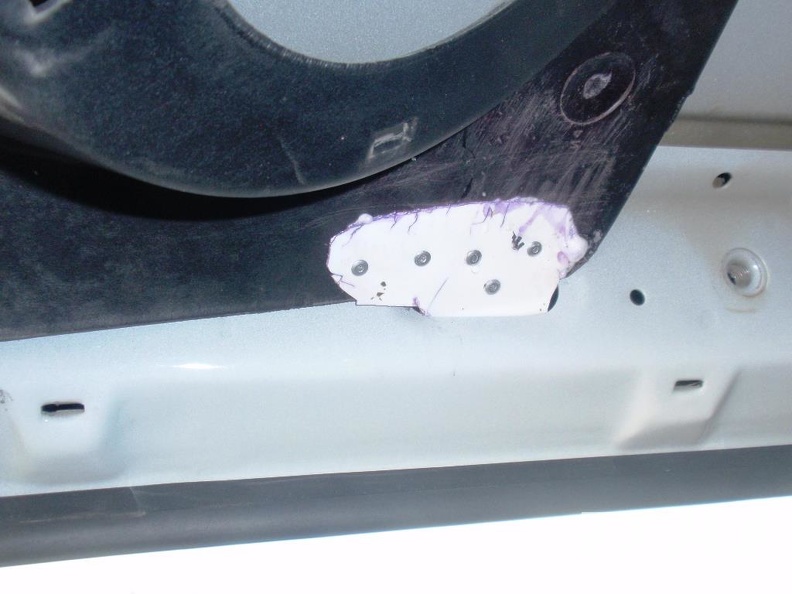
I needed to make a new tab, so I put my Grassroots thinking cap on, and looked around the garage for a fix. What could I make a new tab out of? I eventually settled on an old cracked plastic dust pan that I never use, because it's cracked, but because I'm a hoarder haven't thrown away. I guess I was saving it for just this moment.
A few Harbor Freight pop rivets, and Gorilla Glue later, I had a new tab on the speaker holder thingy.
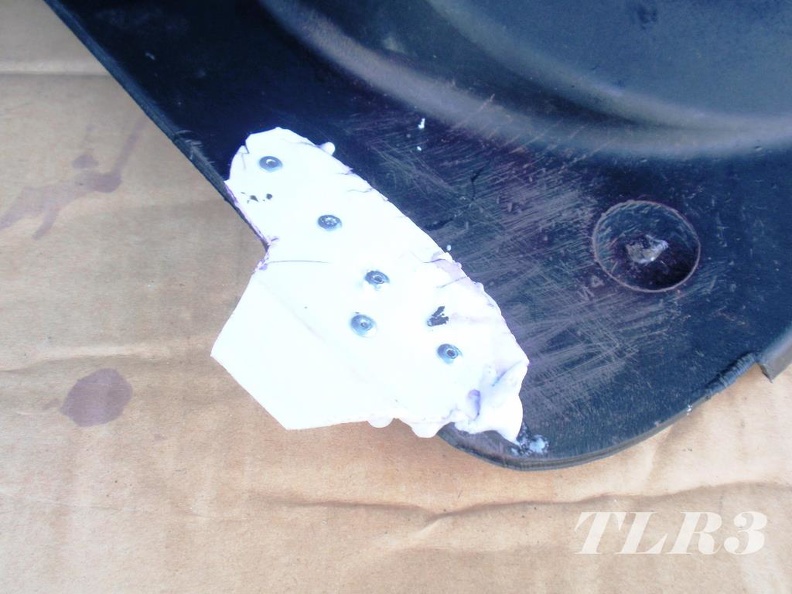
I managed to put the speaker holder thingy back in place without breaking anything else. Fixed!
Yes, you just read a post in a Jeep thread about a dust pan and a wormhole. ![]()

Looking good Lee!

The minispool in my Dana 44 in my XJ was very, very livable on the streets and I did 98% asphalt driving.
I personally wouldn't be in a huge hurry to swap it out.

Your post are always entertaining to read Lee, maybe more so because I know you and that your streaks of bad luck are very real. I think it is fate training you for a bigger task that is yet to come....

As someone with lots of XJ experience, let me warn you against a "lunchbox" locker in the rear. I've driven several different vehicles with lunchbox lockers in the rear and they are not good for DD or street driven rigs. Spend the $$ to get a limited slip 8.8 in the rear or consider putting the lunchbox locker in the front axle. In 2wd you won't even know the locker is in the front. I've personally run the Spartan locker in the front of an XJ and it was a great budget locker. Wheeled that Jeep very hard on 33" Super Swamper TSL's and no issues with the locker.
Lunchbox lockers in the rear axle cause the vehicle to lurch/jerk when turning as the locker ratchets allowing the inside wheel to "unlock". This ratcheting can also cause handling issues when driven in ice/snow.
And very wise choice not to spend any $$ on the d35 axle, I've scrapped or gave away everyone I've ever swapped out.
In reply to untchabl:
I'm all too familiar with the idiosyncrasies of automatic lockers. I've had a Lock Right in the rear of my TJ for ~13 years.
I already have a Detroit Truetrac for the front. Rear traction aid is still up in the air, I've "made up my mind" a couple dozen times now.
You'll need to log in to post.


