


In reply to Vigo:

I know plenty of others with first hand experiance that would disagree with you.

In reply to Vigo:
I know plenty of others with first hand experiance that would disagree with you.

I've always wondered about jeep roll cages. They clearly work to some extent as people have tipped over a million of them and they are legally sold for soccer moms to drive. However, nobody would EVER endorse building something like that with no diagonals if they were building it from scratch.
In reply to mazdeuce:
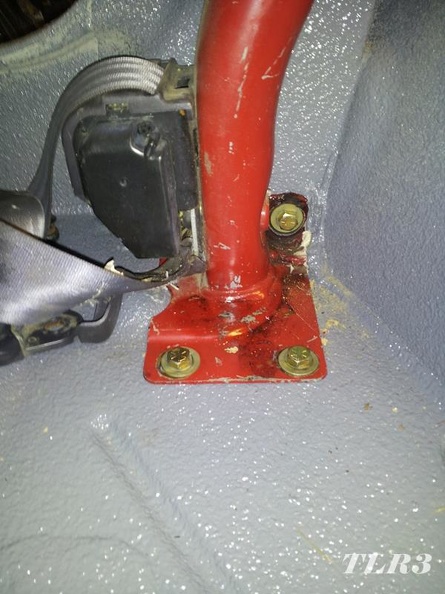
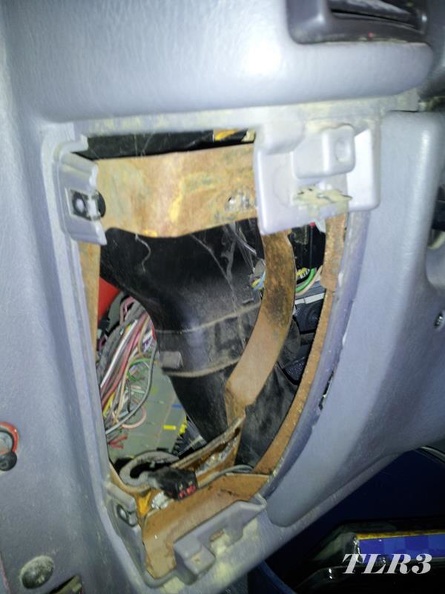
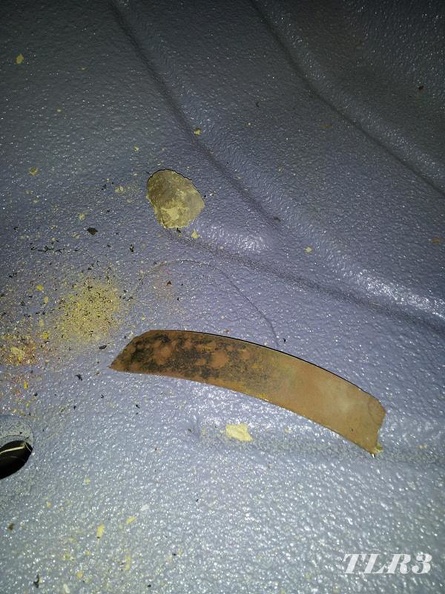
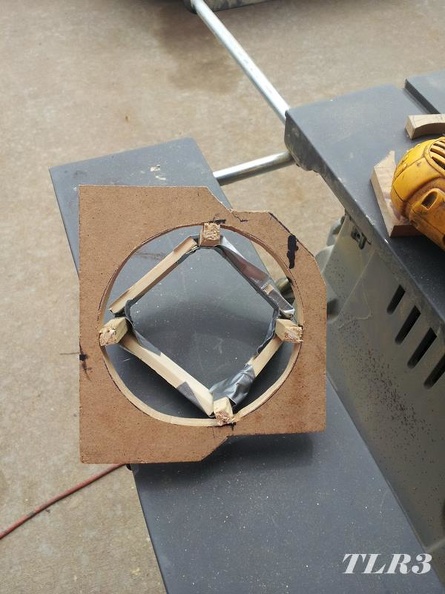
They're fairly substantial EXCEPT for the area you really need the best protection. The B pillar MIGHT save your melon, but you're basically relying solely on it. There is no real A pillar, the spreader bars over the doors merely bolt to the windshield frame, which is attached to the cowl with hinges. Said hinge is fixed in place with a single ~5/16" bolt on each side.
Random Google image of rolled TJ:

So, yeah, I will be adding additional front occupant protection. Thankfully it's a Jeep, and therefore has an enormous aftermarket with half a dozen or so solutions to to the problem readily available from various manufacturers.

In reply to Vigo:
The 3.8 really is a solid engine, nearly 4.0 tough.
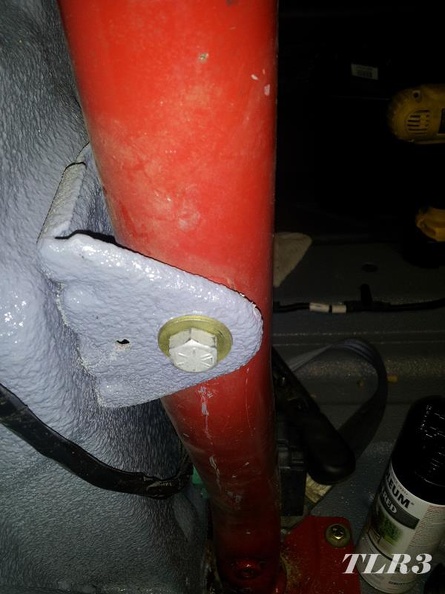
Since I had welded nuts to or otherwise misplaced the bolts removed from the roll cage, I needed to replace them. I originally bought some bolts from Tractor Supply Company, you can't beat their prices buying bolts by the pound, but they didn't carry everything I need, limited selection of metric and fine SAE, didn't have any 1 1/4" long 3/8-16, and no 7/16-24 at all. So I placed an order with McMaster Carr for the appropriate Grade 8 and Class 10.9 fasteners to replace all those evil Torx bolts that attached the cage to the tub. Yes Jeep uses both SAE and Metric fasteners, so you get to drag all of your socket sets out of the tool box.
For those that care here's what you need:
- 12x 1 1/4" 3/8-16 fully threaded bolts for the "feet" of the cage to attach to the tub.
- 2x 1 1/4" 7/16-24 fully threaded bolts for the B pillar side reinforcement tabs.
- 4x 25mm M8-1.25 fully threaded bolts for the spreader bars to the windshield frame. (I think the same bolts attach the other end of the spreader bars to the B pillar too, but haven't replaced them yet)
All the cage to body attachments are torqued to 30 ft-lbs. Seat belt attachments to the cage are 35 ft-lbs.


Decided not to paint it while it was out? (it looks awful next to your pretty bed liner...)
In reply to Mad_Ratel:
This was a, "it's a Jeep" moment, most of it will be covered with padding, or otherwise hidden by the front seats. That long scratch on the last picture was done during install, so I would have been pretty peeved had I just painted it.
Real reason is that there will be future additions/replacement that will require welding, paint will be applied then, and apparently, "getting it out of the garage so I can fix the door on SWMBO's Jetta" is a bigger priority. Who knew?
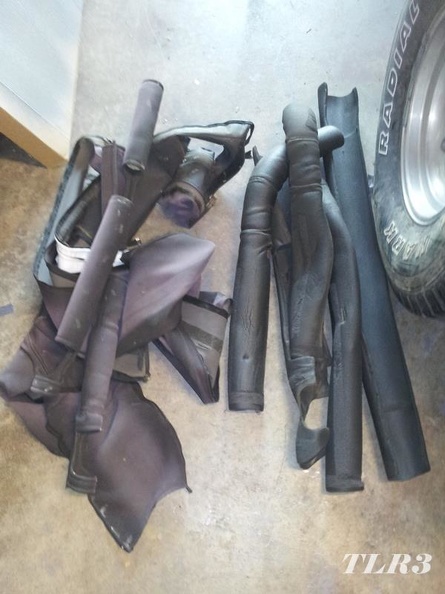
I had the naked cage back in sans the windshield spreaders, and then went to work on the nasty old roll cage padding.
I separated the foam padding from the fabric. The padding and fabric are glued together, basically one long bead of glue in the center, down length of the material, and a short bead, perpendicular to the long one at each end. It doesn't appear that it was designed to ever be separated, but I didn't have any real trouble carefully peeling the two apart and almost all of the foam came off in one piece.
Soon one pile became two:
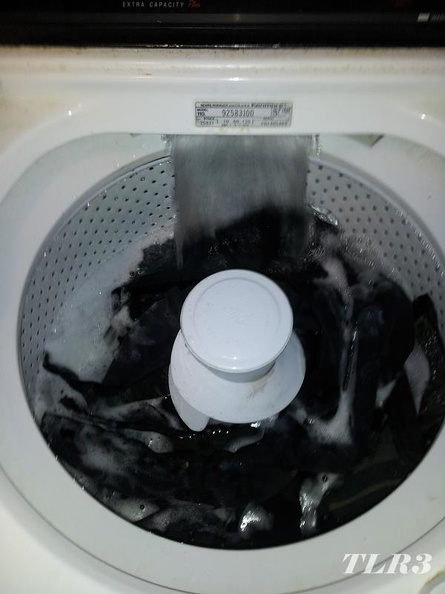
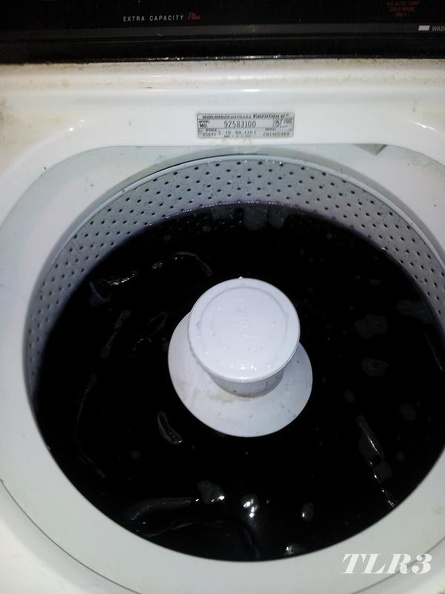
Then I put Muffin's dedicates into the washing machine, gentle cycle, cold water, liquid laundry detergent, and half a cup of TSP for good measure. I ran it through two cycles to get them good and clean.
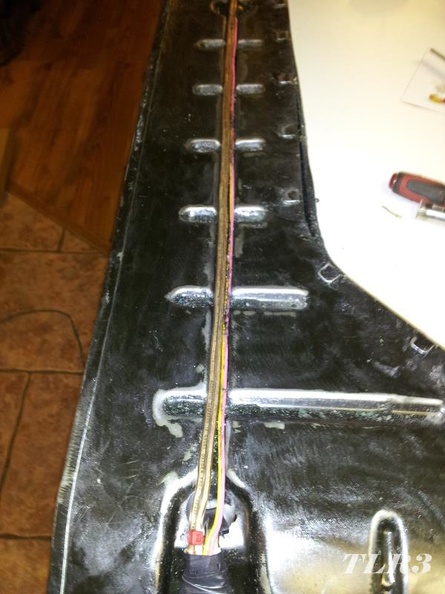
While Muffin's dirty laundry was in the wash, I took care of some wiring. I took a bit of a short cut when pulling the wiring to line the tub. I couldn't find a junction anywhere in the harness to the rear lights that would allow me to separate the trunk from the branches. I really didn't want to have to unplug the lights and fish the entire bulk of the rear light harness up through the tub, so I elected to cut it instead.
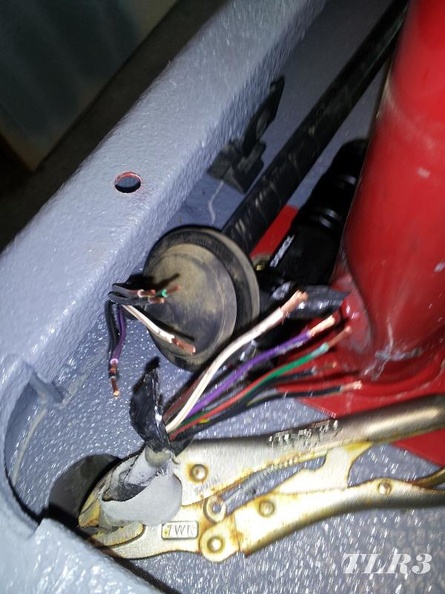
Soldered, and heat shrinked (shrunk?) back together.
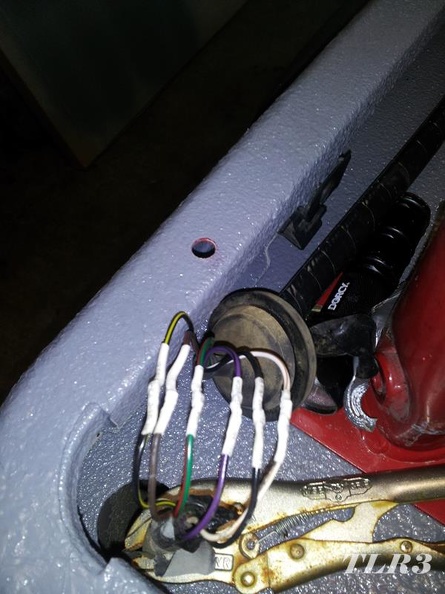
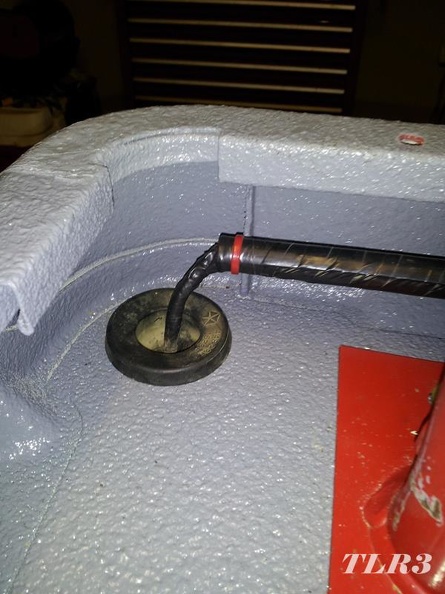
All back together and all the tail lights even work. ![]() That grommet was a bear to put back in the hole, I don't recall it being all that difficult to remove, but it fits in that hole snug. The red zip tie is just to make sure the end of the new tape I wrapped it with doesn't peel back.
That grommet was a bear to put back in the hole, I don't recall it being all that difficult to remove, but it fits in that hole snug. The red zip tie is just to make sure the end of the new tape I wrapped it with doesn't peel back.

bigdaddylee82 wrote: In reply to Vigo:
Just be glad you own the version that doesnt weigh more than a new 4dr f150. ![]()
Funny thing, i FINALLY drove a 2.4 TJ for the first time a couple of months ago. It really didnt seem to drive any better than the 2.5s (which i think are ok with 5spd and stock tires) and unless i DID plan to try for massive turbo power, id probably prefer the 2.5 due to its ridiculous ease of service. That probably goes against the grain of common Jeeper opinion too.
Sad news: "Local Market Research" (my bad CL habit) shows YJs seem to have bottomed out and started heading up again. TJs are still depreciating slowly but almost impossible to get below 5k. In other words, my cheap ass still is too cheap to buy a Wrangler. ![]()
In reply to Vigo:
Had an acquaintance in college that had a new at the time 2.4l, ~'03 TJ, bone stock, was from somewhere in Tennessee, and never complained about driving it completely across the state.
My group of Jeep cronies I ran around with back in the day consisted of a pair of YJs, a MJ, and my TJ, all 4 were 2.5ls, mine was the only auto though. One YJ had 31-33" tires, the other went from 31 up to 35s, the MJ and and Muffin stuck with little 31s for the longest time. Muffin was the fastest of the group for a while, then the YJ that stepped up to 33s got a Vortec 4.3l, 700R4, Atlas II, Currie 9, etc. and schooled us all. Then a new young upstart with a 4.0l, 5 speed, Sahara, TJ started running around with us some, while not as capable off road as the 4.3l V6 YJ, he took the throne in our drag races. Good times. ![]() Eventually most of my Jeep cronies sold their rigs, built and sold, or are in the process of building dedicated offroad monsters.
Eventually most of my Jeep cronies sold their rigs, built and sold, or are in the process of building dedicated offroad monsters.
Now that we have a 4.0l, AW4, XJ I very much wish that power train was offered in TJs, or was at least in mine. SWMBO has a more powerful Jeep than me. ![]()
If you're diligent, and quick on the draw, a sub $5K TJ can be had. Expect issues at that price though, buddy of mine recently went and looked at a '98 TJ that was listed at $3,500. It was a 2.5l, 5 speed, body in okay shape, but had a cracked frame, most of the suspension brackets were cracked and/or ripped off, and had spent a large portion of it's life in Chicago, so you can imagine what most of the frame, fasteners, and exhaust looked like.
After I had the roll cage fabric cleaned to my satisfaction, I attempted to make them black again.
The fabric is mostly nylon, which is apparently difficult to dye with the typical Rit stuff you can get at the grocery store. I didn't know that until after having already purchased the stuff, had a box open ready to dye, and read the directions. It didn't explicitly say it wouldn't work, but you need more heat than the washing machine method can provide for best results. I had no desire to turn my kitchen black while attempting to dye the roll cage fabric with the stove top method, so I stuck with the washing machine instructions.
This wasn't my first Rit dye experience, SWMBO and I were Juno & Paullie Bleaker for Halloween one year, I couldn't find yellow sweat bands so I dyed some white ones with Rit, worked great.![]()
I guesstimated at the amount I needed, I used two boxes, a box will do 3 yards of fabric, so a box would have probably been sufficient, but since I was expecting poor results anyway I figured another box wouldn't hurt.
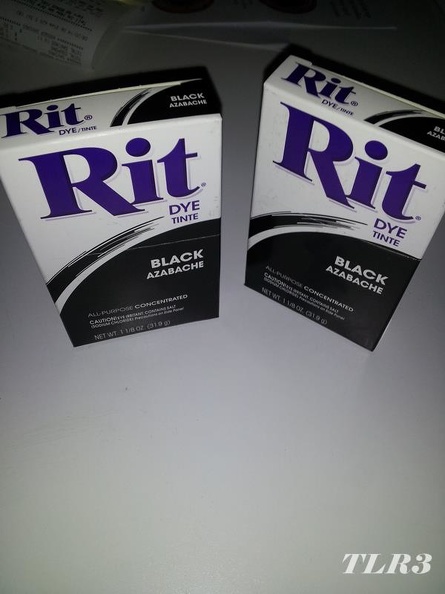
Since I knew I wasn't using the best method for nylon, I let the fabric soak for about twice as long as the directions called for, and ran it through three agitation cycles before rinsing. I also had a specific Doobie Brothers song stuck in my head pretty much the entire time. ![]()
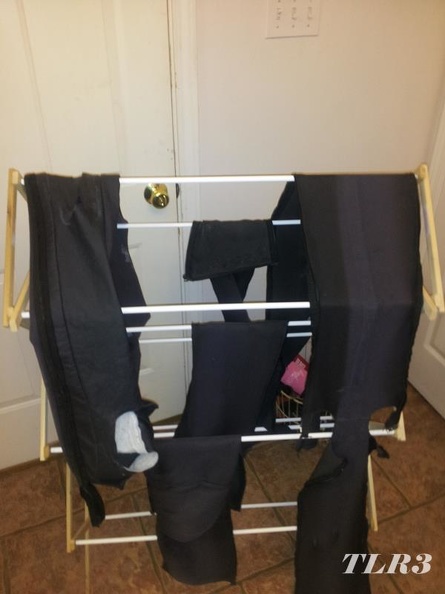
Three or four rinses, and hung on the rack to dry. They turned out okay, I had higher expectations before I read the directions. They're not as dark as I had hoped, and certainly don't look new, but at least they're not gray-purple, grurple anymore.
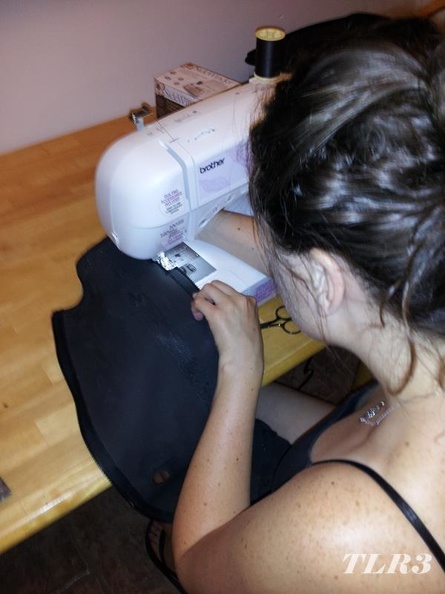
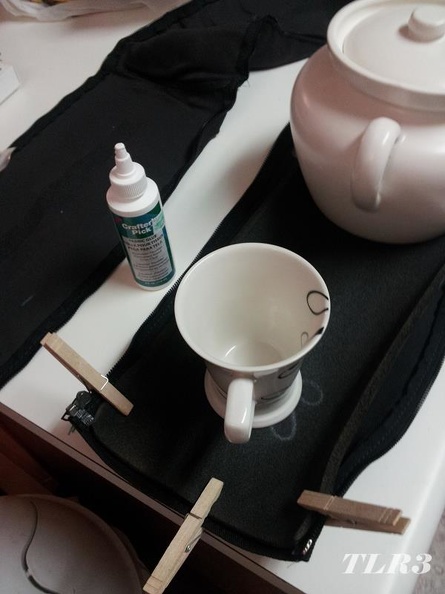
The zipper on the left B pillar cover had been busted for more than a decade, it had been held on with safety pins and zip ties, I got SWMBO to pick me up an appropriate length zipper on one of her many excursions to Hobby Lobby, and she replaced the busted one for me. She is pretty stinking awesome, if I do say so myself.
I had her get me some fabric glue too.
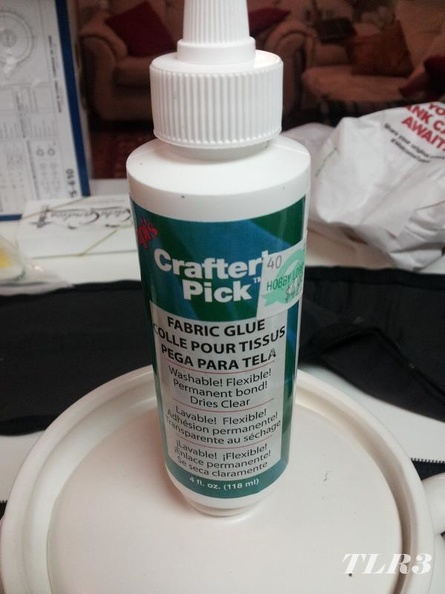
When everything was dry, and patched up, I glued the fabric back onto the foam. The glue isn't very fast acting, but over the course of a few days I got all the sections of all the pieces stuck back together. I used basically whatever was available for clamping and weight to hold the fabric and foam together while it dried.
Now that we have a 4.0l, AW4, XJ I very much wish that power train was offered in TJs, or was at least in mine. SWMBO has a more powerful Jeep than me.
Im sure it's common knowledge if i were to bother to look, but i dont know why they DIDNT use the AW4 in auto wranglers. It's more compact and more reliable than the Chrysler trannies they used in auto wranglers, and the fact that they still put 3spds in ANY of the TJs just blows my mind.
I think an AW4 would take an automatic wrangler from undesirable to in some cases PREFERABLE to the 5spd model!
I had some further head scratching, pondering, and deep reflection to do on the continued path of Muffin's progress, and what the "end goal" really is. I started out with no real plan, just, get her running, get her legal, fix/upgrade known ailments, ???, profit. I was so close to being able to just drive Muffin again, but there are several things I can do while she is still mostly apart that would be easier than if I wait until she's more complete.
While I contemplated the end game, and current, "while I'm at it" repairs and/or upgrades, I tackled another area that needed some attention, and was of utmost priority... TUNES man, you've got to have a good sound system. ![]()
I've still got a couple Rubbermaid boxes of car audio stuff from a previous life, and had an idea of what I did and didn't want for car audio. There was a point in time that Muffin was a rolling jukebox, reference all the holes that were in the bed. I wasn't going down that road again.
I decided to work with what was there, I don't want to lose anymore floor space, there's limited storage to begin with. I wasn't doing the pair of 12s behind the rear seat again; I want to be able to put stuff back there. While Muffin is an SE, she's optioned with the Sport package, and has a factory overhead sound bar. The sound bar housed a pair of 5.25" speakers and the overhead interior light. On either side of the dash was a pair of 4x6" speakers. These are the limitations, "new" better sound from these locations alone.
During that past life, Past Lee had "upgraded" Muffin's speakers many times over, already, but it was time to get serious about sound quality, not just blowing the soft top off with bass. ![]()
Over the course of a few weeks I was watching eBay and Craigslist like a hawk for speakers and a new head unit. I set up some saved searches on eBay which paid off, and threw a few low ball bids out until I won something. I wasn't going to buy top of the line high dollar stuff, it's still a soft top Jeep, easy to get into if someone decides they want the stuff more than me, and the acoustics are pretty abysmal, but I wasn't going to buy cheap junk either. Cheap sure, junk not so much.
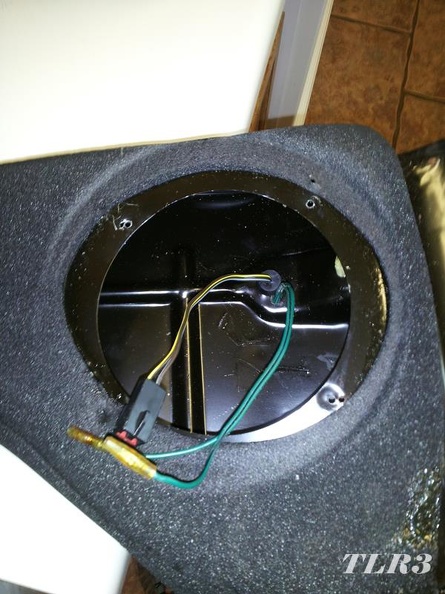
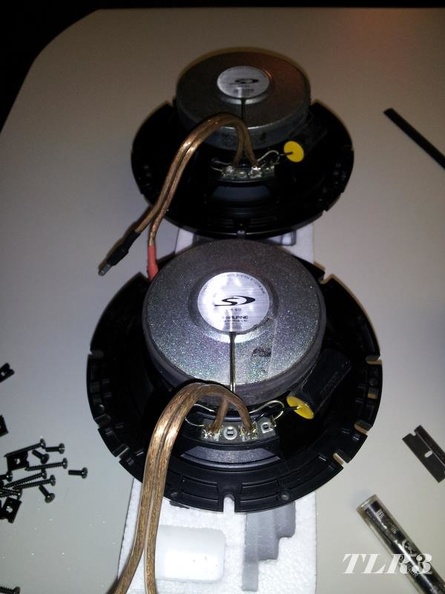
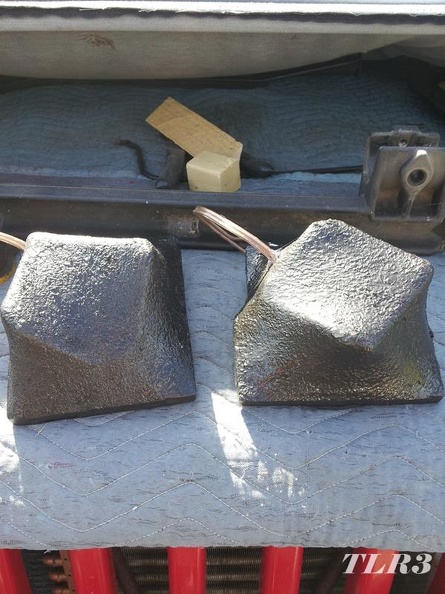
First up was the sound bar. I had it off and stripped already when I dyed all the roll cage padding.
Past Lee had stuck a pair of Phoenix Gold mids, from a set of Components he once had, in the sound bar. I don't remember exactly why they wound up there. There have been a lot of versions of Rolling Jukebox Muffin over the years. The tweeters were still on the window frame, though not hooked up to anything. Pretty sure these are 6.5" speakers, the OE Jeep TJ sound bar speakers are 5.25", but most 6.5" aftermarket stuff drop right in. These will eventually replace the mids in the front doors of SWMBO's XJ, it's got the Infinity system and the front right speaker is blown.
Past Lee had stuck some Dynamat inside the sound bar, how about that? Old school, paper backed Dynamat. It was no longer stuck to anything, adhesive dried up and it was just laying in there.
I guess the green wires came with another set of speakers, I'm not sure what this accomplished, but Past Lee had bypassed the factory speaker wiring on the sound bar and ran this stuff along side the original, drilled a hole in top of the sound bar for it to pass through. Past Lee still used T taps to connect it into the factory wiring harness that goes up the B pillar though. Who knows?
Speaking of wires, the back side (top side) of the sound bar originally had a white Styrofoam material glued to it. It was crusty and flaky, so when I took the fabric off of it, I peeled that foam off too. This left a nasty residue of sticky glue. I didn’t have much luck with any paint thinner getting it off, so I used the wire brush cup on my angle grinder and got mean with it. I wasn’t trying to destroy the factory speaker wires while doing this, but I probably wasn’t trying my hardest to prevent it either. Of course I got the wires in a few spots with the wire brush. Oh well, upgrade time. I removed the pins from the original sound bar wiring harness connection and soldered some 12 ga. speaker wire to the proper pins, and then reassembled the connection. I used heat shrink on each connection, it was a snug fit with the bigger wires, I wrapped the whole thing in electrical tape just for some added security. The red zip tie denotes the right side speaker wires. I left the original wire for the overhead light alone, it was undamaged. You can still see residue from the glue all over the thing.
SWMBO wasn’t too thrilled about me commandeering the kitchen counter, but it was just too hot to be doing anything in the garage. I used some more of that leftover FatMat I had, and covered the top of the sound bar.
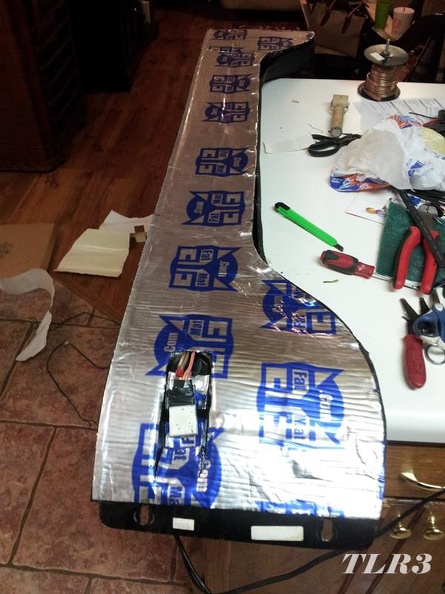
FatMat inside too, as far as I could reach. I also sealed the entire perimeter of the sound bar with aluminum ducting tape, it’s just stamped steel with a pinched seem and relief cuts on the folded side, not exactly air tight. I also sealed the back side of the overhead light fixture, and used some foam gasket tape.
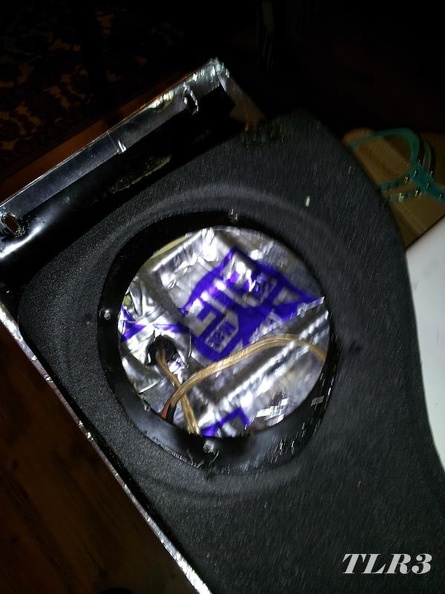
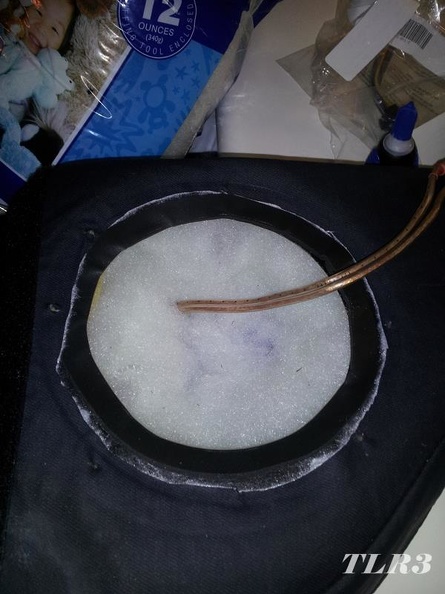
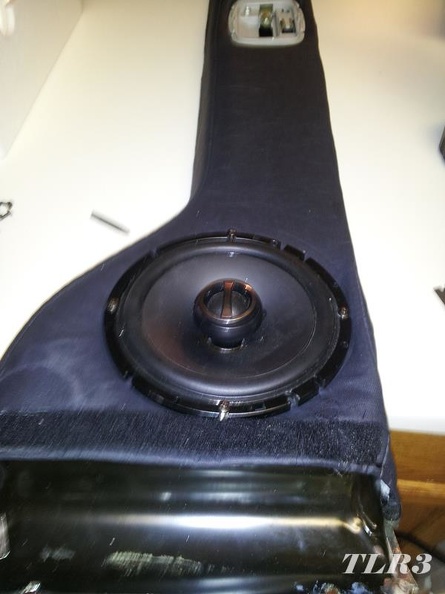
I stuffed the now “sealed” sound bar with some polyfill, put the fabric back on it, trimmed the fabric back around the opening, and put some foam gasket tape around the opening.
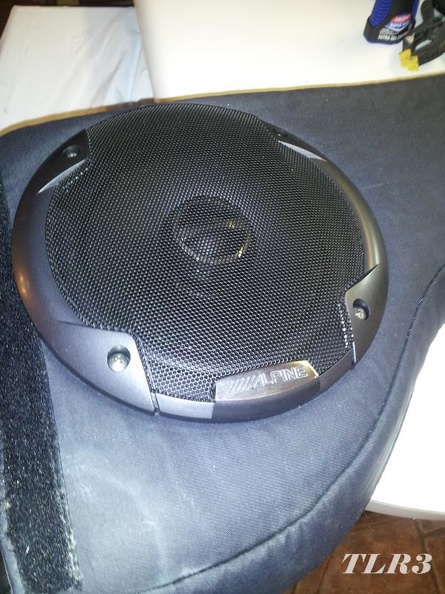
One of my eBay scores were a pair of “slightly used” Alpine SPS-610 speakers. They’re 6.5” 2 way, coaxial speakers. They’re not quite Type R, or Focals, but for a Jeep’s sound bar, and about $30 plus shipping, I am extremely pleased with them. I soldered some wiring pig tails to them. Some folks just use spade terminals directly on the speakers, but I’ve always liked using pig tails, I get a solid connection at the speaker, and have better options for making the wire to wire connection. I chose some fully insulated bullet connectors as you can see. Red and black heat shrink to help me make sure the polarities are correct.
Finally installed, I was really pleased with the sound, but wasn’t wild about how they looked. I guess these are meant to be installed inside car doors or deck lids, since they didn’t come with grills. I shopped around for grills, but I didn’t want any of the ostentatious stuff Alpine had to offer with a giant red S on it. I reasoned from pictures that most 6.5” Alpine speaker grills would work on any 6.5” Alpine speaker, so I looked at other models’ grills. Most of those were pretty ostentatious too, with a giant blue R, or some kind of fang looking thing. However Alpine’s low end E series speakers have a pleasant, sedate looking grill, with a simple little Alpine logo in one spot on the edge. I liked these better than anything else I had seen from Alpine, so I took the gamble they would fit, and they did. Added $12 to my overall speaker cost, but I think it was worth it.
Man, who knew someone could write so much about putting speakers in the sound bar of a Jeep?
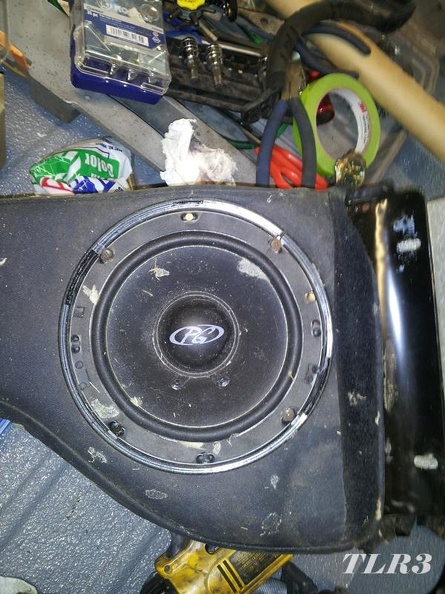
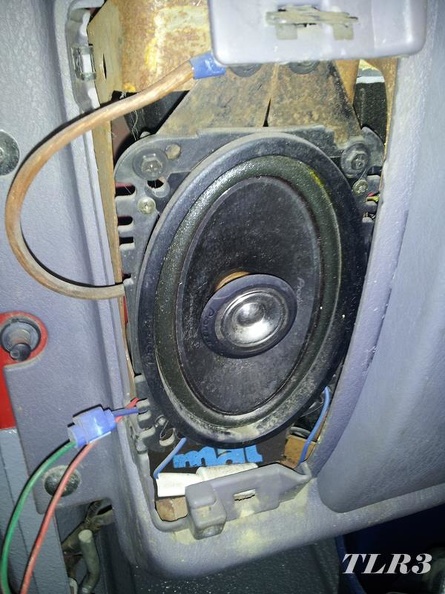
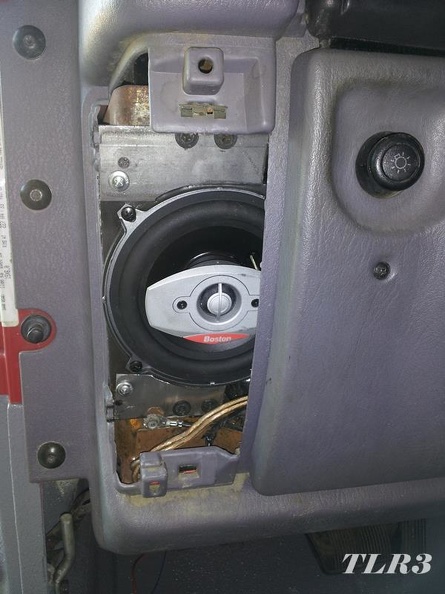
Up next on the chopping block, literally were the front speakers. The factory speakers are a 4x6” I had replaced long ago with a pair of 2 way coaxial Pioneers. Those wires you see dangling were for the illuminated switch for the rear lights that don’t exist anymore.
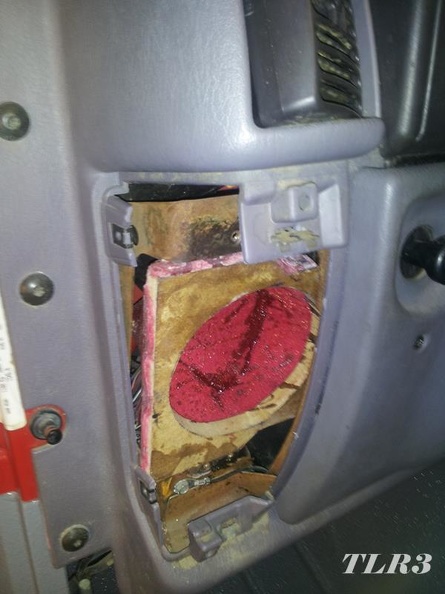
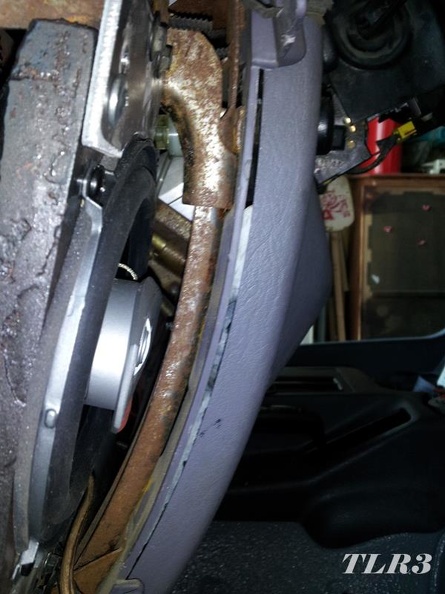
With the speakers removed, this was the space I had to work with. Since there’s no such thing as a “good” 4x6” speaker in my opinion, I weighed my options. I considered the plate style components, which usually consist of a 3” mid/woofer and a tweeter on a plate that fits the same size opening as a 4x6” speaker. However, I wanted a little more speaker than what the 4x6” plates can usually offer, especially with my budget constraints. A fairly common mod is to stick 5.25” speakers into the dash. It’s not as straight forward as swapping out the sound bar speakers, but is well documented, plus I’d have a lot more options for good cheap 5.25” speakers than I would 4x6” speakers, so that was the route I chose. The driver side of the dash is the tightest, there’s some relays, wiring, and switch for the head lights that are all kind of in the way. To fit a 5.25” speaker in that opening requires some modifications. That thin strip of metal dash support has to go.
I broke out the reciprocating saw, and made quick work of it. Surprise, vibrations from the saw knocked loose another dirt dobber nest from inside the dash. ![]()
That’s better, a lot more room to work with. The reciprocating saw may or may not have cut into the HVAC duct a little bit. Nothing a little aluminum ducting tape can’t seal up. I mean that’s what it’s for right? ![]()

Now I needed to build adapters to fit 5.25” speakers in place of where 4x6” speakers once lived. There are adapters on the market specific to this application, and for around $20 you can buy a pair of adapters to fit a 5.25” speaker in the dash of a TJ, they still require you to cut the dash as I did.
I wanted to build some enclosed pods for the space though, not just mount open air speakers in the dash. The common easy solution that folks use are those DEI Boom Mat baffles, they seal that back side of the speaker, and are a soft foam like material and conform well to weird spaces. They have pretty varied reviews, and are a little on the small side though so I decided against them.
There are also blown molded plastic pods specific to the application, with fancy plug and play wiring even. They still require cutting the dash like I did, but the big downside with them is that they’re around $100. Not really fitting with my budget audio plan.
After weighing my options I decided I’d create my own speaker pods. I really needed some speakers before I could start making the pods though. I was originally holding out for some Alpine SPR-50 coaxials or even SPR-50C components, I tried to get some lower end Focal Access too, but even used they all sold for way more than what I was willing to spend. I continued to put a lot of low ball bids on eBay for a variety of 5.25” speakers, and somehow or another I became the owner of a pair of new in box, old stock, Boston Acoustic NX57 2 way coaxial 5.25” speakers, at the pricey sum of $26.50 to my door. ![]() Kind of hard to complain about that, I’ve always kind of liked Boston Acoustic, and these were on the more expensive side of mid range speakers when they were new a decade or so ago. I’ll go ahead and add that they sound pretty dang phenomenal too, night and day between them and those crappy old 4x6” Pioneers.
Kind of hard to complain about that, I’ve always kind of liked Boston Acoustic, and these were on the more expensive side of mid range speakers when they were new a decade or so ago. I’ll go ahead and add that they sound pretty dang phenomenal too, night and day between them and those crappy old 4x6” Pioneers.
Speakers in hand, I had an idea for actual measurements, I’ve got some ½” MDF leftover from another project, so it became the “free” base for my speaker pods. I originally made a card board template for the driver side, but as you can see I had to make some modifications. The original failed driver side mount is in the back ground, I wound up having to trim a little more from the dash structure to allow for a little more meat on the MDF mount.
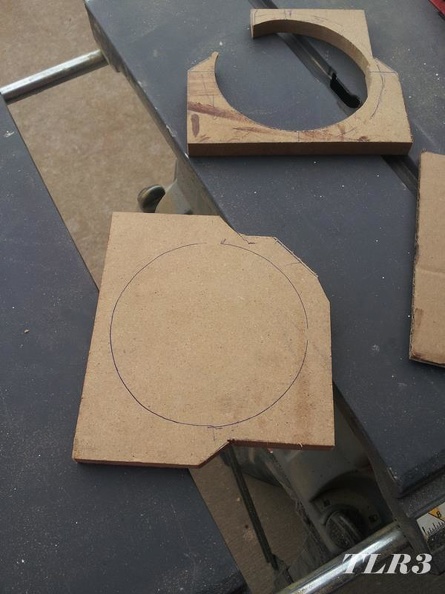
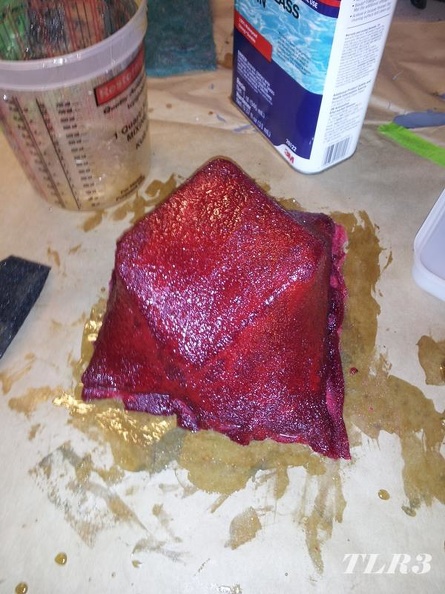
With a mounting surface that fit the dash, and a hole that fit the Bostons, I needed to figure out how I was going to make an actual speaker pod. Enclosing the back seemed like a perfect project to hone my fiberglass skills a little more. I’ve done some fiberglass work before; I built a wooden canoe that’s fiberglass reinforced, I’ve patched up a few random things with fiberglass, and have built a few speaker boxes that incorporated fiberglass as well. This was my first ever, stretch cloth and apply resin build though, and not really fiberglass, it’s really polyester fabric with resin.
With the method decided I needed to know how much room I had to work with. I built a frame structure out of some scrap I had from ripping stuff on the table saw, the length of each of the 4 "posts" corresponds to the maximum depth in that area of the dash. I used a brad nailer to attach my frame to the inside of the speaker opening.
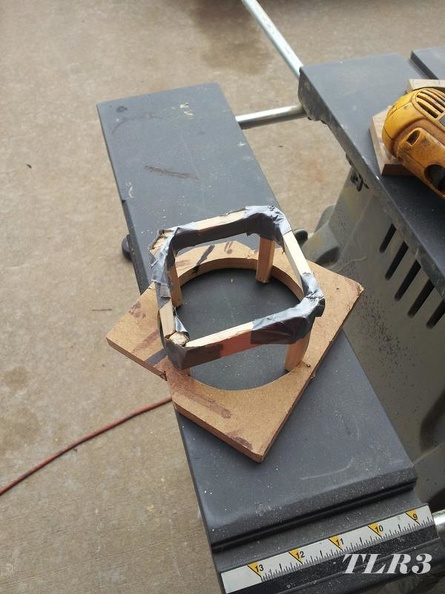
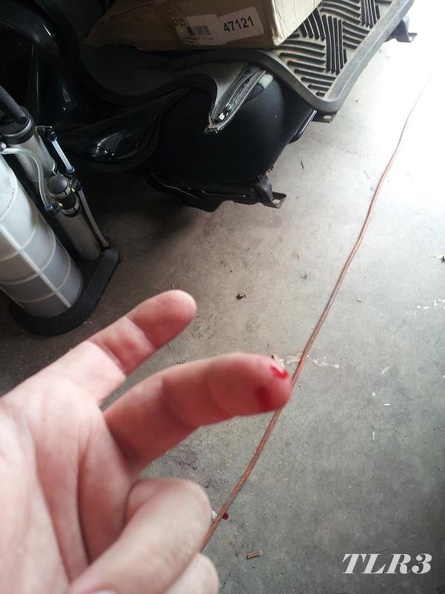
Remember kids, don’t try this at home. There was no good way to hold everything and the nail gun with only 2 hands. While I was careful to make sure all appendages were out of the direct line of fire, I didn’t take into account those little brad nails’ tendency to curve. When I felt something thump my finger I thought, ![]() “I just shot myself,” then I was all, “nah, there’s no way,” but when I couldn’t pull my hand away from the speaker mount it was confirmed, I had a nail through my finger. Through, and through, nothing vital, just the meaty part of the tip, sure did bleed a lot though.
“I just shot myself,” then I was all, “nah, there’s no way,” but when I couldn’t pull my hand away from the speaker mount it was confirmed, I had a nail through my finger. Through, and through, nothing vital, just the meaty part of the tip, sure did bleed a lot though. ![]()
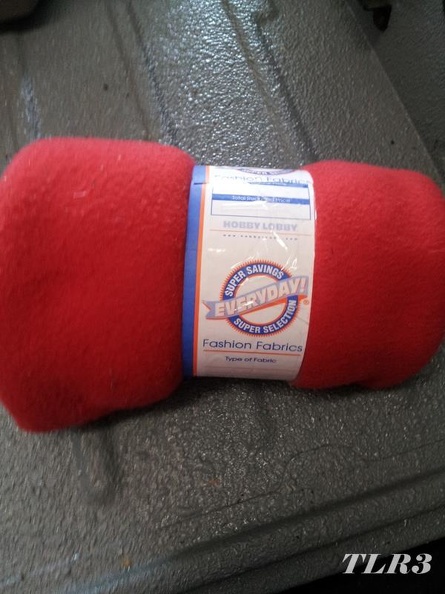
While at Hobby Lobby, again, this time shopping for fall décor, because apparently we needed more fall décor, I picked up a remnant of red polyester fleece, 7/8 yard of fabric, way more than I needed, for $4.17.
I covered the parts of my speaker pod frame that would make contact with the fleece, with masking tape. Then I sprayed liberal amounts of the Al’s LMR (Lecithin Mold Release, same stuff that keeps the bed liner material from sticking to the texture gun) on the tapped areas.
Then I cut a piece of fabric I thought would be big enough for the job. This actually took a couple tries, my advice would be to cut a piece bigger than you think you’ll need, chances are it won’t be, and if it is, trim the excess.
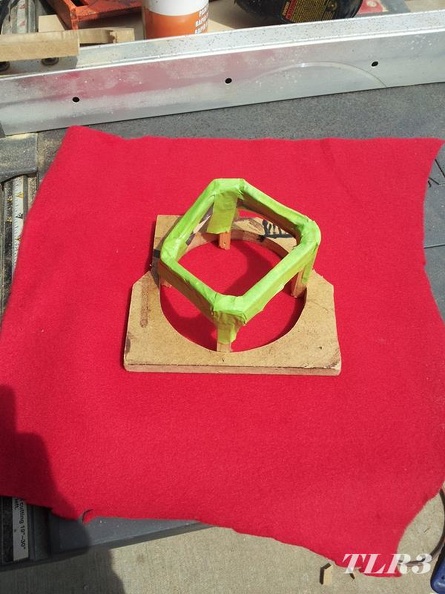
I stretched the fabric over the frame, and used my ancient Stanley manual staple gun to hold the fabric in place around the edges of the MDF. I picked up a quart of Bondo brand fiberglass resin at Home Depot for about $16, I shopped around, and they were within a couple bucks of what I could find online, even with tax, and I didn’t have to wait on shipping.

I applied several coats of resin inside and out. I also cut strips of fabric about 2” wide soaked them in resin, and stuffed them all along the inside edge of where the fabric and MDF meet to help ensure a strong, air tight bond between the two.
I was pleased that the LMR coated masking taped allowed for easy removal of my frame structure. I trimmed the excess hardened fabric from around the edges of the MDF with a jig saw and belt sander, before I knew it, it was starting to look like I might know what I was doing. ![]()

very trick

Woah. Didn't realize how much win was going on in the Jeep thread. Nice work!

"I shot myself in the hand with a pneumatic nailgun, and then I went to Hobby Lobby."
That "fiberglass" looks really awesome though. I didn't realize how easy it is.. or maybe you just made it look that way. The mould release tape on the jig is a great idea.

I use hot glue for this kind of thing. Burns suck less than exit wounds.
Never thought about doing this with glass. Great idea!
In reply to ScreaminE & Dusterbd13:

Thanks for the props everyone!
I have not thought about that scene in YEARS. Thanks. Made me laugh.
The passenger side was easy compared to the driver side, simply a 5-3/8x6" rectangle. The same method was used to build a frame for the passenger side speaker pod. 
The pods got painted, I coated the inside with rubberized undercoating (poor man's DEI Boom Mat spray), drilled a hole, ran some 12 gauge speaker wire through them, siliconed the wire in place, and stuck some foam gasket tape around the speaker opening.
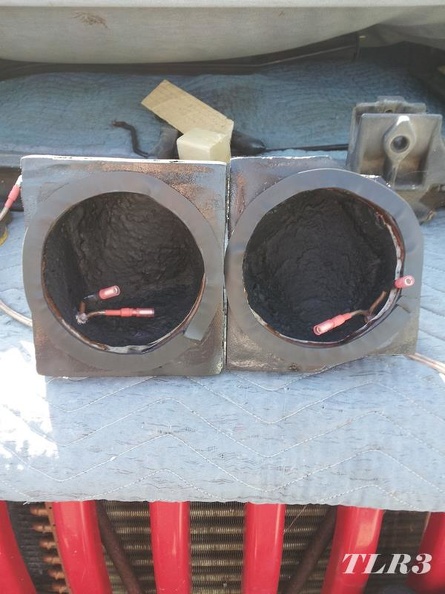
It's a snug fit, I had to actually pull the dash away from the fire wall about 2" and hold my mouth just right to get the the driver side pod with speaker in place. I made some mounting brackets that utilized the the factory speaker mounting hardware out of scrap 10 gauge steel for the top, and 16 gauge for the bottom.
Yes it really fits. ![]()
When I started on Muffin's audio, I was brainstorming where I could hide an amplifier or two, and how I was going to fit an 8" sub in the center console, but at this point, I am extremely pleased with the sound quality. The bass response from the Alpine 2 ways surprised me, it's punchy, a little lacking on the super low end, but I mostly listen to rock an talk radio so I think it'll do as is, for a while anyway. The new to me head unit has got more detailed EQ adjustments than I care to mess with, spending some time tinkering with them might be able to get a little more out the speakers, but for now I think the preset "Power" EQ is sufficient.
Muffin has had a lot of different head units over the years. I stuck with Clarion for a while, I think I only had 2 Clarions, both of which were replaced under warranty for various reasons. After the second one died, again, about 2 months past its warranty, I was done with Clarion head units. From then on I've primarily had Alpines or OEM in everything. Alpine has never let me down, I had a CDA-9813 that was probably the best head unit I've ever owned. However, at some point after grad school, Past Lee decided he needed money more than he needed an awesome head unit and sold it.
I had replaced the last Alpine head unit in Muffin with a cheap Jensen that came with SWMBO, in fact before we started dating, she came over to my house for me to replace said Jensen with a new Alpine in her old car. She didn't want her old Jensen anymore, and Muffin needed a radio so that's where it wound up. The Jensen was okay for AM/FM, but couldn't play a CD while going more than 10 MPH on any surface that wasn't smooth as glass without skipping.
So, I needed a new head unit to go with my awesome "new" speakers. I had my heart set on another Alpine, but I also wanted the modern amenities, USB, Bluetooth, etc. I was primarily shopping "mechless," no CD drive head units since most of my music is on my phone anyway, I rarely ever use CDs anymore. Alpine unfortunately doesn't have anything I just really like for much less than $200, I had just about decided that I was going to settle for the UTE-152, which can be had for around $120.
I was searching used too, most modern head units are absolutely hideous, so I culled a lot of affordable options just based on looks. Then I stumbled across a 2012 model, Kenwood KDC-X696 on eBay, no one was bidding on it, listing said it worked, barely used, and came with everything but the wiring. I've used some Kenwood stuff in the past and it has been alright. I put a Kenwood 10 disc changer in my sisters car, it survived her, so I figured they can't be that bad. The KDC-X696 is an "Excelon" which I remember some of my Kenwood fanboy friends claiming was good. The KDC-X696 has got Bluetooth, streaming and hands free, MP3/WMA, USB, 3 sets of RCA Preouts, pretty thorough EQ adjustability, doesn't look like something from Star Trek, though it is blue text, not wild about that, anyway, it met my criteria and was only $60 shipped to my door. I got a Kenwood 16 pin harness off Amazon for $9, and a microphone for the hands free off eBay for $5, so for $74 I had what I felt was a bargain of a new-to-me head unit.

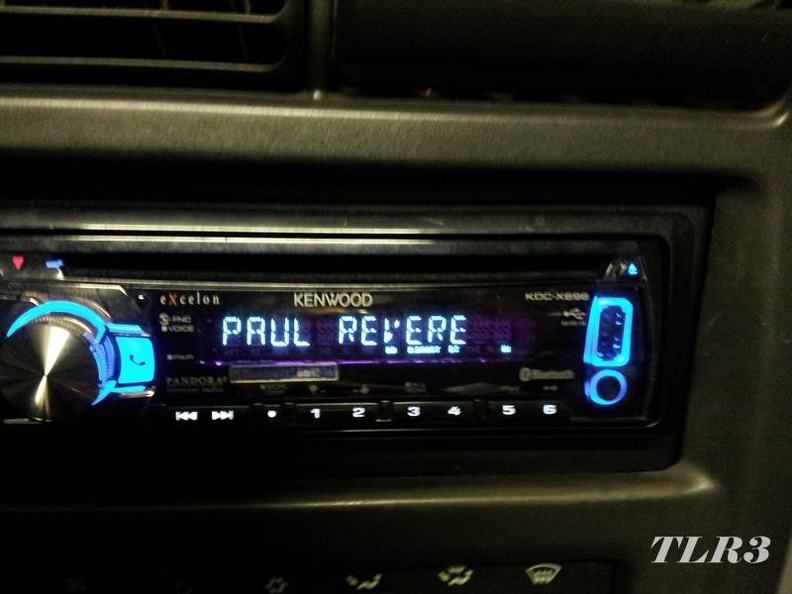
The Bluetooth streaming is a little flaky, I downloaded Kenwood's app for playing music, but the music player that came with Android works just as well. The controls on the head unit don't always work to control the source (forward, back, pause, etc.) when streaming music, not a huge issue. I'm currently on the hunt for a 8+ GB USB jump drive short enough to fit in the head unit and still close the little door that covers the USB port, so streaming audio won't be used a whole lot. The hands free calling works great, phone book access via the head unit is intuitive and easy, calls are clear, and according to folks on the other end I sound fine, even over the noise of the engine and leaking exhaust manifold. The real test will be road/wind noise. I have the Bluetooth microphone mounted on the dash, above the gauge cluster, pointed directly at the driver.
Muffin's now got a rocking sound system with Bluetooth for around $150 all in, speakers, head unit, and materials. ![]()
We've been collecting Jeeps lately, as mentioned before, we got SWMBO an XJ earlier this summer, weekend before last I helped a buddy drag home a MJ (Comanche) parts truck, and this past weekend SWMBO and I went on a road trip to bring home an XJ for her brother. It's a disease, apparently communicable, and I may be somewhat responsible for spreading it. ![]()
Between dragging home Jeeps, parts, niece's birthday, family stuff, etc. taking up weekends; finding time to get much done on Muffin has been challenging. For a while I was forcing myself to at least do something on Muffin every night, but that didn't last. Regardless, I have made some progress, but had a few set backs too.
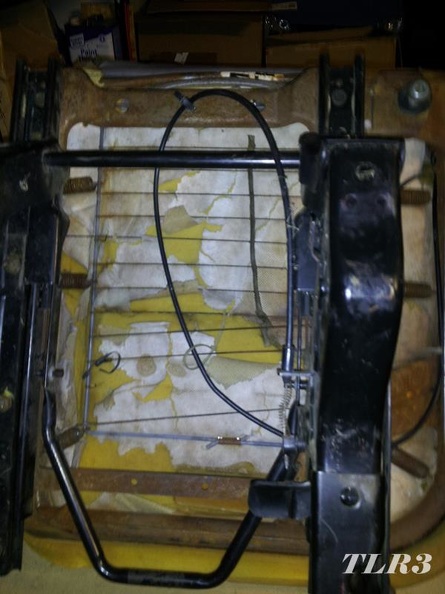
When I left off earlier, I was basically ready to put the seats back in, but before I could do that, they needed some attention. The seat bottoms were in a sad state of disrepair. Most of the cross wire supports for the bottom were broken, the passenger seat only had one remaining. The fabric on the bottom of the cushions were destroyed, cracked and falling off. The neoprene seat covers were nasty; I discovered that something had actually been living between the seat and cover at one point. Finally, neither of the fold and tumble features of the front seats worked as it should.
I got to work on the seats, pulled the neoprene covers off, researched the best way to clean neoprene, and wound up buying some wet suit shampoo off Amazon. I followed the directions and put the covers in the washing machine on the delicate cycle. That wasn't good enough, I mixed up a concentrated solution of water and the wet suit shampoo, then used it, a scrub brush, and some elbow grease to actually accomplish anything. I then ran them through a delicate machine wash cycle with more wet suit shampoo once more before I was satisfied. They're certainty not "good as new," but you've got to look to see any stains, and they're exponentially better than they were.
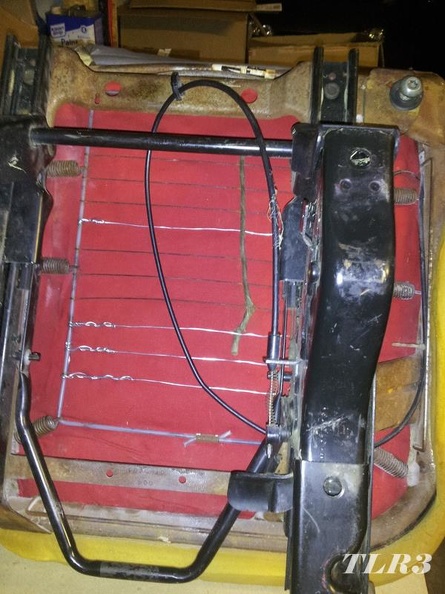
With the seat covers washed and hung to dry I went to work on the seats themselves. I loosened the seat bottoms from the frames, and used some red duck cloth (heavy cotton canvas like fabric) that SWMBO donated to the cause, spray adhesive, and some 17 Ga. galvanized electric fence wire to rebuild the bottom of the seat cushion and supports. I also went to town with the white lithium grease lubing all the joints, and sliders while I had the seats out.
Driver side seat, before:
Driver side seat, after:
The driver seat didn't want to tumble forward; when you release the latch for the seat back to go forward, the motion of the seat back leaning forward pulls on a cable that releases a latch on the seat bottom's "tumble" mechanism allowing the bottom of the seat to tilt forward as well. My seat back would fold forward, but the bottom latch wouldn't release. Stretched and/or broken cables are a common problem. With the seat removed from the Jeep though it worked as it should, I discovered that the seat back was hitting the steering wheel when folding it forward, it wasn't going far enough forward to release the bottom latch, so the cable had stretched over the years. Simple solution was to take some of the slack out of the cable with some lock washers I slipped over the end of the cable and then mashed closed with a pair of pliers. The seat works as it should now.
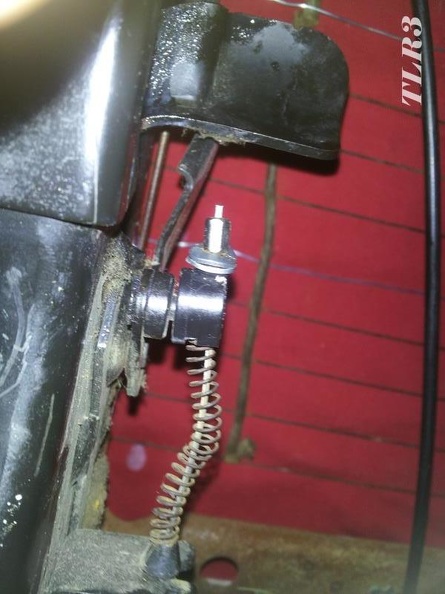
I probably should have added another washer/shim or two, it works with the seat slid as far back as it goes, and releases just as it makes contact with the steering wheel. If anyone with shorter legs drives it, they'll have to scoot the seat back to get the mechanism to be fully functional.
With the driver seat taken care of, I moved on to the passenger seat. It was in the worst shape, I replaced all but one of it's support wires, and it too didn't fold and tumble forward as it should. I dreaded working on it because not only does it have a fold/tilt mechanism like the driver side, it also has a cable release for the slider, so the weight of the seat causes it to slide all the way forward when tilting.
Passenger seat before:
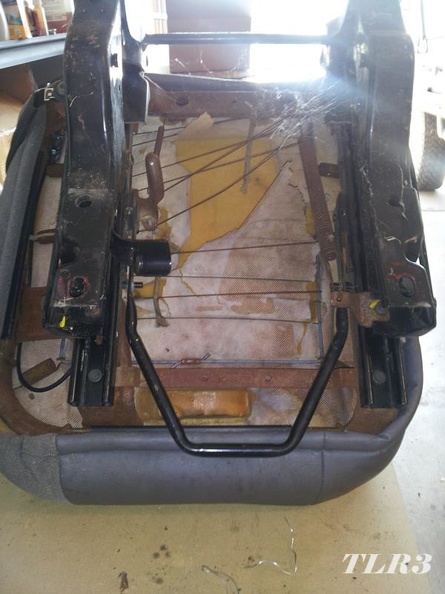
Passenger seat after:

The good news was that the cable between the seat back and bottom had simply come out of its retainer bracket, I put it back where it belongs, put a couple drops of super glue on it, and "voila" it worked again! I love a simple repair.
Rube Goldberg must have had a hand in designing these seat mechanisms, they seem a little overly complicated, and if any one link in the chain of events required for them to work as designed has a hick-up, then you're stuck doing you're best contortionist act to access the back seat.
So in fixing a lot of Past Lee's mods I held onto most of the stuff I removed, just for this photo opportunity. This technically isn't all of it, there are some tweeters that have vanished, and there used to be a pair of 2x6" halogen lights on the rear bumper. I put a hitch bumper on 6 months or so before we moved to OH, I ditched the lights but the wiring and switch was still there. One of my next door neighbors often comes over to check on my progress, I had all of this sitting out and offered any/all of it too him for free, for some reason he declined. ![]()
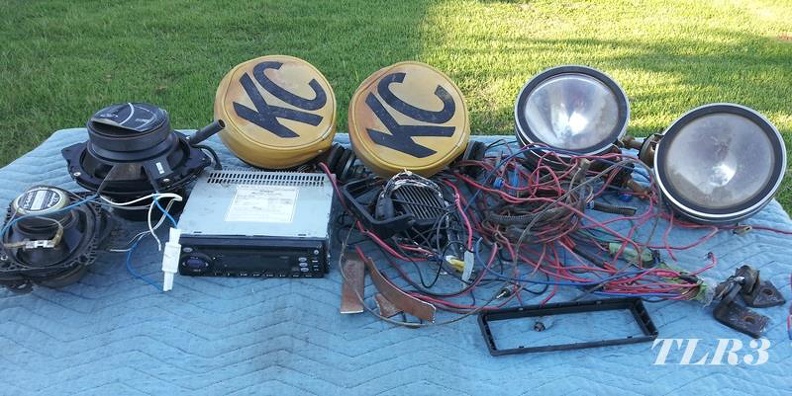
I kept the KC covers, speakers, and head unit (don't ask me why, I might be a hoarder). I put the wire in my "box of assorted lengths of wire," and put the rest in the trash. So all of Muffin's old Walmart truck accessory lights are gone, SWMBO had been campaigning for that for a while, though I intend to put some Hella 500 FFs back on the window hinges, and some Hella 500 Fogs on the eventual new front bumper too. Shhh, don't tell her. ![]() She's still campaigning for a Snorkelectomy too, I'm not sure on that one, she may get her wish, I'm kind of on the fence yet.
She's still campaigning for a Snorkelectomy too, I'm not sure on that one, she may get her wish, I'm kind of on the fence yet.
You'll need to log in to post.


