3 4 5 6 7
docwyte
docwyte PowerDork
8/21/21 12:31 a.m.

I managed to borrow an engine hoist Thursday.  This morning a friend came over and we went after the motor.  I had everything ready to go, we hooked the hoist up and started jacking.  Then I discovered I had to remove the power steering lines from the pump.  Which barfed nasty fluid all over, luckily I had the catch trays underneath it.

Tried again with the hoist, had to figure out which way to rotate the motor/transmission but we got it out!

Big hole in the parts car...

Next step was separating the engine from the transmission.  That went pretty smoothly once I realized I had to remove the engine mount bracket.

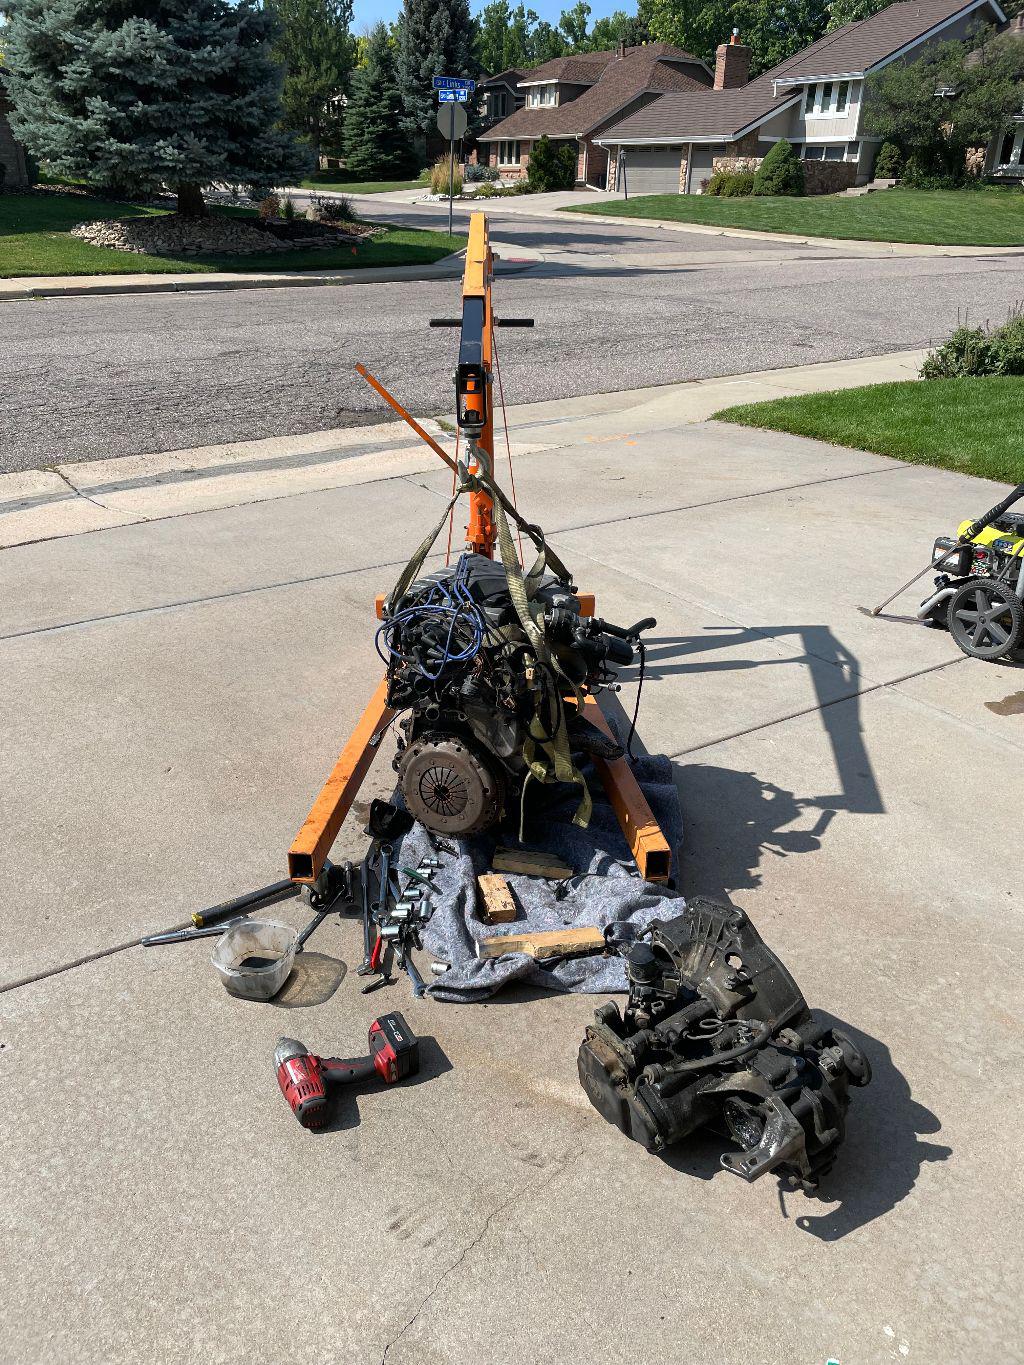
Transmission is super gross.  Hit it with Simple Green and wanted to pressure wash it but the pull cord snapped on my pressure washer!  Ugh.  Hit it with the hose instead, wrapped the axle flanges in zip lock bags with zip ties, stuffed the thing in a 55 gallon trash bag and into the basement storage it went.

Next up was removing the axles, which were totally seized in the knuckles.  Literally had to beat them out with a hammer.  Got them tho and they also went into the basement. 

Hooked the drivers side ball joint back up to the control arm so the car could roll, then took my friend out to lunch for helping me.

After that I moved all the other parts to the basement and took the BBS RX2's over to Discount Tire to have them mount up tires.  Then I started working on the inside of the good corrado.

It had the wrong sun visors and sunroof motor cover.  I'm still trying to find a grey sunroof motor cover but at least I got a black one.  Started here, the tan really was shocking against the grey

Ended here...

Next up was removing the torn stock shift boot and shift knob to put the leather shift boot and Momo shift knob on

Then Discount Tire called me to say my wheels/tires were done.  Went and picked them up and installed them too

After that I vacuumed out the interior and installed the floor mats and trunk mat.  Then I had to clean up and take my son to soccer practice.  However I noticed the car is leaking coolant.  Hopefully it's just a loose clamp somewhere.

After dinner the guy who was going to buy the shell came by with a trailer and picked up the shell and the motor.  Paid me and left.  Super happy, got rid of the parts car in a week!  All the cars are back inside the garage.  Corrado is up on the lift, need to start the car and then get underneath it to find the coolant leak.  Will hopefully do that after my sons soccer games tomorrow.

jfryjfry
jfryjfry SuperDork
8/21/21 11:20 a.m.

How great is it to have had the parts car in and out so quick?

it's just funny to me that he, I'm guessing, is now going to spend a bunch of money and time finding, buying and replacing everything you just took off!

docwyte
docwyte PowerDork
8/21/21 4:25 p.m.

In reply to jfryjfry :

I'm really happy to have the parts car outta my garage in a week!  Yeah, I asked him what his plan was for the car and he said he's going to put it back together.  Thing is most of the stuff I took off is hard to find, which is why I wanted it to begin with!

docwyte
docwyte PowerDork
8/22/21 8:47 a.m.

Fixed the pressure washer yesterday.  Hope to have time to find and fix the coolant leak on the corrado today and knock off some of the other easy installations on it.  Would like to drive it this week!

docwyte
docwyte PowerDork
8/23/21 9:02 a.m.

Spent a little more time on it last night.  Will keep plugging away at the quick jobs in the evenings and on Fridays when the kids are in school I'll do the bigger stuff...

First up, swapping out the drivers side mirror glass for a used one that's in much better shape.  Removing these is fairly easy but does take a lot more muscle than I expected.  I put tape on the mirror housing and then used a plastic trim removal tool to pop off the glass itself.

113216

Here's the "bad" glass I was replacing

113217

I wanted to plug in the defroster for the glass but the male pins for each glass were different.  The ones on the glass from my car were much more narrow than my replacement glass.  I didn't want to modify the harness on the car, or try and cut down the pins on the glass itself, so I just left it.  On the plus side my "new" glass shouldn't get any worse and since the car isn't a DD or will see any kind of weather it doesn't really matter

113220

Next up was installing my Momo Race steering wheel out of my basement stash to match the momo shift knob I'd installed earlier.  Easily done, pop off the horn button, remove the 24mm nut, put on the Momo hub adapter, then the steering wheel.

113222

113223

113224

Some people have wanted to see the Climatronic hvac, here it is...

113225

Drove the car to work today, it's really the first time I've put miles on it since I got it 10 days ago.  I was able to go to the DMV last Friday and register it.  Been a *long* time since I've driven a VR6, probably 20 years?  The car is super tight feeling, no rattles or bangs and is extremely quiet.  It drove really well, perhaps under powered compared to what I'm used to (450-550hp cars) but I'm at altitude and it's taking a ~20% hit in power.  I'll install the Schrick VGi this Friday, that should help a bunch.  Very happy with it so far!

jfryjfry
jfryjfry SuperDork
8/23/21 10:19 p.m.

So very cool to hear that you drove it to work!

if you ever decide you want the defroster option on that mirror, cutting down the spades on the backside of the mirror would be quick and easy with some sharp diagonal cutters. 


docwyte
docwyte PowerDork
8/24/21 8:33 a.m.

In reply to jfryjfry :

Yeah, I know.  I may do it but I doubt I'll ever drive the car in inclement weather, so shouldn't need it.  Keeping them disconnected will also insure the mirror doesn't go all brown like my other one.

Came out after work to a completely dead battery.  Hmm, I know I didn't leave anything on?  Got a jump from one of my employees and drove home.  During the jump I noticed the positive battery terminal was loose on the battery despite being tightened all the way down.  Voltmeter on the way home read ~12v vs the almost 14v it should read.

A quick stop at the auto parts store got me a package of battery shims.

113484

Installed one on the positive post, reconnected the battery, fired up the car.  Voltmeter inside jumped to almost 14v, which I double checked with my multi meter, got 13.7v when running.  Put the car/battery on a trickle charger, this morning it read 100%.  I'll check later to see if I've got a parasitic draw but I think the loose positive terminal wasn't allowing the alternator to charge the battery....

docwyte
docwyte PowerDork
8/27/21 4:50 p.m.

Time to install the Techtonics chip.  It's meant for the 268 cams and Schrick manifold, plus Colin gave me the "high altitude" tune.  This is very old school.  Find the ECU in the rain tray on the passenger side.

Pull the lever on the ECU wiring plug towards the front of the car and lever the plug off and the harness out of the way.

Remove the 10mm nut holding the ECU bracket in place.  Next remove the plastic cover on the blower motor.  There's a plastic clip you need to push to the outside of the car, then pull the entire thing to the outside of the car and remove it.

Pull the ECU to the passenger side of the car and finagle it out of the car.

There are 4 T10 torx bolts holding it together.  Remove these and remove the white plastic cover over the chip.  This chip.  Notice where the notch is on the chip, it needs to line up with the notch on the chip board.

Carefully remove the chip with a flat head screwdriver.  Place the new Techtonics chip into place making sure all the pins line up.

Put the plastic cover back over the chip

Assembly is the reverse, before totally reassembling everything plug the ECU in and make sure the car starts.  Car is noticeably happier with this chip, idles better, idle recovery is better, more power.  Win!

Next up I wanted to swap in my Euro VR6 headlights, as the ones on the car were for a G60 and the passenger side lens was cracked.  I opened up my package of headlights from Perfection Plastics and discovered one tab was broken off and another was cracked.  The other work done wasn't all that esthetically pleasing.  I mean, he did rebuild the tabs but the work is pretty rough looking.  I packed up the two headlights that need to be fixed and sent them back to him. 

I was going to send him the lights on the car, as they need a tab repaired as well but seeing how those other ones came out I don't think I'm going to bother.  So instead I swapped the G60 lens and bezels for VR6 lens and bezels and called it good.  The VR6 lens line up better with the grill, as they stick out more.  They're also not cracked, which is a bonus.

Unfortunately when I pulled the passenger side head light the plug came apart.  The previous owner had made a relay harness for it and I guess I was a little rough with it, or the wires weren't all that secure in the pins.  I ended up de pinning the 3, spreading them open, placing the wires in, then flowing some solder over them to make sure they were good.  Then replaced the pins and plugged it back in.  Checked it before assembly and it's all good

Lastly I wanted to mock up the Schrick VGi to make sure I had all the parts and the throttle body adapter worked.  I'd pulled the throttle body from the parts car, so I had everything I needed to mock up.  Happily it all fits

I also noticed that the manifold *does* have a port for the EGR, it's just not tapped.  So at least I can plug the EGR in and it'll pass visual.

One thing I found I didn't have was the gasket between the upper part of the manifold and the lower runners.  Unfortunately this gasket is no longer available.  I pinged the guy I bought the car from and he recommended using Reinzosil gasket maker, so I ordered some of that from Amazon.  It should be here next week, so I'll put a bead of it on and then bolt the two halves together.  Since only air goes through it I should be fine.  Then hopefully late next weekend I can install the manifold...

docwyte
docwyte PowerDork
9/1/21 8:32 a.m.

Worked on it some more.  I'd picked up a new under hood insulation kit as mine was basically gone.  Well, with the exception of 1/8" of old glue.  Now it's possible I could've just put the new insulation kit right over the old glue and it would've stuck but I didn't want to risk it not bonding.

That led me to removing the old glue and my OCD kicked in a little bit and I ended up removing as much of the old glue as I could.  Probably more than necessary and since this job is THE SUCK, I'd recommend not going as far as I did.

Anyways, get yourself a disposable plastic drop sheet and cover the entire engine bay, this is going to get really messy and when you're done you can just throw the drop sheet away with all the grossness it's caught.

115222

Now gather up all your products.  I tried a bunch of different stuff, a 3M adhesive remover wheel on my drill (Fail!), Goof Off (Pretty much a Fail), WD40 "Big Blast" and 3M Adhesive remover spray.  What worked the best was the WD40 and a stiff spatula or plastic trim remover tool to knock off most of the thick adhesive, following up with the 3M Adhesiver Remover spray.

You can see why the drop cloth is so important, this isn't even half of the adhesive I removed!

115223

Here are some progress pics, one panel done and just hating life as I hadn't quite figured out the correct combination of tools/products to use yet

115224

Here I have all the glue off (well, almost all of it) and I'm mocking up the fitment of the hood insulation

115225

Here's the hood insulation on

115226

And job done!

115227

Really happy to have this job behind me, I'd rather pull a motor than do it again.  Hopefully the new hood insulation lasts a really, really long time!

docwyte
docwyte PowerDork
9/6/21 4:15 p.m.

More work done today.  Put the car up on the rack to do an oil change as the seller told me it had break in oil in it.

Pulled the magnetic drain plug and as he predicted, there was schmutz on it.  Mostly assembly lube it looked it.

Next pull the plug on the oil filter housing, it's a 6mm allen. This lets almost all the oil to drain out first.  Then use a 36mm socket and remove the cap, after you've used a 10mm to remove the clamp holding the power steering line in place.

Replace the filter, put everything back together.  Manual says the car takes 6.3 quarts.  I put in about 5.75 and checked the dipstick and it read full.  I'll let it settle some more and check again but it looks like 5.5 quarts is what I should be putting in.

Since the car was on the lift I decided to put on the SpoonFed Tuning 90mm front lip.  Their mold is pretty good but it needs to be 3/8" longer to be perfect.  It did pretty much snap into place.  Remove the 10mm bolts on either side of the stock lip and pop it out.  Pop in the new lip and replace the 10mm bolts.

Here's a comparo between stock and 90mm. 

And on the car

Lastly I got the gasket maker and laid a bead on the Schrick VGi and bolted the parts together.

I'm letting this stuff set up and will install the Schrick VGi tomorrow.

docwyte
docwyte PowerDork
9/8/21 9:15 a.m.

Ok, more progress last night.  Well, sort of.  My plan was to install my Schrick VGi.  Taking the factory manifold off went pretty smoothly, it's not that hard.  One difficulty is my car still has the air pump and that hose is in the way of the lower, center bolt on the runners.  So I took out the passenger headlight so I could pop off the SAI hose and get that bolt out.

Plug wires off, luckily I still have the plastic OEM plug wire tool

You can't reuse the back, center bracket on the VGI and it holds a bunch of grounds.  I thought about just attaching the grounds directly to the head, but the wires are crunchy due to age and I didn't want them to break.  So I made a "jumper" that's attached to the head and the ground wires are attached to it

Here's where things start to go pear shaped.  I get the VGI totally installed and start hooking everything back up.  My VGI is an OBD2 version, but I'd gotten an adapter plate so my OBD1 throttle body would bolt up.  Thought everything was taken care of.  Well, not entirely....

Once I hooked up everything I realized that there isn't a port on the throttle body neck of the VGi for the idle stabilizer valve.  The boss is there, but the port isn't.  At this point I was feeling pretty pissed off at myself as I've had the VGi sitting in my basement for weeks.  I should've compared it to the stock manifold and then had that boss drilled/tapped and the port installed.  Argh!

I did test fire the car and it does run, just not happily as it has an enormous vacuum leak with that hose not hooked up.  The guy I bought my car from runs a machine shop and has offered to drill/tap/install the port in the VGI neck for me.  So I needed to pull it and the last thing I wanted to do was remove the VGi.  Getting the lower runner bolted on was a massive PITA as they're larger than the stock ones, so access is poor.

I managed to pull the neck off by leaving the lower runners in place and popping off the middle part of the VGi.  I had to do that because there's one bolt in the middle of the neck that you can't get off from the top, you have to get at it from the bottom.  Anyways, no pics because I wasn't happy.  The neck is boxed up and I'm going to 2 day it to my friend so he can install the port.  Then I'll go ahead and reinstall everything.

What's annoying is that I googled everything I could about OBD1 to OBD2 VGI differences and nowhere did anyone mention this!  So now you all know, if you're trying to install an OBD2 VGI onto an OBD1 car, you need to drill/tap the VGI throttle body neck to add the ISV port....

What sucks is I was supposed to go to the radwood show this Sunday with the car and now I can't.

docwyte
docwyte PowerDork
9/9/21 8:21 a.m.

So I overnighted the "neck" of the VGI to my friend yesterday.  He should have it by 6pm today and he told me he had time this Saturday to get the port installed for me.  Hopefully he gets it done early enough in the day to get it in the mail back to me later that afternoon...

docwyte
docwyte PowerDork
9/11/21 12:25 p.m.

Well, I had a sleepless night when USPS, who guaranteed delivery of it by 6pm the next day didn't.  I was afraid they'd lost it and then I'd truly be screwed.  Luckily they delivered it the next day and my friend got right on it.


Here's the port he plans on installing

Machining the port

Drilling the neck of the Schrick manifold for the port

Hole drilled

Mocking up the port in the Schrick manifold neck

And installed

I've sent him a UPS label this time to get it back to me, should have it Tuesday.  

Then I also got this heat shield for my Neuspeed p-flo, it came with molding to seal against the hood and mounting hardware.  It's meant for a Mk3 12v VR6 but I figured I should be able to cut it down to fit the corrado.  I'll make a cardboard template of it and see first.  Figure worst case is it won't work and I'll resell it.

pimpm3 (Forum Supporter)
pimpm3 (Forum Supporter) UltraDork
9/12/21 6:44 p.m.

Saw a beautiful Corrado at cars and coffee this weekend and thought of your thread.

docwyte
docwyte PowerDork
9/13/21 8:33 a.m.

Love those wheels, they're 18" BBS RC's that came on Mk4 VW's.  I also see they removed the black side stripe moldings, that's a clean look!  I think I'll have the body shop remove mine next month when I bring it to them for the paint...

Paul_VR6 (Forum Supporter)
Paul_VR6 (Forum Supporter) SuperDork
9/13/21 11:23 a.m.

I hit that same issue with the VGI back in the dark ages. I posted about it on Vortex but it's probably lost in the ether somewhere. I did something similar but used an alum NPT fitting I had to 3/4" hose that worked fine. I didn't use the OBD1 tb adapter and just used an OBD2 tb with just the one tps wired in. Worked great. 

Also on the EGR the computer will have a E36 M3fit once you plug it in and it isn't delivering EGR. Messes up the fuel trims and eventually throws a code. Cut pin 10 on the ecm harness (white or brown white) to disable it in software.

docwyte
docwyte PowerDork
9/13/21 3:33 p.m.

In reply to Paul_VR6 (Forum Supporter) :

Hmm, can you give me more detail on how you wired the OBD1 tps to the OBD2 tb? 

I'll check out the EGR, thanks!

Paul_VR6 (Forum Supporter)
Paul_VR6 (Forum Supporter) SuperDork
9/13/21 6:59 p.m.

I used three of the wires and not all 7 laugh iirc used pins 4/5/7

docwyte
docwyte PowerDork
9/16/21 4:36 p.m.

OK, got the part back and finished up the Schrick VGI install. Everything went back together fine. Then I installed my P flo and the cardboard heat shield template I made. I shaved down the corner of the VGi but it's still hitting the hood. I'll have to cut a slot in the hood to give it clearance.

You can see that the heat shield is hitting the AC line here.

So I'll need to cut that part away from the real heat shield.  The other side is good

There's proper hood clearance as well, it doesn't hit the hood.  I do wish it came more forward and sealed up better but it's a whole lot better than just having the air filter sitting out there...

Went for a test drive and hmm, I don't feel the manifold runners switching over...  Ok, checked the vacuum signal with a Mity Vac, yep, that's working.  Pull up the actuator rod and it moves smoothly.  Pull vacuum on the actuator and the rod doesn't move.  If I pull the rod up all the way and put my thumb over the port, the rod slips down half way.

Crap!  The actuator is bad!  That part is NLA, can't find it anywhere!  Anyone have one laying around?  Otherwise I'll hit the pick n pull tomorrow am and see if I can find some...

Paul_VR6 (Forum Supporter)
Paul_VR6 (Forum Supporter) SuperDork
9/16/21 9:37 p.m.

You can shave the front motor mount 1/4" to make it clear. 

docwyte
docwyte PowerDork
9/16/21 9:41 p.m.

In reply to Paul_VR6 (Forum Supporter) :

I shaved down the corner of the Schrick but it's still hitting the hood.  So take the front motor mount off and knock 1/4" off the top?

On my first corrado I cut away that part of the hood, might do that on this one too.

Bigger problem is finding that Ford vacuum actuator...

Paul_VR6 (Forum Supporter)
Paul_VR6 (Forum Supporter) SuperDork
9/17/21 6:02 p.m.

Yep you just cut a chunk off the upper. If its a stock one thats plenty. If it is urethane prob do a little more. With the $ a hood is I wouldn't cut it. You want your partout value maxxed when it happens. cool

docwyte
docwyte PowerDork
9/17/21 7:53 p.m.

In reply to Paul_VR6 (Forum Supporter) :

Meh.  I've got a spare hood.  If someone is really that picky about a small slot (well done) cut out of a hood, then they can go find another one.  Which they won't be able to do, easily...

docwyte
docwyte PowerDork
9/20/21 8:58 a.m.

So met up with another VW guy yesterday morning as he'd posted a bunch of corrado parts on local Craigslist.  What I was after were these

They're the under dash parcel trays the Corrado's got in Europe.  We never got them here because of our crash standards, VW put in a crash bar and then covered it with a knee bar/foam dealie.  I'm not sure if I'm going to install them though, I didn't do a lot of research into it and turns out you need to cut that crash bar we got in the US corrados.  I'm not really keen to do that, so I may resell them or more likely put them in my basement stash as you never see these for sale.  If you do, they're generally not for the A/C cars like this set is.

Then my friend and his son came over to use my lift and bleed the brakes on the sons car.  Since they were out there I tuned up the template for my heat shield.  Filled in a few gaps and extended it towards the radiator support.

I'm not sure this will work tho, I can manuever it into place now since it's cardboard but I won't be able to do that with the ABS plastic the shield is made out of.  So I might not add the extension towards the radiator support...

In other news, a GRMer was able to find me a used working vacuum actuator for the Schrick and another one helped me track down a brand new one too.  So my plan is to pull the Schrick (again, gah!) on Friday, install the "new" actuator, then the intake heat shield.  I think I've also managed to file the corner of the Schrick down enough that it doesn't hit the hood anymore...

docwyte
docwyte PowerDork
9/21/21 8:51 a.m.

So I'm debating myself.  I'm trying to decide if this is a car I'm going to keep awhile, like several years or more.  If it is, instead of paying the body shop to paint that one rear quarter panel I'm debating having them repaint the entire car and do a color change.  I'm not a fan of wraps, so that's out.

The green on this car is a nice color but truth be told, it's one of my least favorite colors on the corrado.  I bought this car because it was the nicest one I could find, was totally mechanically rebuilt/sorted, had all the right stuff done to it and has the tasty recaro interior.  But I kinda wish it wasn't green. 

VW brought these over in 1994 in a purple color they called Bramble that I like a lot, or I really like the Audi nogaro blue color.  Of course that would mean stripping the entire car, painting the exterior, the door jambs and probably pulling the power train so the engine compartment could be painted too.  I don't know what my shop would charge but I'm sure $10k or more.  Financially it'd make no sense, I'd never get my money out of it...  I wonder if WyoTech would do it and how much they'd charge.  Then what sort of result I'd get back...

3 4 5 6 7

You'll need to log in to post.

Our Preferred Partners
U5fXV5aPCbWrnktjNkz3UbBQVYtMgCVGULs0y2hnLb6isgYAQ5bAqNaMt6jFmgF1