


The gauge panel came out nice.

The gauge panel came out nice.

Looking good! I wish I didn't have to get back to town in good time tonight or else I'd stop by. Hope the new job goes well next week!

Thanks, it has been falling into place this week. I'll finish the wiring tomorrow and then I just need to finish the front brakes, bleed the lines and triple check every thing and then I should be ready to power up the Hydra and start configuring it and see if it starts. I did get my title and Street Rod plates today, so it is road legal once I am ready to start playing with it. I had to laugh, the MVA folks asked me if it was modified in any way as it needs to be to register as a Street Rod...... I tried not to laugh too hard.

In reply to dherr :
Big thumbs up on the title and plates!
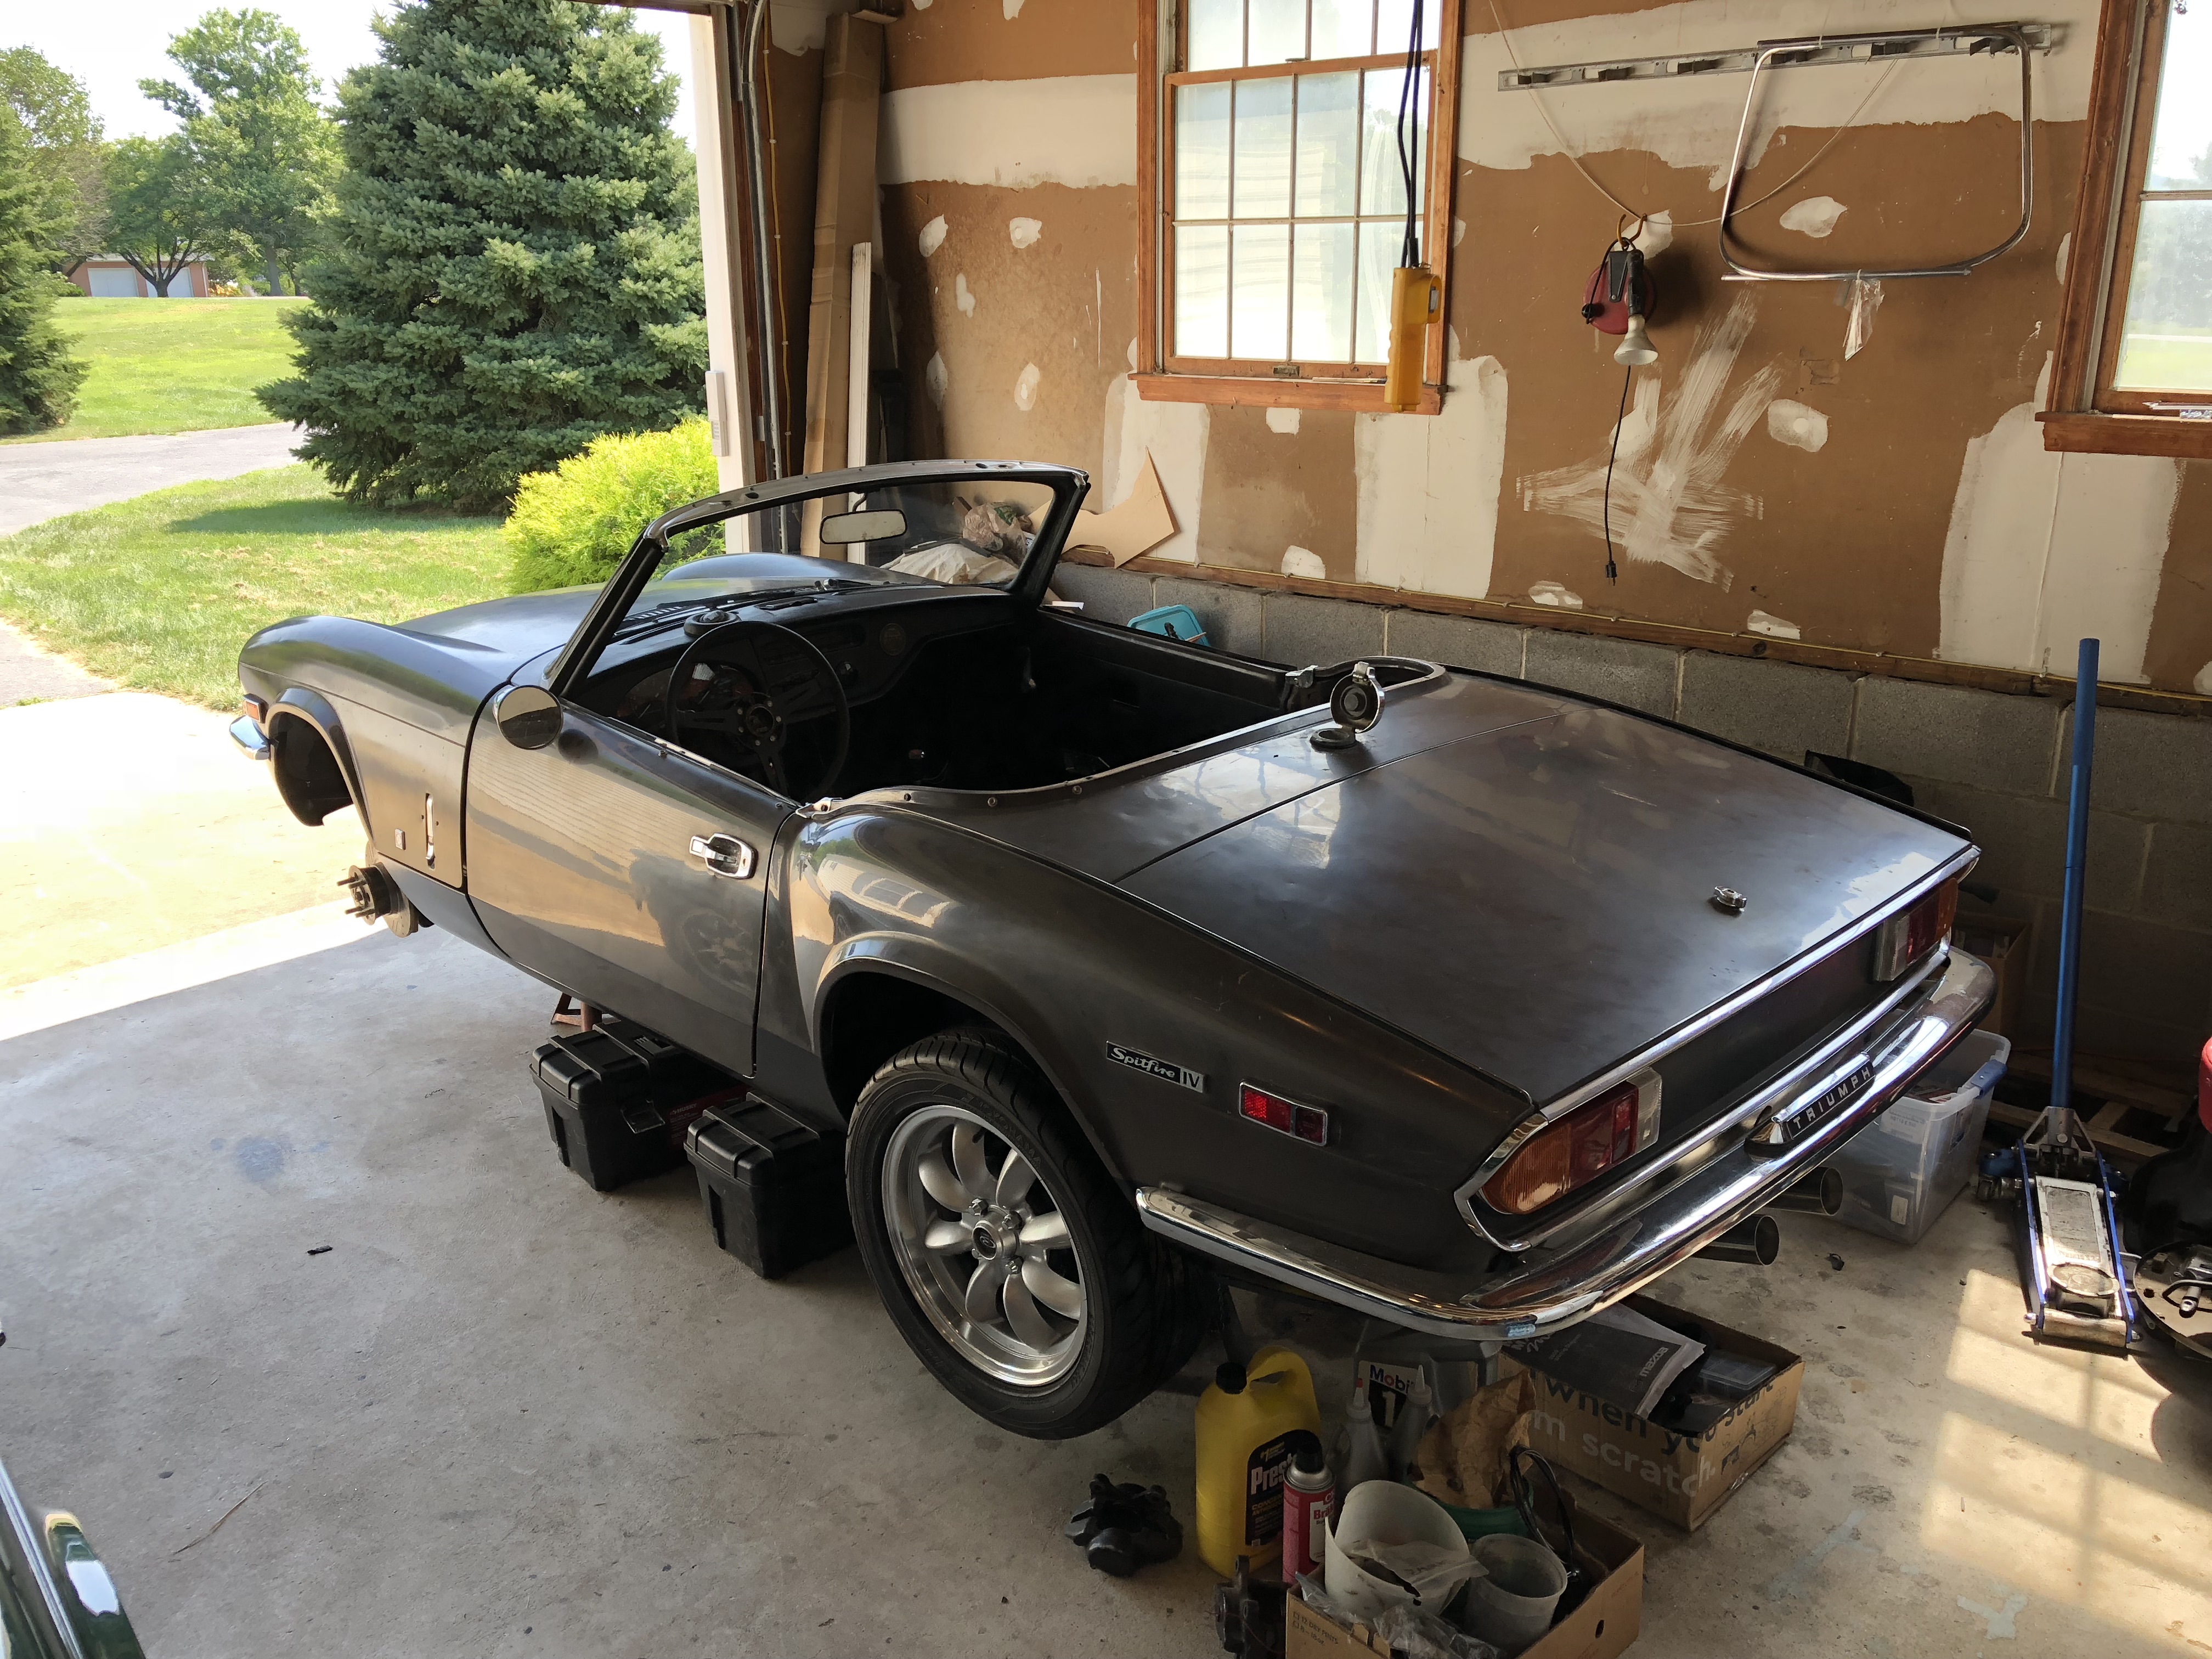
Put the doors on today, will need to install the GT6 window wings and windows, but good to have it looking like a complete car again. I'll have to play with the front to rear adjustment of the doors, but no changes in the door gaps in regards to the replacement of the floors.
Will have a full day tomorrow to work on it, so will be finishing the two wiring harnesses and hopefully work on the front brakes. Getting so close to starting it up!

That's going to be an epic sleeper :)
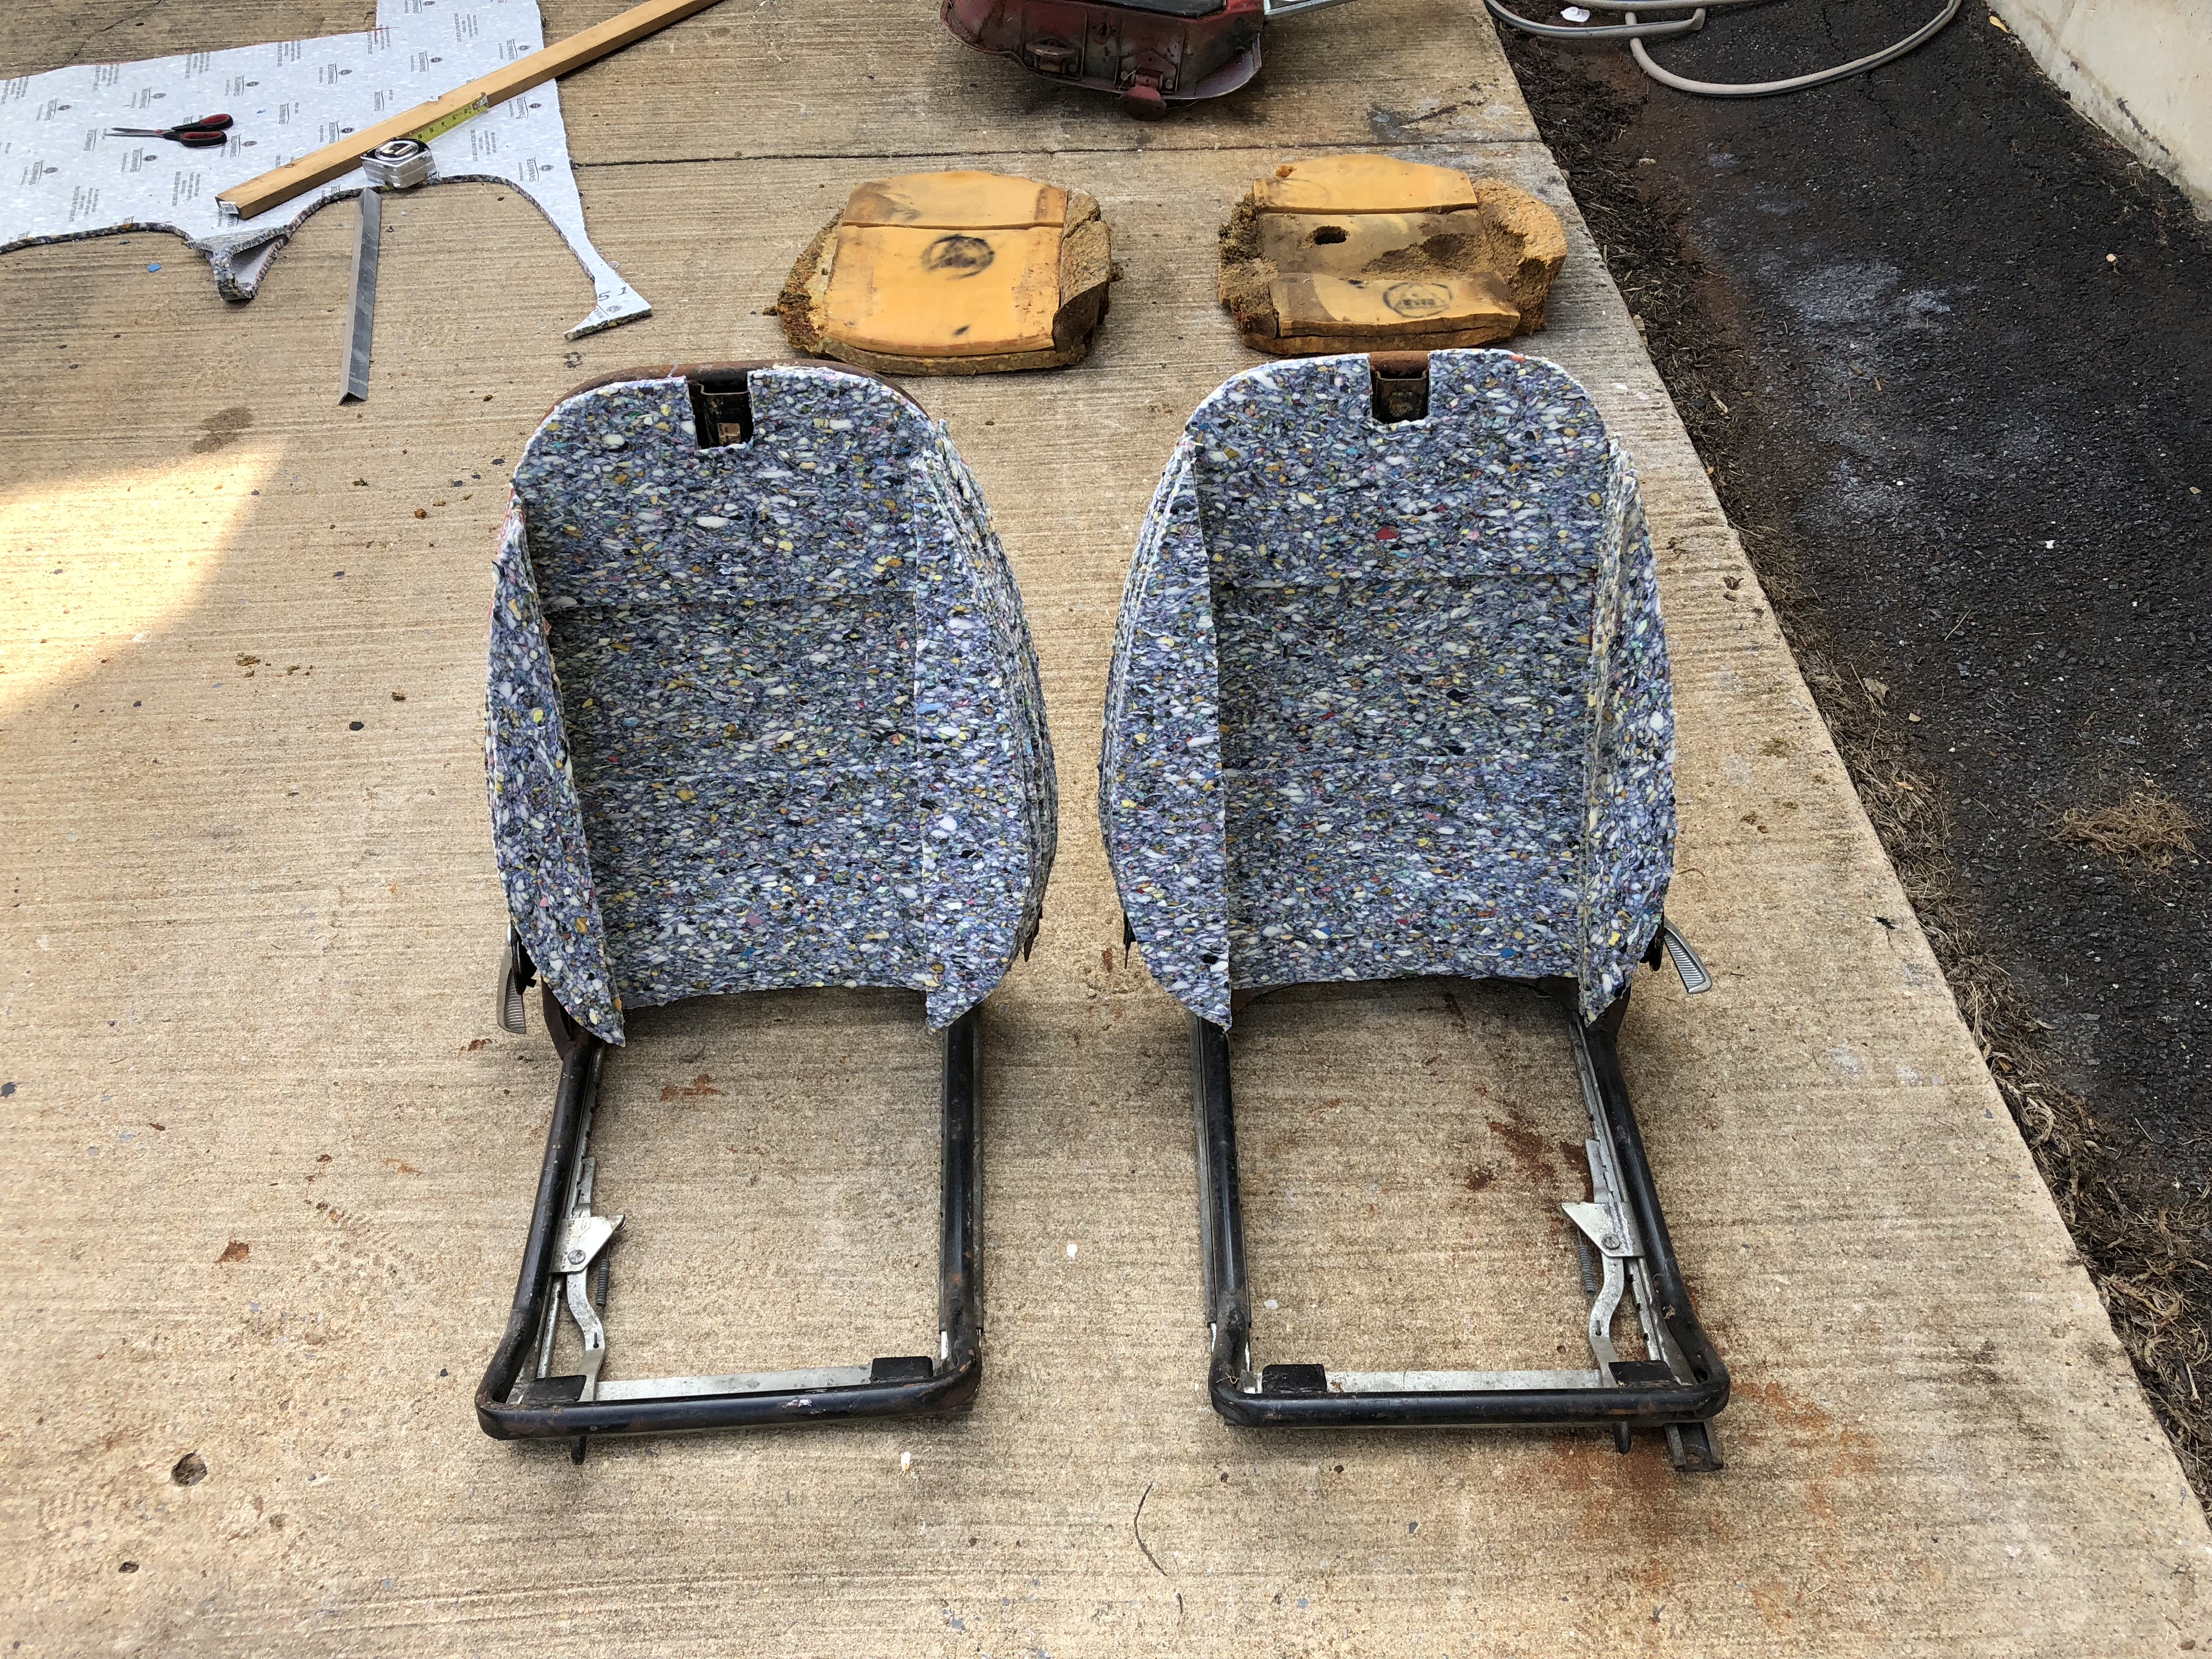
Decided that I was tired of wiring today and wanted to do something different, so started working on the seats. They are the "free" set that I picked up back in April and were overall in good condition, except that mice had gotten into them and destroyed the upper foam. So first order was to disassemble, clean and paint the frames. Surprisingly, the lower cushions had their foam intact and in good condition, so I will reuse the foam for the bottoms, but need to make new foam padding for the upper seats. I refuse to pay $400 for new seat foam when it is obvious that they are just gluing pieces together that I can do myself. After studying what is left of the existing seats, there are three kinds of foam, plus webbing. The back is a high density foam, the side bolsters are a stiffer foam and the seat backs and lumbar supports are a sandwich of firm and soft foam. I have tried to source some of these foams, but it is hard to do over the internet, so I ended up just gluing layers of carpet underlayment to make up the stiff sections. I'll add a layer of soft foam in the middle sections, as I have layered it with the stiffer foam as the factory did, so the final layer will be soft foam and then I'll sculpt the side bolsters to match the existing foam.
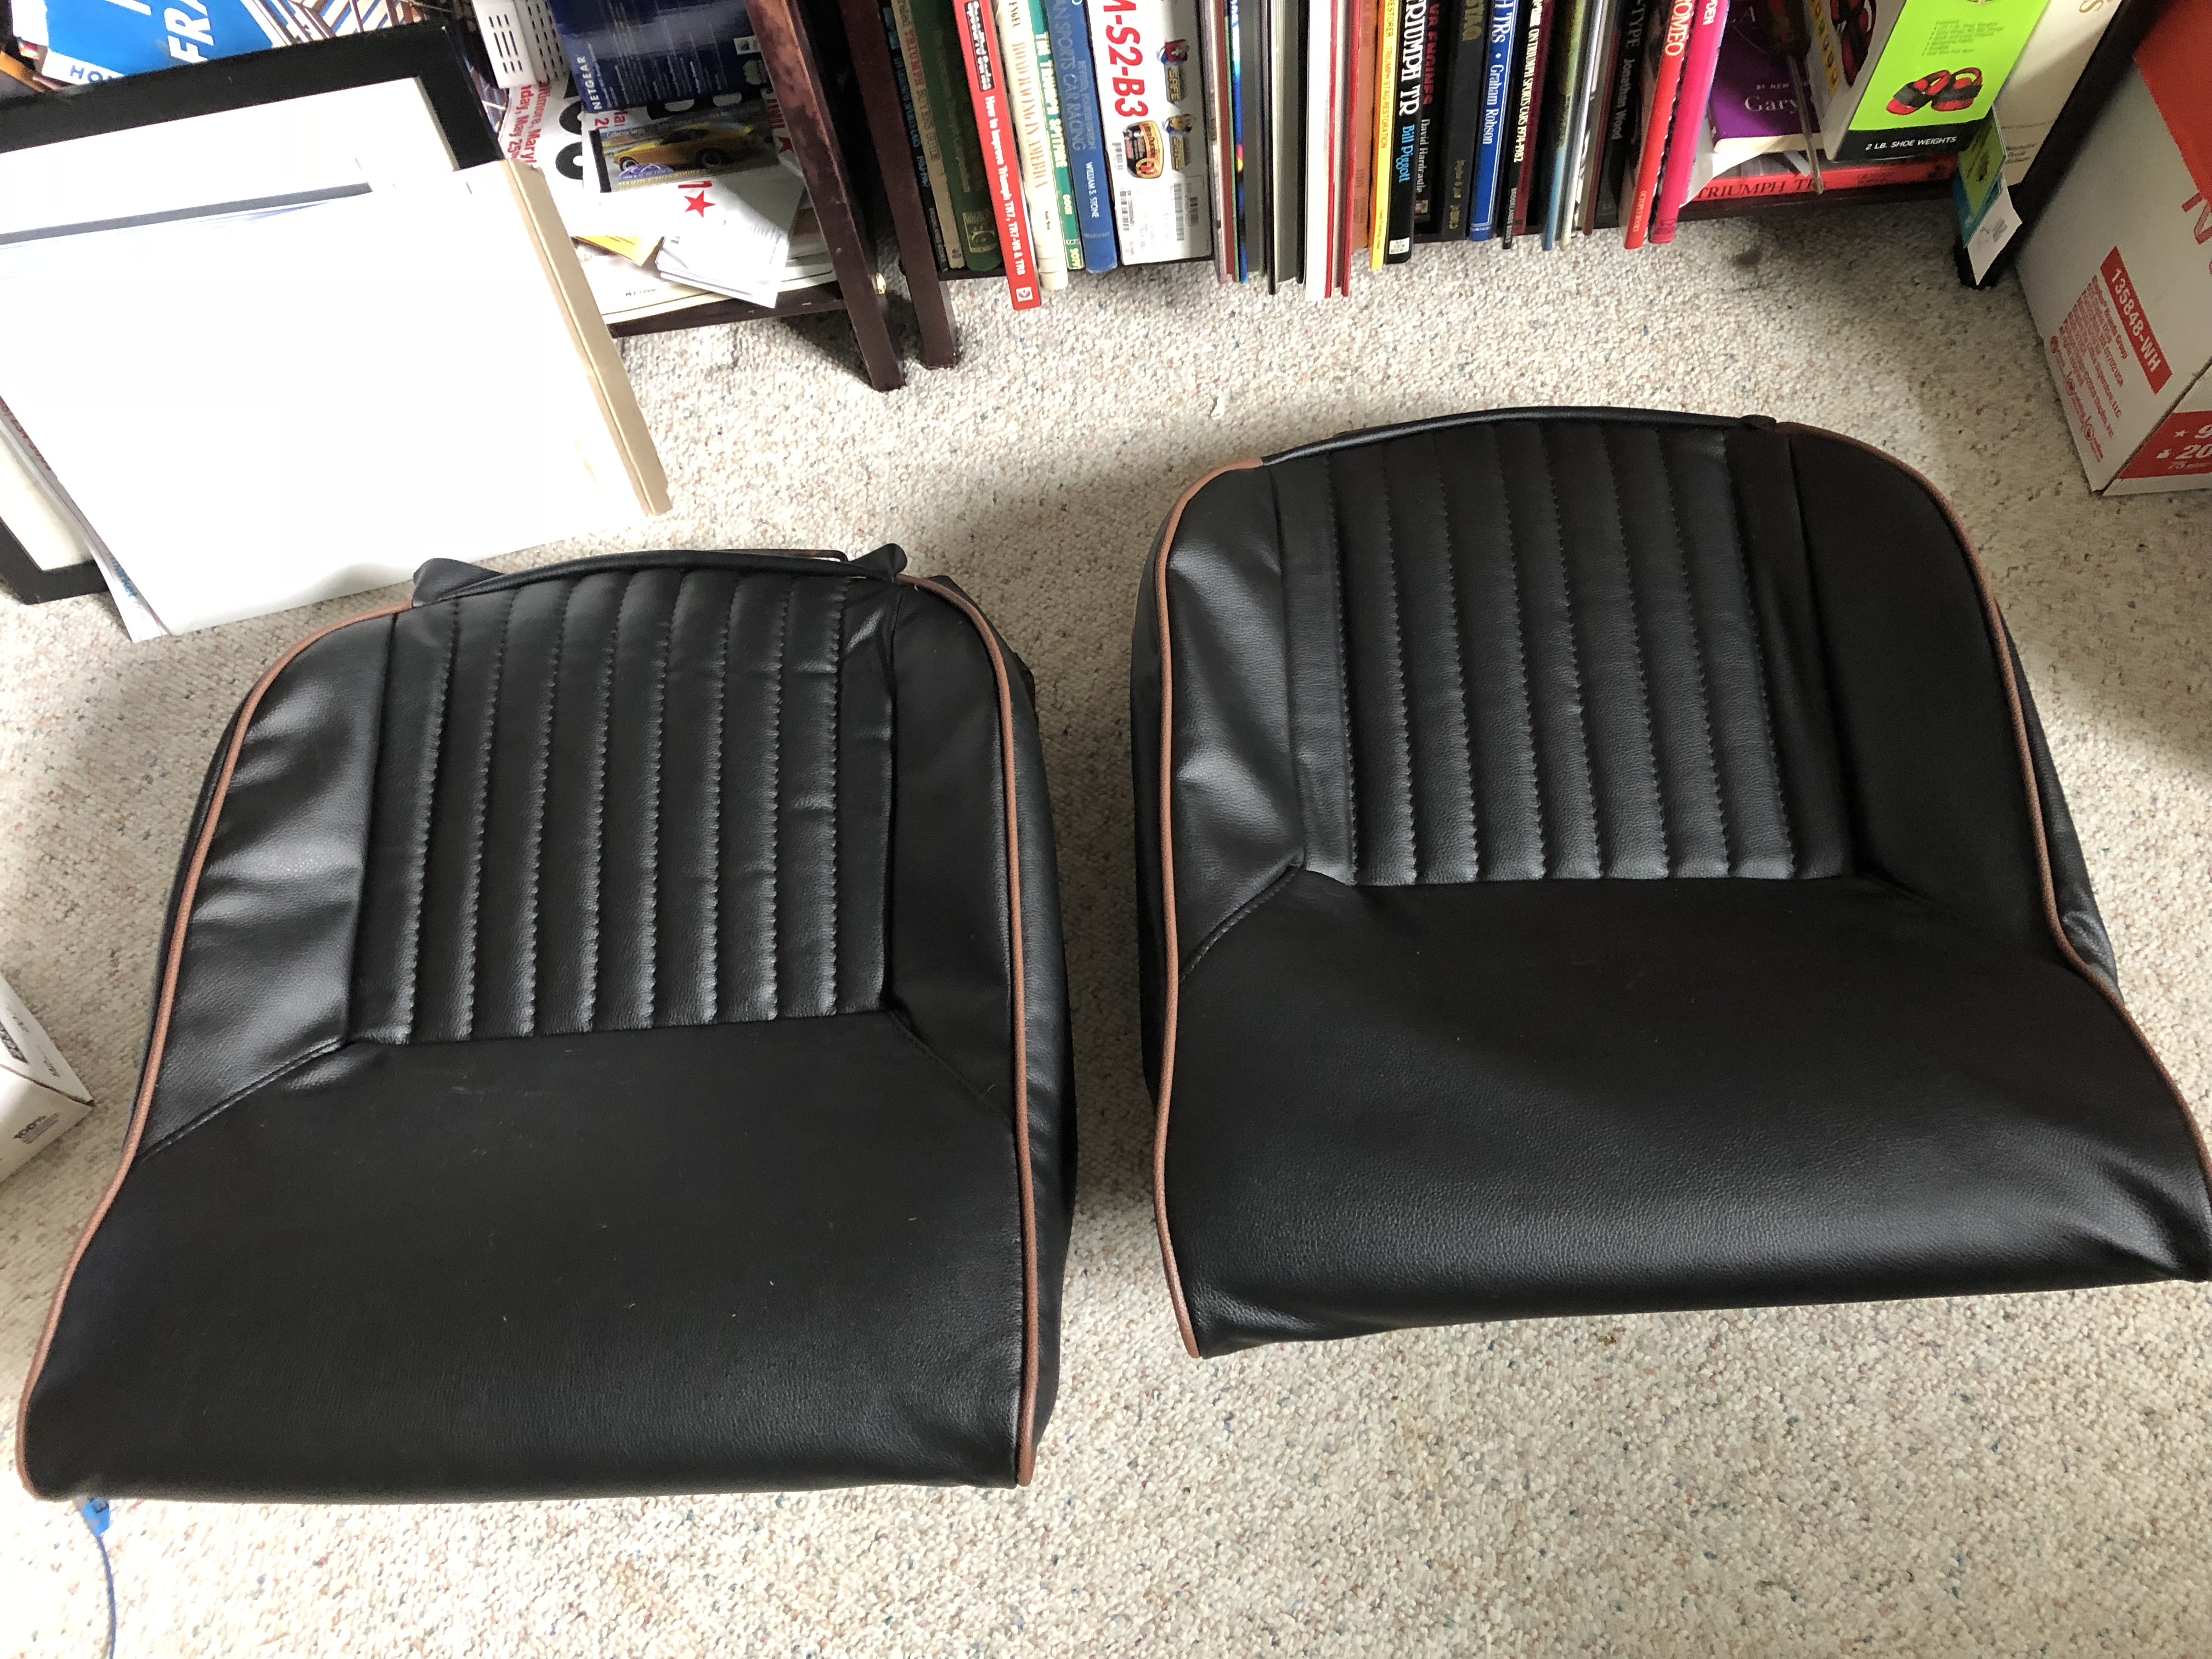
The upholstery kits for Spitfires run from $400-600 from the major suppliers. I took a chance and purchased the set on Ebay that are inexpensive and appeared to be quite nice. Turns out they are and should look good in my car. They will need more work to install, as I'll need to make up the masonite side panels that clip in on each side and sew in a flap in the middle of the upper piece to pull the seat in as the factory covers do, but overall they are very nice for $109. Added bonus, they are black with brown piping so will look good in my car.
The bottom cushions have been glued in to the center section, but need to be tensioned to be completed. I will install some additional soft foam around the edges to fill them out completely, but quite happy with the results.
I watched Ant Man again last night an noticed that Dr. Hank Pym Drives a nice looking Spitfire... Funny how you don't notice cars as much until you become semi-familiar with them, then you spot them all over.


That is pretty cool. Can't say I have seen a Spitfire in a recent movie or show, but have seen TR3's for some reason in a few shows. Thanks for sharing!
Been two weeks since my last post, but the car is moving forward. I am just finishing the engine compartment work, the wiring has been completed in the trunk, dashboard and engine compartment. I need to mount the Hydra and finish two engine pieces and then I can fill it up with oil and antifreeze and hook up the Braille battery and laptop and get ready to fire it up! Wiring really went smoothly, happy with the layout and results. The front harness runs on the passenger side now, rather than the hot turbo side as the stock front harness does on a Spitfire. I still have to hook up the horn and wiper motor, but I'll mess with that after the engine is running.
Still have to run my front brake lines and install the calipers and do a "string" alignment, but it should be running next week. I am taking it to the Roadster Factory Summer Party probably on a trailer to be safe, but it is going!
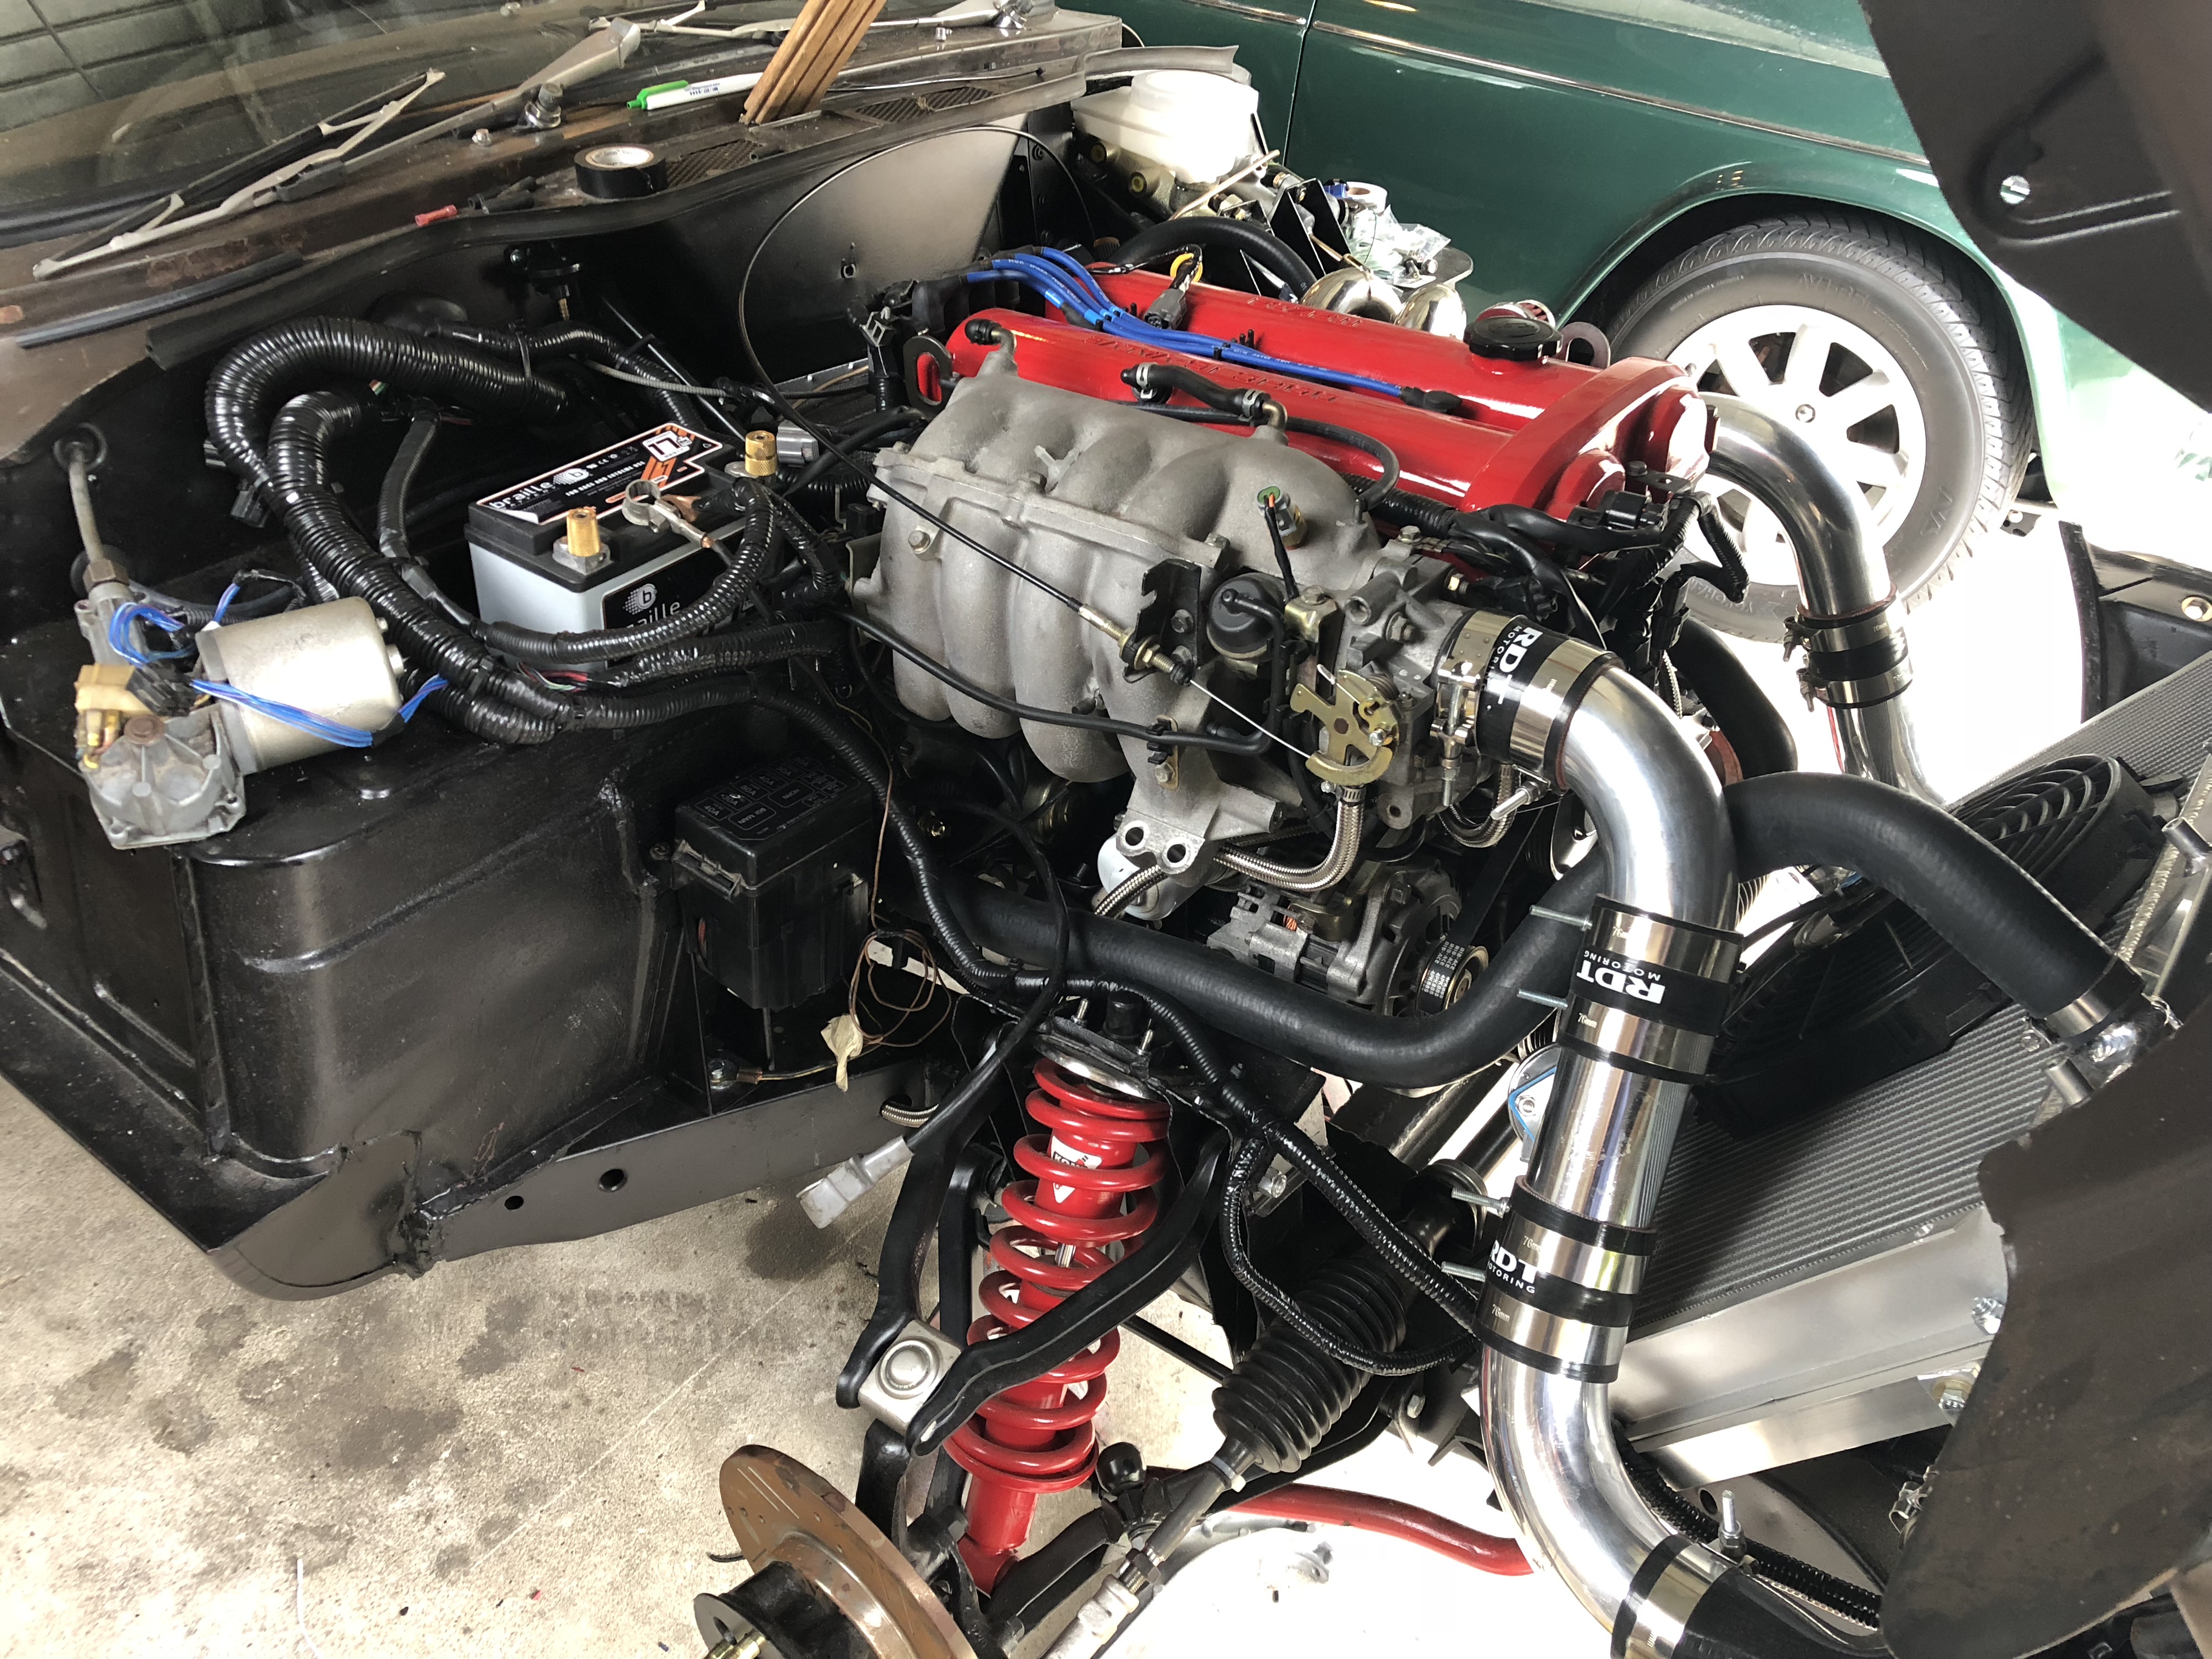
For my water line back to the heater assembly (Bypassed for now), I was able to shorten the steel line and run it to the coolant reroute port. I'll add a valve for the heater assembly later, but for now, it will just return to the head assembly. This required me to shorten the stock pipe, relocate the bracket and then wrap the pipe in heat resistant insulation since the turbo is so close. Should be good, and better than running it forward since I have changed the flow of the coolant, this is just a secondary circuit for the heater in the future. So the last thing needed is the turbo drain line, it was very close to the steering, so I needed to change the fittings but it should now clear by 1/4 inch, so once that is done, I can add the oil and antifreeze and can test fire this thing later this week!

I have a pair of these if you want to borrow them to do a more accurate alignment. (Mine is one step older than the current gen, but practically the same.)
https://pacomotorsports.com/product/diy-alignment-hub-stands/
Thanks Andrew, that would be fantastic, I'll send you a text to arrange to borrow them. The rear suspension has toe adjustments, so these would be ideal.
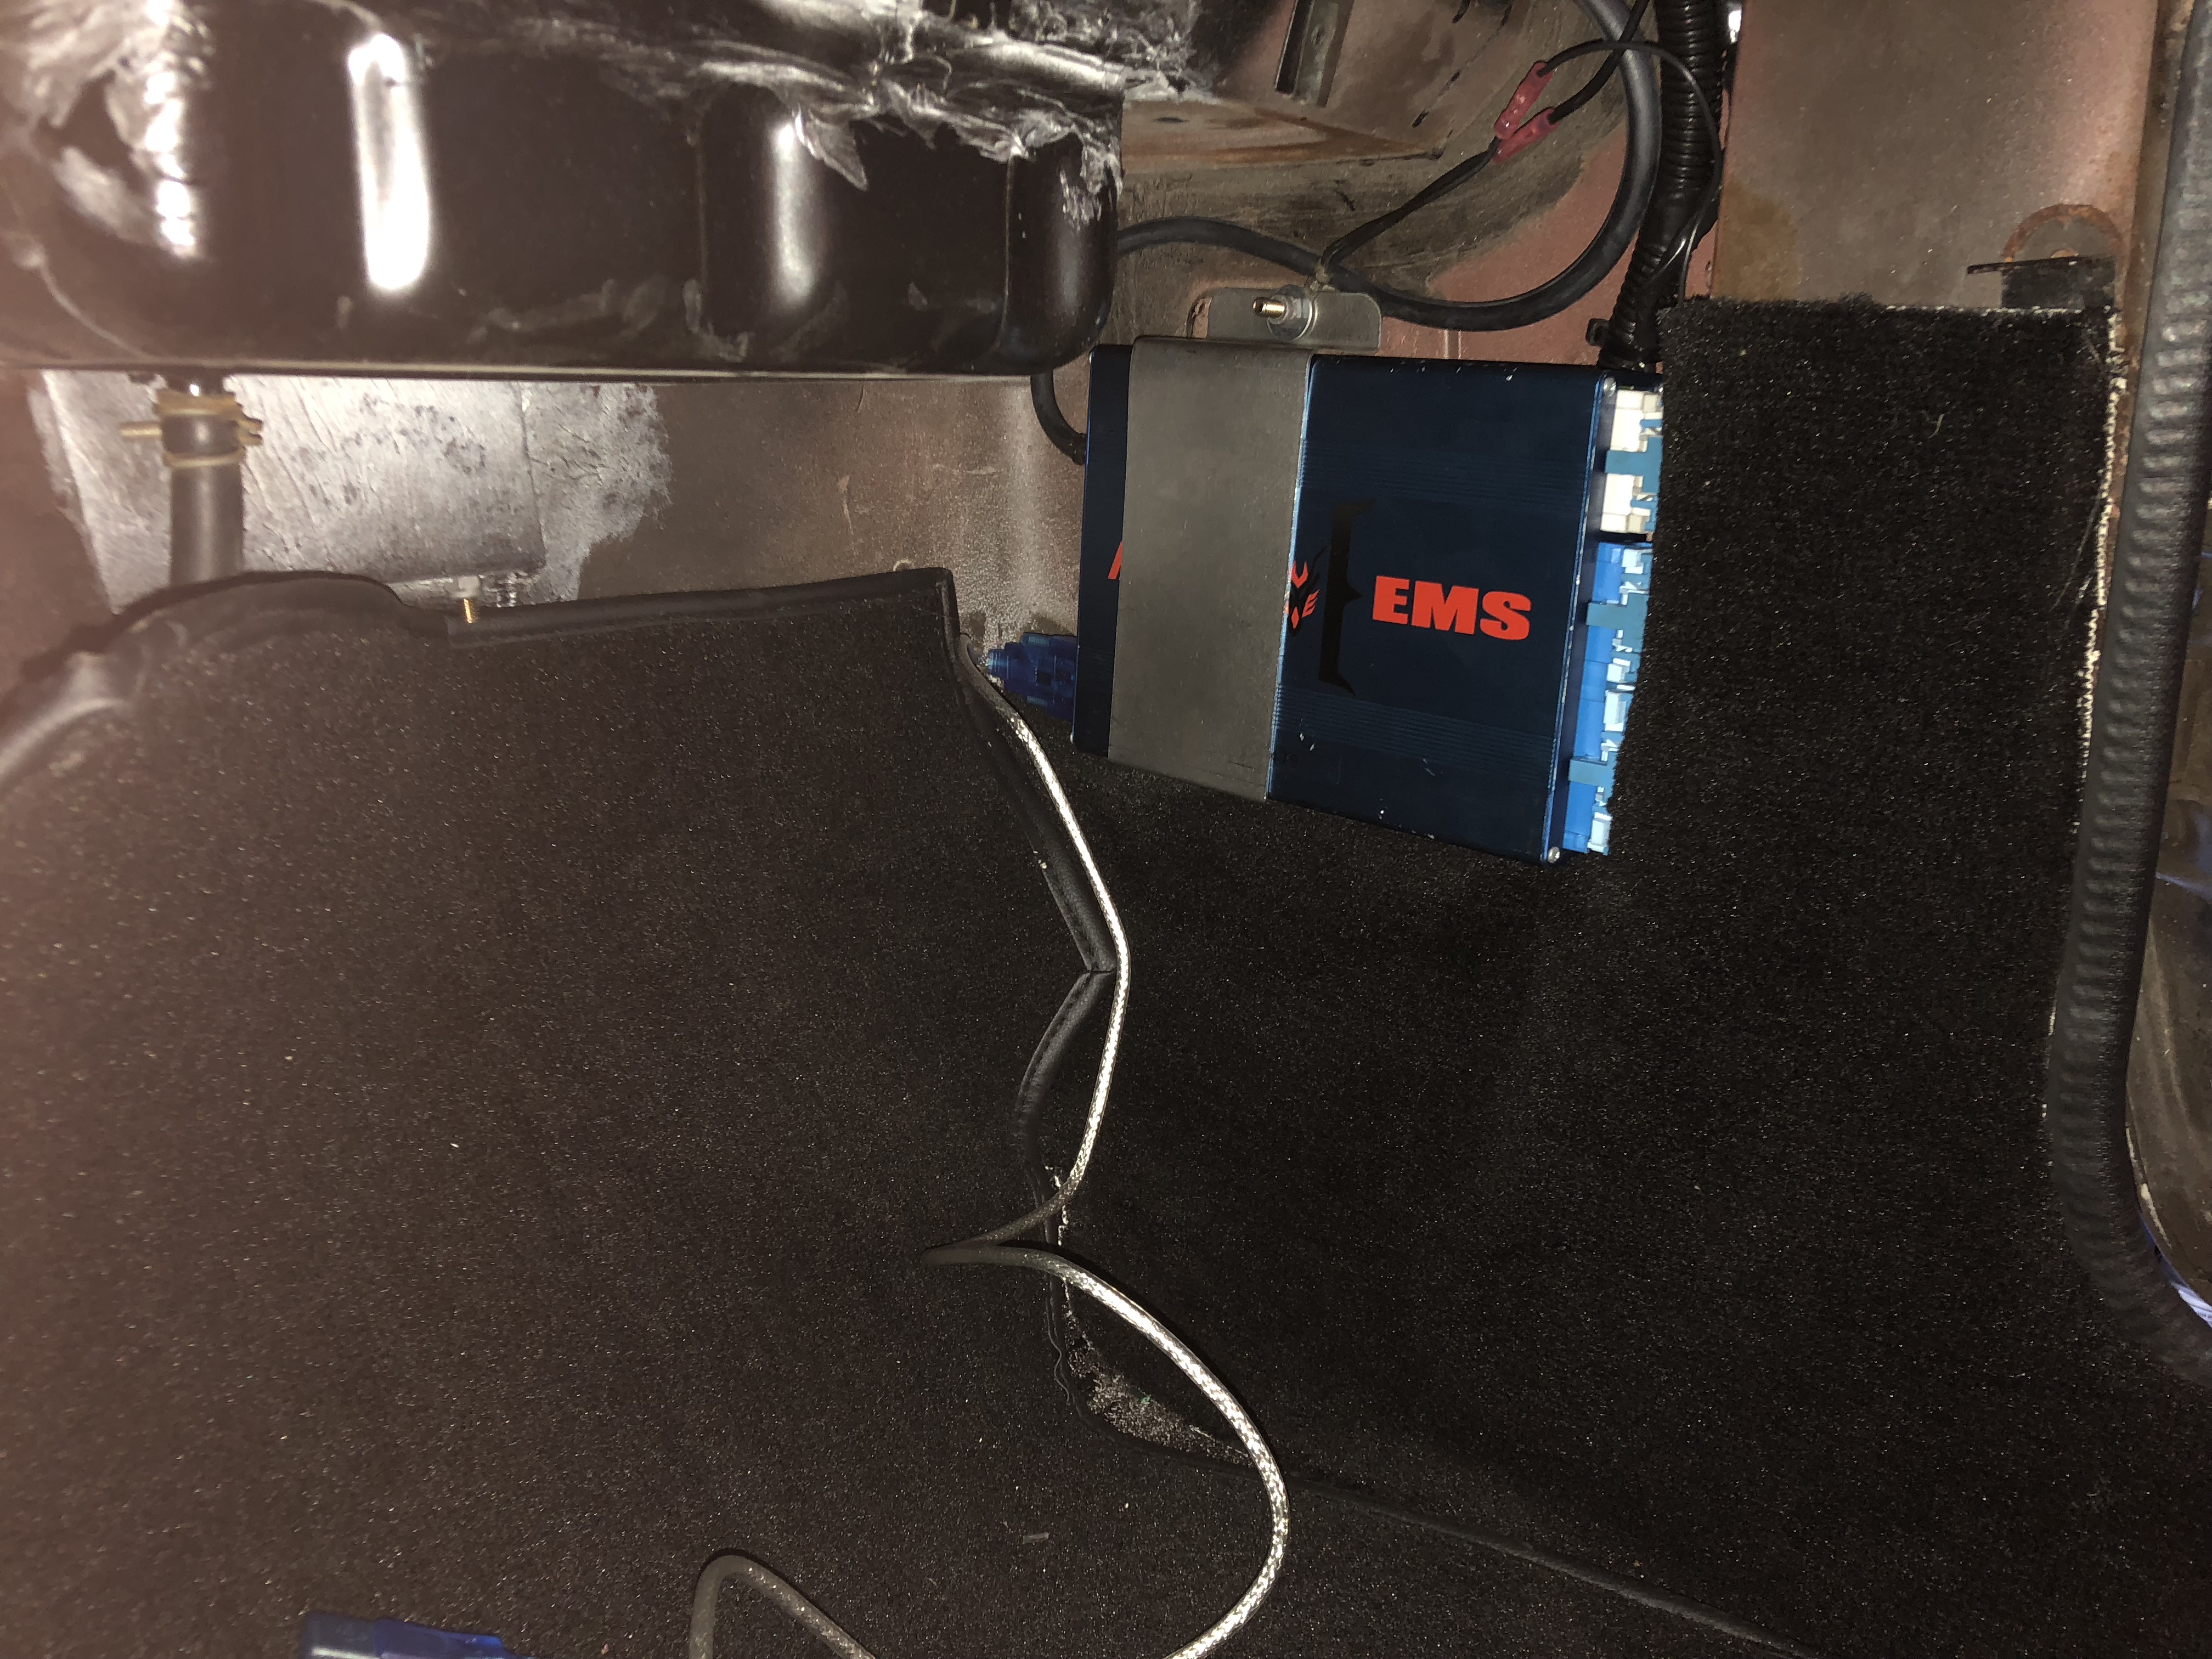
So very close to test firing the engine. The bypass pipe is run to the back of engine and insulated from the Turbo heat, Oil drain line from the turbo to the oil pan is installed and the car is topped up with Mobil 1. Just need to add antifreeze, check all the connections and water/oil lines and hook up the laptop. Installed the Hydra today as I figured I am done welding on the car. There is a perfect spot for it on the side of the passenger foot well that is just the right size. Next steps will be to hook up the laptop and see that we have communication and wish me luck!

Looking forward to the "first start" video. Fingers crossed it goes well.
Well after a small "embarrassment" I did get it started. No video yet, but it does run. I have a question on the main board on what to do about the map and my injectors , but I am thinking that I will swap the 320cc injectors for the stock set I have and run the FM map that I have for the stock injectors as it is running rich. I currently am using the FM 550 map and Jeremy at FM suggested that I multiply everything by 1.72% in the fuel table, but rather than mess it up, the stock injectors might be the safe thing for the initial tuning and driving. I can have it tuned professionally later on and add bigger injectors if necessary. The issue right now is time (want this at least on a trailer on August 16) to take to the Roadster Factory Summer Party and don't have time to mess with that part of the build.
The important thing is it starts, so next steps are to finish the front brakes, swap to the stock injectors and FM map and keep working on the interior so it is drivable next week. Pictures and video to follow shortly!

Woohoo! Congratulations!! Looking forward to that video...

Awesome news!!! Been following along and looking forward to the video and first drive.

Congrats on the success Dave.
Looks like you have a similar situation that I had with filling coolant with the rad cap lower than much of the cooling system; curious how you did it?
I ended up making a filler for my upper rad hose....near the bottom of the page here....
http://stevew10.wixsite.com/spit16/cooling-system

You can buy one, or of course make one with a rad cap as well, but retaining the cap on the rad gives you the overpressure protection anyway so an extra one is useless.
Without it I suspect that the system would eventually burp itself, but anytime you pulled the rad cap off, fluid would spew.
The only thing I'd do differently is use a larger fitting and cap.
Yes, I will likely need to get one of those as you are correct the hose, but in my case, it runs all the way to the back of the engine since I did the water reroute kit. Been more focused on what remains as I am getting down to the wire for my goal of having it at the Roadster Factory Summer Party. So yesterday and today was focused on the remaining work on the front, primarily the front brakes, calipers, pads and front brake lines. Mission accomplished as I was able to rebuild my calipers with new pistons and seals (glad I did), painted them and reinstalled them today with my Hawk blue pads. I am hoping that a more aggressive pad will let it stop reasonably well as I have not been able to find a set of GT6 uprights yet and from what I have read, the Spitfire parts are lighter and with a good set of pads can be quite effective on such a light car. We will see....
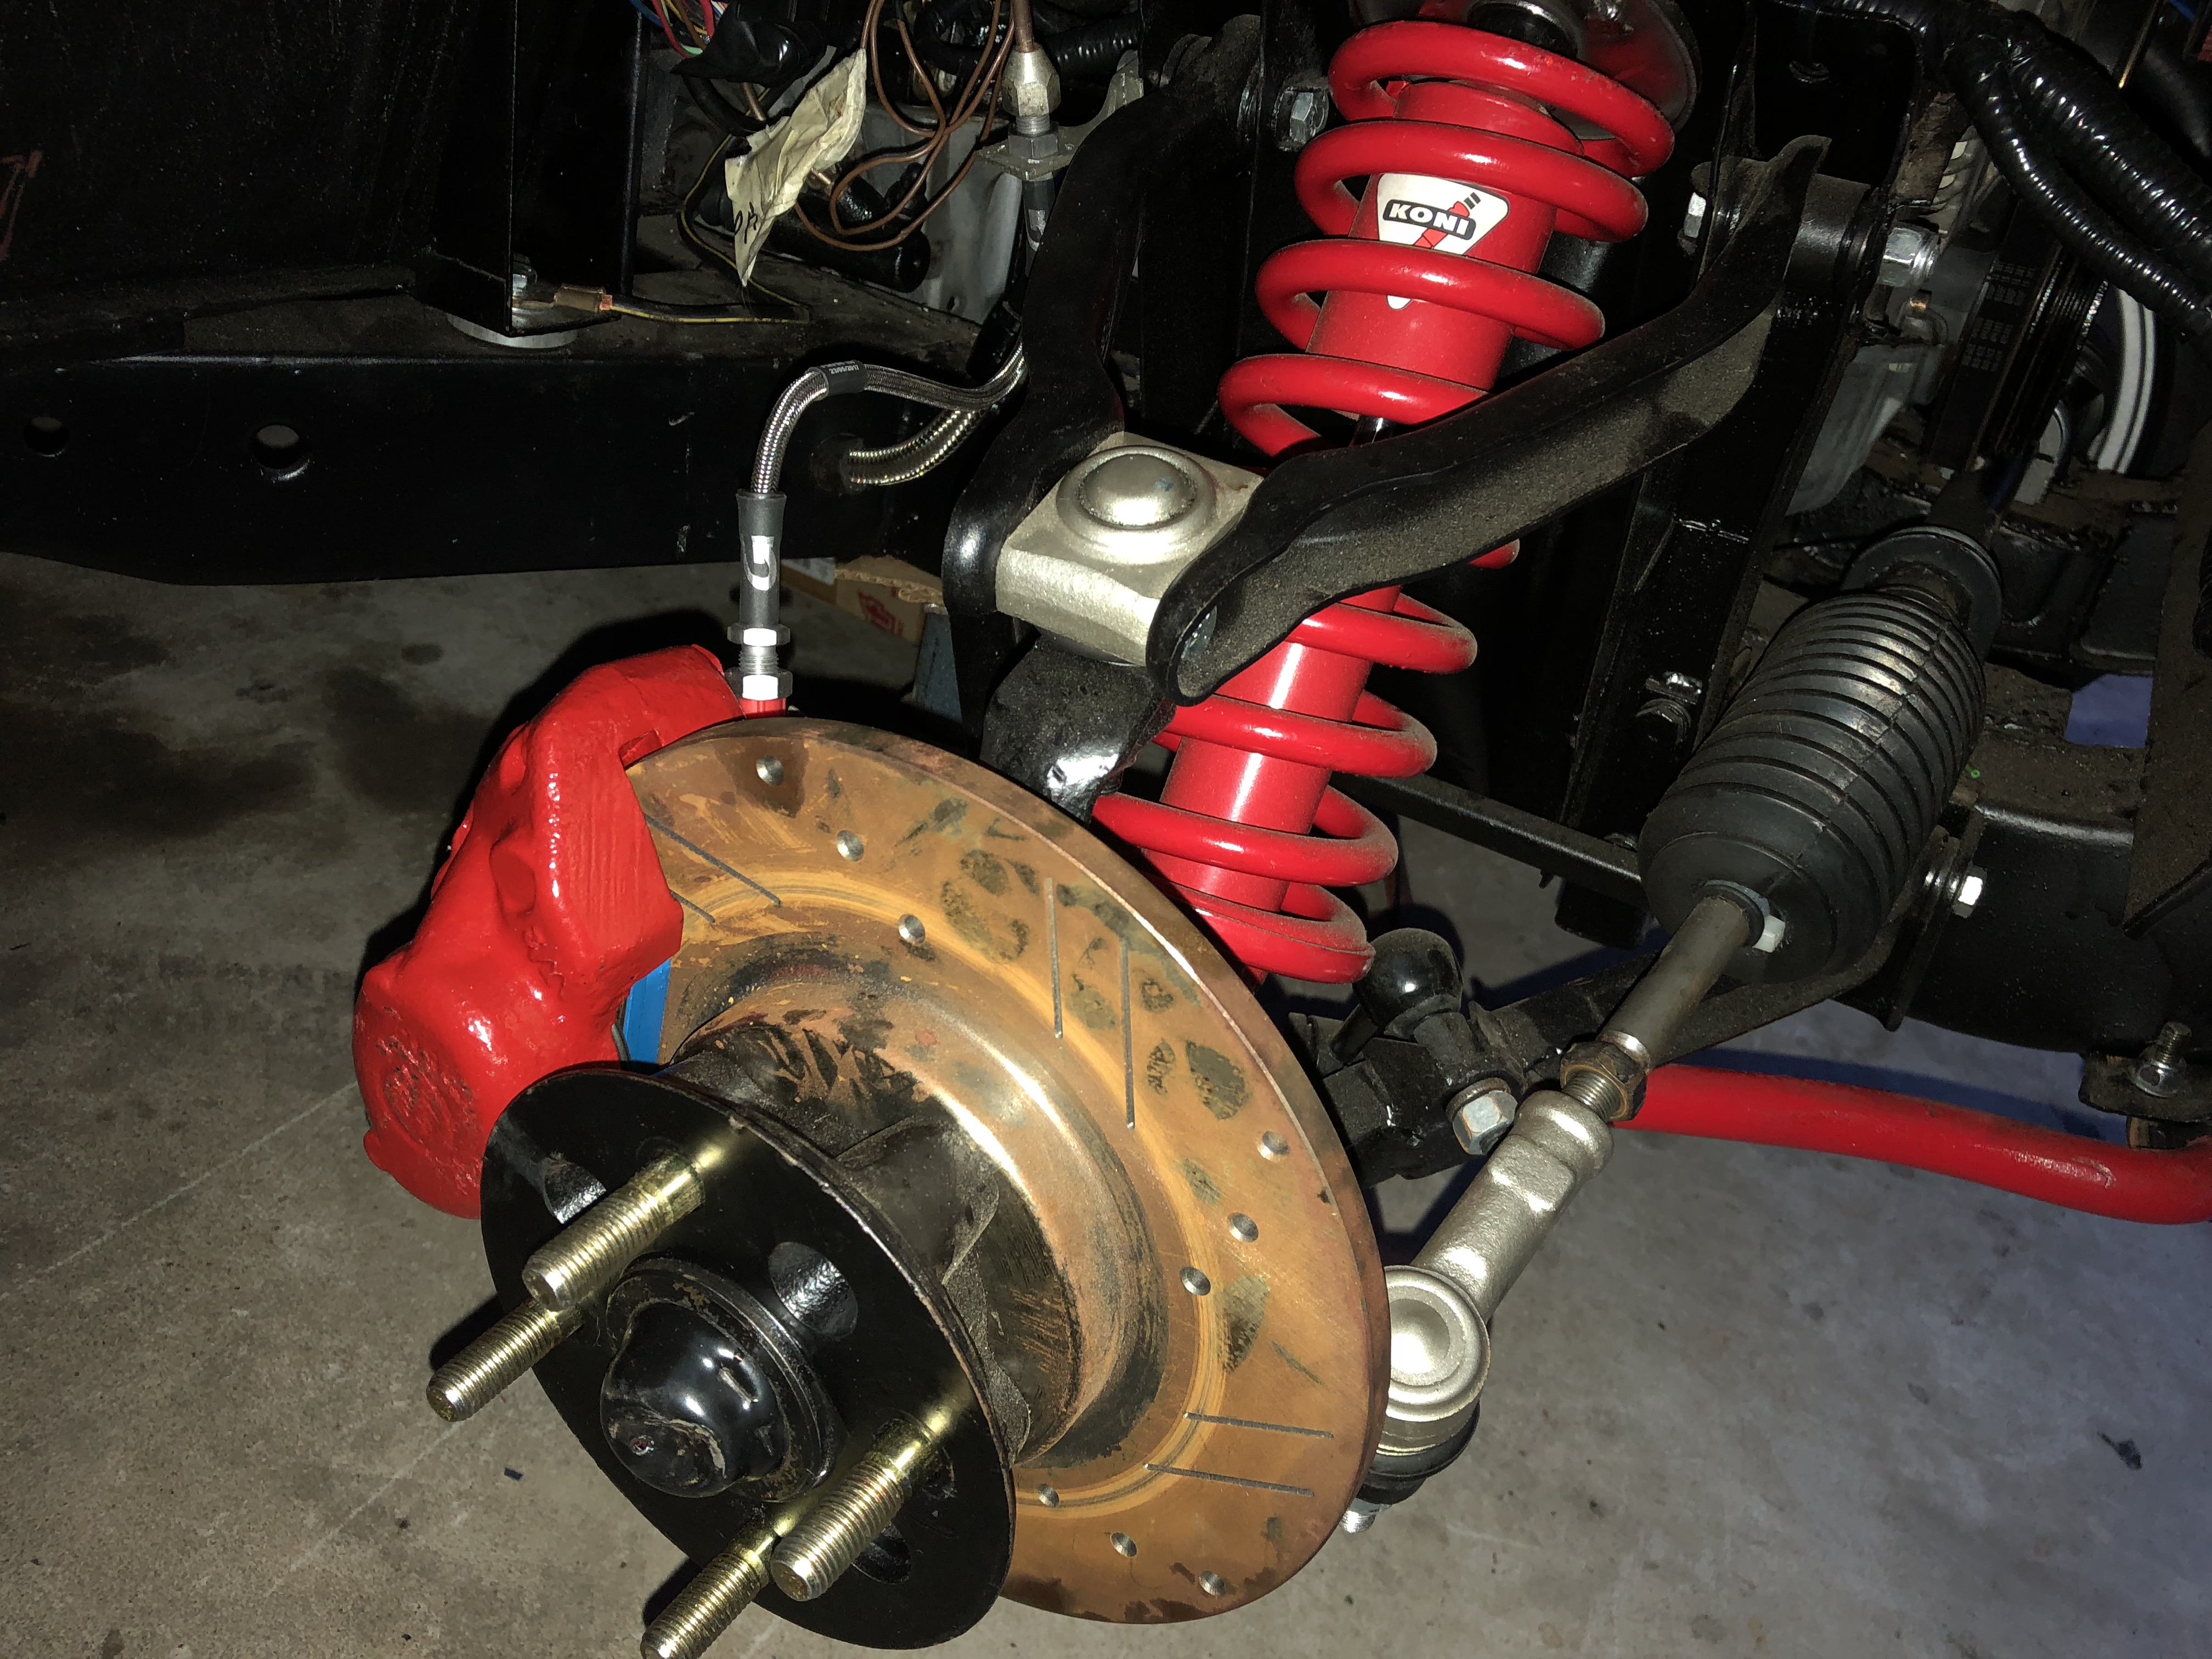
Unfortunately, since my car is a hybrid, I had ordered a set of braided lines for the car based on having the Rotoflex rear, but this meant that my front lines are too short, so I to also order a Spitfire set for the front. I also ordered a 1999 Miata fuel injector harness so I can go back to the stock injectors for the initial driving and tuning. This will be much easier to deal with since FM has a tune for the stock injectors and that will work until I find someone familiar with the Hydra that can help me with the larger injectors. So last few things are to swap the injectors, bleed the clutch and brake lines, hook up horn and finish the interior installation and seats and new seat belts and it will be ready for it's first drive in probably 20 years?
Yeah, definitely that filler is a low priority at this point; just thought to mention it.
I think you are right on the braking ability of the factory stuff, a lot of guys raced on those so even AutoCross shouldn’t present any problems.
I like your choice of Hawk pads. I’ve never used ‘em but think they are better than others. My standard Victoria British pads don’t bite at all and the rear wheels lock up well before the fronts. I had EBC on my Prelude and they separated from the metal within 2 years. Looking forward to hearing how you find the Hawks.
Looking good Dave!
Well, no progress after finding out that my brake lines had several leaks. At that point, I decided not to rush to finish to attend The Summer Party and worked on all the things I have been ignoring the last few months around the house. Now getting back to the car as it would be pretty nice to take it for a spin a year after starting the project, so my new goal is Labor Day weekend for it's maiden voyage.
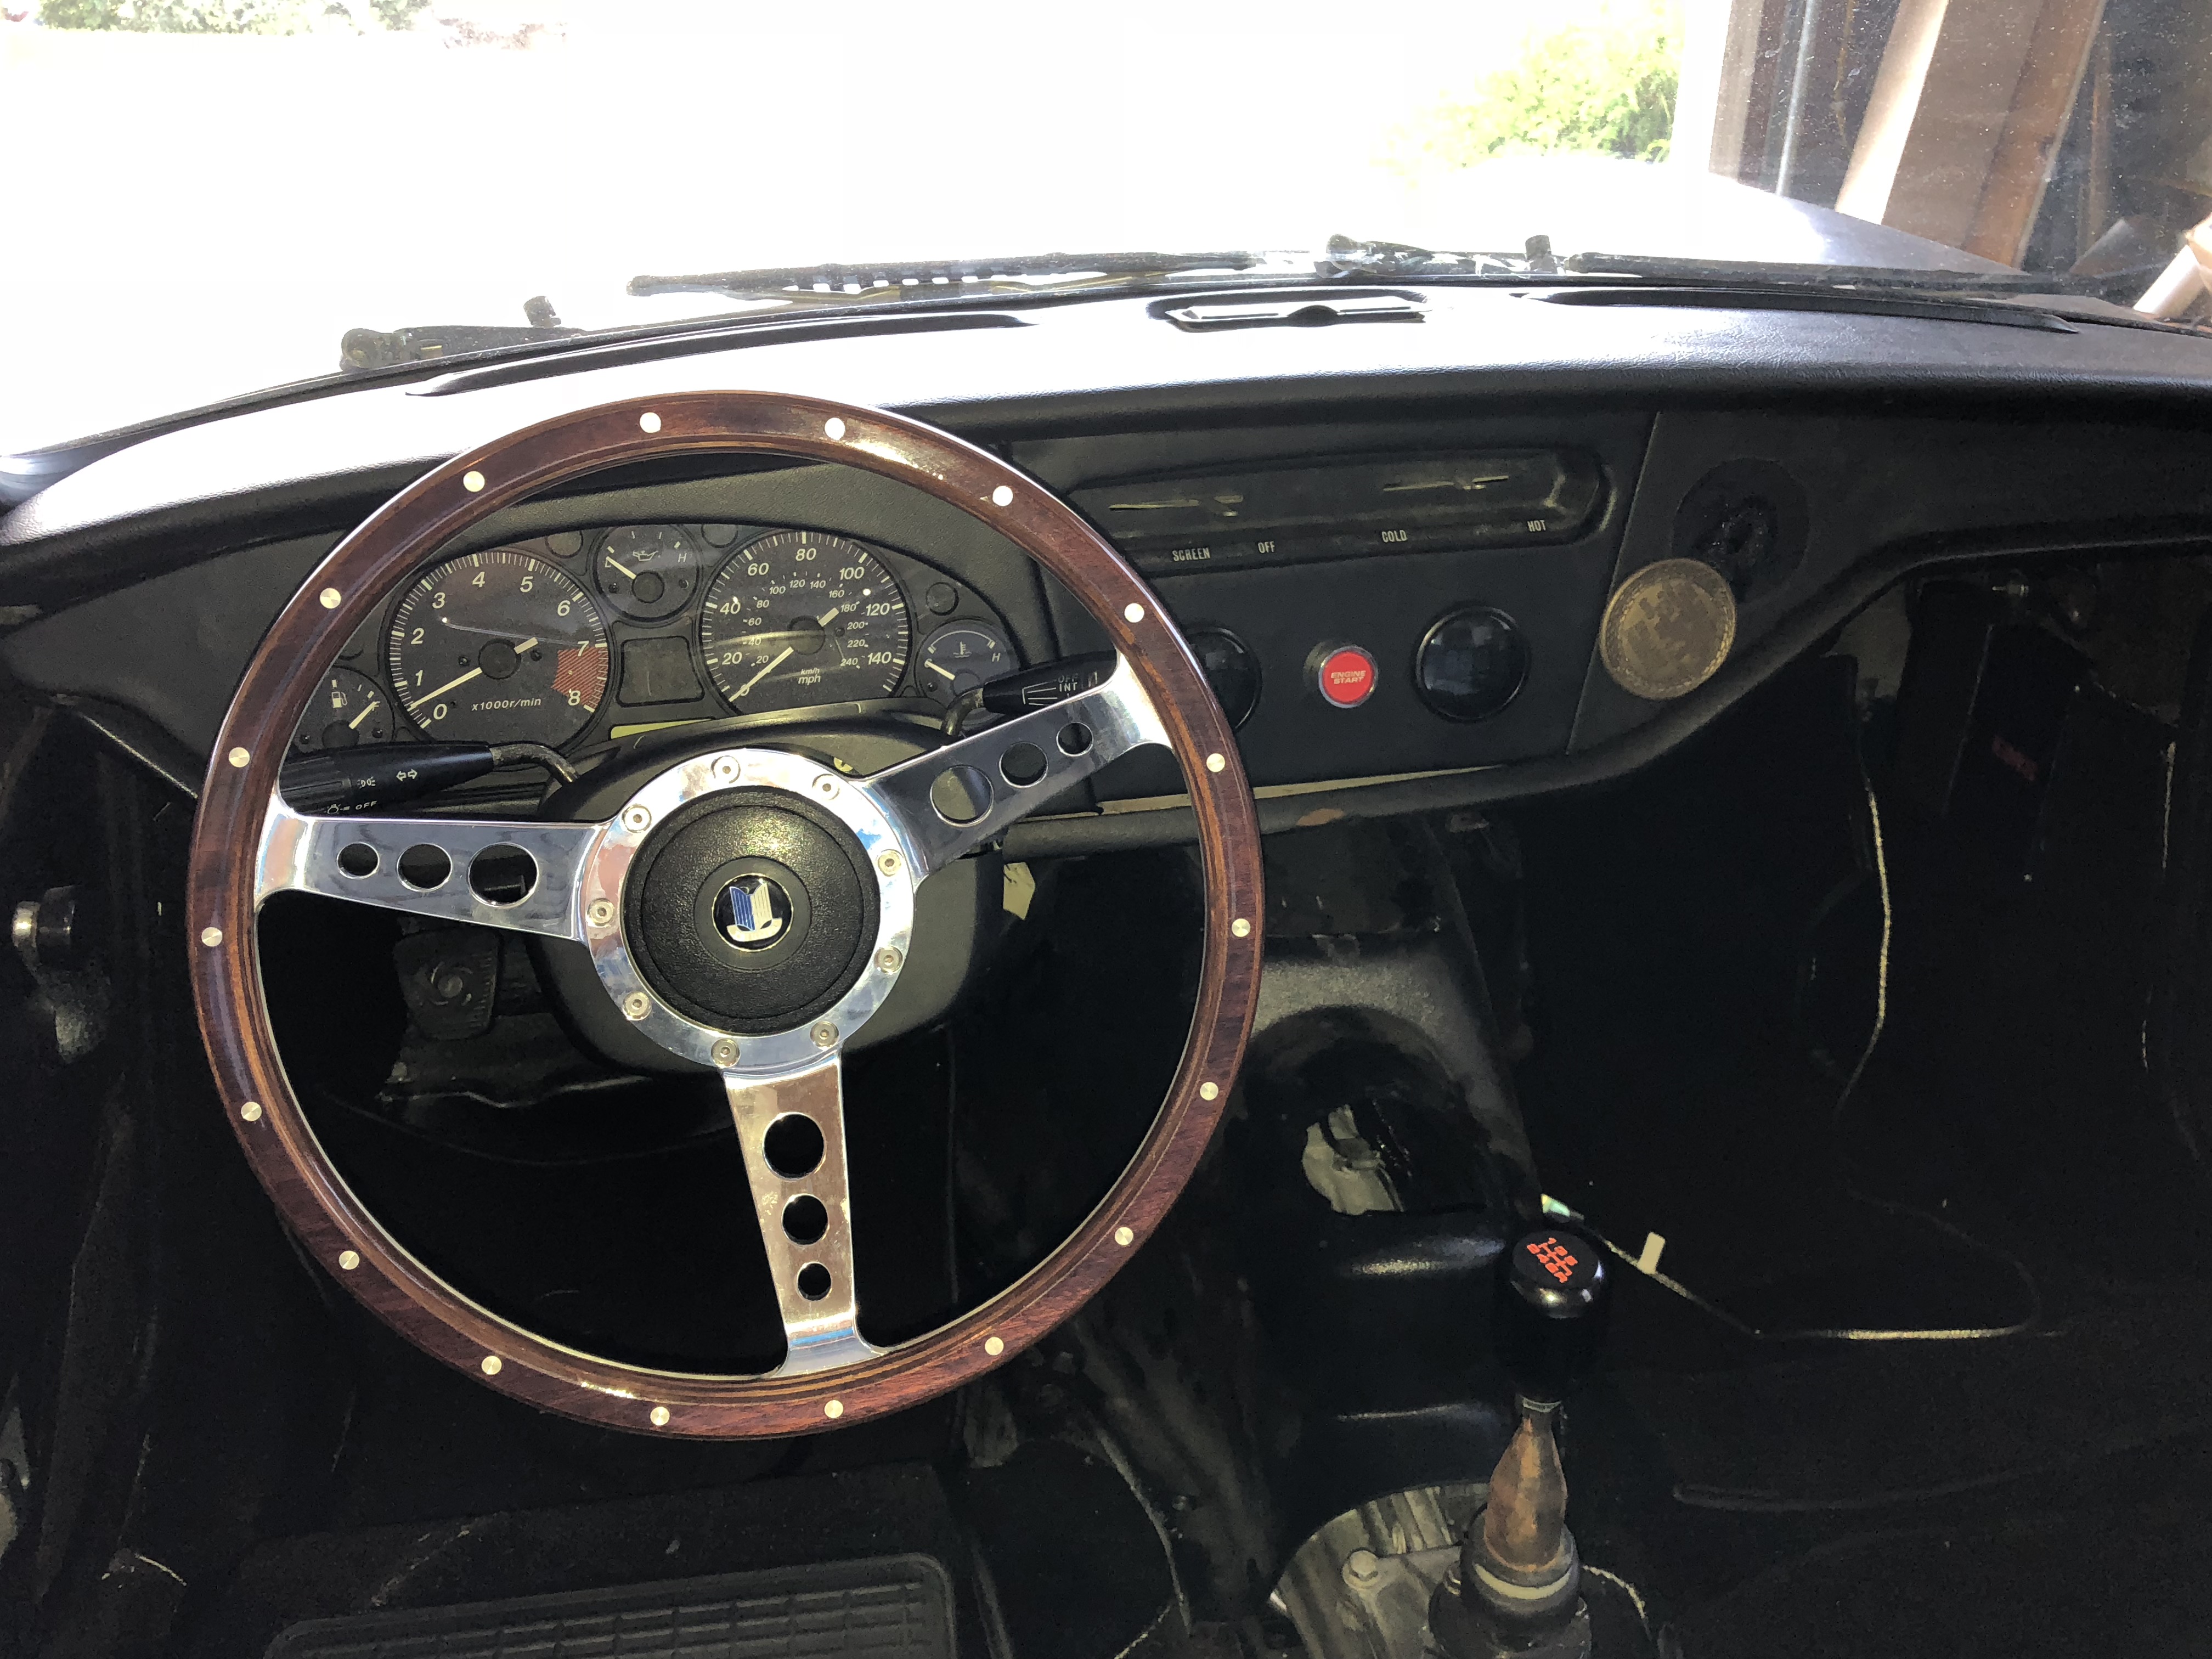
So a little bit of "bling" always helps. The Miata turn signals and light switch was too close to the stock steering wheel. I did some research and several vendor have replacement wheels that are dished an inch or two. This one fits nicely, gives me plenty of clearance and still easily reach the turn signals and looks nice as well. Miata gauge cluster is looking good in the dash. Nice to have a full set of gauges that all work with three connectors! Also bled the clutch and ran the car through the gears on the jack stands, so good to go once the brake lines are fixed.
Looking good! How'd alignment go?
Doing the alignment this week, I'll ping you as to how it all works but should be pretty quick and simple. I have been trying to get some recommendations for best alignment settings since my car is a "hybrid" of Spitfire and GT6. So far the plan is to run 1/8 front toe in and either neutral or 1/16th toe-in the rear so that it will not have any toe-out during acceleration. I want it to be stable in a straight line, as this will be a car that will get up to speed very quickly and it should still be very quick to change direction with the settings above and a fast steering rack.
Anyone else have any thoughts in this regard, would welcome your opinions as I'll be setting this up before the weekend.
In reply to dherr :
Front toe is so easy to set on a Spitfire, a wrench, vicegrips, and a screwdriver to loosen the boot clamp.
I set to 1/16" toe in, and then tweak if needed, but usually not needed.
What are your plans for camber?
You'll need to log in to post.


