In reply to dherr :
Sounds good on all accounts!
As to getting to work on the SpitBird, I have a couple outstanding house maintenance/repair items taking up most of my free time at the moment, (Why I bought a daily that I *shouldn't* have to work on too much...) then I have to strip my 97 miata of parts before I scrap it, and then pull the drivetrain from the Turbo Coupe parts car I picked up so I can sell the shell to hopefully offset to $0, THEN get to work on the SpitBird. My goal is to have it running reliably and made street legal by May to drive it up to Carlisle. Given the other items on my plate, that may be too ambitious, but as long as I get it running properly by then, I can trailer it to Carlisle and some other events, and of course, back to the Challenge next year!

dherr
Reader
12/30/17 5:05 p.m.
So after the Christmas break, been working on the car. Ordered many parts including a turbo, manifold, water line relocation pieces, motor mounts. I also decided that to properly fix the minor rust in the floorboards that I needed to find some used panels to use as patches. Well I ended up scoring both floor pans and a rear valance used locally for $300. There are only two small holes in the pieces in the flat sections that will be easily patched (verse trying to fix all the pin holes in my current floors). I'll drill out the spot welds and this will make it much easier to fix it 100%. My rear valance had also seen better days and the used one I picked up is in really good condition. I also got my axles back from Dutchman and have started putting the CV axles back together. The floor pan sitting on the chassis will make it much easier to figure the emergency brake prior to welding it into the body shell.


I would just like (hate?) to say how jealous I am of how fast you're progressing.
dherr
Reader
1/4/18 2:25 p.m.
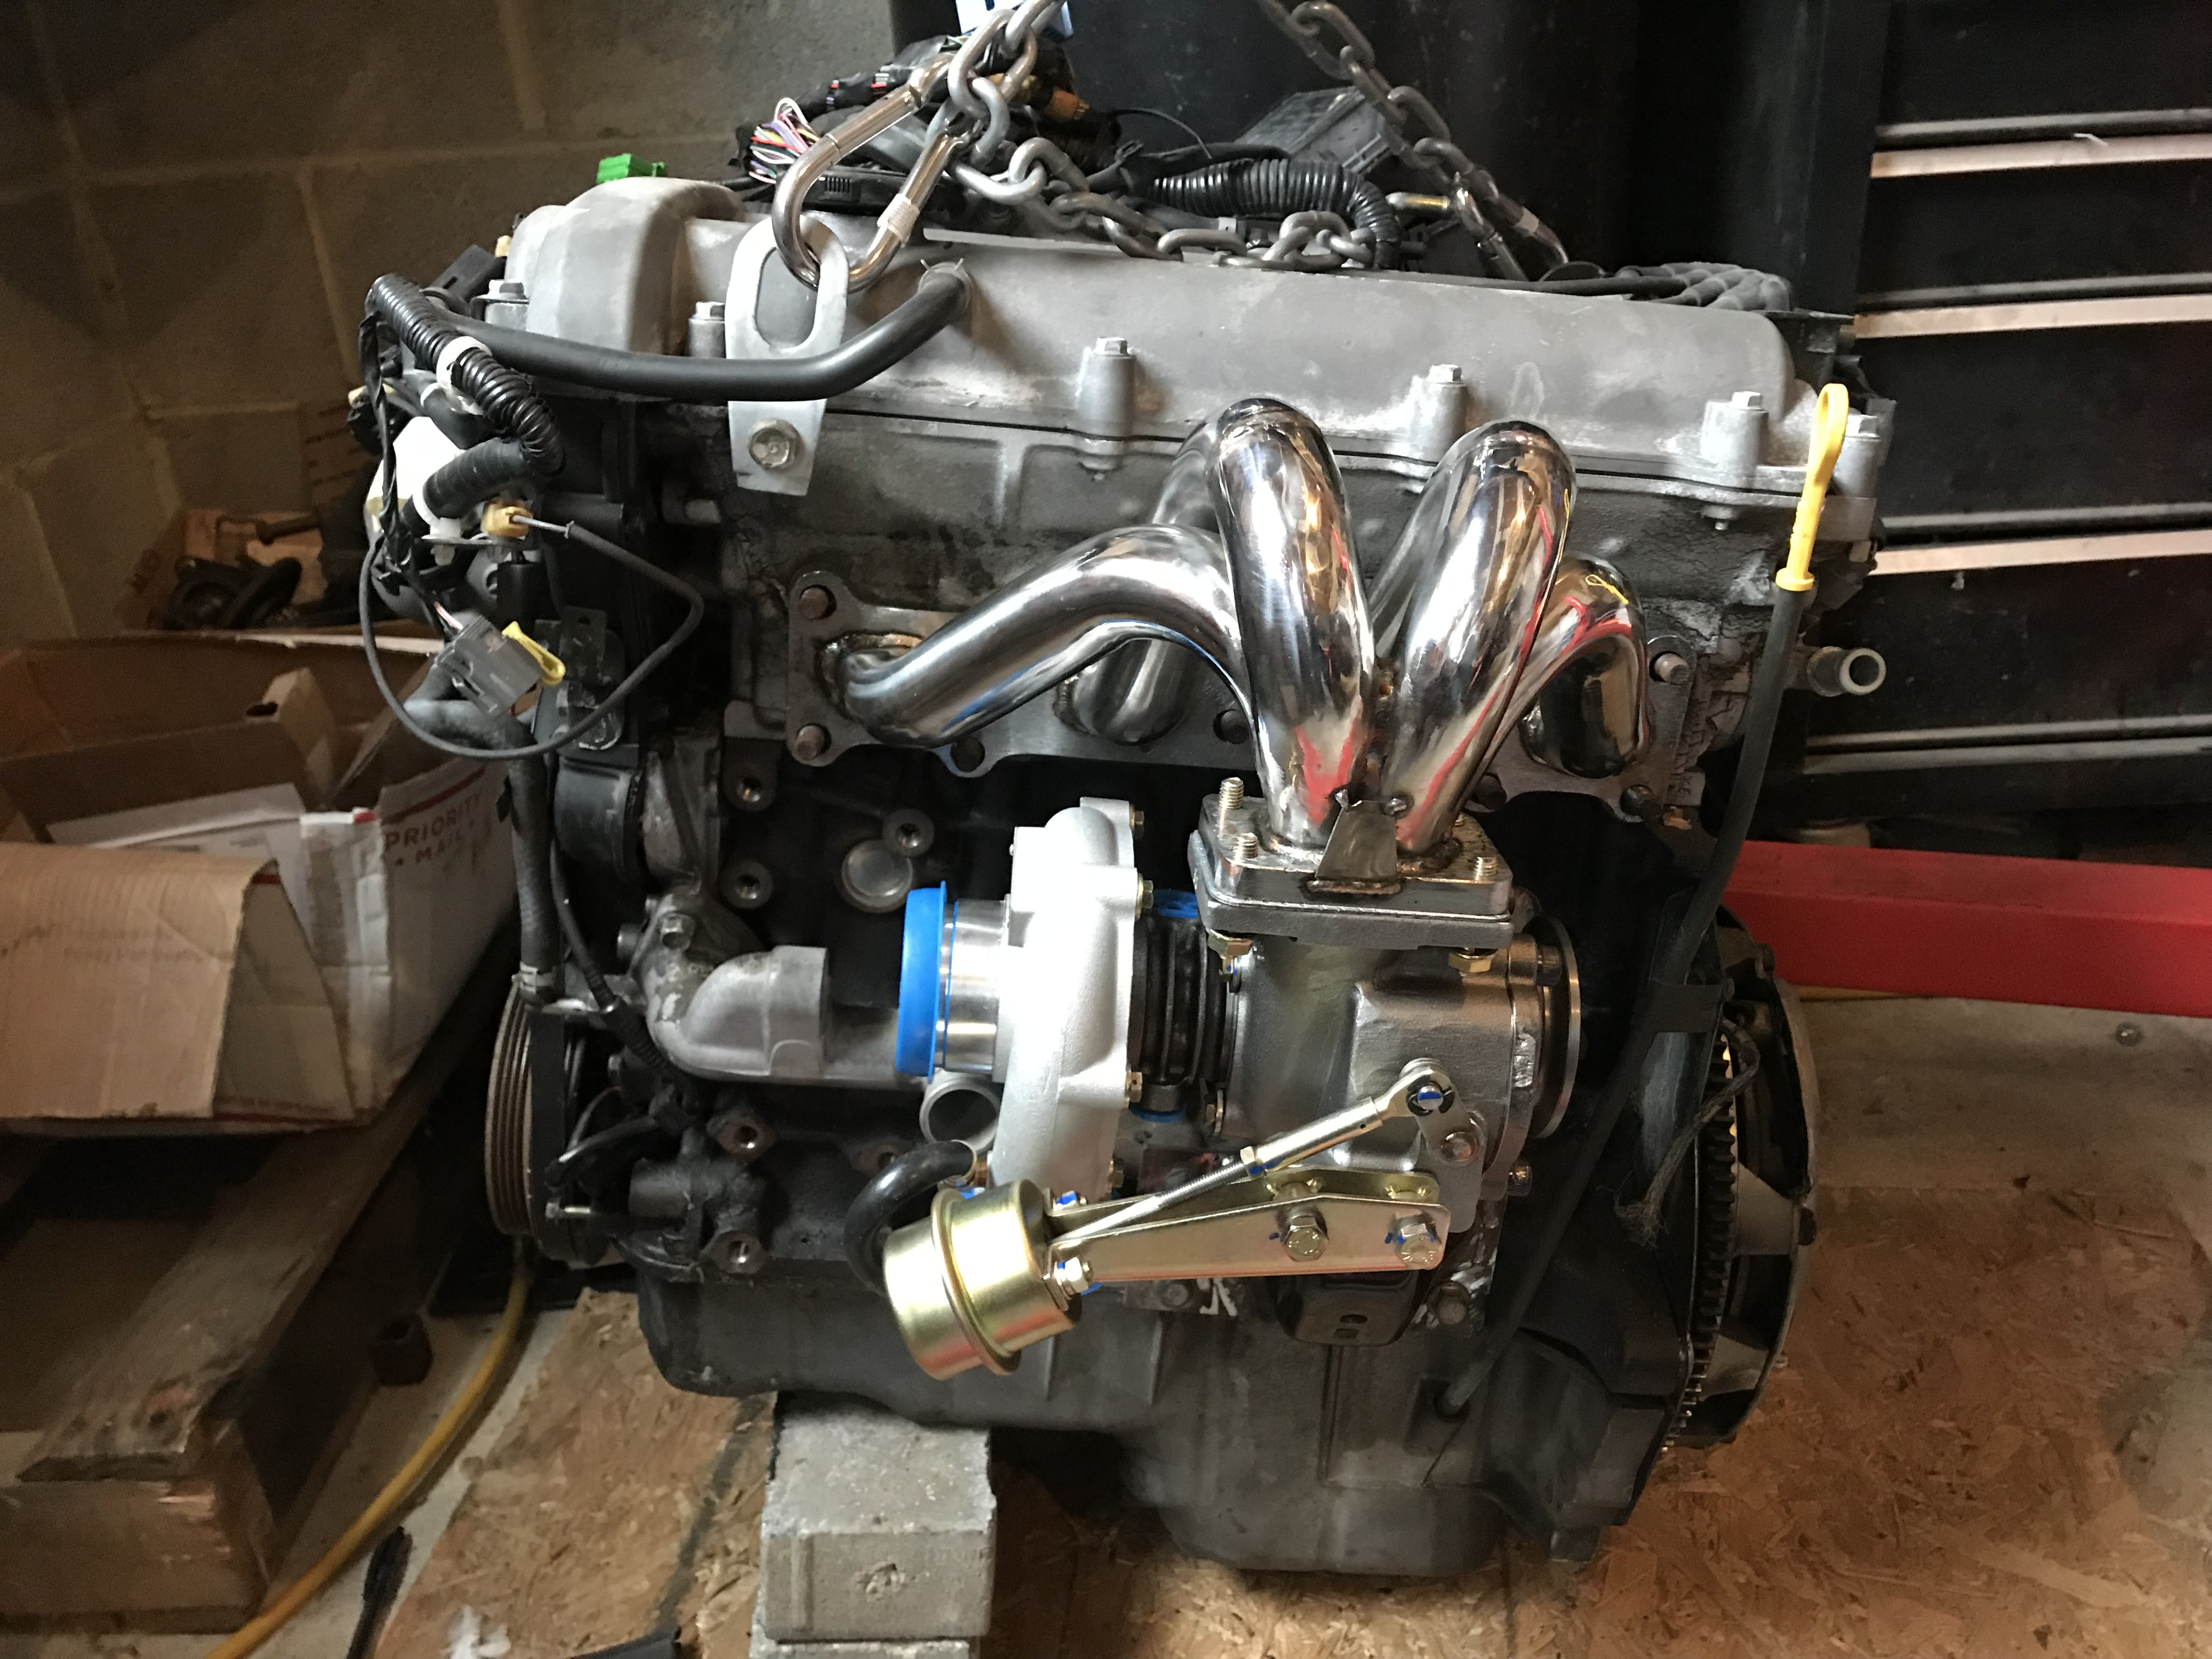
15 degrees in the garage the last few days, so no work outside, but have been sourcing parts and ran out to the garage to see how this fits ...... These ebay manifolds get such a bum rap for cracking but it is not because they are poor quality. The issue is the weight of the turbo hanging off of the mount is just too much weight for this to last in the long run. I'll have to build up a support bracket once I have the rest in place as steering, motor mount, heater return lines and exhaust downpipe all want to occupy a small space. Can't wait to get my engine and transmission reinstalled so I can start building the rest of the chassis, but I will need to do the maintenance items first, so timing belt, clutch, front radiator bypass and drill the oil pan for the drain bung before I can put this back in the chassis.
Can you elaborate on the process with Dutchman? Just what was done, how you determined lengths, cost, etc?
dherr
Reader
1/4/18 2:55 p.m.
Basically you have three choices when you need CV axles that go from one manufacturer to another, try to welding them together (almost never works) or have splines cut on an existing axle if it can be shortened and resplined. The third option is expensive custom axles. In my case, it was MGF/Rover to Subaru. the axles for the MGF/Rover were long enough and large enough diameter to have them shortened and splined for the Subaru inner CV joints. I assembled my rear suspension, inserted the MGF/Rover axles/CV in the outer hubs and the Subaru inner CV's into the diff and measured from the outer CV to inner CV joints with the suspension at full extension. I added 1/2 inch for good measure, so my CV axles should be right at 1/2 inch of travel when fully extended and have an inch or so of travel when fully compressed. Dutchman than cut my axles to the proper length (15- 1/2 inch in my case) and then splined the Subaru end for my CV inner joint. Cost was very reasonable at less than $200 for both axles with shipping back to me. Fit perfectly, hopefully they will be strong enough but guessing they will be more than adequate for a 1700 pound car with 185-200 HP.
dherr
Reader
1/19/18 4:40 p.m.
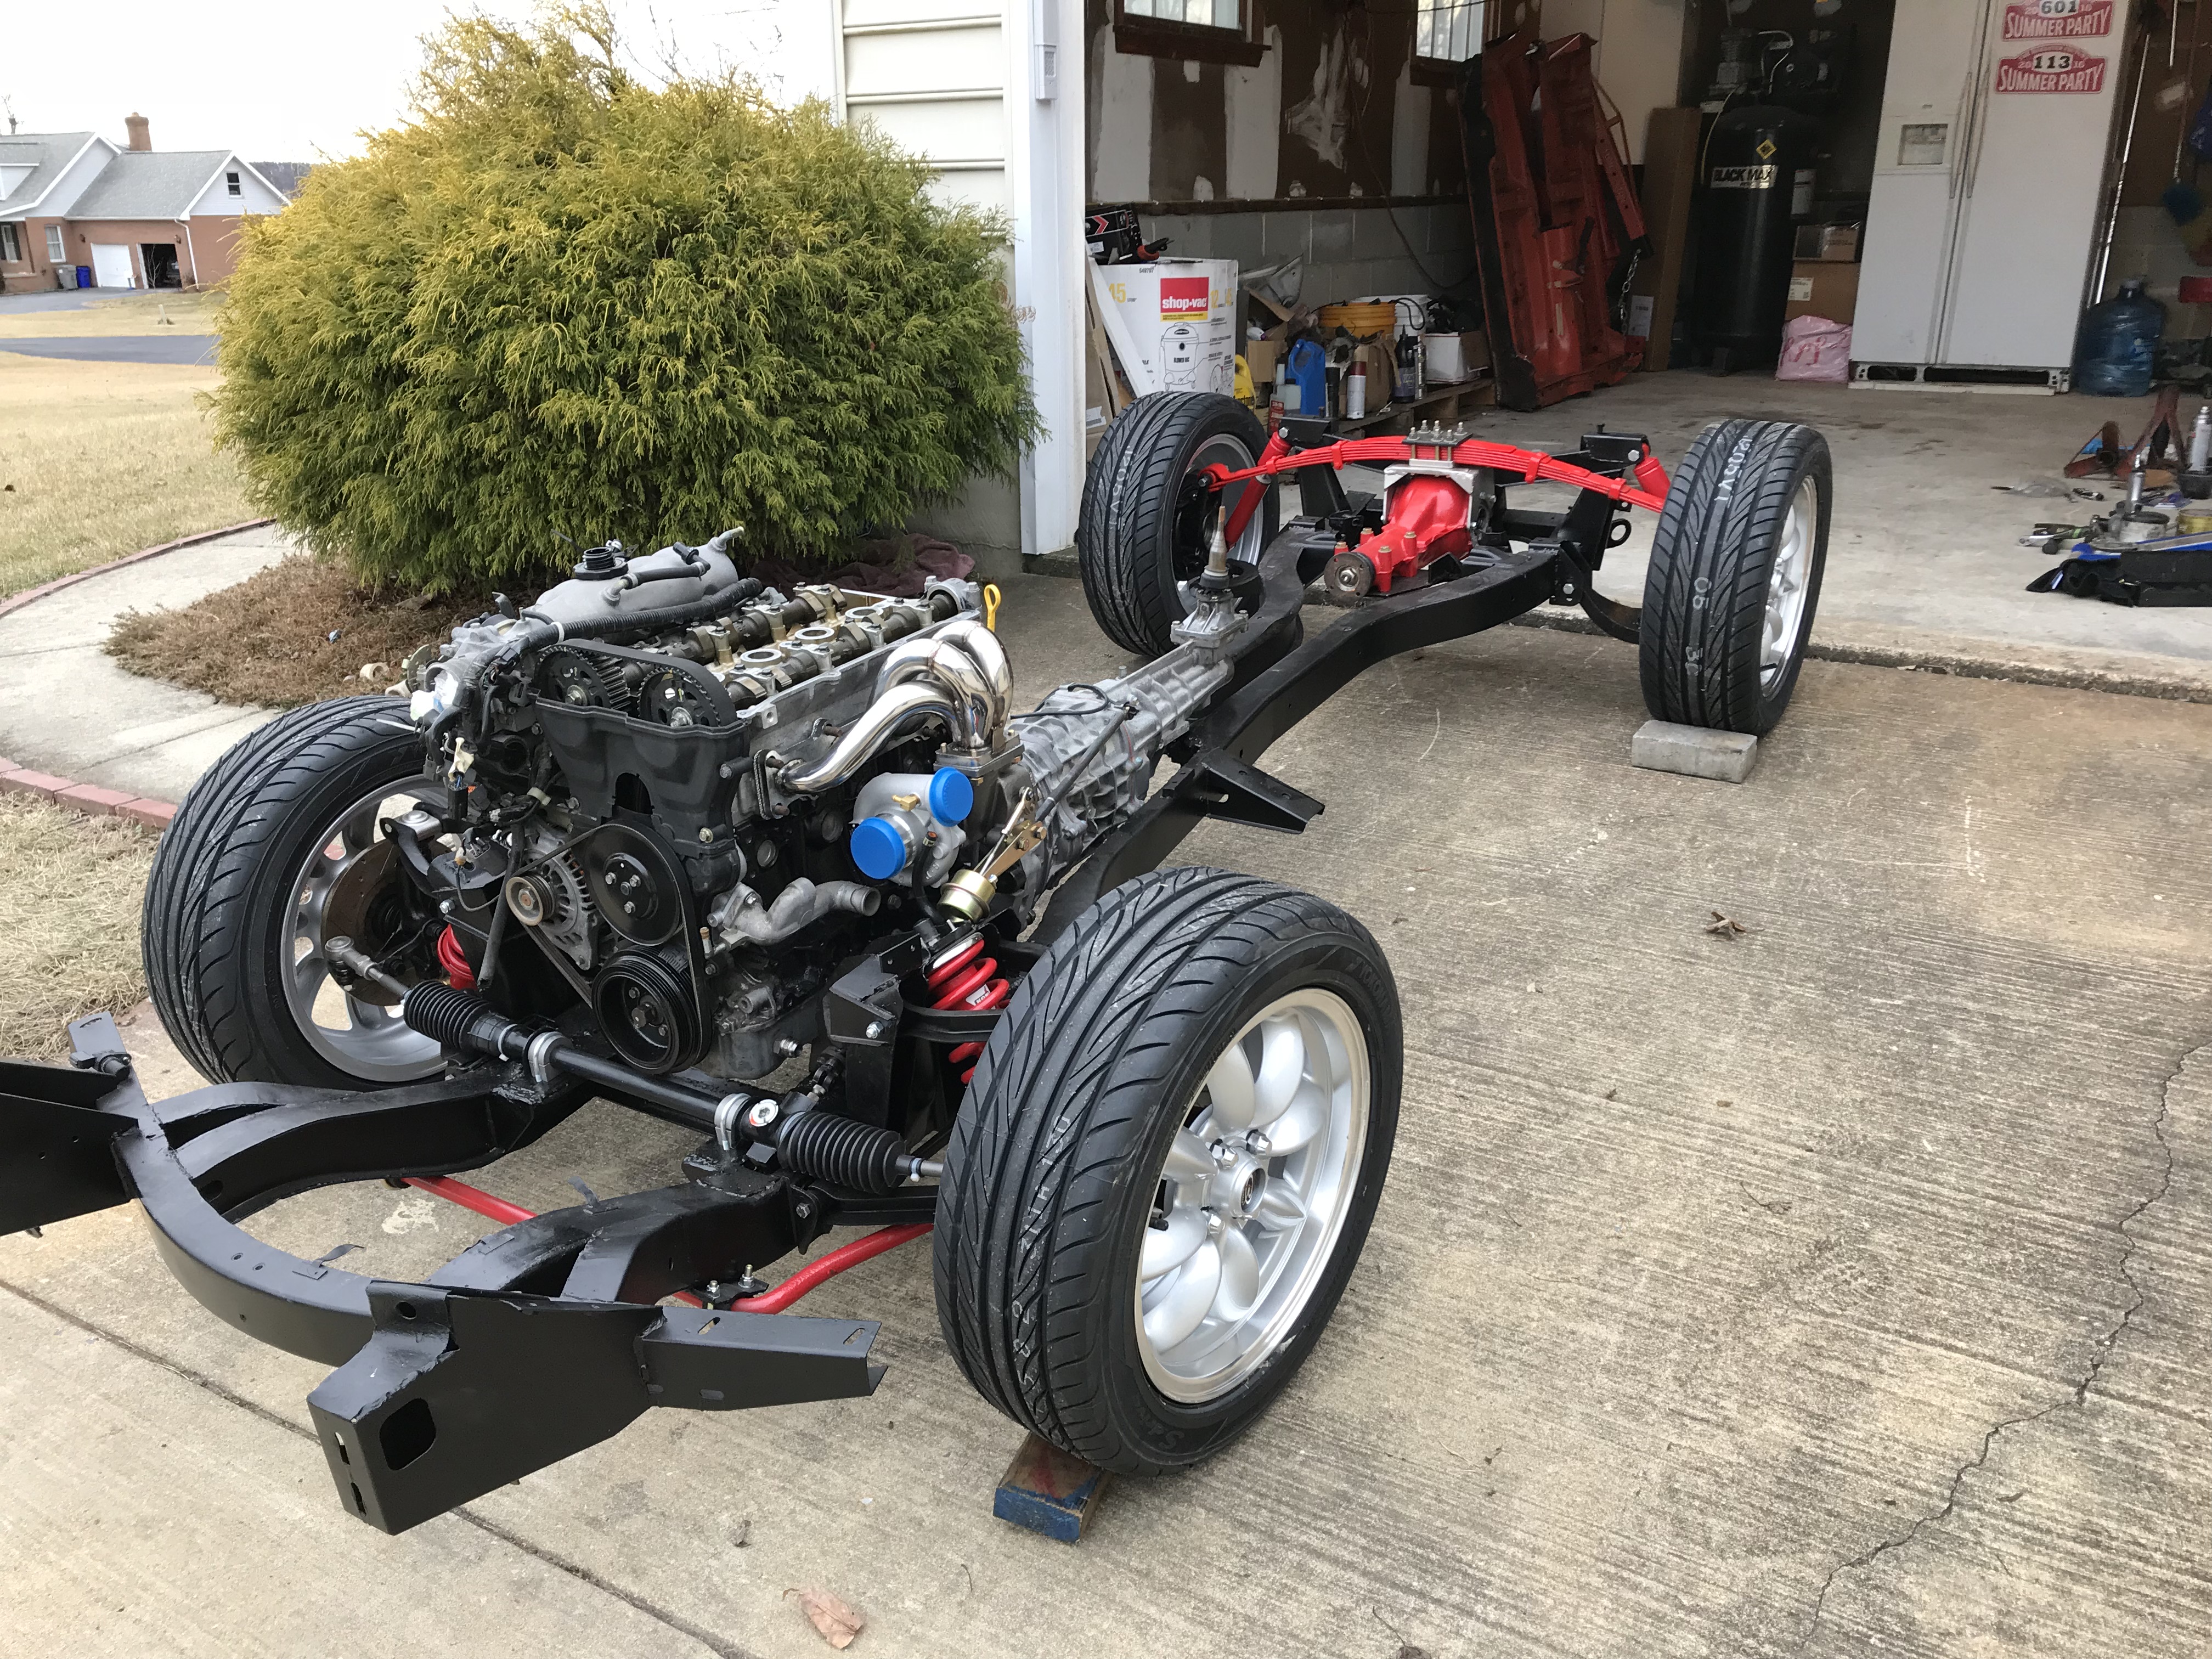
So I have sold some old Triumph parts to fund the Spitfire build. Netted $3,000 so that means I can't paint the body and also do the rest of the build, so it will remain in that wonderful Triumph Brown color and be much more of a sleeper. So the plan is to build the chassis and engine/turbo in the manner that I had been planning but will fix up the body rust and the car will remain brown with some satin black stripes, rocker panels and floors/ valance where I had to do some repairs. Ordered the Rota 15" wheels and Yokohoma S-Drive tires so it can be rolled around and a GT6 sport exhaust and will put the engine and transmission in this weekend. That will let me finish the chassis, get the rest of the brakes/fuel/drive shaft/Exhaust completed and then can work on the body shell to get it ready to remount on the chassis. Will definitely be running a megasquirt and using a Miata gauge cluster I picked up so that simplifies the electronics and all the gauges. I will add a boost gauge and A/F gauge with a wideband so this can be tuned for 200 HP and be reliable and quite fast!
I am also doing a radiator bypass for the Miata engine and it looks like the exhaust going to the rear will let me keep the stock colder water "mixer" as it is without modifications. More on this as I get the engine installed.
In reply to dherr :
Sounds like it's coming along! It's going to be an awesome sleeper, and you can always paint or experiment with a wrap later.
Side note, if you need any other miata things, let me know. I parted out my 97 recently, if I had known I could have hooked you up with that cluster.
Tuning the Megasquirt should be a fun learning experience, I'll be having a similar learning experience soon as I was able to get a steal of a deal on a MS based standalone for the Spitbird.
dherr
Reader
1/21/18 8:04 a.m.
Yes, that is what I was thinking as well. Cosmetics are overrated ....
I think that the 1999-2000 cars have a different cluster, but I will reach out if I need anything else.
The Megasquirt part will be fun, I am pretty sure I'll upgrade to the http://www.tunerstudio.com/index.php?option=com_content&view=article&id=5&Itemid=13 version of Tunerstudio as I can run a wide band and have it tune as I drive the car. There are plenty of maps available for the Miata and I am not running crazy boost levels for this project, so it should be interesting to get this going. Can't wait to see what you do with the Spitbird!
I was under the impression that keeping the brown was the original plan. I really liked that plan so I can't say I'm sad that's how its ending up.  I love this build.
dherr
Reader
1/21/18 9:17 a.m.
Yes, that was the original plan, but since I stripped the body shell, I have been on the fence as the time to paint it would be once it has the rear valance and floor pans installed, but once you go down that rabbit hole, the costs just keep going up. I am back to being comfortable with the "rat rod" theme and this will ensure that the car will be on the road later this summer. Engine and transmission go back in today, then I will do the maintenance (timing belt, waterpump) and work on exhaust routing and cooling/inter cooling systems.
dherr
Reader
1/21/18 7:07 p.m.
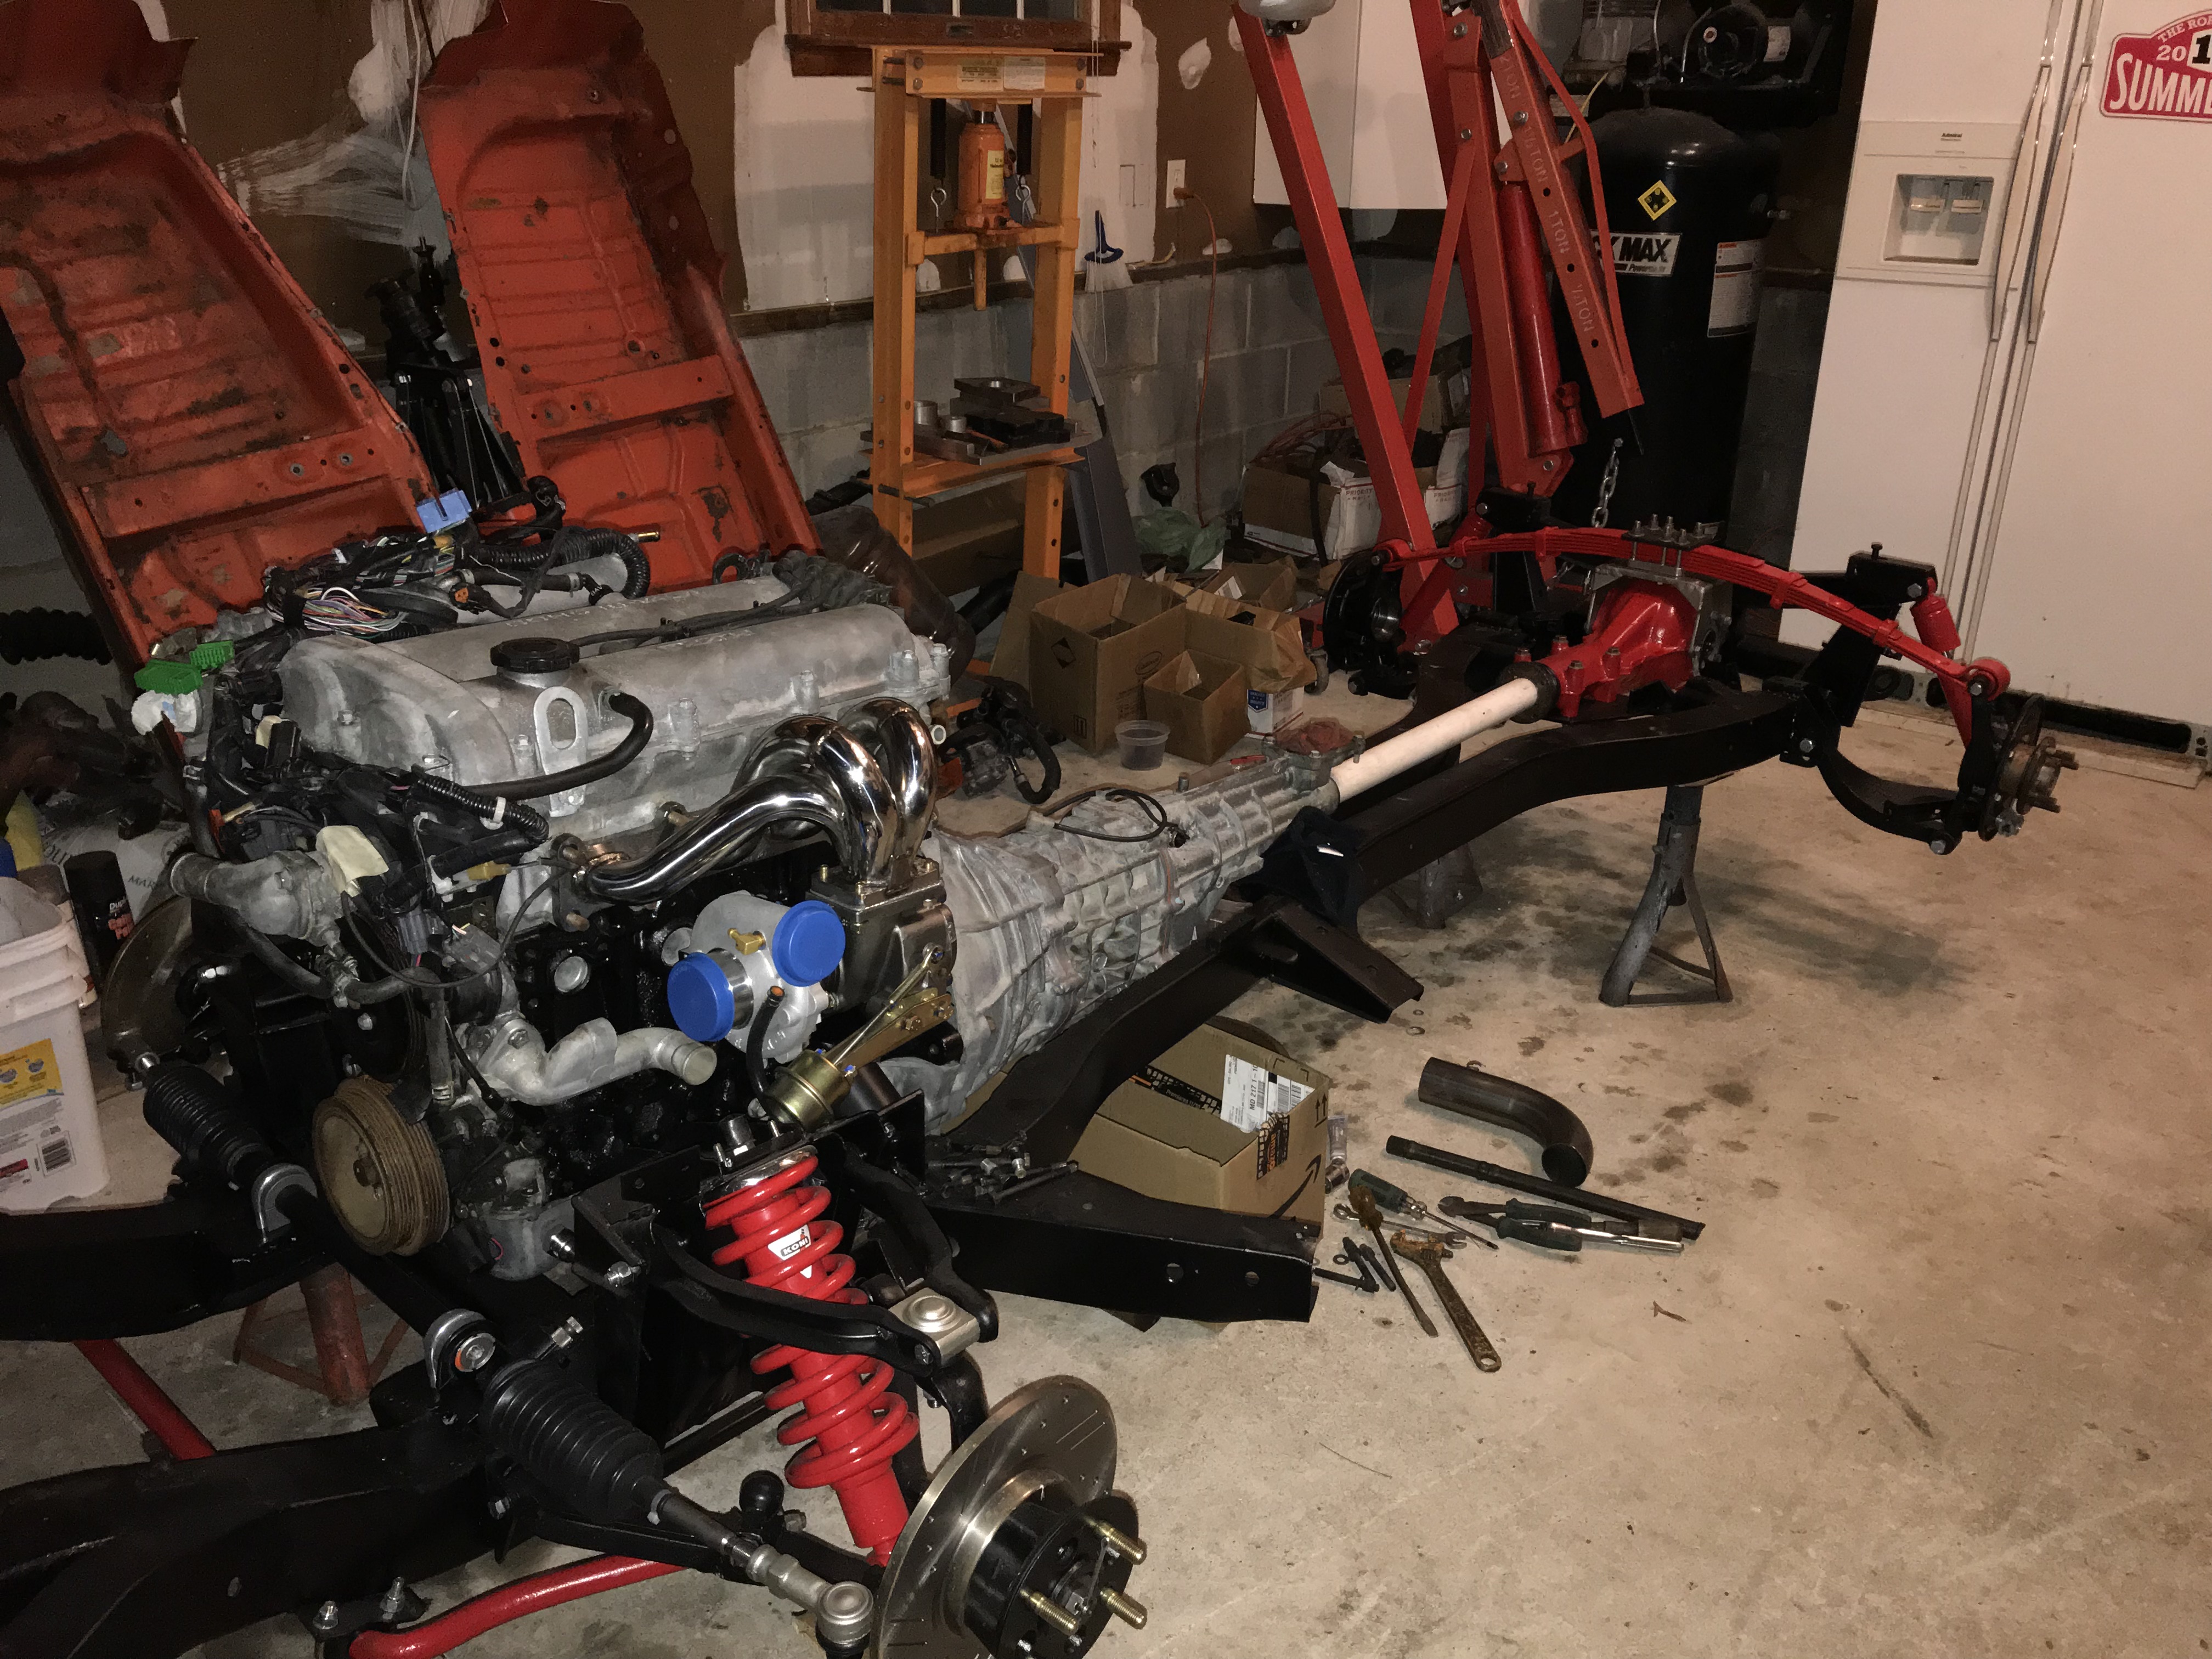
Drilled the oil pan for the turbo oil return line and reinstalled the pan and mounted the transmission. Bolted it in place, looks pretty nice in the chassis. Next steps will be to do the timing belt and water pump and get the aluminum cam cover either painted or power coated in red to match the rest of the theme. Turbo fits just fine, I have plenty of space to build a bracket to support the weight of the turbo from below, but the exhaust will be an adventure, might have to take it across the back of the head and down to the passenger side as there is more room there to drop down between the engine and frame. I might have to use a stronger drive shaft, what do you all think?

manana
New Reader
1/21/18 8:33 p.m.
Awesome work Dave,
I don't know, that white PVC is pretty strong, just make sure you use the correct glue!
Exhaust was a big concern of mine right out of the gate. As mentioned I mounted my engine high, with just enough clearance from the bonnet (about an inch). On my build that gave me enough room to run the exhaust forward of the engine mount between the frame rail and oil pan. I suspect your turbo routing would make that difficult, if not impossible, even if you made a different header.
I think some guys run it outboard of the frame rail and then under and back, even out the side. I'm not a fan of that as it limits steering travel and ground clearance, but may be an option.
Keep it up.
dherr said:
I think that the 1999-2000 cars have a different cluster, but I will reach out if I need anything else.
The Megasquirt part will be fun, I am pretty sure I'll upgrade to the http://www.tunerstudio.com/index.php?option=com_content&view=article&id=5&Itemid=13 version of Tunerstudio as I can run a wide band and have it tune as I drive the car. There are plenty of maps available for the Miata and I am not running crazy boost levels for this project, so it should be interesting to get this going. Can't wait to see what you do with the Spitbird!
True, I keep forgetting that you're using the second gen motor.
Yeah, having it setup to use the wideband to autotune seems like the best way to start.

dherr said:
Drilled the oil pan for the turbo oil return line and reinstalled the pan and mounted the transmission. Bolted it in place, looks pretty nice in the chassis. Next steps will be to do the timing belt and water pump and get the aluminum cam cover either painted or power coated in red to match the rest of the theme. Turbo fits just fine, I have plenty of space to build a bracket to support the weight of the turbo from below, but the exhaust will be an adventure, might have to take it across the back of the head and down to the passenger side as there is more room there to drop down between the engine and frame. I might have to use a stronger drive shaft, what do you all think?
Hmmm, trying to picture the rest of the engine back in my head. If you're thinking about running the exhaust around to the passenger side, would it be possible to mount the turbo upside down from where it is now for a top mount turbo setup? Seems like that would make for a simple exhaust route to the other side, and it would look pretty cool. Just spitballing. Though, I can't remember how much clearance you had behind the between the back of the engine and the firewall, if there was enough for an exhaust pipe I guess you might be able to run it right behind the engine. I'm sure you'll come up with something sweet once the body is back in place for fitment.
dherr
Reader
1/22/18 7:42 a.m.
I have room to get behind the motor mount and between the engine/frame, but just enough, it will be quite close but the engine dipstick is also there. But it will require the turbo downpipe to do an "S" and I'll need to insulate it as it is very close to the oil pan and frame, dipstick, etc. There is more room on the passenger side for some reason as the starter is mounted high and twice as much room. But that would require coming straight off the turbo and running across the transmission and then dropping back down which would require more firewall trimming and some creative mods the firewall for this to safely run this path . Running outside of the frame is not an option as I am using a Bell dual muffler GT6 exhaust running up the middle of the frame as stock so whatever solution I come up with will be mating with this exhaust in the middle of the car.
Should be fun to figure out!
dherr
Reader
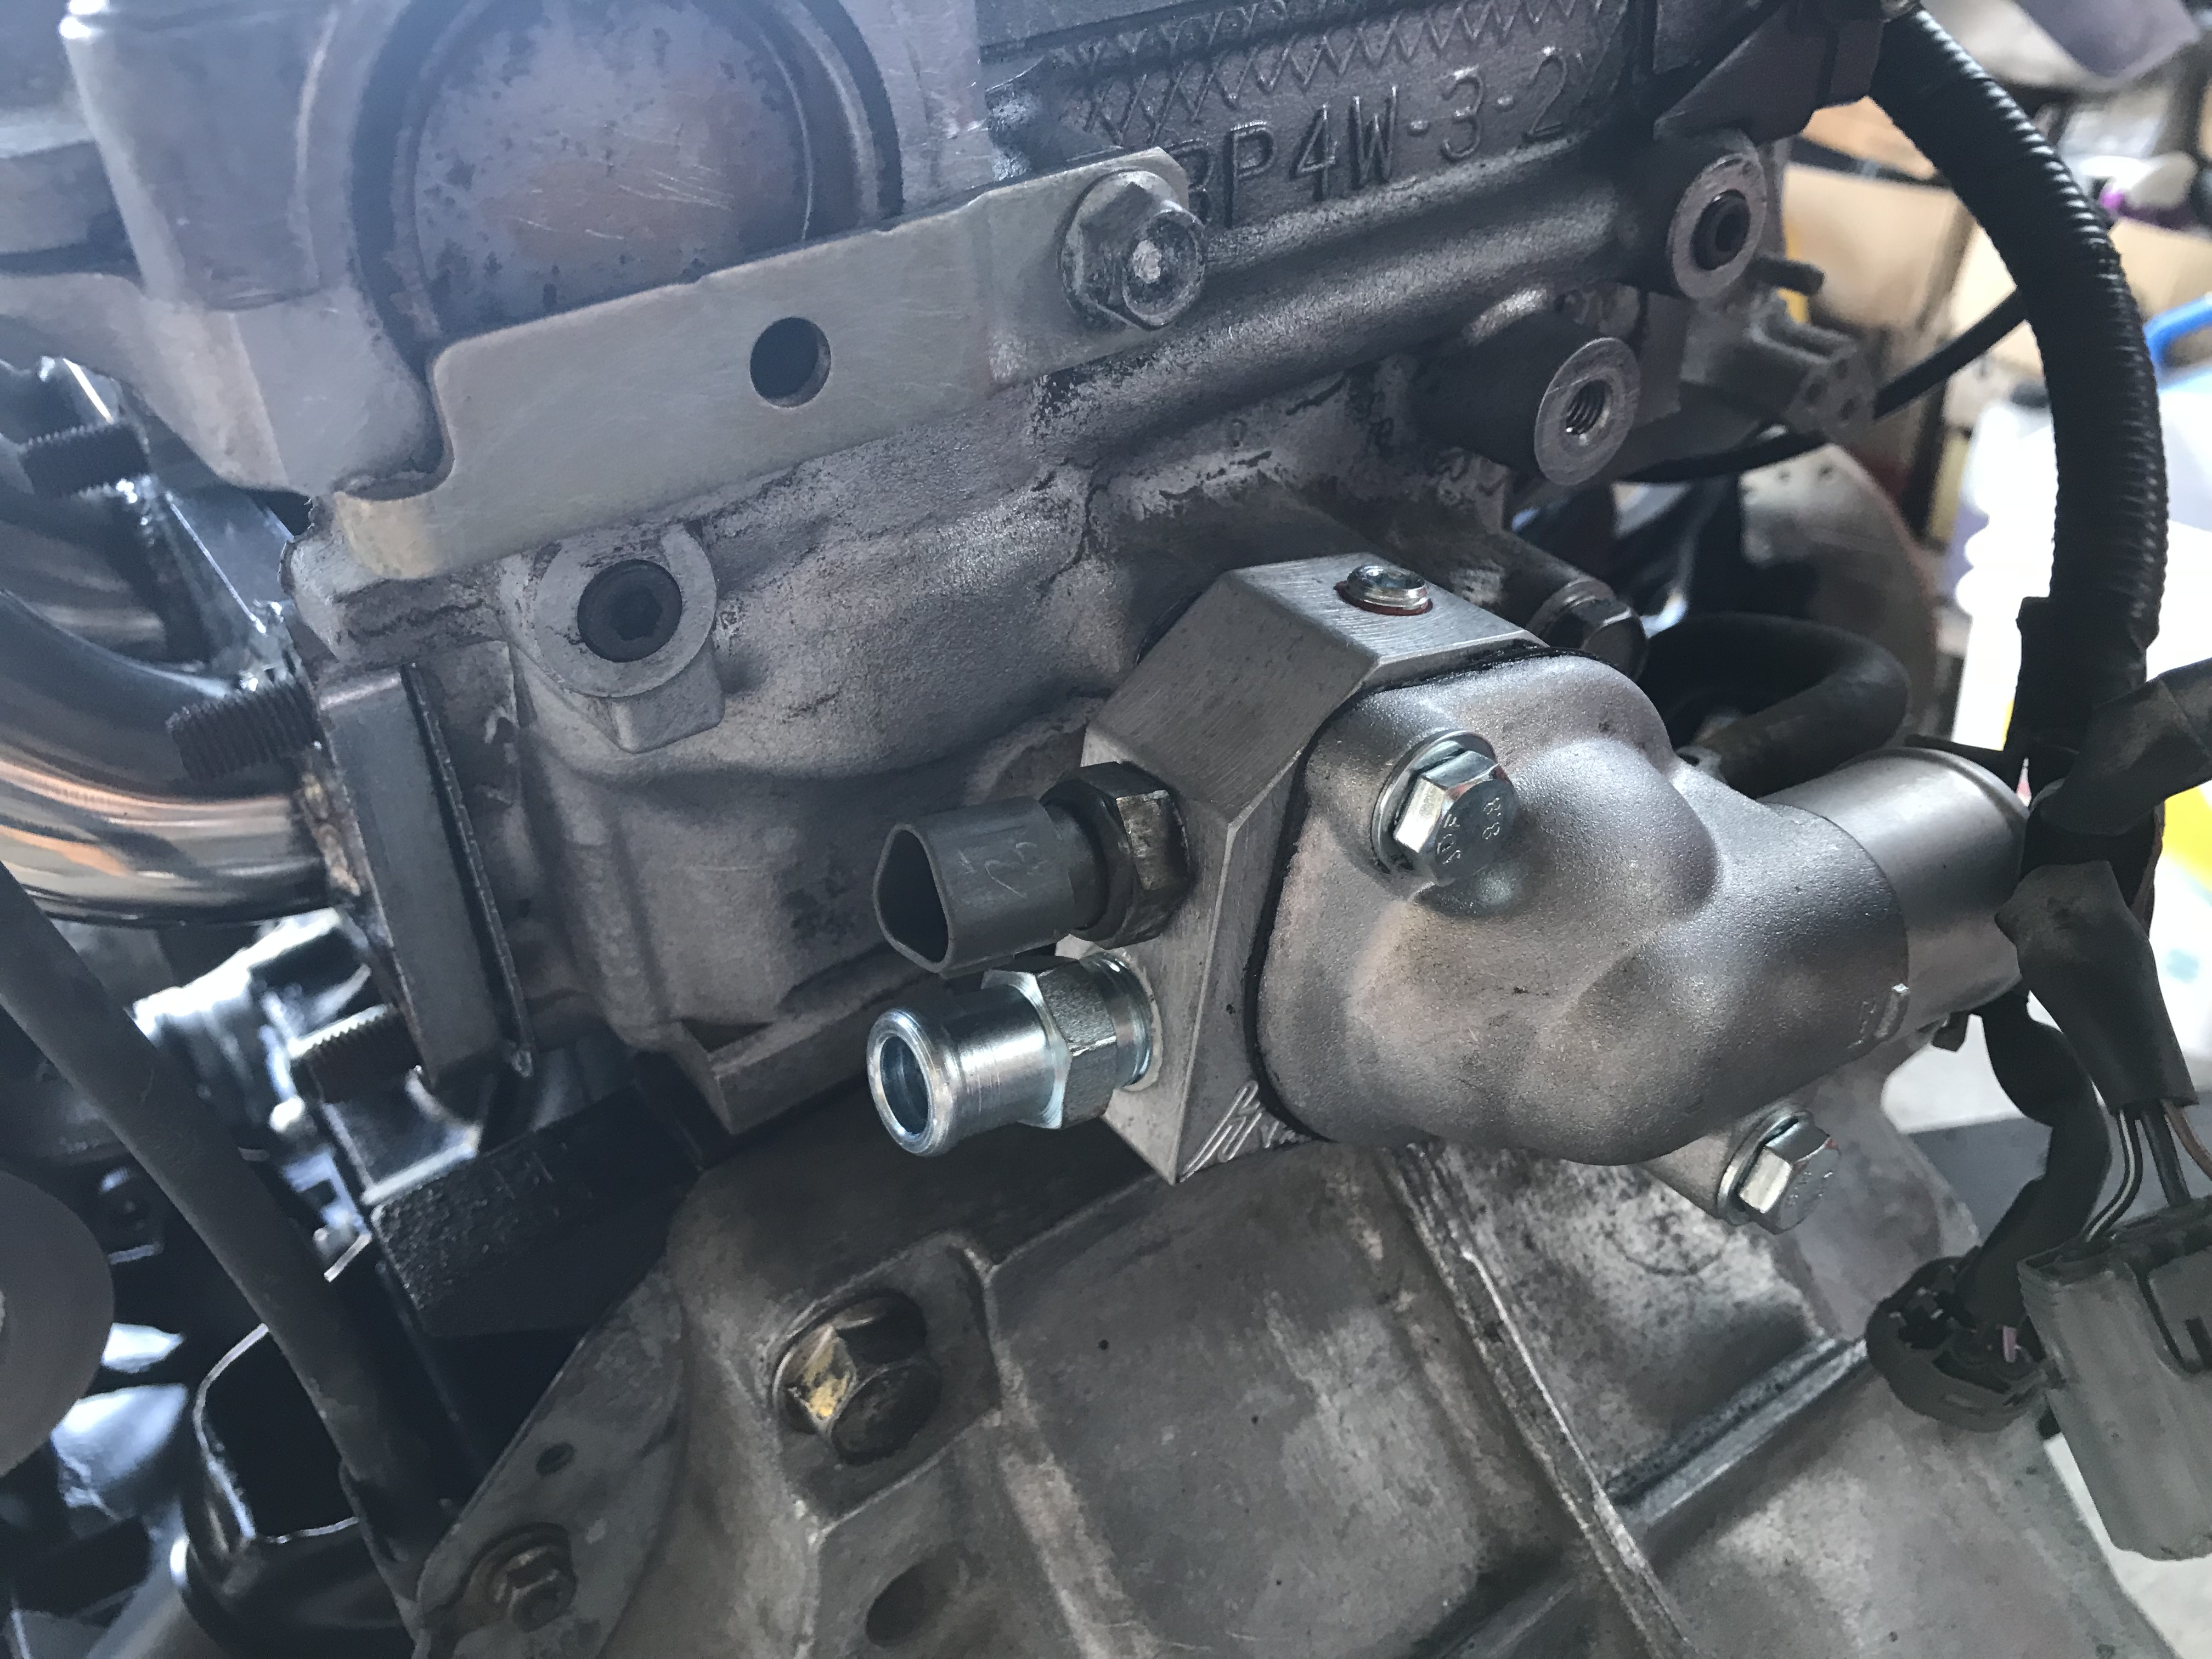
1/22/18 8:05 a.m.
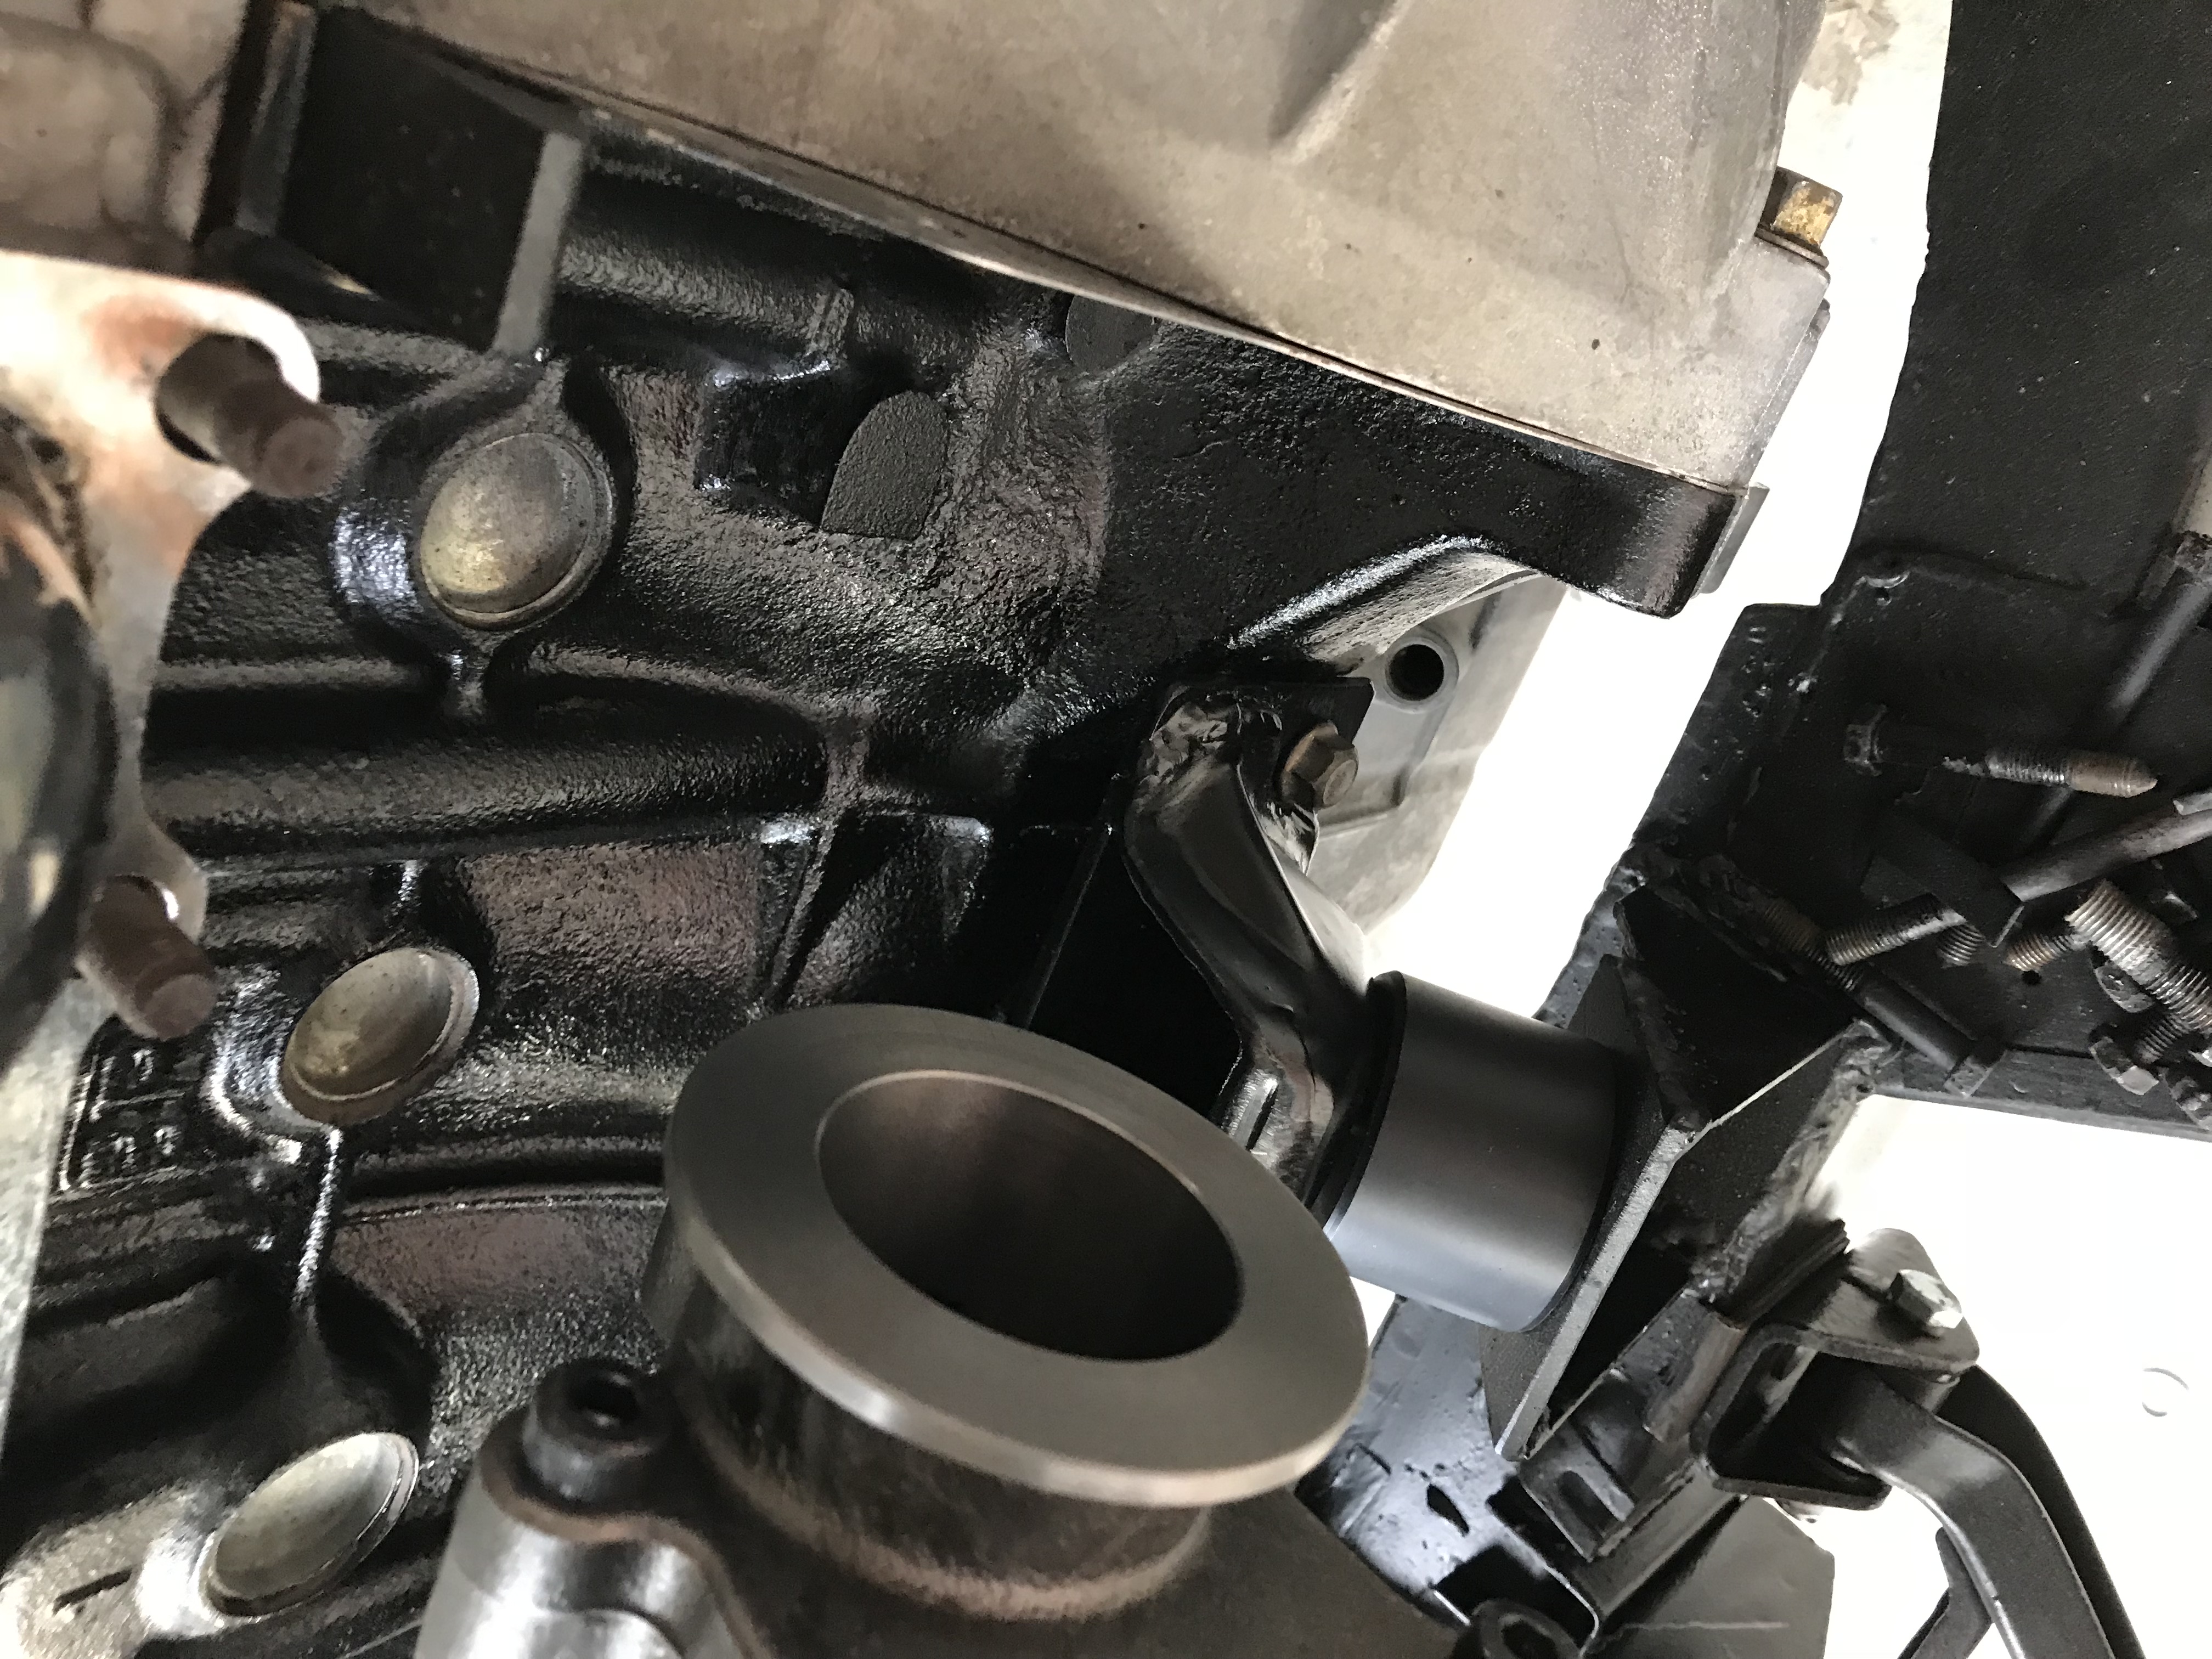
The picture below shows the original intended routing of my turbo downpipe. I can cut away the frame flanges and weld in a plate to get another 1/2 inch of clearance, but as you can see the dip stick is in the way and the downpipe will need to curve back towards the front to make this work.
dherr
Reader
1/22/18 6:57 p.m.
I am starting to think that just flipping the turbo 180 degrees might do the trick, that way the exhaust just runs forward and then drops along side of the engine back to the center exhaust system. Will be much easier to route a cold air intake to a filter in the back than to try to get the exhaust run and shield my legs from the heat. I will flip it tomorrow and see if it is doable.
In reply to dherr :
Ohhh, so the exhaust would go out the turbo toward the front of the car, and large u-turn down to run beside the engine back, underneath the mounts? That might work!
dherr
Reader
1/23/18 1:59 p.m.
Yes, that is my thought as the exhaust could easily go forward and then u-turn down running between the frame rails and engine/transmission to my rear exhaust system. Easy to wrap to keep the heat down in the engine compartment and much easier to weld up. So if the intake is in the back, I can still figure out a way to route the cold air intake. But first I want to get all items installed and the maintenance work done so it is all there before I fabricate anything. So first stop is the water line re-route. The rear is easy, just a housing for the thermostat and fittings for the heater and water temp sensor. The hot side of the return will then route under the intake manifold to the front top of the radiator. This changes the cooling system by removing the front water neck and then routing the cold water into the mixing chamber inlet, through the block and head and then out the back of the head and keeps there from being a temp difference between the 1st and 4th cylinder. In the front, the entire water neck is just replaced by a freeze plug and block off plate. Simple and much more effective, especially for a turbo application. I'll do the timing belt/water pump next and install the freeze plug next.
In reply to dherr :
Neat. Seems like that would work for the exhaust.
I'm familiar with the coolant reroute, seems to make sense for engine life, especially on a turbo. Never did it on any of mine, but so far they have all been stock daily drivers or parts cars... ;) The only issue I remember hearing about is leaks or seeping if the gasket doesn't set just right or something?
Timing belt isn't too hard. I have the FM Cam Tool if you want to borrow it. I did mine before I had the tool though, and it still wasn't that hard.
dherr
Reader
1/23/18 4:11 p.m.
It was pretty easy to install with all my access right now, would be much harder in a Miata engine compartment..... The castings are high quality and have gaskets that I sealed with permatex, so I don't anticipate any leaks. Apparently when they converted the BP motor from FWD to RWD, the factory moved the outlet to the front of the engine but if you look at the coolant path, very little goes to the rear of the head (the outlet is for the heater). So the first two cylinders run fine, but the last two run hotter. Again, not a big deal unless you race or have a turbo. Easy to do now and it also solves the issue of plumbing in the heater core in the car as if you closed the heater valve in the summer, there would be no circulation from the back of the head in a stock setup. I have a cam tool to lock the cams as well, does not look that hard, again much easier in my case as the engine is completely exposed.
dherr
Reader
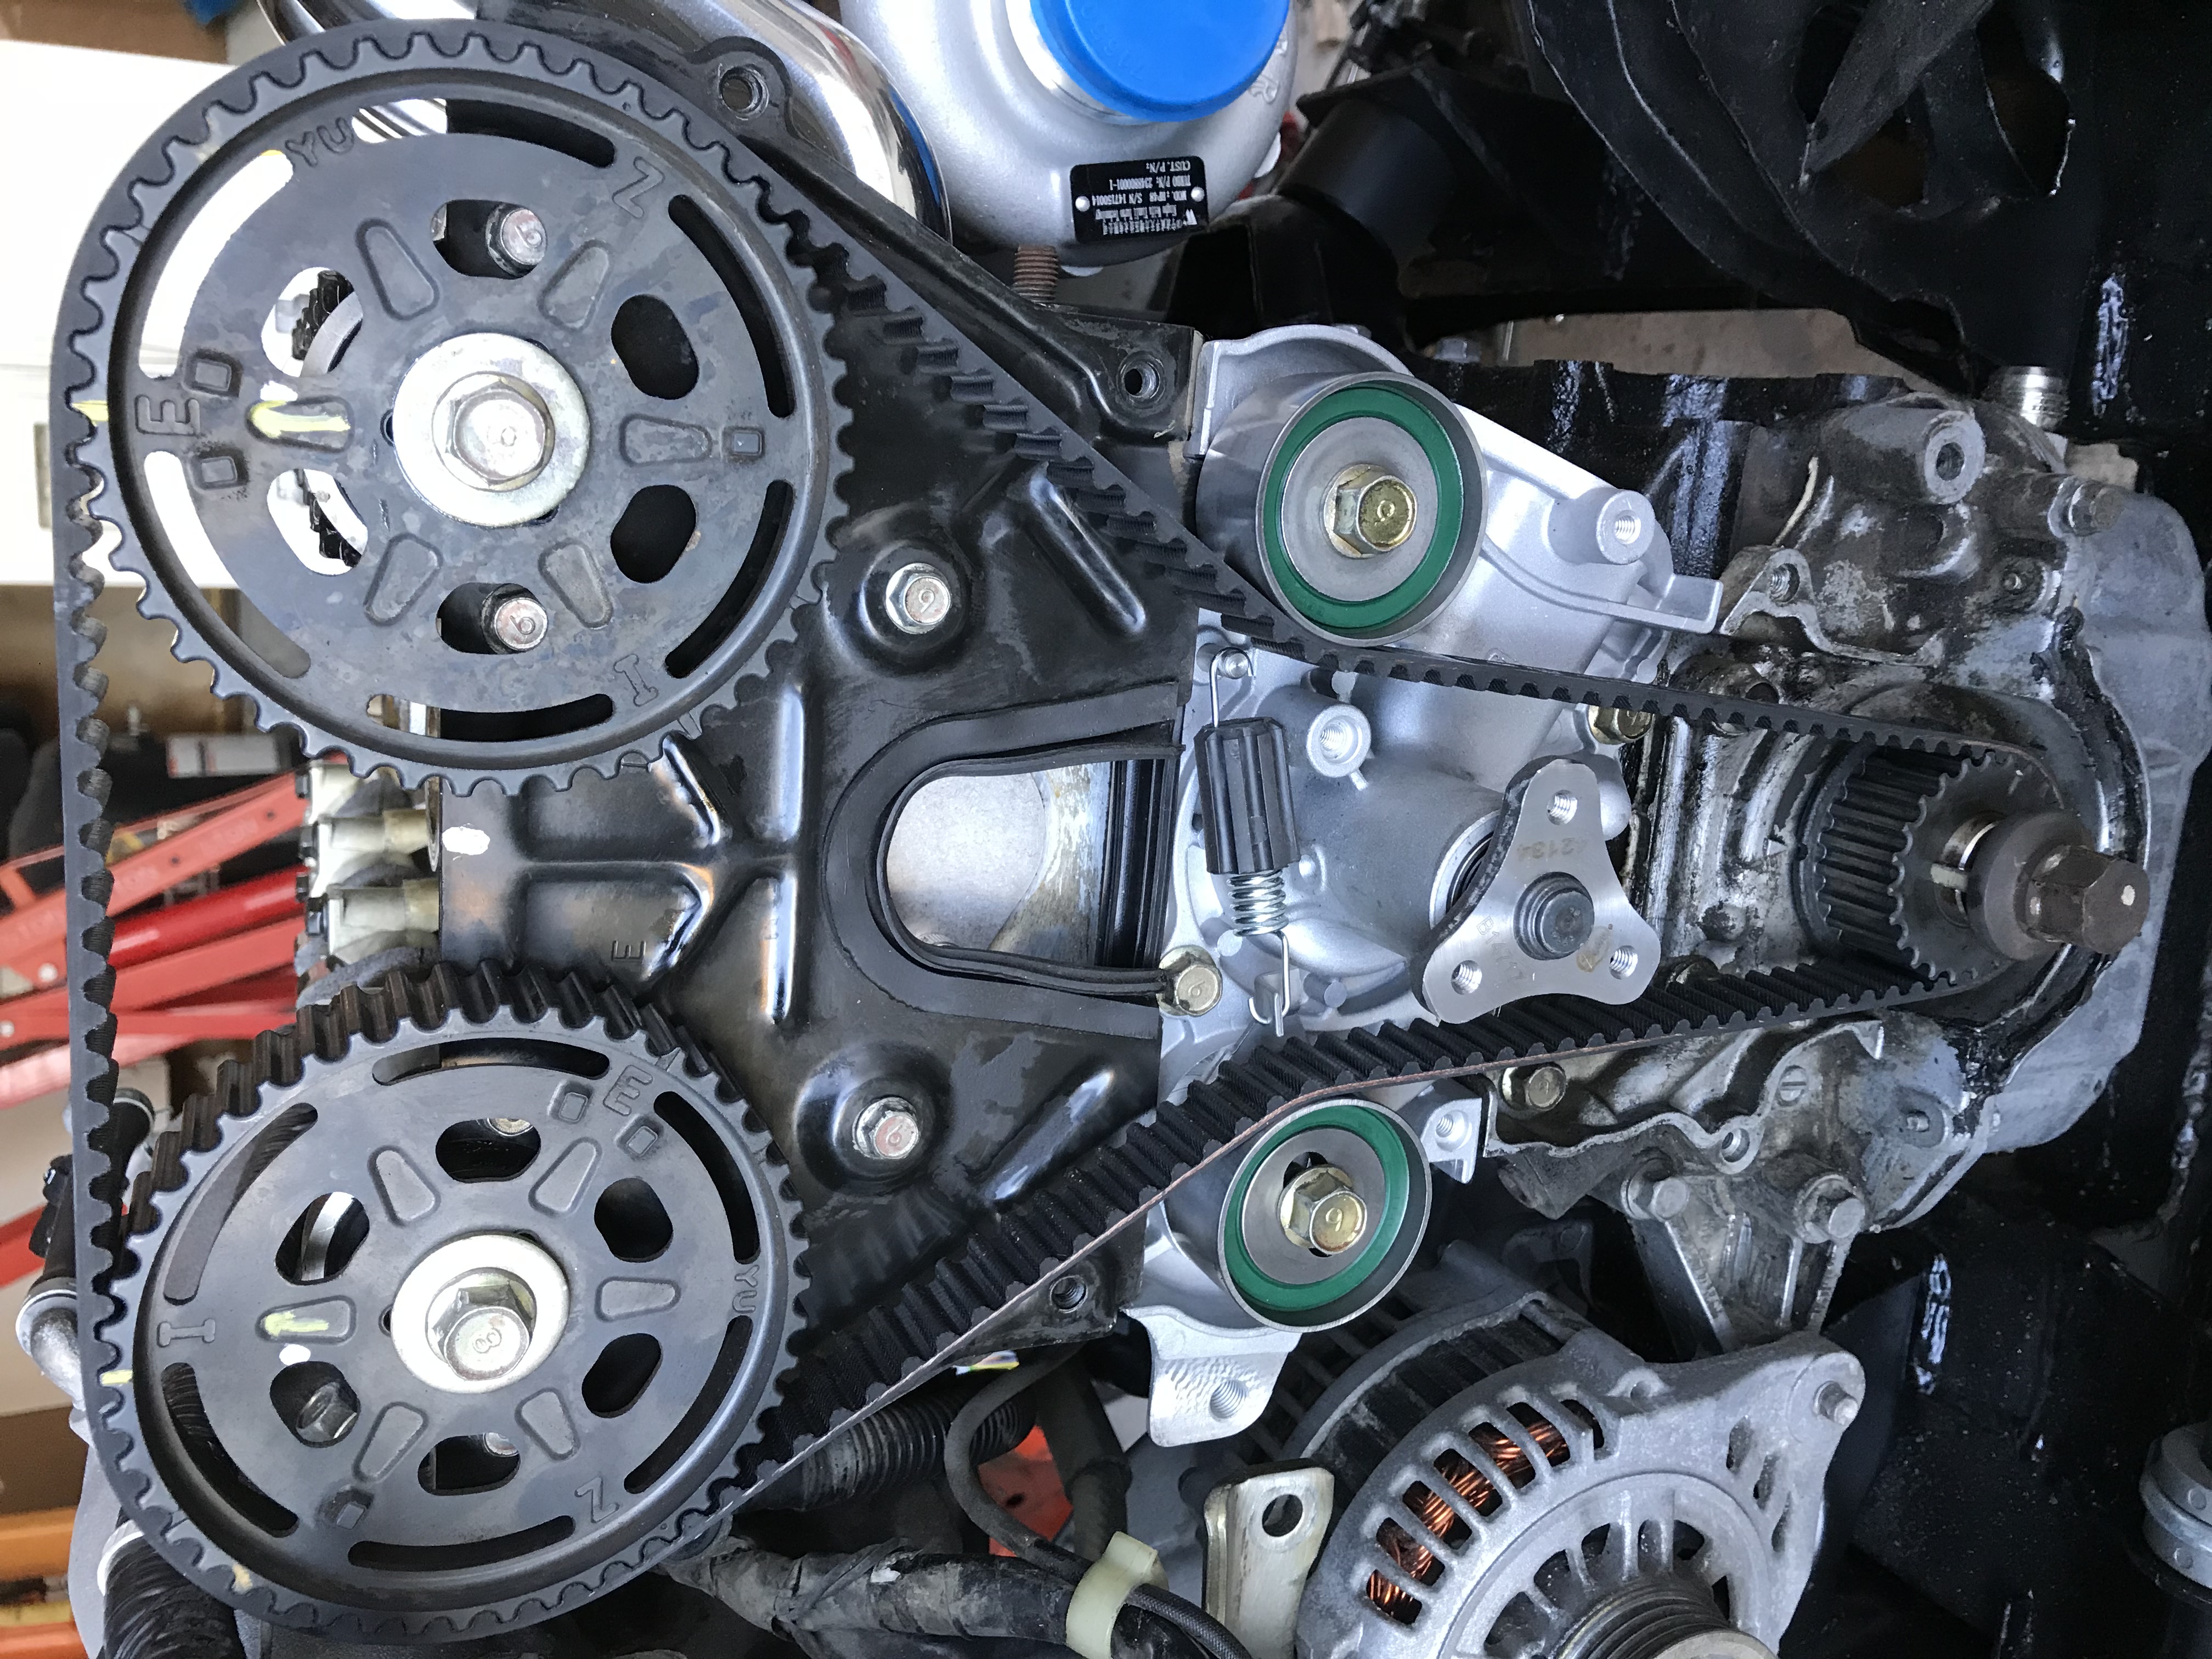
1/25/18 8:38 p.m.
Finished the new timing belt, water pump and the front water neck delete today. Painting the valve cover and buttoning it all up tomorrow. Engine is remarkably clean inside, no sludge or really anything in the oil pan or under the valve cover, head looks like it is barely run in. I really did not need to replace the water pump, but replaced it anyway as these JDM motors are supposed to have 55-60k miles on them, so figured I should just do it as insurance along with the timing belt. Front water neck delete was easy, just remove the neck, seal and tap in a freeze plug and bolt in the cover plate. I get my wheels tomorrow and have the day off, so will be getting them mounted so this chassis will really start to look like a car, Drive shaft was ordered yesterday will have it in a couple of weeks. Also ordered the radiator, intercooler and hoses so I can start figuring out the cooling systems.
dherr
Reader
1/27/18 4:14 p.m.
So got my wheels yesterday and had the tires mounted and balanced. After much debate, I ended up going with 205/50-15 on the back and 185/55-15 on the front. Wheels are Rota 15x6 on all four corners. Tires are Yokohama S-Drives, which I have on my DD MX5 and are happy with them for street use. Have not weighed the wheels with the tires (wheels are 15 pounds each) but they feel light. Both sizes are almost the exact same height as the stock 155/80-13 tires and thus fit in the narrow spacing in the front. Width wise, I will be rolling the fender edges front and rear so not worried about the width. I like the staggered look and have a feeling that this thing will be easily steered with the throttle on an autocross course, so it should be quite fun. I attempted to clean and paint the valve cover but was not happy with the results so I dropped it off at the powder coater, will pick it up later next week. Drive shaft was ordered and will have it in a few weeks, so next steps are to run brake and fuel lines, figure out the emergency brake cable modifications and then the chassis will be ready for the body. Depending upon the weather in February, I will either keep working on the chassis systems or start on the body shell.