1 2 3
madmax98
madmax98 New Reader
9/15/21 9:48 a.m.

Hello Everyone

Long time lurker , first time poster. I never posted about my projects till about a few months ago. I realized I need to document what I'm doing, at least for bookkeeping sake. I started a build thread on ClubLexus and Supraforums, since the platform is a Toyota/Lexus. But I figured I should be really posting here, since the car is going to be track focused after all.

The car is a 98 SC300. It has a list of modifications already:

- Built 2JZ short block (rods, pistons, bearings...etc)

- VVT i Head with springs and retainers

- Borg Werner 8375 S300sx Turbo

- R154 5 Speed conversion

- Fuel Cell

- Full Re-wire

- AEM EMS 

- Bosch 044 Fuel Pump (for now)

- 6 piston calipers brakes (porsche calipers, ISF rotors, brackets...etc)

- Turbo Supra LSD

- AC-Heater Delete

- Other supporting mods like oil cooler, PS cooler, fuel lines&  rail...etc


The driver is meeeeeeeeeeeee smiley  Aerospace Engineer with 2 toddlers and an insatiable love for speed.  I work as a stress analyst but after work....I'm a "hardcore" DIY enthusiast. To give you an idea, I made a carbon fiber hood from scratch (mold, layups, vacuum bagging...etc) without having any background in composites. This was before Youtube had any tutorials on how to do any of that lol  Details here https://www.clublexus.com/forums/sc-1st-gen-1992-2000/550751-the-latest-of-my-insanity-home-made-hood.html

Everything I post here was/is/will be performed by myself.

Most of the modifications above were performed between 9-12 years ago. Since then, I mainly focused on graduating, career, getting married, kids....etc Basically life took over . I recently just started getting back to it and wrenching on the car. It is difficult to do a lot when 2 toddlers are involved, but I do enjoy it.

My objective is to develop a time attack car. The car is not street-driven anymore (although it's still registered). My approach is to start from the front and work my way to the back in the development process. I'm going to avoid making compromises regarding street vs track use. If any, the scale will be tipped heavily in favor of track use. Still I'd like to drive the car every once in a while in a non-track setting.
My plan is do a full iteration to address/restore any mechanical modifications related to Engine, Drivetrain, Fuel System...etc. Then, address Suspension and Chassis. And Finally, address my Aero (BIG PLANS HERE).

Here's what the car looked like before;

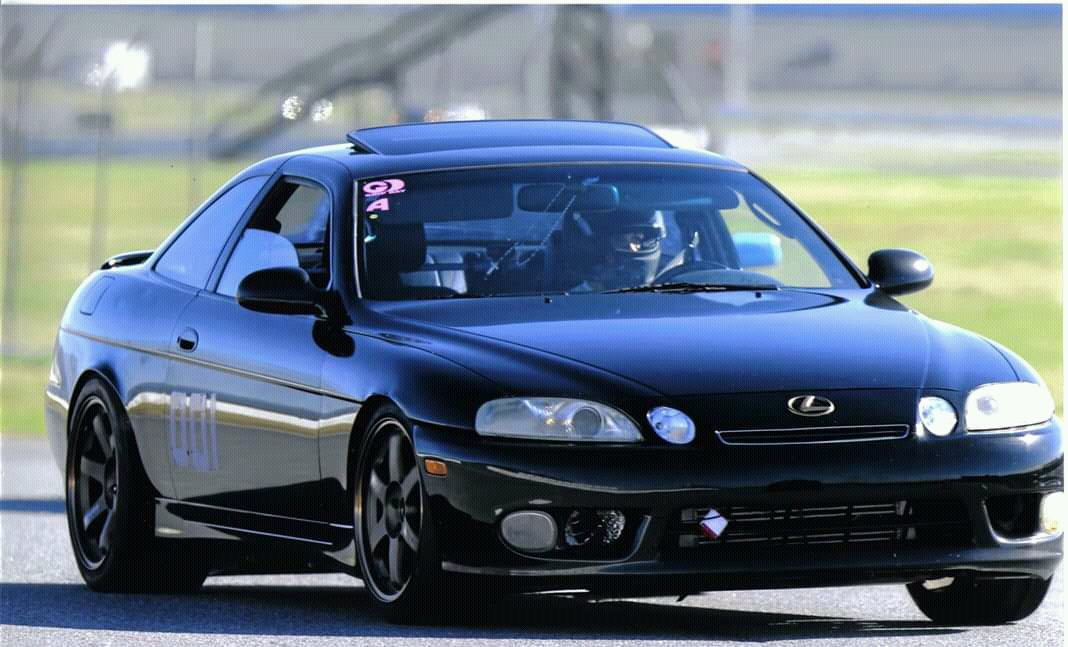
Auto Club Speedway, Fontana 

I'm going to condense posts I've made, the last couple of months, on other forums, first, for bookkeeping purposes.

iansane
iansane HalfDork
9/15/21 9:58 a.m.

Cool. Cool, cool, cool,

AngryCorvair (Forum Supporter)
AngryCorvair (Forum Supporter) MegaDork
9/15/21 10:01 a.m.

In reply to madmax98 :

You've come to the right place. Welcome!

dannyp84
dannyp84 New Reader
9/15/21 10:10 a.m.

Exciting! My first thought is to get the car on corner scales and see what you've got.

madmax98
madmax98 New Reader
9/15/21 10:12 a.m.

In December, I started a wiring project. I only wanted to clean up the wiring and move the fuse box inside the car. 

It started out simple, but evolved into a much bigger mission as you will see:


Took all the AC-Heat stuff out


Dash is out too (temporarily)


This made me realize that trying to keep the factory harness is futile:


Enter the re-wire


Harness is out   (over 25 lbs )


Making a template for fuse/relay board


Broke out the CF


Fuse panel


Test Fit


Harness to ECU is tucked. Fuse panel is under the radio/center console.


Mocking up the switches. Wanted them to be low-key under the center console cover


Master switch with a resettable circuit breaker...

Robbie (Forum Supporter)
Robbie (Forum Supporter) MegaDork
9/15/21 10:14 a.m.

awesome!


tuna55
tuna55 MegaDork
9/15/21 10:16 a.m.

Cool project! I have always liked these cars.

madmax98
madmax98 New Reader
9/15/21 10:17 a.m.

In reply to AngryCorvair (Forum Supporter) :

I do think so, and thank you

madmax98
madmax98 New Reader
9/15/21 10:20 a.m.
dannyp84 said:

Exciting! My first thought is to get the car on corner scales and see what you've got.

I did put the car on corner scales a few years ago. It weighed ..... 3750 lbs with me in it (i weighed ~ 180 back then). Front-to-rear ratio was 52-48% distribution. Weight is definitely one of my priorities for obvious reasons lol.

mr2s2000elise
mr2s2000elise UberDork
9/15/21 10:56 a.m.

Welcome. Been an active CL member since 1999 when I got my first SC3.

Had 3 SC300 (two single turbo) 5MT, one AT, lowered at that time on Blitz Type 03 wheels, and some on Supra 17s.  92 94, and 98. My 98 was my fave. Great car. Miss them a lot. 


Almost bought the mint SC400 on BAT few weeks ago. 

Am following your thread on CL and here

madmax98
madmax98 New Reader
9/15/21 11:43 a.m.

Just realized my first post was all jumbled up lol FIXED...

madmax98
madmax98 New Reader
9/15/21 11:47 a.m.

In reply to mr2s2000elise :

Thanks brother.

They are great cars... I almost feel bad cutting into them. It's like getting punched in the gut every time I toss something out lol 

I am looking forward to feedback here. CL and SF are great, but GRM is on a different level when it comes to DIY, brainstorming and thinking outside the box. 

mr2s2000elise
mr2s2000elise UberDork
9/15/21 11:50 a.m.

In reply to madmax98 :

See your pic is from Fontana. I run locally HPDE as well. You may see me out there. I am either in an Elise or S2000 these days. Gave up tracking my Miatas about 5 years ago. 

madmax98
madmax98 New Reader
9/15/21 9:51 p.m.
mr2s2000elise said:

In reply to madmax98 :

See your pic is from Fontana. I run locally HPDE as well. You may see me out there. I am either in an Elise or S2000 these days. Gave up tracking my Miatas about 5 years ago. 

Cool. I don't think I'll make it to Fontana any time soon haha I want to make sure I don't rush the critical projects.

bonylad
bonylad HalfDork
9/16/21 7:18 a.m.

Well, now...............this is beautiful work!


madmax98
madmax98 New Reader
9/17/21 8:55 a.m.

Condensed post #2; Big Brake Kit on the cheap


Another project I worked on was upgrading my brakes. I had adapted a 4 piston caliper to the front before (original caliper was a 2-piston ).  One day I saw a Porsche with big'ole brakes, so I thought hmmm "I wonder if I can fit these". The calipers were dirt cheap so I bought them. Next was the rotors.  I looked at various options till I came across the ISF. The Lexus ISF rotors were 14.2" which is perfect for this, and I got them too.

This was the easy part. The hard part was adapting the calipers to the knuckle, which required a bracket. I fabricated one out 4340... and the rest was history... few difficulties along the way, as you'll see below;


The calipers I picked up in red vs the ones on the car (in black)


I ran a quick FEA on a preliminary caliper bracket. Low stress values there, even with stress concentrations. I initially planned to just make it out of mild steel, but I found a good deal on some annealed 4340 so I'm going to use that instead. Holes have a bearing allowable of more than 20,000 pounds..


Made the caliper bracket out of pvc to test-fit. I was satisfied with the fit with a few improvements. Then, I started making the caliper bracket out of 4340... this proved to be a pain to cut into , specially when all i got is an angle grinder and Harbor Freight mini milling machine.
I broke the gear on the milling machine so i'm waiting for parts haha


16 mm drill bit for caliper holes


fixed my mini milling machine  (Harbor Freight). Here's the gear I had to replace... freaking made out of plastic


Finished roughing the caliper bracket. I gotta clean it up and add fillets in the pockets. The OEM knuckle actually has a .010" step in it so I opted to machine that in (kinda bothers me lol)


To position/center the caliper relative to the rotor, there's only a 0.250" gap between the caliper mounts and the steering knuckle mounts. This's why the pockets are machined into the 1/2" 4340 plate.

the Caliper side


The calipers are in need of some TLC


Pulled the hardware off


Restored the color to red for the time being  I'm not a big fan of the color  Will change it later


Finally finished and installed the caliper. These things are massive... Below is the LS400 caliper vs the Brembo caliper.


Fit inside the 18's... Let me know if you have any color suggestion for this combo..


I later changed the color to blueish


For whatever reason, the clearance between the rotor and the tie rod was different from right to left. The clearance on the driver side was only .068" as you can see below.

This was too close for me considering high temperatures and deflection. So I had to think of a way to set the balljoint farther from the rotor.


I also decided to replace the OEM Tie rod with a shorter aftermarket one.


Had to buy  taper reamers for this project... these things are expensive..


Then a Father's Day  present came in time for me to make that tapered stud


Below is the pffset bracket in the middle, and the tapered stud (right) to mount the bracket to the knuckle.


quick mockup


madmax98
madmax98 New Reader
9/20/21 12:05 p.m.
bonylad said:

Well, now...............this is beautiful work!

Thank you sir.


Shavarsh
Shavarsh Reader
9/20/21 1:31 p.m.

Very cool, always fun to see some FEA usage.

madmax98
madmax98 New Reader
9/20/21 10:34 p.m.
Shavarsh said:

Very cool, always fun to see some FEA usage.

Just wait till I get to the serious stuff wink

madmax98
madmax98 New Reader
9/27/21 11:49 a.m.

Condensed Post #3

A compilation of stuff I did the last few months.


Port matching the intake ports on the head. I had to do it while the head was on the engine. Stuffed paper towels in there, then used a powerful vacuum after I was done to make sure nothing made it in the cylinders.


Added an adjustable rod in place of the compressor to support the PS Pump.


Installed the Howe 1.5 Steering Quickener. I don't like this setup. I also found about 2 degrees of play after installation, which I think is a bit dangerous at high speeds. 


Intake leak check... found 4 leaks with this thing, best 50 bucks I ever spent..


made a very preliminary solid model of the car in preparation of what's to come laugh


And.....Bamm    

Took me a month to run a prelim. CFD simulation hahaha. Got a Cd of .31, which is same as published!


I had to do some work on my exhaust, but my lincoln was recently stolen. So i Had to make it work with the fluxcore welder. Problem is it's a AC welder (you want DC)... So I fixed that :)


A look inside revealed what I'm working with 


The rectifier and sink I used


Mounted... I later added a drain resistor to drain the capacitor after I'm done welding.


It had a crappy 8 ga ground cable... So I fixed that lol (below is 8ga vs the 4 ga I installed)


Stock ground clamp vs what I added

AngryCorvair (Forum Supporter)
AngryCorvair (Forum Supporter) MegaDork
9/27/21 12:01 p.m.

What's up with the DC vs AC? I readily admit I know almost nothing about welding or welders.

madmax98
madmax98 New Reader
9/27/21 12:05 p.m.
AngryCorvair (Forum Supporter) said:

What's up with the DC vs AC? I readily admit I know almost nothing about welding or welders.

DC welders produce a much smoother and more stable weld/arc because the current is uni directional (unlike AC). The weld from this crappy welder was 100 times better after I did this simple modification (I don't have a before and after sad )

madmax98
madmax98 New Reader
9/28/21 9:11 a.m.

Last week I decided to improve the hardware on my calipers.

So I got nord washers, better bolts and better nuts. This setup is more resistant to vibration and heat cycling.  Also, the threads of the bolts are not on the shear plane. I had to buy bolts that were too long but had the right shank length, then I cut them shorter. I feel better about that.


I also changed my oil that smelled like gasoline. I guess the car ran rich before I tuned it a few months ago. While I'm at it, I aslo changed the oil filter. The remote mount makes this a breeze.


Out is the old filter.  I want to dissect it to see if it caught anything, can anybody recommend a proven way to do this?

madmax98
madmax98 New Reader
9/28/21 9:58 a.m.

On another front, I started my sunroof delete.


I initially I thought that black trim (where the bolts are inserted) is metal. Upon further inspection, It seemed to be some kind of fibrous plastic composite.


Out went the composite panel and sunroof frame.


The composite panel, alone,  still weighed over 9 pounds, so I decided to do some lightening :)


I was disappointed to see it weigh just under 6 lbs. That was a lot of work ... nasty work.. I was itching for a couple of days (there's probably some fiberglass in there).


Installed


Then comes the hard part: Making a fill panel instead of the heavy glass sunroof. I was kind of torn between a light lexan duplicate, or a carbon panel.  I ended up decided on going the carbon route. To me there's no point of the lexan unless you really can't do without the sunlight shining on top of your head while you drive. In Ca, most people end up using the sunroof shade to block it (at least I did). So... what's the point ?! lol

Anyway... I started to make the mold. In an effort to not damage the original sunroof panel, I wrapped it with vinyl (the kind you wrap food with).


That didn't work out so well because the vinyl did stick enough to the glass. It ended up sticking to masking tape. Additionally, it formed bubbles near creases or edges of the rubber gasket. I tried to remove the rubber gasket but it wasn't a removable part (it was sealed with urethane). 

So I took off the vinyl wrap and waxed the sunroof panel well. I then taped over the rubber part to further protect it from the gelcoat.


Last time I made a mold was making the one for my hood (you can see that HERE). That was quite a project, but it was also over 10 years ago. So I lost a lot of what I learned. I made a few mistakes. First, I didn't buy enough gelcoat. One quart was not enough to achieve proper thickness. So, some areas ended up thinner than others. I didn't have my support fiberglass cut beforehand so I was under the gun a bit. The resin was curing too quickly and the heat wasn't helping. Last, my flanges were not great, so I had to spend a lot of time making sure they hold vacuum.


Any who..

This was me starting to pop the mold a few hours later. That wasn't too difficult, but took about 30 minutes.


Mold out... looks like crap I know... It was a good surface though, with no problems. So that part I'm happy about.


The flanges have to hold vacuum. That struggle I still remember from my first project with the hood. So, I decided to make sure the flanges have a good surface, that's big enough for sealing tape, before going forward.

I taped the area around th flanges and currently in the process of depositing polyster resin all around.


will report back with progress in this project.

Loweguy5 (Forum Supporter)
Loweguy5 (Forum Supporter) Reader
9/28/21 10:14 p.m.

Holy cow I love everything about this!

1 2 3

You'll need to log in to post.

Our Preferred Partners
qOX0C50J7b2wBNFRPUEGAS34VUstG2bvF3mTKCXCLoN9hqd9iVAWfAbW5GWuombk