


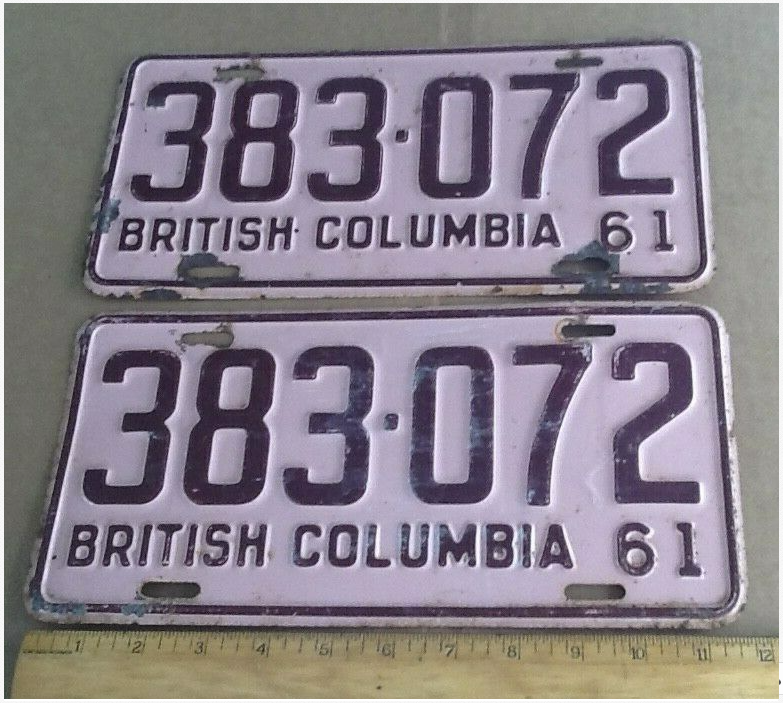
Won these on eBay.
Can't legally run them, but pretty cool nonetheless.

Won these on eBay.
Can't legally run them, but pretty cool nonetheless.

I ran one on the front of my Gladiator (the real one) for years and never got into trouble.
I'm sure if you got Dudley Do-Right you might get a ticket though.
I was thinking I could get a vanity plate with 383 072 on it, that way it -is- the correct plate number, and it -is- a BC plate....

SkinnyG (Forum Supporter) said:I was thinking I could get a vanity plate with 383 072 on it, that way it -is- the correct plate number, and it -is- a BC plate....
brilliant!

Ill put $10 to the lawyer if you get a ticket

Sheet metal is coming along nicely. I like the repurposed trailer fenders for inner wheel wells. I’m curious what you have planned for rust proofing when finished. I also have a suggestion for rust proofing if your interested.
I'm always interested in information.
The inner fenders (and the underside of everything) will be blasted, and epoxy primered, and bedlined, and possibly also undercoated as well.
I'd spray some kind of internal spray for the bits on the inside. Eastwood has a spraybomb of this, plus I have heard of other waxoyl or similar things. Diesel I've heard of.
I don’t know if you have heard of penetrol before but it is an additive for oil based paints that helps promote adhesion and leveling. However it also can be sprayed or brushed on by itself. A few of years ago I started researching different rust sealers/preventers as I’ve removed enough automotive cancer for a lifetime. Anyways a few people online had tried it but they also immediately subjected it to the elements. When I first used it I assumed it would never dry, to my surprise after about 3 days all but the drips had formed a dry to the touch skin. It also soaked into any porous surface(especially rust) near instantly, the same way PB blaster or WD40 would. It is thin enough to be used in garden chemical sprayers, which I use for inside frame rails/unibody structures, rocker panels, doors and any where else that is hard to reach. 2 years ago I used it to seal the start of tin worm on the grand marquis as it was starting to get some loose scale. I wire brushed it to get the loosest scale off then applied penetrol on with a brush and let it sit for about a week before driving. Last fall I did a check up on it and scraped some areas that had been coated the previous year. It was dry, really truly dry, the way rust looks when stored indoors away from any moisture and once more their was no spread whatsoever. Another good thing about it is once dried you can paint over it with oil based paints such as tremclad, rustoleum, velspar, or whatever you prefer. Honestly after using this I don’t think I’ll ever even touch the rust inhibitors/converters again as they usually dry, then crack, and allow moisture to get to the rust. Anyways just my 2 cents. Also how is the paint holding up on the 77 C10? I’ve been contemplating using rustoleum or velspar to paint a project car and was curious as to the UV staibility of oil based stuff. I also see a few oil based clears are on the market now that might help.
The paint on the 77 is holding up reasonably well.
Rust pops through every year, and I just scuff it and roll on some more in the affected areas.
I wash the truck once a year with soap and a green scrubbie - which takes care of any oxidization. It is not a shiny surface, it's dulled from the scrubbie and I'm fine with that.
I would have no problem rolling or spraying Tremclad/Rustoleum again on a car that I didn't really value that much but just wanted a nice 50 footer. I have no complaints or regrets on the Tremclad/roller.
I value this '61 much, much more, so it will be sprayed a urethane enamel. I don't think I can put up with "maintaining" the patina; keeping the rust at bay.
I know I couldn’t. I never really have gotten the appeal of the patina craze although that’s probably because I have had to remove and replace enough panels when patina becomes rot. I think I’ll try the clear coat with my paint job then. I’ve also heard that keeping oil based paints waxed helps with the UV issues but I can’t confirm that yet either. The DuPont Nason line is pretty good for a cheap alternative to the oil based stuff. (Although paint pricing has gotten ridiculous in recent years.)
Cab corners are welded.
Like an idiot, I decided that I should oxy-acetylene weld these in. My reasoning, is that gas welding leaves the most malleable weld, (theoretically) distorts less as you heat the metal up more gradually, and cool it down more gradually. In theory, it is quicker, as you do not need to stack a bunch of beads together, but you can give'er in one pass (once tacked, of course), and you don't have to grind the welds down, and there's a whole lot less shrinkage since there's a whole lot less bead to contract.
At least that's the theory.
The reality was really more of a slow-paced but-whuppin.
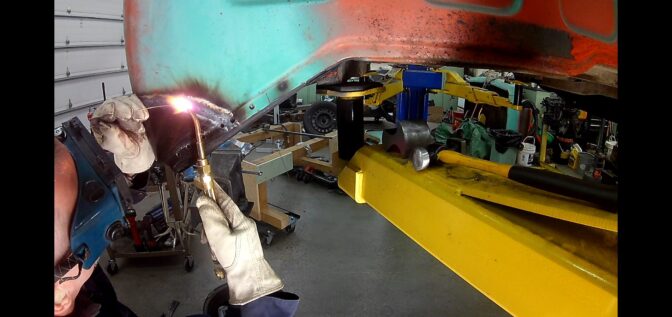
They ain't gorgeous, but they are solid, and they actually ended up fitting relatively well. And yes - there was less shrinkage/distortion.
MIG is so much easier, and while it may be more work, MIG feels more productive.
It also took quite some time to stretch/shrink parts of the cab wall. That was un-fun.
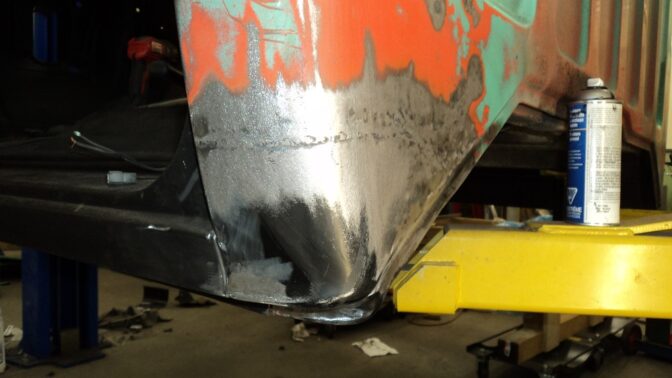
Also filled two antenna holes (shortwave? two way? CB?) that had been caulked and plated many moons ago.
And filled the fuel filler hole. I bent the flange into the opening and planished it flat, then cut a patch from some e-coated offcuts, and gas welded that in. The gas welding certainly is WAY more malleable than MIG.
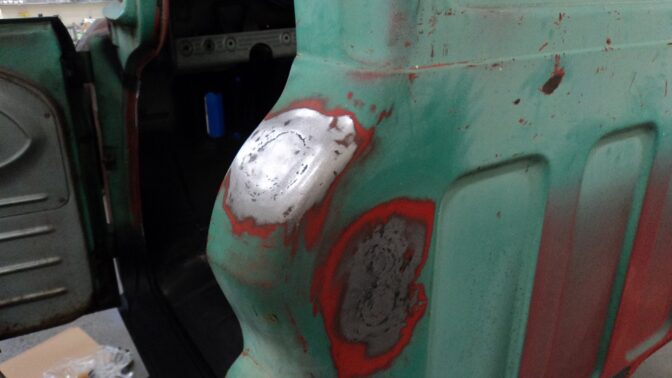
These'll be good enough for a skim of filler. It ain't gonna be master metal craftsmanship. Not yet, anyway.

looking good
Nothing to report today.
Dump run. I was the king of the landfill, pulling my longbed squarebody trailer painted up to match the shorbed squarebody pulling it. Lots of positive comments!
Ran a few errands in town picking up stuff for me (some Princess Auto hubs and sprockets to make a couple different tipping dies) and for school (Evaporust to try and rescue the Doritos in a rusted-solid 12A rotary a kid is going through).
And then the bathroom faucet went for a poop and I just finished replacing that.
Inner and outer door bottoms came in yesterday, so maybe tomorrow.....

Astounding skills. As always, you make it look easy. Do carry on.
Didn't get anything done on the weekend.
Tentatively fitted the driveshaft to see how I need to modify the top of the X, so I can modify the cab to fit.
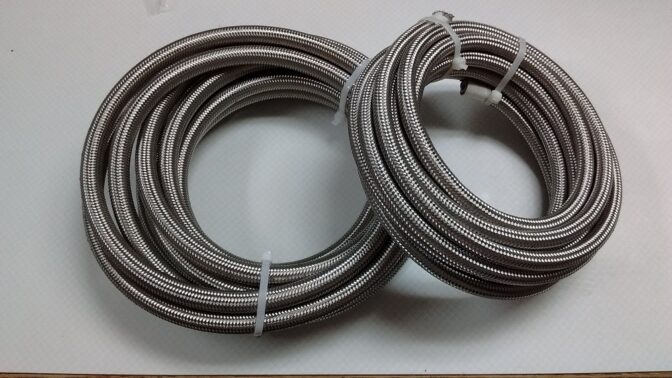
Fuel lines showed up. -8 for fuel feed (yeas, that's half-inch fuel line!), and -6 for return. PTFE to last longer, stink less, and be E85 friendly.
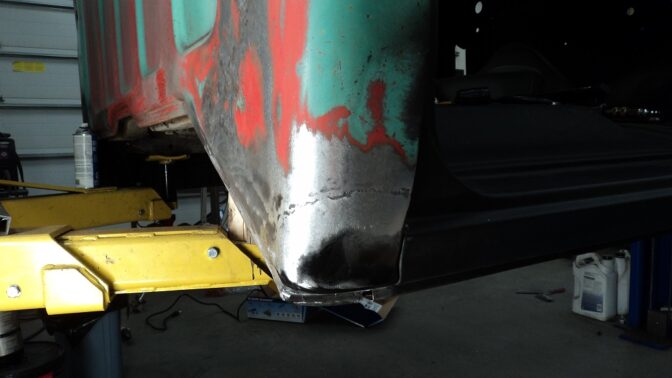
Filled the last rust repair on the cab. Thus endeth cab rust repair.

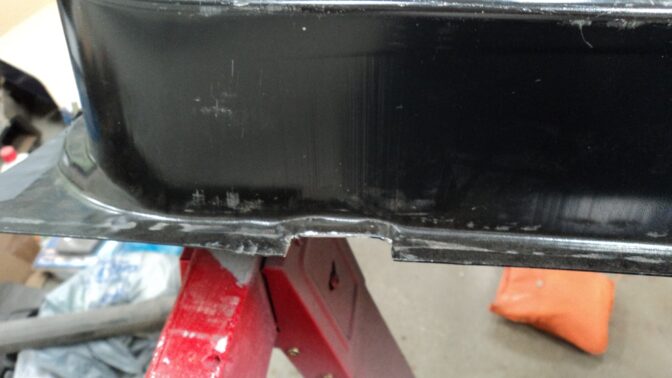
Started in on the door bottoms. Measured, cut, fit, and blasted as far as I could reach on the inside. Ran out of daylight. With the door bottom removed, I could get a dolly in to planish the door-swung-too-far door crease.

The inside of that door doesn't look bad.
There was a lot of surface rust, and I cut higher than most of the pitting. The new skin is 11-1/2" tall. I -could- have cut it lower, but why not remove all the corrosion issues? The door bottom had typical corners rotten, and only the very bottom corners (front, back, rocker side) was soft. This truck honestly is better than most I've seen.
The new bottom inner does not have any drain, so I need to add those.
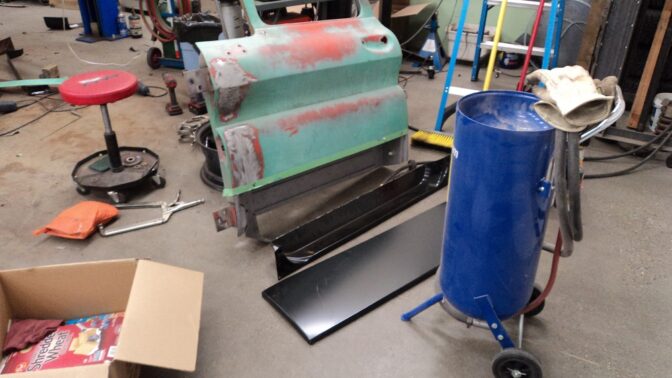
It took HOURS blasting the door, but it felt good; I could see progress. Once I started double-sifting the used crushed glass (sifted it into a bucket, then sifted back into the machine), I had almost zero clogs. Machine works well.
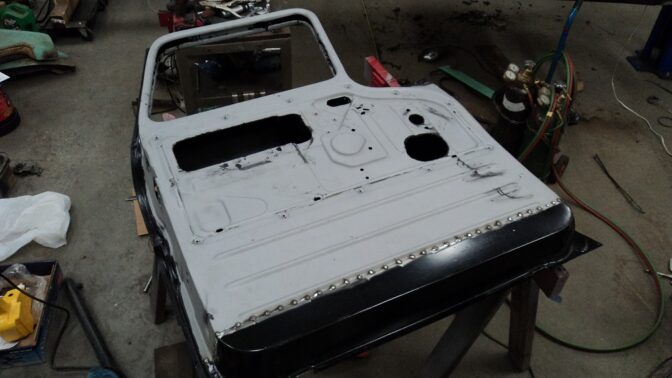
Door bottom is tacked, and two coats of epoxy primer rolled inside.

Also formed some actual drains since the replacement bottoms came with zip.
Nothing to report.
Bottom inner is welded, but then I remembered I had to plug some holes from West Coast Mirrors, which revealed stress cracks, which necessitated a larger patch than just plugging holes. I'm currently planishing the repair, and we'll see if we can get some epoxy down tomorrow.
Repaired torn, bent, and fatigue-cracked West Coast Mirror holes, fitted the bottom door skin, then sprayed epoxy primer on everything in anticipation of final welding some time this week. Before closing it up, I'm going to run some Eastwood Internal Frame Coating through the cavities in the door.
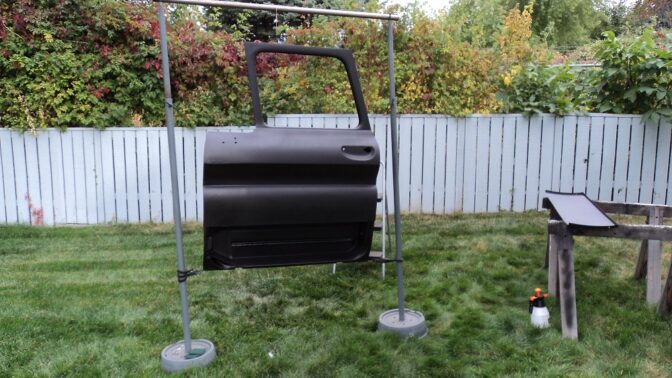
The stand is my "Exhaust Pipe Stands" for doing exhaust, which double as the kids' Badminton net stands.
In cleaning my spray gun, I broke the mounting bolt for the air flow adjusting screw. Turns out it's 5/16-UNF, with a 4.5x0.75mm thread inside. I machined a new one out of a bolt, but I need to get that tap as I don't have one. Should be able to fix it just fine.
I tacked the inner bottom with MIG, but chose to finish weld in Oxy-Acetylene. Much better than my cab-corner experience, but I should not have tacked with MIG, I should have tacked with gas; the MIG tacks were much harder, and did not melt in nicely when I did the gas-weld pass. The end result, though, was minimal distortion for sure, but I made the cut just below the strengthening rib so the rib could act as rigidity (and because the reproduction panel's rib was drunk). Much easier to planish the gas weld than the MIG. Worth it, now that I've done more of it.
Also, I'll share a couple of tools I made.
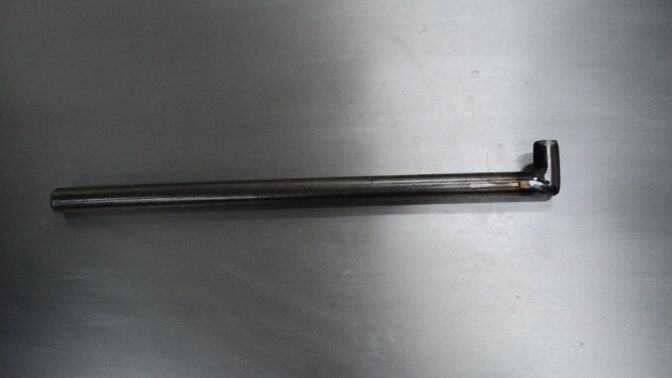
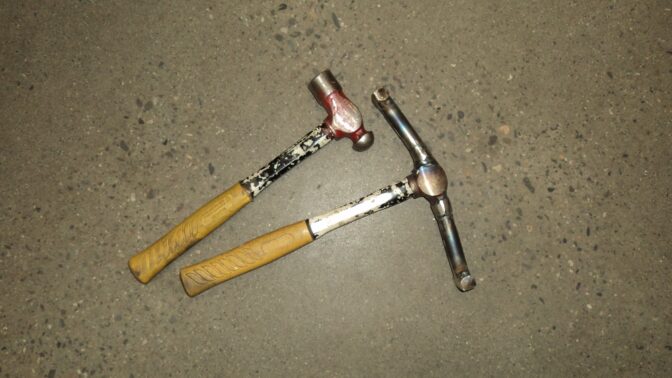
First up, is my Hammer Hammer. Initially about 18" of 3/4" solid round, to help my planish the fuel filler hole patch, when I couldn't get a hammer in there. I used it as a hammer, and I used it as a dolly. Dealing with one of the West Coast Mirror holes, I cut about 1" off the end and welded it 90° to fit inside the window opening, and I hit it with a hammer to push metal out, and I used it as a dolly to hammer metal in.
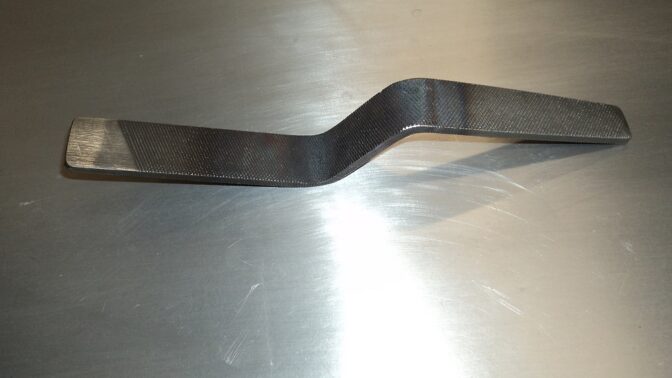
And then I made this one, to pull part of the window felt flange that I buggered fixing the aforementioned hole. This hammer-smacking-flange-putter-back-inator is just 1" flat bar. I welded a tang from a file so I can beat it with a hammer, to pull the wee flange back into place.
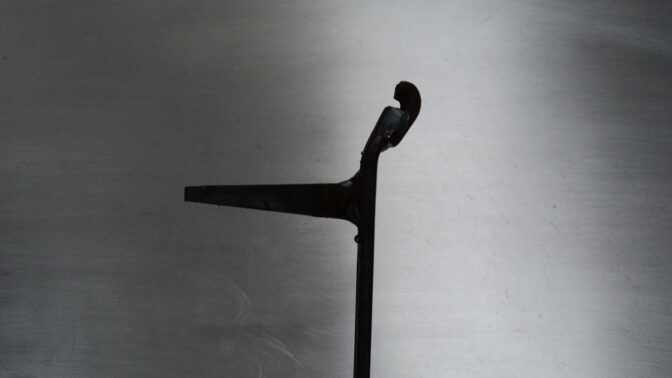
The tang came from this tool, a slapping file, which does a grand job of persuading metal into perfection. Or perfect enough for a skim of filler in my case.
Also fabricated my own door-panel-hammer. Local prices are $75 for one, but I have a stack of old hammers, some 5/8" steel bar, and a welder....
Tell me more on the use of a slapper. I'm aware of their existence, but I've not used one.
It and a dolly are used for planishing. It's very flat, and very large surface area spreads the strike out for a gentler, broader, planish. It also leaves marks from the file teeth to tell you where your high spots are.
This is the video that inspired me to try it. I like it.
You'll need to log in to post.


