


That is a big difference from when I was down there.

That is a big difference from when I was down there.

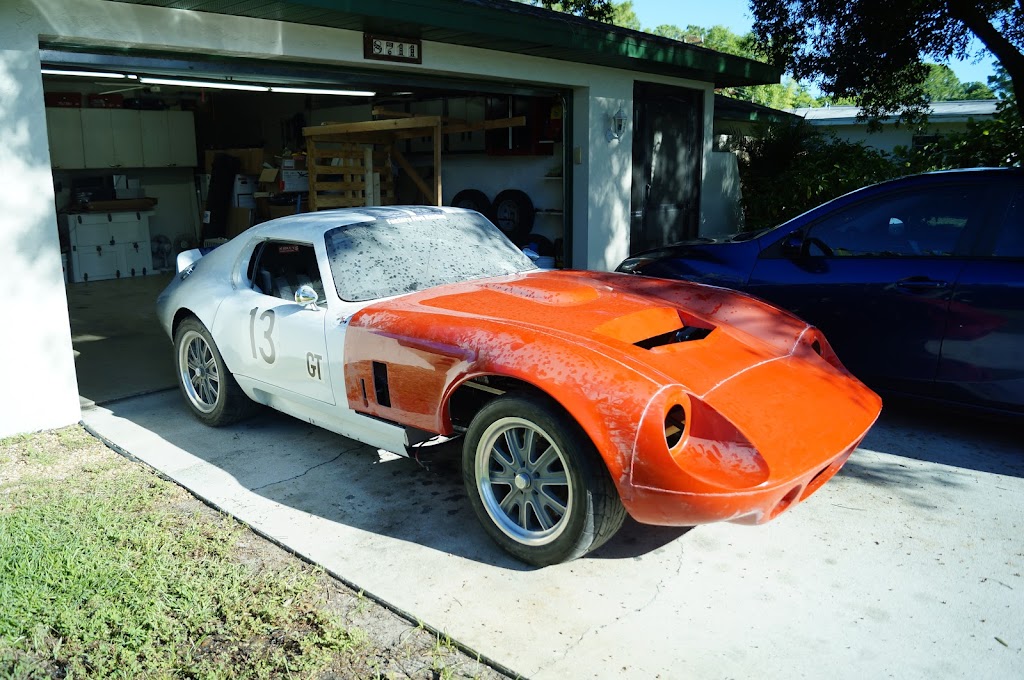
Yeah and the thing is it didn't really take that long to get this far. Just a couple days work really. I was just so busy with the house that come the weekends I didn't feel like sweating all day in the garage.

Ok I feel that you need to do a few button welds on the frame to sleeves as well. That would help tie the sleeves together with the frame for added strength. If the sleeves had been whole and not cut down with a good press fit it might have been ok with just the seam weld. Other than that I'm liking this build so far. I could see using that as a daily in the summer around here no problem at all.
brad131a4 wrote: Ok I feel that you need to do a few button welds on the frame to sleeves as well. That would help tie the sleeves together with the frame for added strength. If the sleeves had been whole and not cut down with a good press fit it might have been ok with just the seam weld. Other than that I'm liking this build so far. I could see using that as a daily in the summer around here no problem at all.
Yeah I was thinking the same thing. I'll probably go back and drill a few holes to weld it like you said. This is mainly just to get it rolling so I can move it. Once I'm in my new place I'll fix all this little stuff.
Got out in the garage today and got the upper braces welded in. Didn't take too long to get those in so I started to throw the front suspension on there in order to get it to a rolling state again. I will disassemble this when I get it back to the new garage, I'm missing a lot of bolts and spacers so I'll need to order all the correct fasteners.


Like I said earlier, this is all just assembled for moving it. Once I have the proper hardware (some of which is on the donor Mustang at my parents house) I'll go back over it all and make sure it's all assembled correctly and to spec.


I was missing an upper ball joint for the passenger side so it'll have to wait till I get that in from Amazon.

Since I am still waiting on the ball joint to show up I went ahead and got the hood prepped for installation. It will be nice to not have it taking up half the garage anymore. ![]()
I had to cut and re-weld the flat parts to allow for the contour of the nose, and sit more flush on the fog light holes.


I took a couple of the 2x4's out of the shipping crate and then slid the hood forward. From there I man handled it up onto the car.

Then I had something resembling a car!

I'll need to do a lot of trimming for this hood to fit right.


Awesome project!!

Before you trim that hood, are the wheels centered in the wheel wells? Just making sure that hood is mounted far enough forward before you trim. I'm kinda surprised it's that far off. Does all the kits they make need that much bodywork? Great project!

Dog looks less than impressed.
Me on the other hand ![]()

I sure hope the front wasn't attached too short. That would suck.
4Msfam wrote: Before you trim that hood, are the wheels centered in the wheel wells? Just making sure that hood is mounted far enough forward before you trim. I'm kinda surprised it's that far off. Does all the kits they make need that much bodywork? Great project!
Yeah I'm waiting till I get the wheels on and it on the ground before trimming. I sat here looking at the pics thinking maybe the frame is about an inch to short where I cut it, but the motor mounts line up and the cross brace up front is the same distance as the old one. The other thing is if I move the hood forward to make it line up, then the holes for the hood latches on the side don't line up with the latch strikers and the wheel arch on the hood doesn't line up with lower body panel.
Once I get the wheels on I'll know for sure where the issue lies.

It's fiberglass, Trim to fit does NOT surprise me. Easier to make it fit by cutting than adding length. They might trim them to a template at FF but when you are fixing a car it's best to give you a bit more so you can get it to work with your changed body.

Daytona coupes are gorgeous, a worthy project here man.

Tangential question, but do you know when it hit the wall at Roebling Road? I've lived nearby for 12 years and I'm out there frequently, but didn't know about this one.
Mad_Ratel wrote: It's fiberglass, Trim to fit does NOT surprise me. Easier to make it fit by cutting than adding length. They might trim them to a template at FF but when you are fixing a car it's best to give you a bit more so you can get it to work with your changed body.
Yeah my guess is that since every body is different that they make, they then trim the hood excess to fit that car. Since this is a replacement hood, they left all the excess on it so i can trim to fit my body.
I got the passenger side ball joint on and made a wooden steering rack out of 2x4's to keep the wheels pointed in the same direction when I roll it around. The steering rack is still in the donor mustang which is now at my parents house till I get moved.
Looks like I got the frame measurements right, the wheels seem to be in the correct place. The car even rolled out on 4 wheels for the first time in probably 3 years.
And being Florida, as soon as I pulled it out, it started to rain. So I rolled it back inside and started getting the rear glass hatch in. I sprang for this upgrade over the plexi unit to make it a little bit nicer place out on the street.
You can see here the old hinges got sheered off in the wreck.

I removed the old bolts, and bushings from the cage.

This bushing gave me some trouble but I finally got it free. The new hinges came with a different bushing.

I then assembled the hinges so I could get the glass installed and adjust the hinges.

Next up was installing the latch after adjusting the hinges and trimming even more of the body after I tried opening the hatch it only opened about halfway.
The latch came with some longer screws for installing it in the glass instead of the plexi, but they turned out to be too long and also the flathead style is pretty crappy. I dug through my screw bucket and found some t25 torx screws from the SAAB I parted out a while back which fit perfectly.


A little adjustment of the latch striker on the body and I that job is done. I'll need to redo the weatherstrip after I paint it down the road.

I also got the side windows mounted in the doors so it's now ready for transport.

So, did the original upper control arms get damaged? If so, did you scrap them yet?

t25torx wrote: I dug through my screw bucket and found some t25 torx screws from the SAAB I parted out a while back which fit perfectly.
it was destiny.
Dusterbd13 wrote: So, did the original upper control arms get damaged? If so, did you scrap them yet?
The passenger side arm got destroyed, the drivers side was fine, so it got reused. I found a guy selling a set of used upper and lower arms on the FFR forums and bought those for it. So now I have 2 extra upper arms and 1 extra lower arm.
Do you still have the trashed arm? It looks pretty close to what I'm engineering in my head for my pro-touring duster.

Cool project. What's the latest on this one?

Very cool project, glad it was bumped to the top. I've always loved these too. I hadn't seen a picture of sleeve welding so that was informative as well.
Cheers!

Any updates!?!?

t25torx, I don't know bro, I'd have a very hard time parting with this once it's all said and DONE! ![]()

In reply to RossD:

Whatever happened with this one? This is one of my favorite projects on here.
You'll need to log in to post.


