4 5 6 7 8
volvoclearinghouse
volvoclearinghouse PowerDork
10/25/19 9:41 a.m.

In reply to NOHOME & TurnerX19 :

I plan on relocating the engine, and not mounting it off the subframe anymore.  So that problem becomes moot.

On our LeMons 122, which was a very similar chassis, we cut the rear springs like 3 inches and never had a problem with driveline rubbing.  Plus, since the engine's moving, there will be some tunnel "adjustments" that happen, anyway.  

tuna55 clued me into the QA1 catalogue, going to measure up my ball joints tonight and see if there's anything available off the shelf that might give me some improvement.  Agreed, 1/2" of raise on the lower joint shouldn't present too much of a concern from a failure perspective.  

tester
tester New Reader
10/25/19 10:54 a.m.

In reply to volvoclearinghouse :

You can always use half measures. A longer lower ball joint and slight relocation of the upper arm might get you where you want to go without tons of work. If the ball joint angle gets too radical, a wedge plate can be used to move it back in a good range of motion. 
 

Of course,  Arning, Miles, and Shelby all a approve of the upper arm move:-)
 

McCall 


volvoclearinghouse
volvoclearinghouse PowerDork
10/25/19 5:08 p.m.

In reply to tester :

Agreed. A few incremental changes shouldn't be enough to radically upset any one aspect of the suspension tuning, but cumulatively they should get the system where we want it.

volvoclearinghouse
volvoclearinghouse PowerDork
10/28/19 6:21 a.m.

As I was shedbuilding most of the weekend, I didn't get too much garagetime.  Last night was the bulk of the progress, which consisted of more disassembly of the front suspension.  Here's the lower ball joint, completely isolated:


And the LCA where it bolts onto:

I also took some measurements of the ball joint, and determined it has 1/2-20 thread.

Still need to calculate the taper; it looks like something around 1:10, which doesn't correspond to anything on the ball joint purveyor's website, but perhaps my measurements were off a little.  Anyway, there's something to work with.  Unfortunately, the ball joint doesn't seem to be able to press out of the V-shaped bracket, at least not in any way I can figure out.  So if I were to go with a different lower ball joint, it would have to be a custom fab job.  

A closer look at the spindle, stripped down to just the spindle and caliper mounting plate:

Incidentally, and a bit off the suspension topic, I had an old Volvo 240 rotor and caliper kicking around, and decided to mock up the brake fitment.  The rotor fir onto the hub perfectly, and even the little holes for the retainer screws lined up exactly.  Here's the two rotors, for comparison:

Unfortunately, the bracket for the 1800ES caliper won't work with the 240 caliper; the offset is different (probably because, as you can see above, the hat distance of the 240 caliper is smaller).  The good news is, a new caliper bracket should be pretty easy to fabricate; the bad news is, a new caliper bracket will need to be fabricated.  So, since that has to happen _anyway_, there's not really any reason we _have_ to use the 240 caliper.  

So, in summary, the 240 rotor looks great, the caliper options are (at this point) unlimited, and the lower ball joint situation looks somewhat complicated.


volvoclearinghouse
volvoclearinghouse PowerDork
10/28/19 6:34 a.m.

From this screenshot:

It looks like the ball joint in the ES is most similar to the bottom one on the list.  See that major diameter at the base of the taper- 0.635?  Doesn't seem to be any other ball joints listed with that major diameter and a 1.5:12 taper (which is pretty close to what I measured).  So no leads here.  And all the press-in style ball joints have larger major diameters, so they won't work.  

TurnerX19
TurnerX19 Dork
10/28/19 8:13 a.m.

I can confirm that the ball joint does not press out of the bracket. Just buy new Volvo ball joints and re-use the lower arms you already have. If possible avoid Quinton Hazell brand on the ball joint, but that might be all that is available now. I have not bought a 122 ball joint in 35 yearssurprise, but the Q-H ones were lower quality then.

volvoclearinghouse
volvoclearinghouse PowerDork
10/28/19 8:47 a.m.

In reply to TurnerX19 :

I know I have some Ball Joints "in stock"; I used to daily drive an Amazon and kept a good supply of spares on hand to avoid waiting on parts when I needed them.  Not sure what brand they are.  

Nice thing about these cars is an entire front suspension rebuild is like $200 in parts.  

volvoclearinghouse
volvoclearinghouse PowerDork
10/29/19 6:10 a.m.

Not to get too distracted by silly things like brakes and stopping, I refocused last night on the plan for the front suspension.  Thoughts had been rolling around in my head about relocating the LCA hard point, but that then led to relocating the lower spring mount, and possibly altering the LCA ratio in an undesirable way.  So, in the end, it looks like lowering the UCA mount is the "low-hanging fruit"; we'll do that and call it a day.  

But...

What if we relocate both the UCA and LCA and spring and shock mount...outboard...to gain some additional track, without altering their relationship to each other (aside from the aforementioned lowering of the top mount)...?

Sharpie and Straightedge Time:

...all the way round...

Hold breath, initiate cutting sequence in 3....2....1....

A 1" channel to drop the subframe looks about right, and another 2" inboard to move the suspension hard points, and thus, the hub, brakes, spring, shock, and wheel outboard. 

Paging Mr. Lincoln, Mr. Lincoln to the red courtesy phone.  

Ian F
Ian F MegaDork
10/29/19 6:36 a.m.

A bold move.  I assume the plan is to slpit the cross member under the engine in half and then figure out filler needs once the two outer parts are bolted to the car?

On the plus side, this should help with engine clearance quite a bit.

volvoclearinghouse
volvoclearinghouse PowerDork
10/29/19 6:46 a.m.

In reply to Ian F :

Exactly, on all counts.  

I was just sketching this out for a co-worker of mine on my white board.  I got all done, and finished with, "So, this should give me a nice drop, and an increase in track.  And do you know what that means?"  

"Flares?", he said, through a smile.  

NOHOME
NOHOME MegaDork
10/29/19 6:58 a.m.

If you flare the fenders I will be curious what it looks like. When faced with the possibility that I might have to do so to accommodate the Miata track, I was not liking any of the mental images that presented. 


Pete

TurnerX19
TurnerX19 Dork
10/29/19 7:05 a.m.

The flared 1800s I have seen all looked wrong in some way.sad

volvoclearinghouse
volvoclearinghouse PowerDork
10/29/19 7:09 a.m.

Well, I guess you'll have to stay tuned to see how this one turns out now, won't you?  devil

Are there any 1800ES out there running flares?

Ian F
Ian F MegaDork
10/29/19 7:16 a.m.

I've seen one.  It was a race car, so the flares looked very.... functional. Basically E30 M3 style where the made a horizontal cut above the wheel and added maybe 2" to push the fenders out.  It kinda looks like poo on an otherwise rounded body style.

The only way I'd consider flares is the way Keith added them to his MGB GT using early Rabbit flares.  I think they netted him about 1.5" on each side.  

volvoclearinghouse
volvoclearinghouse PowerDork
10/29/19 7:29 a.m.
Ian F said:

I've seen one.  It was a race car, so the flares looked very.... functional. Basically E30 M3 style where the made a horizontal cut above the wheel and added maybe 2" to push the fenders out.

The only way I'd consider flares is the way Keith added them to his MGB GT using early Rabbit flares.  I think they netted him about 1.5" on each side.  

Yeah, box flares on a car as swoopy as an 1800 would look....well, functional, as you said.  I don't plan to go that route.  

The white board this morning...

volvoclearinghouse
volvoclearinghouse PowerDork
10/29/19 11:00 a.m.

Lunchtime steel procured.  Scrap piece from a local machine shop.  I asked how much, he said, "free".  I tried to put dollars into his hand, he refused.  

volvoclearinghouse
volvoclearinghouse PowerDork
10/31/19 6:54 a.m.

Tuesday night was Trick or Treating (we have some friends up in Hanover, PA where we go, and the entire town of Hanover has decided that the Tuesday before Halloween shall be the day that everyone Tricks or Treats, from 6PM until 8PM.  It's a Pennsylvania thing....just like how half the houses give out little foil bags of Utz pretzels or cheezy pops..but anyway, I digress)

Where was I?

Oh yeah,  so no garage work Tuesday, as the kids were busy contributing to early-onset diabetes.  Last night the last game of the World Series was on, and it was pouring rain.  I asked Mrs. VCH if she wanted me to turn the game on.  "Nope".  OK, I'l be out in the garage.  

In the time since I'd last worked on this project, a possible issue occurred to me.  Moving the UCA pick up point outward could run afoul of the frame.  Last night I confirmed this.

There's about an inch or so of clearance now.  

And, since lowering the UCA pick up point will necessitate moving it inboard, call it maybe 1.5" of clearance.  So, I decided the track shall be increased 3" total.  This will be a nice little bump, shouldn't require additional surgery on the frame rails, and won't necessitate giant ugly flares.  

Measure out some of the nice virgin plate.

And cut....

WTF is going on with my plasma?  Even cranked up all the way, I'm only getting maybe 1/16" of penetration through the 1/8" sheet.  I'd replaced the tip and other consumables, the air pressure was right, what in the world is going on?  Frustrated, but undaunted, I grabbed the angle grinder to make the rest of the cuts.  I need to email Eastwood today and figure out what's up with my VersaCut.

Cut out a bunch of metal, pieced it together and started welding it.  As you can see, I aso notched out the perch area so I can drop the UCA mounting point even further.  

Need to clean up the welding, and finish attaching the frame mounting bracket in it's new location.  

Happy Halloween!

NOHOME
NOHOME MegaDork
10/31/19 7:19 a.m.

Your new front track will end up at 54.7"


The Molvo ended up with a 55.5" front track from the Miata. I don't run flares but I do run a 48 mm offset wheel from a Mini and cant go much if any wider, I rolled the fender lips on the back.


How wide of a wheel are you planning to put on the car?


Pete

volvoclearinghouse
volvoclearinghouse PowerDork
10/31/19 8:04 a.m.

In reply to NOHOME :

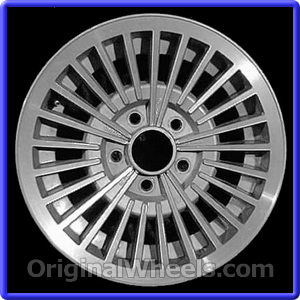
I have a set of these I plan to run:

Image result for volvo 240 wheels

On the back the plan is simply to run spacers.  We've had good luck with bolt-on types.  

NOHOME
NOHOME MegaDork
10/31/19 10:14 a.m.

Good chance you will not need to flare the arches. Do you know the offset?

I like the wheels.


Pete

volvoclearinghouse
volvoclearinghouse PowerDork
10/31/19 11:36 a.m.

In reply to NOHOME :

Not off the top of my head, but they're OEM 15" Volvo 240 wheels.  A buddy of mine found them at a junkyard, $200 for the 4 of them.  

volvoclearinghouse
volvoclearinghouse PowerDork
10/31/19 11:39 a.m.

Oops, wrong wheel.  You can see one of the actual wheels in the upper left corner of this pic:


Ian F
Ian F MegaDork
10/31/19 11:40 a.m.

240 wheels have a similar offset to the 1800 wheels.  About +20.  My guess is you probably will need to run a small flare to clear those wheels.  A FWD offset wheel like the MINI will likely not clear the front suspension when turning.

volvoclearinghouse
volvoclearinghouse PowerDork
11/5/19 6:14 a.m.

Despite the lack of updates, I have been poking along on the front suspension.  Daylight saving time threw our family off for a few days (as it turns out, toddlers do not care what time the government says it is).  And the last car show of the season was held at the local mall.  I took Plymford; Mrs. VCH took her Camaro, and we had a fine time.  Even the kiddos seemed to enjoy themselves.  

I realized last night that I may have done some work slightly out of order, and need to correct for this.  The side of the front crossmember I've been modifying is the same side that has the extensive rust damage on the frame.  I had now gone and cut up the side of the member that I needed to use as a template for the repair of the frame rail.  

As luck would have it, though, I have another 1800 front crossmember, though it's still encumbered by all the rest of the suspension bits.  I guess I'll have to strip it down so I can use it to line up when I fix the frame ugliness.  *sigh*

I've also decided to abstain from gluing on any of the crossmember mounting points until I have everything sliced up.  I plan to bolt them to the car, then raise the crossmember up (in two pieces, probably tacked together loosely with some metal because, recall, the track is getting en-widened) and then, hopefully, weld it together.  Or, more likely, discover how far off my fabrications were and have to redo everything.  

Thankfuly, there will be shims.

My plasma cutter is still not working right, so last night I angle-ground and dremeled my way to more progress, this time on the driver's side.

The spring pocket side on this side had some corrosion, so I cut that out.  

We'll have to fab up some plate to fill this void.

volvoclearinghouse
volvoclearinghouse PowerDork
11/6/19 7:00 a.m.

That thought that I needed to mate the crossmember up to the frame rails of the ES eventually got lodged into my brain somewhere annoying, so last night's activities were marked with my ping-ponging back to the corrosion on the front passenger side unibody.  

*DIGRESSION WARNING*  I've bought a lot of volvos in my day.  Many years ago I bid on, and won, a 1965 122S in Richmond, VA.  The final, winning bid?  $0.01.  This would have been the perfect LeMons car, had I known about the whole LeMons thing back then.  As it was, it cost me $60 in gas and tow dolly rental (I bought my first flat bed a few years later; got sick of giving $50 to UHaul every time my gaze fell upon another non-functional piece of Swedish pig-iron) to get it home, and it had no engine, brakes, or interior.  But, it did sport a very fancy driver's door:

In January, 2007 the City of Baltimore (where I lived at the time), apparently tipped off by a neighbor who was probably pissed-off that I hadn't invited him to my New Year's Eve Party, cited me for having unlicensed cars on my property.  In the mad rush to title, register, and/or move enough metal to comply with code (which ultimately resulted in my stuffing 5 cars into my garage when the inspector came to give me the gold star of compliance) I ended up cutting up the '65 that belonged to this door.  It was sad, but besides being engine-less, brake-less, and interior-less, the car was also title-less, and had some pretty bad metal cancer eating up the floor.  Milwaukee still makes a decent Sawzall, and within a half-hour I was $100 richer from the pile of scrap metal.  And the world was one Amazon poorer.  

I did save that door, though.  And a bunch of other parts, some of them sheetmetal.  That '65 will always live on in my mind as "The Penny Volvo". 

*END DIGRESSION*

From the Penny Volvo I had saved, besides the door, some pretty decent front inner fender sections.  As it turns out, these are pretty much interchangeable with those sections on the 1800.  And so I hauled this out of the barn last night:

The offending rusty bits on the ES (in front of the suspension hump)

With my plasma cutter back on line, I figured out where the frame was to be diced and spliced, marked it out, and started making sparks.

The old bit cut out, next to the 122 donor:

And what's left on the ES currently:

Tonight the plan will be to extract a similarly-sized chunk from the 122 donor tin and start tacking it in place.  Stay tuned...E36 M3's getting real.  laugh

4 5 6 7 8

You'll need to log in to post.

Our Preferred Partners
8p4GK9BIzTaA40qWKavNqn77jYybH5ZLGgiq1O6uGCFgT5EY9losioa4xnARLCLw