3 4 5 6 7
teamilluminata
teamilluminata HalfDork
10/10/19 10:42 a.m.

We finally have a center console!

The saga of the OE center console is over! This piece took a very convoluted path to get to us from Germany but it arrived via (Friend returning from a trip to England) courier and couldn’t wait to install itself under the dash.


This is the same piece used by most if not all the works cars and comes off lower spec cars not sold in the USA. We could have chopped off the lower half of the UR’s console but we really didn’t want to ruin one and it would never have looked so tidy.

The upper bay will house the OE heater controls, if we can find them again, while the lower bay is still up for grabs. We could install the OE cubby for storage, which would be useful as we’ve lost our glove box, but it might end up being home to the brake bias knob and USB ports. As a bonus, it does come with an accessory socket so there’s that!

teamilluminata
teamilluminata HalfDork
10/24/19 9:34 a.m.

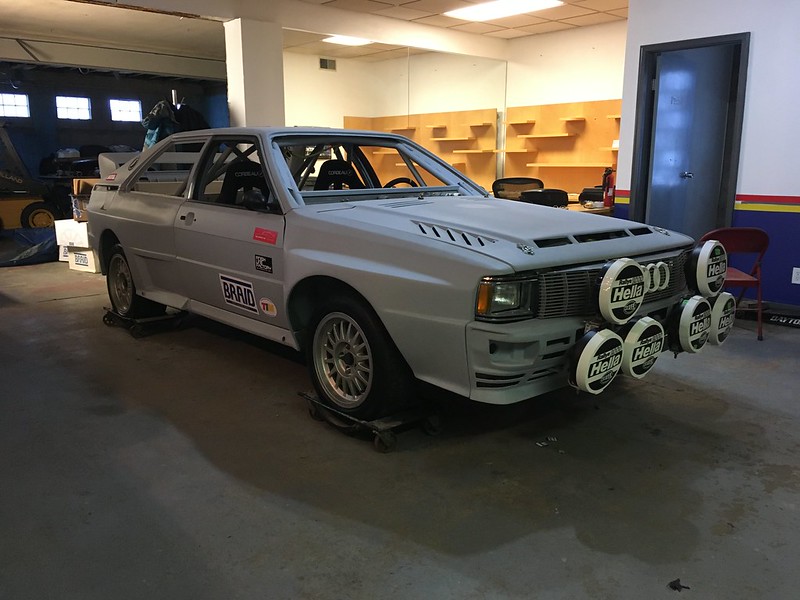
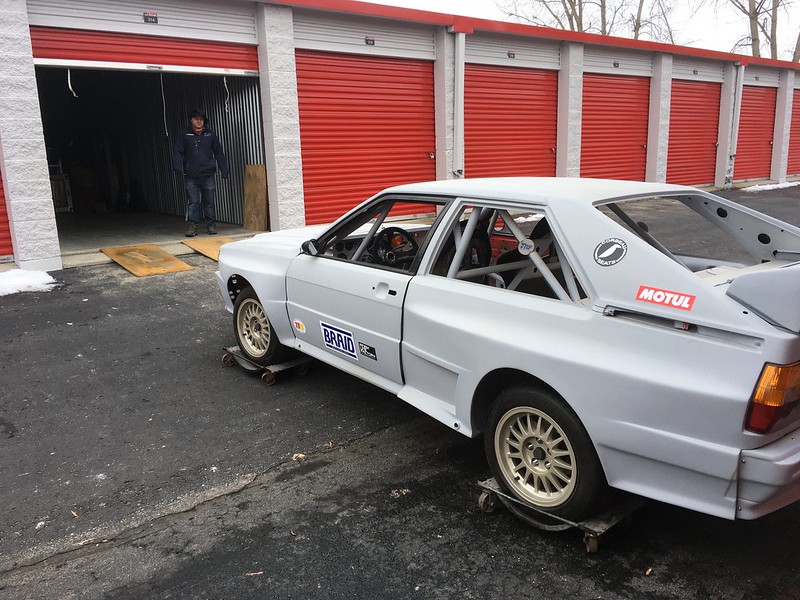
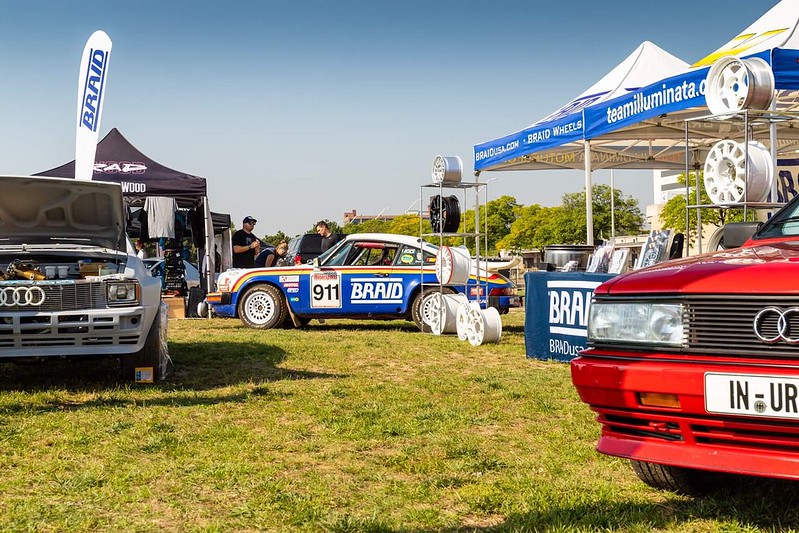
Proper Gravel Rally Wheels!

We ordered more BRAID wheels for the car. This is the third set! We sold the first set including the tires. We have a problem. We justified this set of gravel wheels by ordering them double drilled so we can also use them on our 911 rally car. That car now has five sets of wheels yet only does about 300 miles a year. Did we mention we have a problem? Anyway, we think they look really cool.

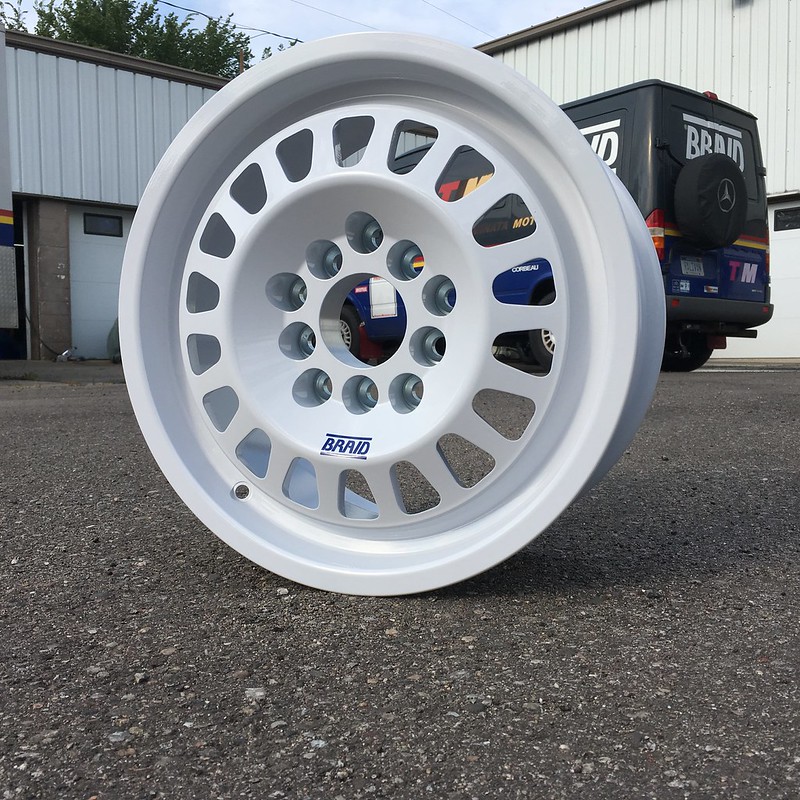
Even though they are ET20 they still sit pathetically inboard of the wide body fenders; as they should. LOL

These are a classic BRAID gravel wheel in 15x7. Let’s hope these MRF rally tires don’t age out before we finish the car!

teamilluminata
teamilluminata HalfDork
11/7/19 8:54 a.m.

THE ROAD TO RADWOOD - Part 1

“The best laid schemes o' mice an' men………..” Robbie burns said that, way before Quattros were invented. Still applies today.

When we left you we had just installed our center console and were about to start working on installing brake lines before we put the engine in. Well that plan got blown up as the car got invited to Radwood Detroit, the car show for 80s and 90s stuff. So our first thought was “Nah, It’s not finished” but then someone suggested that if we got it on its wheels and put the engine in it would still be cool and people would love to see it. So that’s what we did, or tried to.

So this was our starting point, with the engine on a stand and just shoved into the engine bay and the car still on the wooden build table.


We didn’t have a plan for getting it off the table but thought it would be a dam site easier if the engine was still out of it. But first we had to prep a few things. Chiefly bolting the front tie rods onto the uprights. We hadn’t sourced nuts yet but realized some lug nuts of the correct thread would do for now:


And that we’d also need a steering wheel in order to manipulate it around.


We temporarily installed the rear firewall (again):


And rigged up the door strike pins so the doors would stay closed:


We also bolted down the Corbeau seats as best we could. Some adjustments will be necessary before final assembly:


Next time we'll mount the engine and transmission together and get it bolted to the chassis.

teamilluminata
teamilluminata HalfDork
11/21/19 8:07 a.m.

THE ROAD TO RADWOOD - Part 2

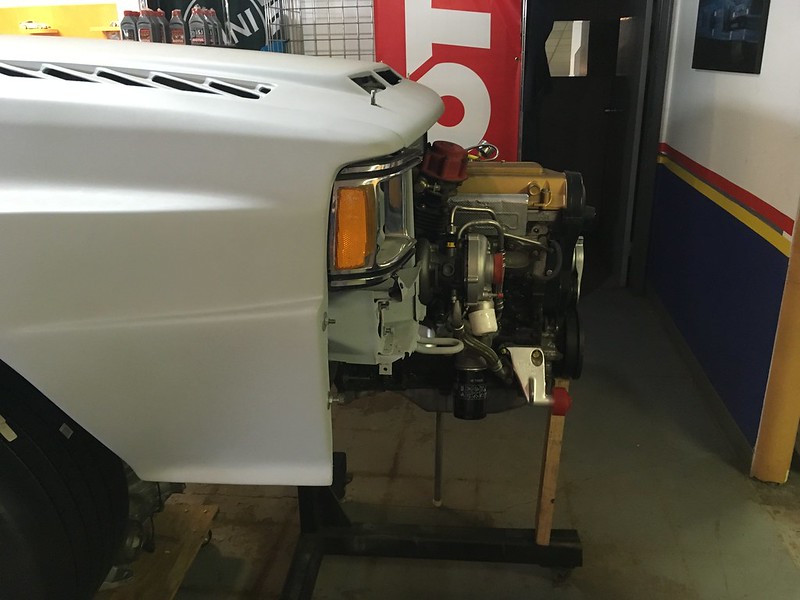
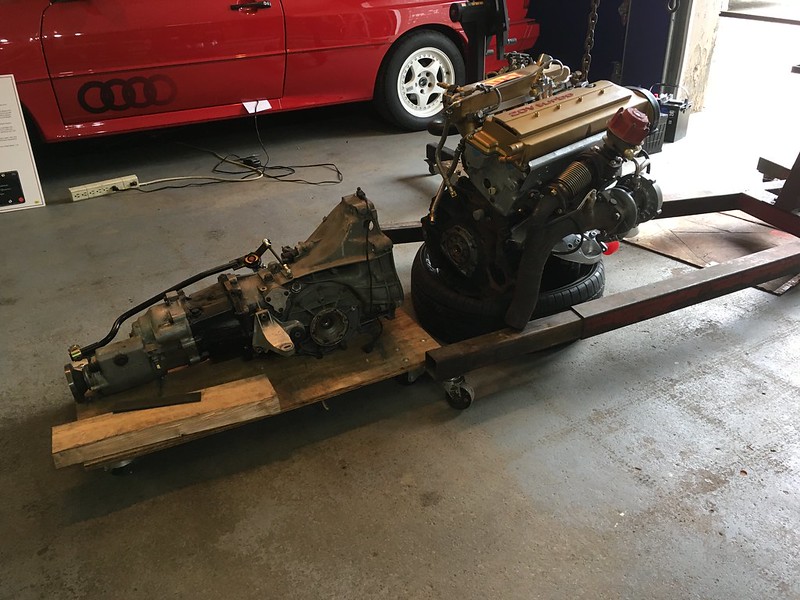
We thought we should mount the transmission as well as the engine only has two engine mounts. We figured the whole package would be much more stable mounted together. We don’t yet have a flywheel or a clutch but neither of those are necessary just to bolt the two lumps together.

We recently sourced some pin stands from Motamec in England so our plan was to lower the car onto these initially as that would only mean dropping it a few inches. Plus, the screw jacks we planned to use at one end of the car were to long to allow the wheels to reach the ground in one go so it would have to be a two-step process anyway.

So our plan was to lift the rear using screw jacks on the subframe, as far apart as possible and the front using our engine stand. Once we could slide the table away we would incrementally lower each end of the car onto the pin stands then off those using our high lift jack. This is how it went:

That’s the first time the car has been on the ground in about fifteen years!

Now the easy bit, throw the engine in and put it in the trailer. How hard could that be with no front on the car:

But wait, what? Who knew the AAN engine brackets wouldn’t line up with the Quattro engine mounts? Oops.

A quick swap to the 10 valve units and we were back in business:

But what’s this? Now the hood won’t close!

Will we make it to Radwood after all? You’ll have to wait to find out.

teamilluminata
teamilluminata HalfDork
12/10/19 10:10 a.m.

We Made it to Radwood!

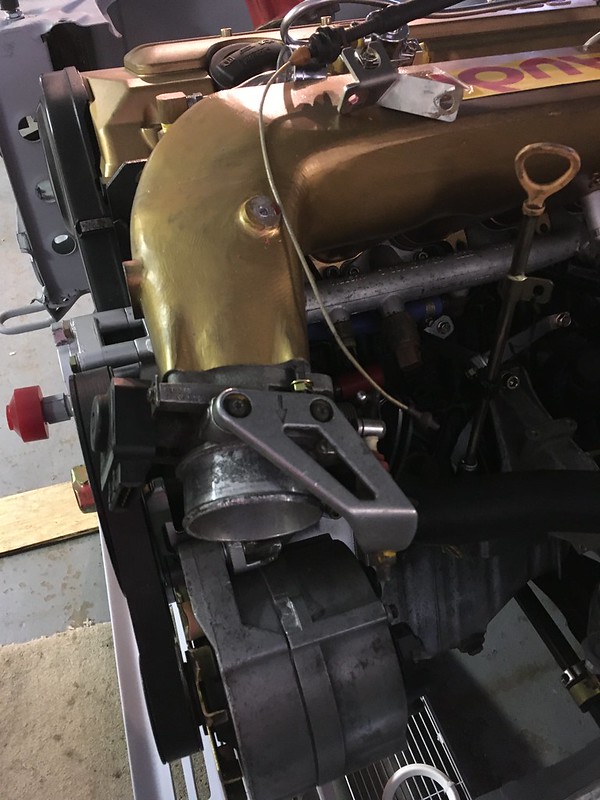
It turns out this super easy, bolt on aftermarket intake manifold just keeps giving……………us problems. Now the engine is in the hood hits the throttle body, even after we built a custom adapter to stop it hitting the alternator! Well, we soon realised we didn’t need a throttle body to push the car into the trailer so we took it off and adjusted the hood pins so it at least could be locked down. We’ll figure that out later.

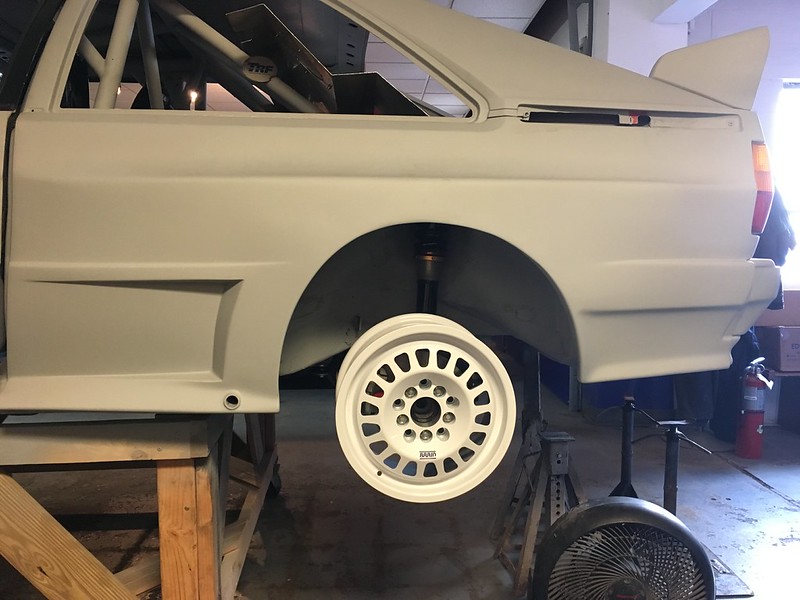
So we pushed the car into the light of day. The first time it has rolled on wheels for fifteen years or so. It was during this process that we realised an eyeball alignment is not really accurate and properly aligned wheels make pushing so much easier! It wasn’t bad in a straight line but with the slightest amount of steering lock and it became very difficult. Still it looks pretty good in the day light.

And In. Yes, we used the trailer winch.

The car was very well received at Radwood and look resplendent parked alongside  its stable mates.

We must admit, getting the car in the public eye inspired us to push harder to get it finished. We might even have a deadline now!
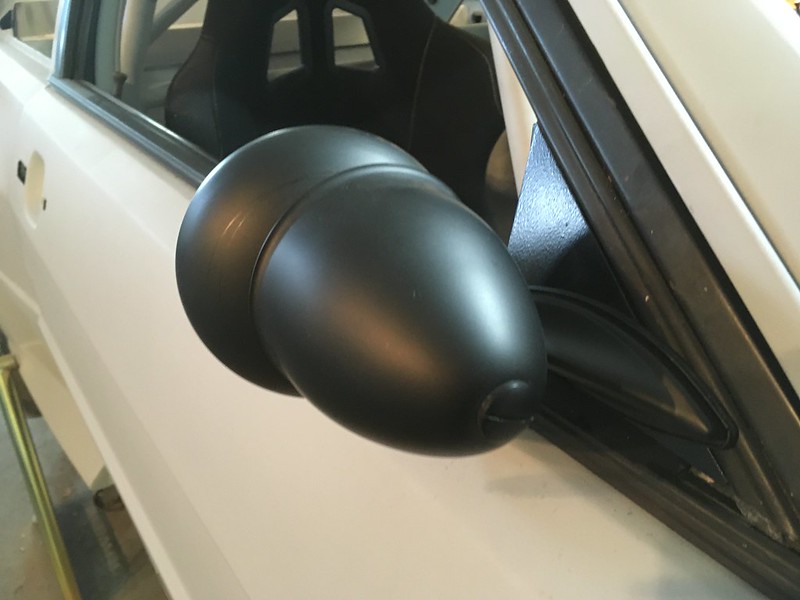
teamilluminata
teamilluminata HalfDork
1/30/20 10:22 a.m.

HOOD CLEARANCE

Back from Radwood we were inspired to get the car finished for next year. Not the least because we realized that 2020 is the 40th anniversary of the Quattro as it debuted at the Geneva Motorshow on March 1st, 1980. We don’t think we can get it ready for March but certainly having it done sometime in 2020 seems a worthy tribute. So lets get cracking!

First we have to get the hood to close. It turns out the strengthening ribs on our fiber glass hood are about twice as deep as the stock hood’s. That and the fact that this engine was never meant to go in this body are hopefully why there is interference. We hope so because we decided to cut a big hole in the hood!


And then make it even bigger!


It fits now and is almost smiling.

teamilluminata
teamilluminata HalfDork
2/27/20 9:49 a.m.

MIRRORS

It’s nice to conquer the big projects like intercoolers and radiators but sometimes those plans get stalled due to parts availability or even just the magnitude of them. Then it can also be nice and quite gratifying to check off a small project, even something as seemingly trivial as door mirrors.

Yes, we installed the door mirrors. But first we had to track some down and then decide where to put them. These cars in period were never quite the same as one another but they all seemed to share a common mirror, the now ridiculously expensive, for a mirror, Talbot bullet-shaped classic:


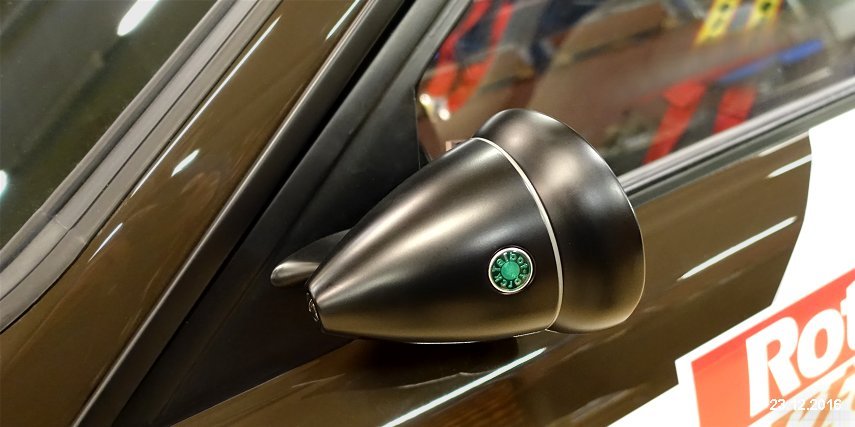
Price for new ones are over $300 each but, of course, something this easy to copy has been replicated by many and we found a set of knock offs in in England for just $65 .


Next massive decision: where to mount them? Some cars had them mounted to the doors in period, including the Rothmans cars after which ours is modelled. Others had them on the triangular part at the bottom of the window frames where the road car mirrors were.


Both locations position the actual glass in more or less the same place so functionally there is little to be gained with one or the other. If they mount to the doors they seem to be white and if on the window surround they are black. Also, if we mount them on the window frames we still have the problem of filling the hole left by the original mirror.

At this point is should be clear where ours are going. Yes, on the window frames. They are already satin black so will not need to be refinished and they will automatically fill that little triangular hole. Well, the mirrors won’t but the triangular plate we’ll have to make will.

First mockup took a lot of trial and error drilling.


Which left quite a few additional holes on the inside, which, to be fair, was always going to need a cover anyway.


We initially mocked it up in cardboard:


And then cut them out of 1/8” aluminum. A bit shorter as we realized we needed to extend the top bar in order to mount the door card.


But then we found a piece of very thin carbon fiber and decided that would be way more appropriate, especially as the surface wasn’t flat anyway.


We still made the outside pieced out of aluminum as they had to span a large void.


That gave us everything we needed.


Just had to slap it all together.


We may paint the screws and washers black one day.

teamilluminata
teamilluminata HalfDork
3/19/20 1:14 p.m.

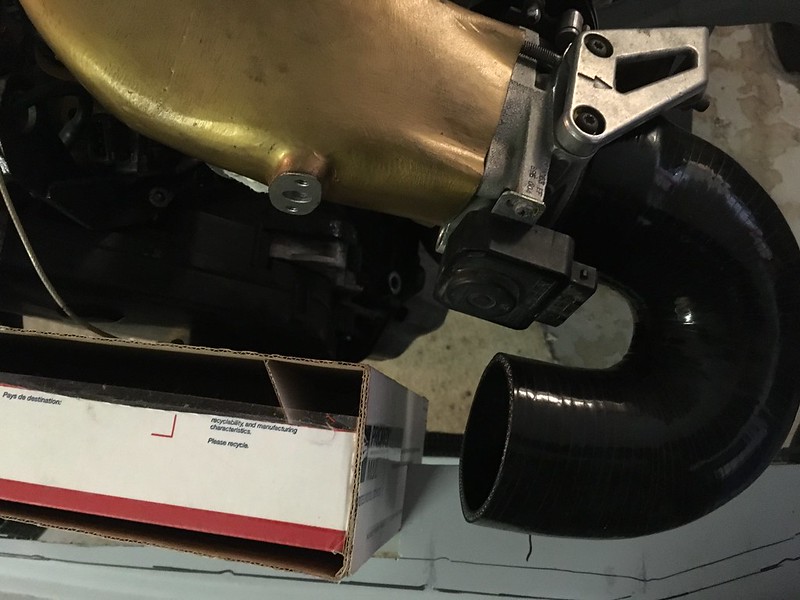
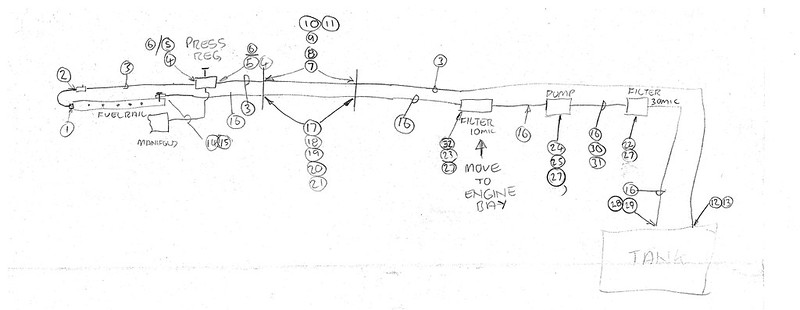
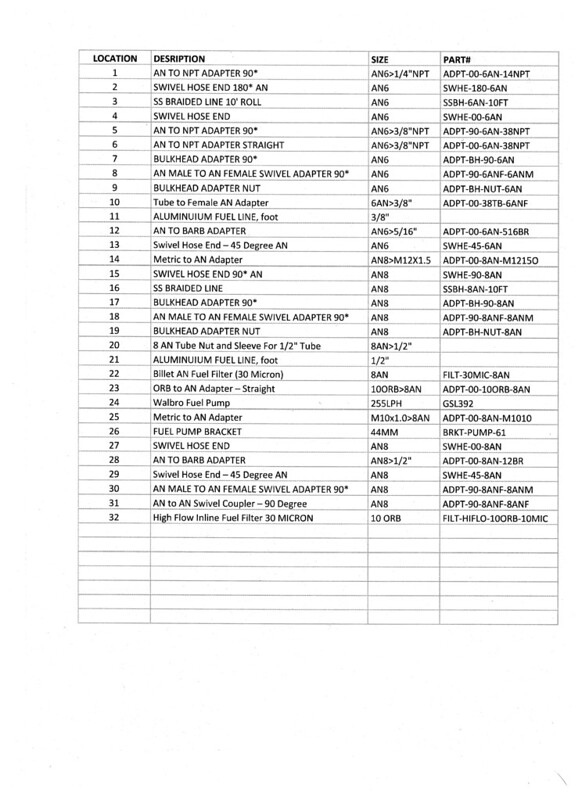
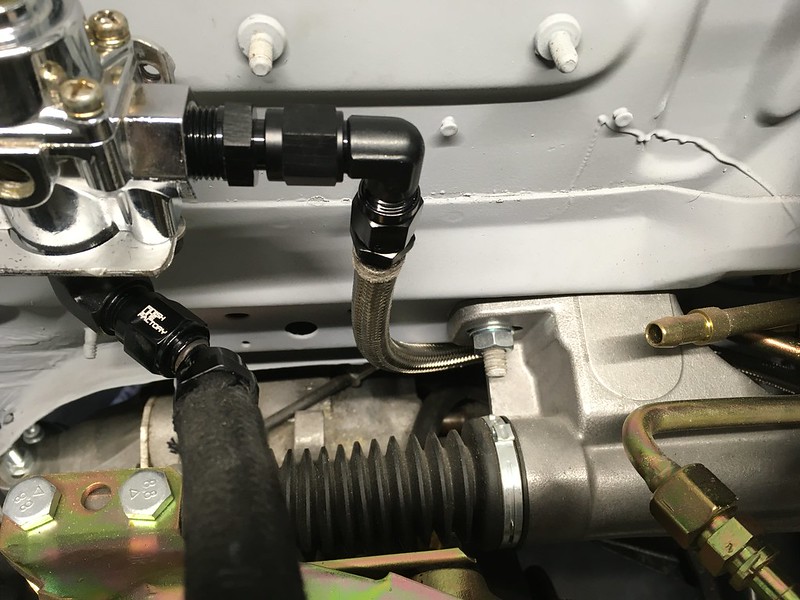
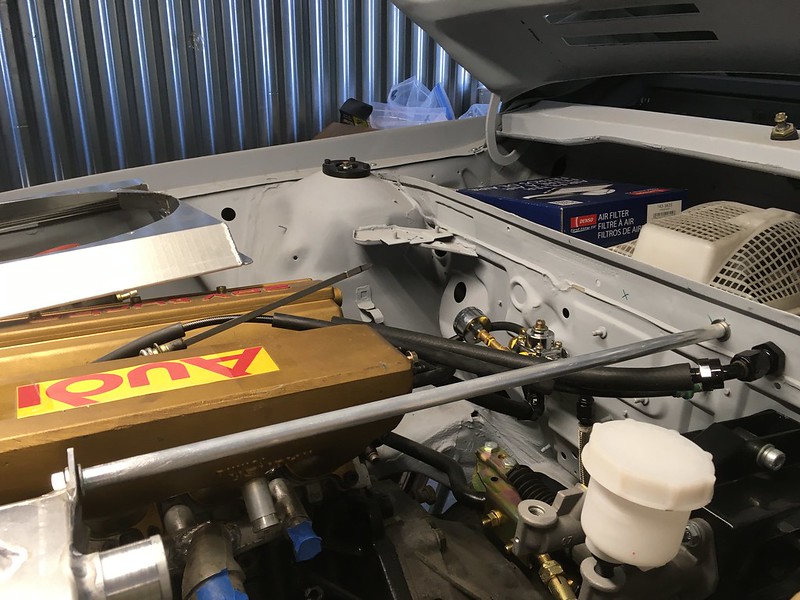
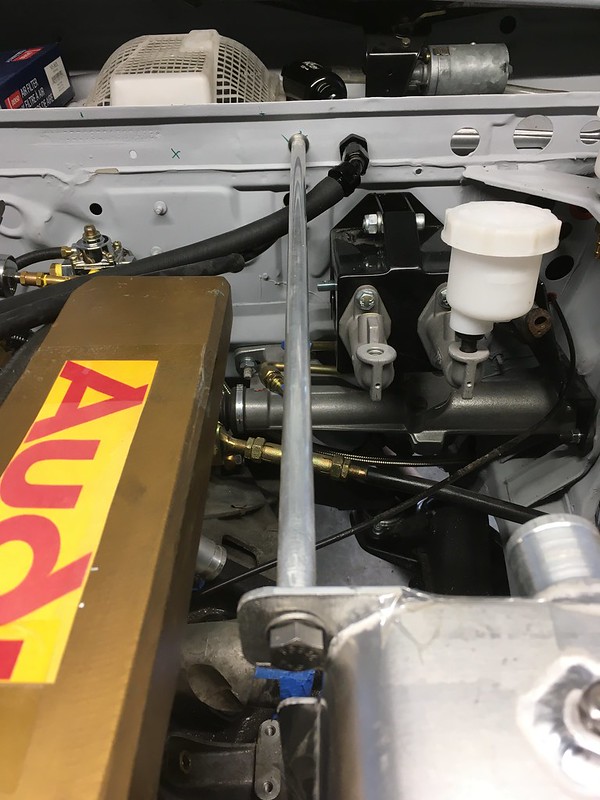
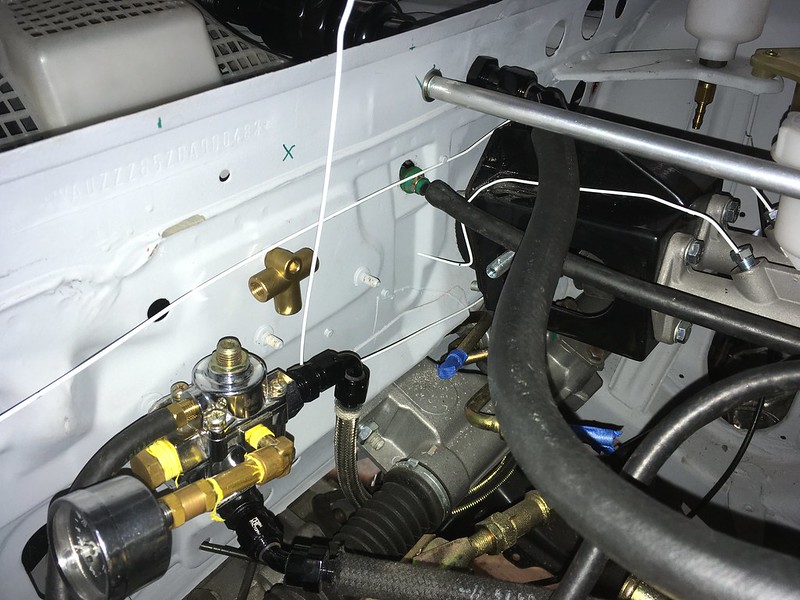
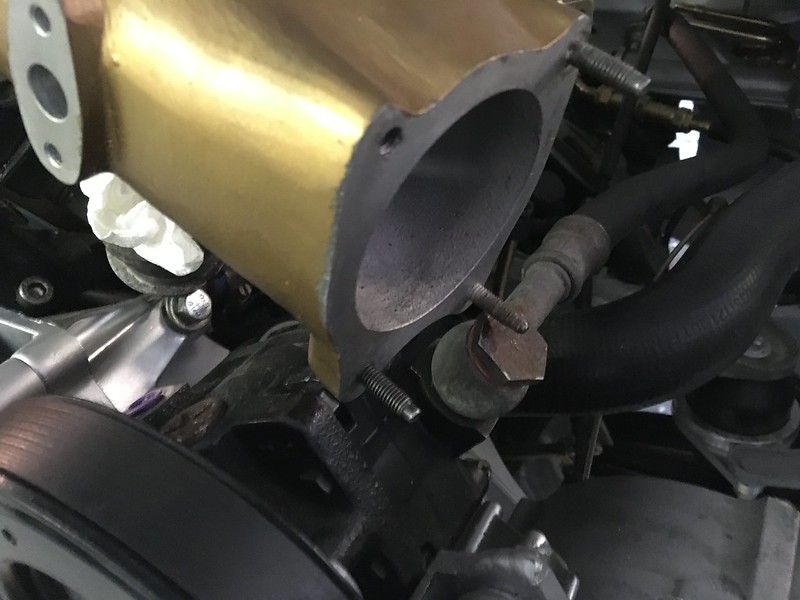
Throttle body, power steering, alternator. Pick any two!

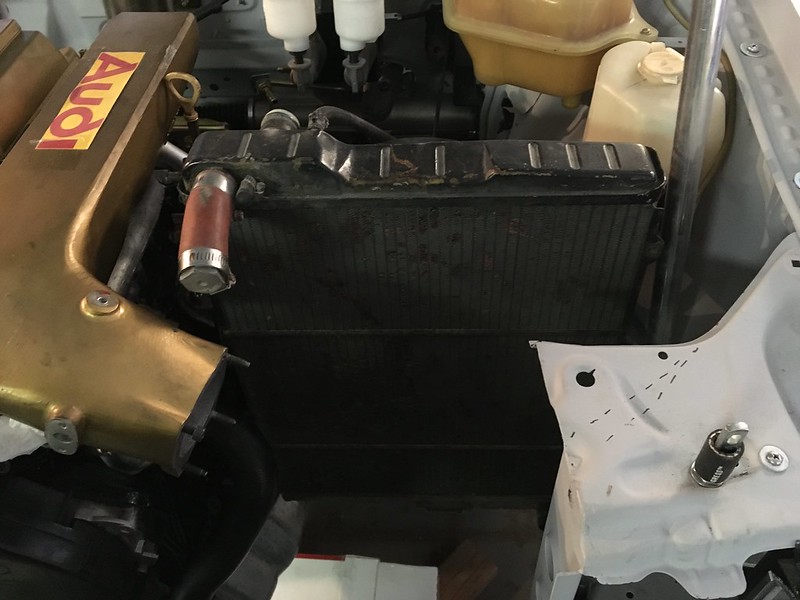
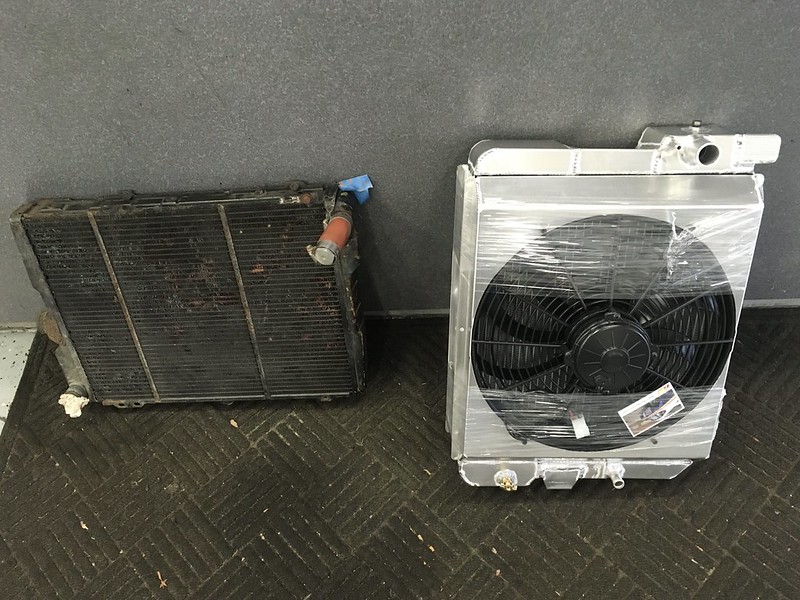
Yes, that's the conclusion we have come to trying to locate all the ancillary components in the engine bay. Right now, everything wants to be on the left side of the engine in front of the radiator. Remember, on these cars the radiator is not in front of the engine but to the side on the left. Because we are using an aftermarket intake manifold the throttle body is very close to the power steering pump. In fact, if we orient it correctly it is inside the power steering pump. We think we can rotate it 90 degrees and still mount it, though only one of the mounting holes lines up right now. Some adaptation will be necessary but we think we can make it work. Anyway, it has to be that way round to clear the hood and there is not really any room for an adapter. Even then, another issue is the outlet from the power steering pump still interferes with the throttle body, even after sourcing a really flat banjo bolt. Also, the outlet from the head coolant manifold is behind the power steering pump and very difficult to mount a pipe on. It's also heading in the wrong direction as it needs to end up behind the radiator. The coolant outlet from the block is also very tight where it passes the back of the power steering pump. Can we do without power steering?


Certainly, if we remove the power steering pump from the equation it creates some room but we are then left with an alternator stuck way out in front of the radiator and without much triangulation for the belt and no free length for the tensioner to push on. Maybe we should convert the power steering pump bracket to a second idler.


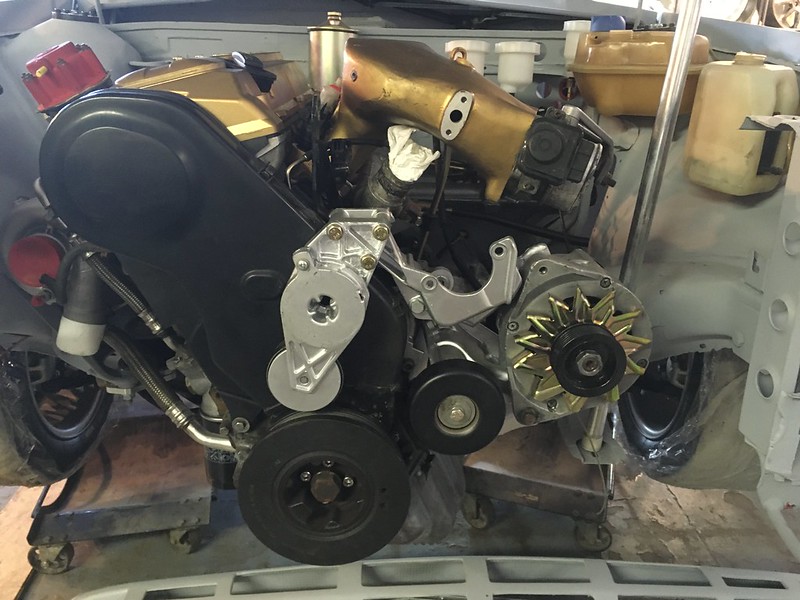
Another problem came up though: we can't seem to find a replacement alternator with the 200 amps or so we think we are going to need to power the six driving lamps and everything else.

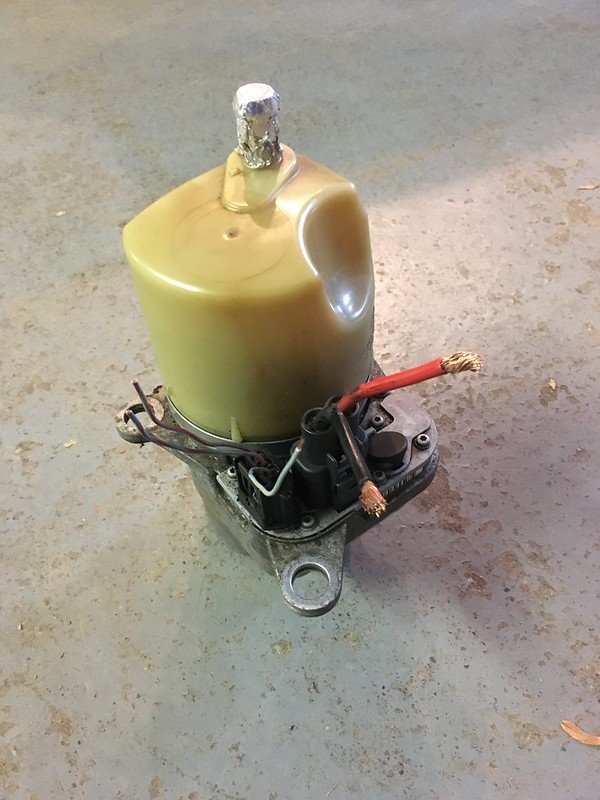
So now we have no power steering pump, no alternator and a throttle body that's held on with one bolt! What should we do? Well we think we have an elegant a solution. Firstly, why not use an electric power steering pump? They are readily available used from a variety of cars including Volvos, Toyotas etc. They can be mounted almost anywhere you can get lines and wires too as they obviously do not need a belt to drive them. They will also work even when the engine is not running which might be useful around the shop or if the engine blows up mid stage. Here’s an example of a Volvo unit.


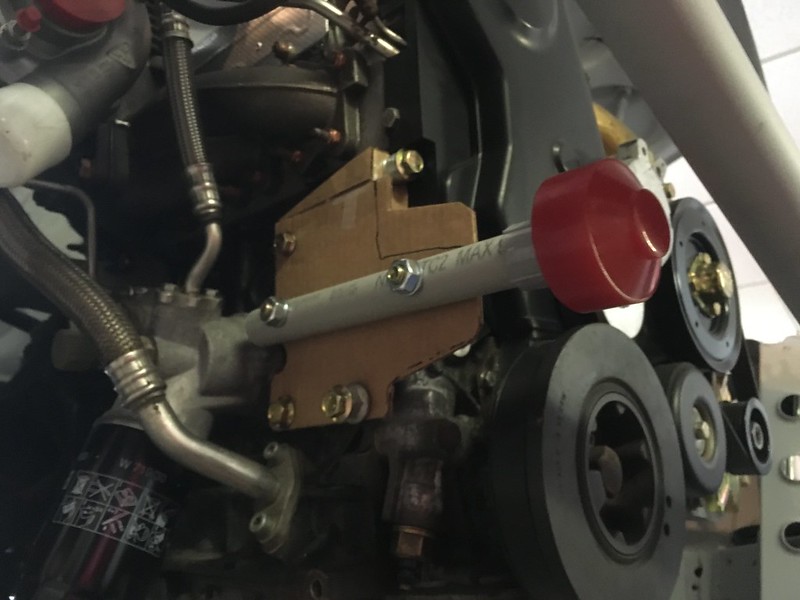
Then we realized, if we are prepared to make a custom alternator bracket, we could use any 200 amp alternator from any vehicle. It just so happens that we have to make a custom bracket for the front engine mount on the other side of the engine and there is a nice alternator sized space doing nothing next to that. Why not source an inexpensive 200 amp remanufactured alternator from a Ford truck and mount it on the right side of the engine on a custom alternator/engine mount bracket?


These two solutions, if possible, will then result in us having only an intercooler outlet pipe in front of the radiator which can’t be a bad thing for cooling air flow, right?

Subscribe to find out if any of these work out or if we go back to the drawing board.

teamilluminata
teamilluminata HalfDork
4/23/20 11:04 a.m.

Sorting out Radiator Choice, Placement & Mounting

This is the original radiator in the stock location.


We want a much bigger aluminium radiator as this one probably isn’t big enough as it worked in conjunction with a smaller auxiliary radiator mounted behind the grill. We don’t have room nor are we inclined to use that.

We found two companies that purport to sell a suitable radiator but neither returned calls or emails so we assume they are no longer supplying them. I guess we are making our own or at least getting one made for us. There are a couple of issues to consider: Any additional thickness will have to be in the front as the frame rails bend inwards just behind the radiator.


The stock radiator interferes with the AAN’s oil pan. We think this is usually solved by replacing the old pan with one from something else but maybe, as we are doing a custom radiator, we can solve it another way.


We were lucky enough to find a superb radiator shop nearby, Four Seasons Radiator Service in Madison Heights. Their bread and butter is fixing radiators of all kinds but they also make custom aluminium radiators. They are the company who recored the radiator for our 85 Quattro a few years ago so we were very confident to use them again. They took our requirements and in just a few days produced this masterpiece. They even added a Spal fan and custom shroud.


It fit perfectly but there was one small problem. Remember how we thought all the extra width had to be on the front because of the frame rail? Well we forgot about that when we asked them to add a fan and shroud. Simple solution though: notch the shroud:


Now we haven’t lost our cool we can move on to the intercooler.

teamilluminata
teamilluminata HalfDork
5/29/20 9:58 a.m.

Progress with the Intercooler

Despite all the confusion about where things are going to go a couple of components are fixed: the radiator and the intercooler. So we pressed on with the intercooler.


We wanted to place it as far forward as possible while remaining inside the grill’s envelope. This meant cutting our expensive bumper up.


We couldn’t find an off the shelf intercooler with the correct inlet and outlet orientations so we decided we’d have to make our own. We ordered the biggest core we thought we could fit.


The intercooler will sit on the front bumper bar but will also need an upper support bar. We fabricated one from an aluminium closet hanger rod.


And then set about mocking up the tanks.


Before finally making an intercooler!


Which actually didn’t leak!


And, surprisingly, even fit!


teamilluminata
teamilluminata HalfDork
6/26/20 11:50 a.m.

Moving into storage temporarily...

They say “all good things must come to an end”. Well, this good thing has come to a screeching halt but not the end. We finally had enough of our landlord and upped sticks. We were already looking for a new building but the situation in our old space became untenable and we quickly decided we could just put everything in storage for a couple of months while we found a new home. Then the virus hit! So we still don’t have a space but we also don’t have a big rent bill every month so now we look smart. We’re not. The business is still going strong. Just not working on car projects right now.

Here are some pics of the move:

We decided to store it on the wheels from our 85 Quattro because the tires are 12 years old and shot and we didn’t think exposing $2000 worth of Michelin historic rally tires to freezing temperatures was a good idea.


At least we got a chance to try out our new E-Track tie-down system in our trailer.


Sad showroom


New home. Ramp was a bit steep but three wimps managed to push it in, though we had to take it off the dollies.


So now it sits surrounded by junk. Can’t wait to get a new showroom and get it finished.

teamilluminata
teamilluminata HalfDork
8/18/20 1:33 p.m.

Introducing: Storage Unit Rally Build (We're still at It)

We hope everyone is safe and healthy and wearing a mask. We have been hunkered down in our various basements for what feels like forever but thankful that we live in a state that has fairly low case counts lately. We still haven’t found the perfect building for our business but did come to the realization that it might be possible to continue building the car in its current location: a 30’ x 10’ storage unit! While the only electrical power is a single light fixture in the center we found it has enough juice to power an LED worklight and a drill. We don’t think we will be welding though. Of course, there is no bathroom or running water so we will have to plan ahead. First some pictures of our “facility”:

Going into its new home January 29th


We managed to get it up on its pin stands ready for surgery:


We constructed this bench from an old kitchen table/chopping board complete with two Harbor Freight vices that cost less than $50 total!


And a makeshift workbench from a foldup table.


We are working with rudimentary tools and our emergency toolkit that normally is in which ever car we are driving.


As you can imagine, with one naked 60W lightbulb, it’s pretty dismal in there so we plan to rig up a LED strip light to the hood that used to hang above the work bench in our old workshop.


We realized that when we moved into the two 30’x10’ units that we packed them according to which room the stuff came out of. Consequently almost everything for the Quattro was in with the Porsche and vice versa. A bit of schlepping later and the Quattro was once again reunited with its innards. There’s not a lot of room to maneuver and it seems that every time we go looking for a part it ends up being in one of the bottom boxes. We suspect this might become quite frustrating.


And here’s what we think we can make progress on in this space.

BRAKE LINES
FUEL LINES
COOLANT SYSTEM
PCV SYSTEM
IDLE AIR SYSTEM
OIL COOLER
ENGINE WIRING LOOM
INTAKE SYSTEM/AIRFILTER
HEATER CONTROLS AND DUCTS
VARIOUS BODYWORK BITS
DOOR HANDLES

Basically anything that just involves bolting parts on and maybe drilling holes. Let’s see how realistic this plan turns out over the next few (hopefully) weeks.

teamilluminata
teamilluminata HalfDork
8/27/20 4:25 p.m.

Just a reminder: we are still in the "dry build" phase of this project. That means the shell is prepped but not painted. Everything else is going to be essentially test fitted before the car is disassembled for paint. Once it's cured we'll start bolting things on for good. That way we don't have to do any cutting, grinding and welding on a painted shell, hopefully. We mention this again now because you are about to see some weird stuff.

So, we thought we could probably manage to install the fuel system as we are using AN lines and fittings and they just need to be cut to length and screwed together. How hard could it be? We are using fittings from Finish Line Factory as we sell these and we don't like to sell things we haven't use. We also want to preface this part of the build by saying "We have never used AN fittings before" but we had a plan, drew up a parts list and then parts showed up so we thought we'd dive in.


We installed the fuel pressure regulator on the bulkhead because there were some studs already there. Only one lined up with our bracket so we will have to come up with something to mount it fully later. Then we installed some 8AN and 6AN adapters and some hose ends to each end of the fuel rail and ran some hose to the fuel regulator for the return. At this point we should mention that we are using any old bits of hose for now, preferably the oldest or cheapest we can get our hands on because we don’t know what we're doing and also "Dry Build".


Then we thought about our planned route from here through the cabin to the fuel tank. We were intending to put bulkhead fittings through the bulkhead then run hard line through the cabin to the rear bulkhead but no obvious route was revealing itself, plus there are a lot of other things that need to go through the bulkhead and "we don't know what we're doing". We therefore decided to scrap that plan and run the return line (6AN) through one of the frame rails (bear with us) and the feed line (8AN) down through the cowl and into the cabin on the driver’s side. This later was based on having to find somewhere to mount the fuel filter and pictures from original cars.


We used actual AN line on this run because we wanted to make sure we could actually thread it through the frame rail. This was one idea for the fuel filter location and bulkhead penetration:


But we settled on this location because this is where the factory teams put them and it made the route shorter:


Then we were stuck because we needed different AN fittings as we'd almost completely changed our design already. DOH!

teamilluminata
teamilluminata HalfDork
9/3/20 12:48 p.m.

While we were waiting for fuel line parts from Finish Line Factory to arrive, we started fishing around for other projects we thought we could accomplish. Because of this we found ourselves contemplating where to put the air filter. The factory cars had it on the cowl with a trick ovalized Kevlar tube feeding cold air to the turbo. While we don’t envisage utilizing that level of technology that area did seem intriguing, not the least because it is a high pressure area for cold outside air and there is a hood vent right above it. We could just stick a cone filter on the end of the intake tube but then it would sit right below the hood vent for the turbo and get rained on. We therefore put this here as a sort of placeholder:


Then we turned our attention to properly fixing the radiator. The works cars used a brace rod from one corner of the radiator to the metal work near the rear corner of the engine bay. We thought we’d do something similar and scrounged up some aluminum tube that looked like a suitable size. We wanted to tap each end but couldn’t access our tap holder so made do in true storage build style:


A couple of stainless steel bolts and washers later and this thing isn’t going anywhere:


With the radiator in we test fitted the shroud and fan. We had previously determined that the shroud needed clearancing to avoid the frame rail because we added the shroud as an afterthought at the last minute. We now realized that the fan would also hit the frame rail if we mounted it on the modified shroud. DOH! Perhaps a shroud isn’t necessary after all. We don’t think we’ll use those through the core plastic ties though; unless we can’t come up with something more mechanical.


Thwarted again we really needed a victory so we turned our attention to the brake lines. We already planned the system out and had purchased almost everything we thought we’d need.


We had started this project late last year but only got as far as installing the stainless steel flex lines from the calipers before the car got invited to Radwood Detroit and we scrambled to get the engine in and put it on the ground. Now we were excited to complete the process but just needed to source some bulkhead fittings. We are trying to keep this build as metric as possible but we couldn’t find metric bulkhead fittings nor SEA versions anywhere. Then Ryan from Thompson Racing Fabrication told us he uses 3AN fittings on his rally car builds and suddenly the way forward was clear: 3AN brake line system! Again, we were stopped waiting for parts. Still, these look pretty:


teamilluminata
teamilluminata HalfDork
9/9/20 11:54 a.m.

Storage Unit Rally Car Build: Week 3 - Fuel System Progress

Fortunately some fuel line parts came in from Finish Line Factory so we switched our attention back to the fuel system. We received some hose end barb adapters to transition from the fuel tank to the AN lines and brackets and a sleeve for the Walbro fuel pump so we scrambled under the car and installed those:


We attached the fuel pump using an existing stud but later we will remove that and use two threaded inserts and mount it level. We just don’t have access to our grinder right now because “storage unit rally car build”.

We also received a 90* bulkhead fitting from FLF for our 6AN return line. The hose end will probably need to be a 45 degree version but, guess what, we didn’t order any DOH!


Stuck again we decided to open up the coolant hose part of the project and got busy with or calipers and started measuring up hose barbs on the radiator, coolant manifold, thermostat housing etc.


Our plan was to cobble together various bits of silicone hose to create some of the convoluted hoses we’d need as we were quite far from adapting anything stock. Fortunately Pegasus Auto Racing Supplies carries everything we seem to need. New to this whole thing we thought the best plan was to wet our feet with the main hose from the thermostat housing to the bottom of the radiator as this stuff is quite expensive and we didn’t want to waste more money on an abortive plan. We’re waiting for parts again.

teamilluminata
teamilluminata HalfDork
9/18/20 7:49 a.m.

Ill Fitting Downpipe and More Brake Lines - Storage Unit Rally Car Build Week 4

While we were going through our boxes of parts we came across the AAN’s down pipe so thought we’d install that as it might impact the intake system we were thinking about. Of course it didn’t fit. It fouls the subframe as it descends below the axle. We need to cut and weld it anyway so now we will be doing that just a little closer to the turbo, or making one from scratch. No welding in the storage unit though. That would be a little ambitious, don’t you think?


Some 3AN brake fittings came in so we made a brake line, our first! It was complicated (for us) as it was metric at one end and 3AN at the other. It was also tricky because we don’t have a 37* AN flare die but Ryan at TRF told us, as we are using copper nickel hard line, we could just flare them 45* and once we synch them up they will magically become 37*! Who’d have thought?


So this is what we made:


And this is what it looked like once we’d made it fit:


We were so excited we had to stop and have a cup of tea! Oh, no kettle in the storage unit DOH! On a roll now we started laying out the under hood brake lines but immediately decided that this SAE tee had to be a 3AN so the job stopped again while we wait for parts.


teamilluminata
teamilluminata HalfDork
9/25/20 9:52 a.m.

Storage Unit Rally Car Build, Week 5 - Coolant System

Our coolant hose components came in from Pegasus Racing Supplies:


So, we wasted no time in cobbling together a custom front coolant hose:


And offering it up to the car:


Our plan is to clamp this all together with Gates Powergrip heat shrink hose clamps. We’ll probably use regular hose clamps at each end though. We were very happy with how this turned out so we began to look at the rest of the system so we could order more hose bits and bobs.


We hope to be able to reduce this to a more manageable configuration once the parts show up.

teamilluminata
teamilluminata HalfDork
10/1/20 12:25 p.m.

Storage Unit Rally Car Build: Week 6 - Odds & Ends

We installed some jewelry this week. Always nice when you bolt on some freshly zinc plated bling:


We also dug the PVC system out of the boxes.


Then the last bits for the fuel filter came in from Finish Line factory so we mounted that.


Just sheet metal screws for now but when we strip the shell for paint we’ll drill holes for threaded inserts which we’ll install after the paint has cured. That way the holes will be protected.

teamilluminata
teamilluminata HalfDork
10/15/20 11:43 a.m.

Storage Unit Rally Build: Week 7 - Finishing Brake Lines

This week we were determined to finish the brake lines. We had so many projects open we were determined to finish anything to be honest, but brake lines seemed the most likely candidate for success so we jumped in. Our 90 degree 3AN bulkhead fittings had arrived so we started in the rear wheel wells and created hard lines to the flex pipes.


The next obvious step was the lines from the bulkheads to the tee at the end of the transmission tunnel but instead we moved to the engine bay and plumbed in the brake master cylinders and lines to the front brakes!


Then we focused on the lines inside the car starting with locating the line lock. We think we’ll dispense with a handbrake. We’ve never been keen on handbrake turns all wheel drive cars so just need something to act as a parking brake so this should do nicely:


Now we just need to get brake lines to it.


We’ll clamp everything as a separate project as we might have to move everything later anyway. We are very happy with how the brake lines turned out but there were a few casualties along the way. This got flung across the unit in fit of frustration...


...and next time we work in the rear of the car we’ll perhaps remove the seats and climb in rather than leaning in through the window aperture. Ouch!


stu67tiger
stu67tiger Reader
10/15/20 8:28 p.m.

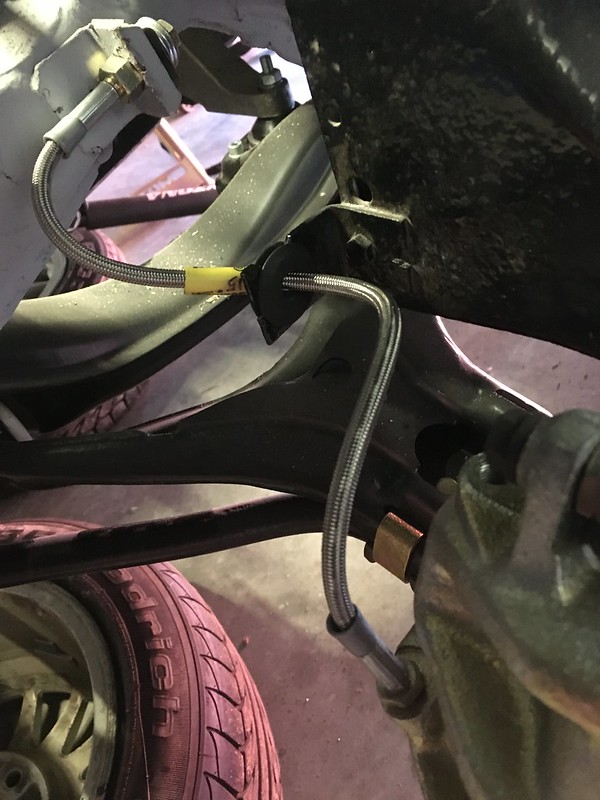
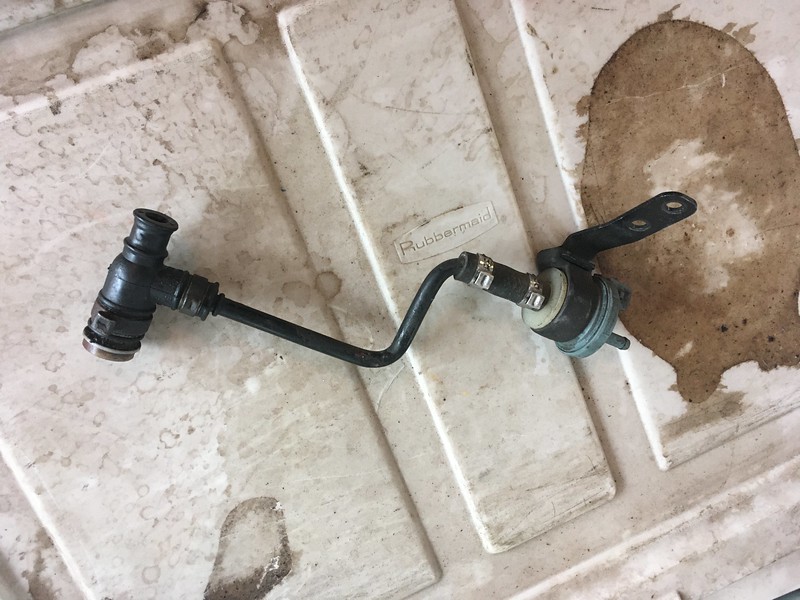
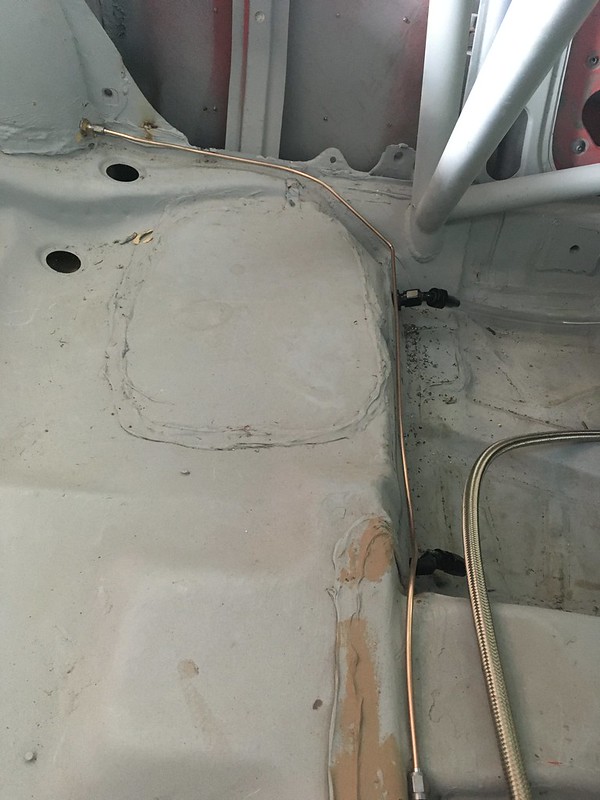
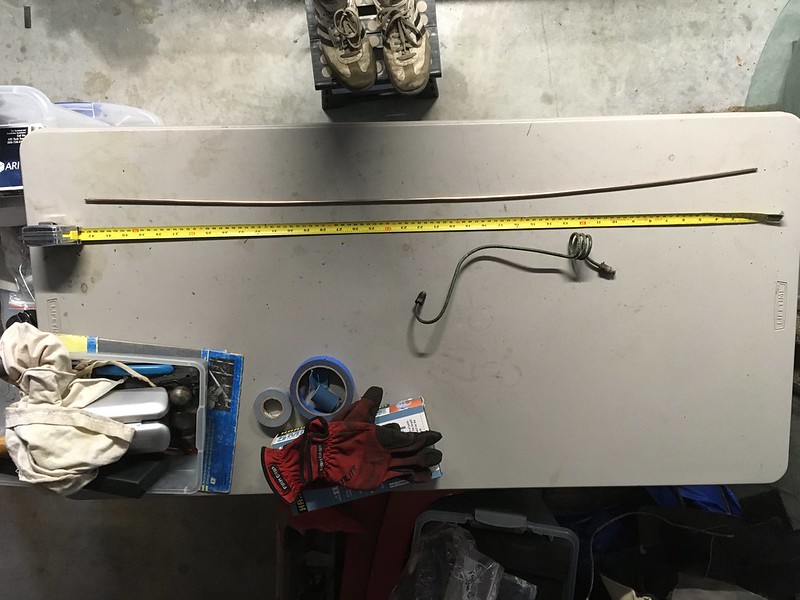
Those metal brake lines... It may be just the color reproduction, but... Copper?  NOT solid copper, right?

teamilluminata
teamilluminata HalfDork
11/12/20 9:50 a.m.

Storage Unit Rally Car Build, Week 8 - Coolant/Heater Lines, Power Steering & More

More coolant hose parts from Pegasus arrived. Yes, those are Dzus fasteners. More on those later. This hose worked out a lot simpler than we thought it might with just two shortened elbows, one of them being a reducer.


We also got the heater valve and pipes in:


At this point we gave up on the coolant lines as we need to locate the electric power steering pump and lines before we know where we can run lines to the coolant reservoir. So we shifted our attention to the PVC system. Getting crowded in here now.


This section needs to find its way into the intake manifold via the PCV check valve, which we don’t seem to have. It also seems to want to go through our new radiator DOH! We are hoping we can bend the steel lines just enough.


teamilluminata
teamilluminata HalfDork
12/10/20 8:49 a.m.

Week 9 of the Storage Unit Rally Build

We ran out of things to do so now we can reveal what those quarter turn Dzus fasteners are for: The removable dash panels!


We have never played with these before so this might not go well. Our panels are not very thick so we ordered the fasteners for the thinnest material possible. Fortunately they seem to be the perfect size:


Our dash and removable panels cane pre-drilled for these fasteners but we still had to clearance the center hole to allow the fasteners to sit flush. Then we riveted them in place.


That went well but then we had to attach the springs to the back of the dash panel. In order for the removable panels to sit flush we needed to countersink the holes and to use countersunk rivets. But we couldn’t find any locally. Then an old-school bodywork guy told us how to make our own countersunk rivets. You place a regular river in a 45* flare die and chamfer the end or a short piece of steel brake line. Place this brake line chamfer “tool” over the stem of the river and tap it into the die with a light hammer until it forms a 45*. It worked great!


and enabled us to mount the springs without any frontal protrusions once we filed them flush:


Then we installed our first removable panel. May be time to order some fuse blocks:


The rally computer panel had us worried though as the top right faster was really close to the roll cage. In fact we had already filed it down to get the dash to fit. We went at it without a plan for that one fastener.


After attaching the other fasteners we riveted the top right one in place and filed it down a little to clear the cage but we were still missing one of the rivet holes for the spring. Still, one less countersunk rivet to make!


Then we thought “What the hell. Maybe It will work with half a spring!”


And what do you know; it did!


We decided to hold off on the gauge panel as we’d have to remove all the gauges and switches to install the fasteners. We’ll wait till we do that when we paint it.

teamilluminata
teamilluminata HalfDork
12/17/20 10:13 a.m.

Week 10 of the Storage Unit Rally Car Build

Inspired by our success with the dash fasteners we moved on to something that has been troubling us for a while, the PCV system. We’d like to keep the engine as stock as possible for now as we don’t want to complicate getting an engine we are unfamiliar with running well after it has been idle for who knows how many years. So we think we’d like to keep the PCV system intact as it came from the factory. This was complicated by the fact that we know nothing of the mysteries of PCV and that part of it connects into the intake manifold; the stock intake manifold. Undaunted we dug through our 300 boxes and pulled out anything that looked like it might be part of a PCV system.


We thought it good insurance to replace all the weird bits that weren’t just pipe so we went to our friends at Pelican Parts.


We offered up the bits that went around the back of the engine but it was clear that our radiator was in the way of a straight shot forward. So out with the pipe cutter!


And added a length of flexible hose. It fits now.


Once passed the radiator we aimed it at the intake manifold behind the throttle body like the stock manifold and used a piece of clear hose for now. We will need to take the manifold off to either weld on a bung or tap it for a fitting of some sort. Next time the engine’s out perhaps.

teamilluminata
teamilluminata HalfDork
12/24/20 9:18 a.m.

Storage Unit Rally Build Week 11 - Diverter Valve & Door Handles

Diverter Valve

Our new diverter valve arrived while we were playing with the PCV system so we slapped that in too, upside down at first!


Fortunately, it sits directly over the turbo pipe into the intercooler


But we will need to weld on a bung to attach it. No welding in the storage unit though.


Door Handles

We were told to get a handle on things so we pulled these out of a big blue box.


They go on the doors. Might not seem like a big deal But it’s been a real PITA to constantly reach in through the window aperture to pull the interior door handle. This will make storage unit life much more palatable. If we can fit them.

We again went to the parts diagrams to see what was needed.


Initially it didn’t look promising as we seemed to be missing some actuator rods. Specifically, #8 and #9 but when we looked inside the doors we found both #8s still attached to the lock mechanisms.


Also, it turns out the missing #9 operates the lock so we’ll get one of those later as we won’t be needing to lock it for quite a while. The handles themselves cleaned up very nice and we had all the bits. The driver’s side lock did give us a scare as it appeared it may have been re-keyed at some point because we could not get it to turn. A bit of WD40 freed it up though so we slapped them on.


The actuator rods were a bit fiddly but they are now on and the doors work. Nice!

teamilluminata
teamilluminata HalfDork
12/30/20 9:41 a.m.

Storage Unit Rally Build - Week 12: Clutching Straws

We spent this week clutching at straws, curly straws at that! No, actually, we made a curly clutch line that goes between the slave and master cylinder. We have no idea why it’s this shape but Audi went to a lot of trouble to make it so we thought we should too! We were going to use the original one but it’s in really good shape and will make a great spare for our '85 road car so we decided to get bending. Hope it doesn’t drive is round the bend.


According to math this thing is enormous before you bend it. Nearly 3 foot long!


We needed to find something suitable to form it round. The jack handle will do.


It was actually easier than we thought it would be.


And it added up fitting pretty well. Don’t worry, we have a new master cylinder, somewhere. Pat on the back!


3 4 5 6 7

You'll need to log in to post.

Our Preferred Partners
nagA8DzBvsxC8dfQVz7D108ezNdAdzqUzXpb1H9XgQ2nCCAWZ7EgYnr25gXwmw2K