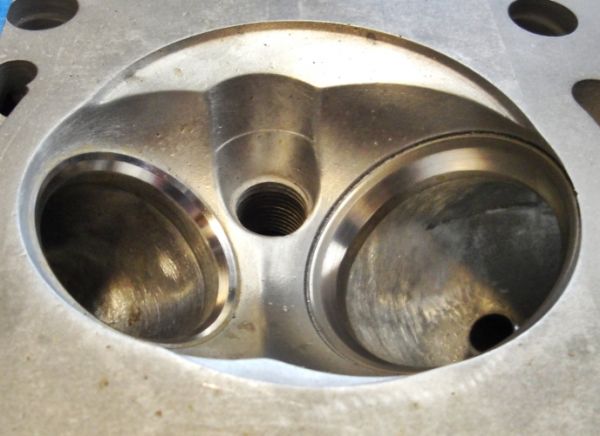
A short annotated photo showing the areas of work, and the similar area before work - no "hogging" here

the translucent redline shows us the port floor
1) The short radius - a gentle curve to the valves edge to promote cylinder filling
2 & 3 ) shaping the bowl to the seat, further promote cylinder filling
4) "Opening" the passage between the splitter and the guide, allowing the airflow easier passage past the guide - once again to aid in cylinder filling.
Nothing drastic, just taking a mass produced part and making it better
oldeskewltoy wrote:
Nothing drastic, just taking a mass produced part and making it better
Very cool.
I'm sure it varies a lot from application to application, but what range of improvement (percentage increase) might you expect in flow bench numbers or dyno results with this kind of mild port work?
I think you showed a graph earlier in the thread that showed a 10-15% increase in flow bench results. Is that typical for this level of work? Does that usually translate pretty directly to hp on the dyno?
Probably pretty noobish questions. 

JohnyHachi6 wrote:
oldeskewltoy wrote:
Nothing drastic, just taking a mass produced part and making it better
Very cool.
I'm sure it varies a lot from application to application, but what range of improvement (percentage increase) might you expect in flow bench numbers or dyno results with this kind of mild port work?
I think you showed a graph earlier in the thread that showed a 10-15% increase in flow bench results. Is that typical for this level of work? Does that usually translate pretty directly to hp on the dyno?
Probably pretty noobish questions.
Some heads are more difficult then others... The 4AG head was designed over 30 years ago the castings are far from perfect....
....You'd think castings would have improved, and they have... but they are still mass produced parts... and as such there will be flaws, as an example...
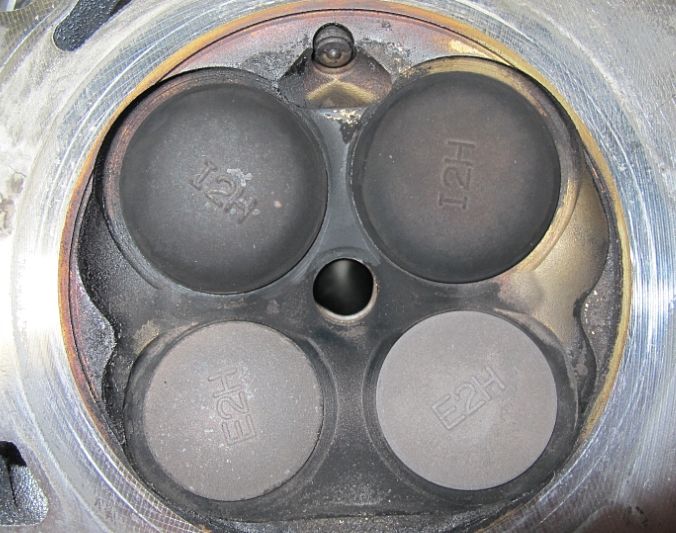
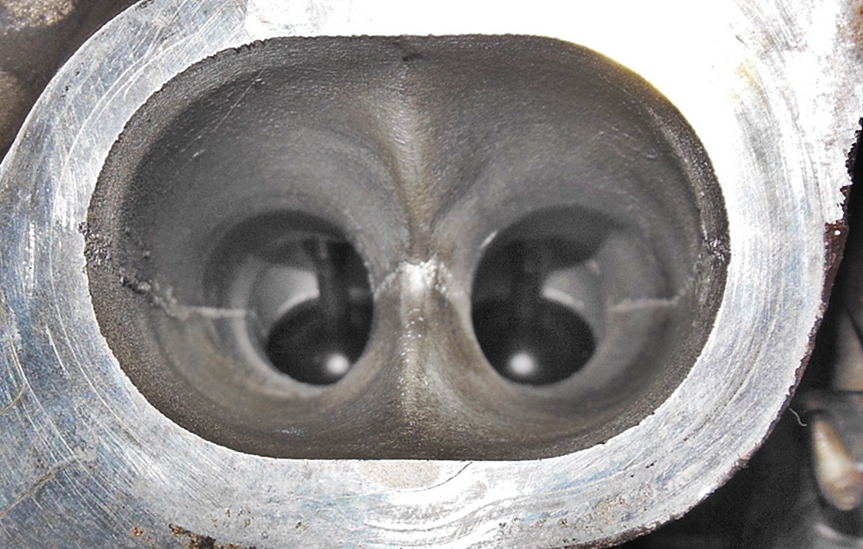
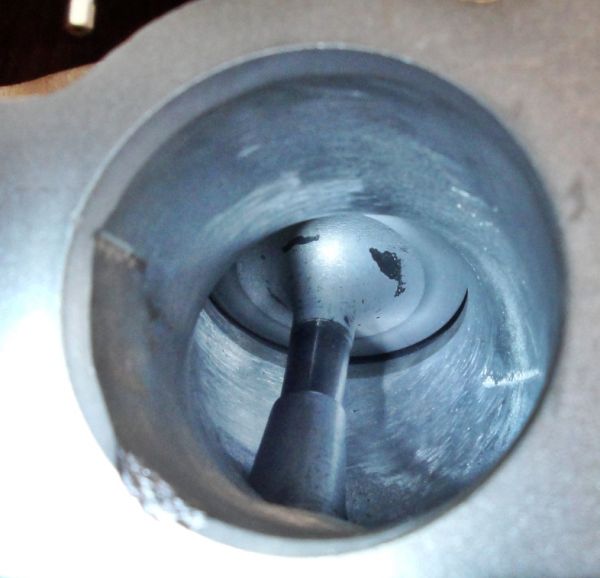
The view below is a magnified view of the exhaust outlet from a 4U-GSE/FA20(FRS/BRZ engine). Even as unclear as this view is... flaws are evident....

and not only in the ports, but in the chambers too
Most of my work is verified on a flowbench, the 7MG head didn't respond(flowbench # improvements) as well as the 4AG, but it did respond
As to dyno numbers... none of my clients has shared that with me 

JohnyHachi6 wrote:
I'm sure it varies a lot from application to application, but what range of improvement (percentage increase) might you expect in flow bench numbers or dyno results with this kind of mild port work?
It really does. For instance, the last BMW M20 head that I did only showed about an 11-12% increase in flow, but I can get a LOT more than that out of a 16v VW head. I don't remember the numbers (it's been a long time since I had one on a bench), but I made 146hp at the wheels with the head and fuel enrichment module being the only mods. Stock they're rated at 134hp at the crank, so you're looking at somewhere around a 20% increase. There's a guy on the VWVortex that has one of the heads that I built that's making 181hp on a stock bottom end and stock CIS-E injection.

Cotton
UltraDork
1/30/15 1:24 p.m.
In reply to oldeskewltoy:
What do you typically charge for a set of v8 heads? Like a set for a Pontiac 400.
Cotton wrote:
In reply to oldeskewltoy:
What do you typically charge for a set of v8 heads? Like a set for a Pontiac 400.
I assume cast iron?? I've not done a set.... I'd have to look at them and come up with a cost. The 4AG heads (4 cylinder, aluminum) typically run $600 for the port work - rebuilding costs, and valve jobs are additional.

Lamps3
New Reader
2/4/15 10:04 a.m.
Oldeskewltoy Love your work. I used to do some polishing, but a long time ago and not on cylinder heads! Have you done a set of DOHC Cobra Mustang 99 model?
Lamps3 wrote:
Oldeskewltoy Love your work. I used to do some polishing, but a long time ago and not on cylinder heads! Have you done a set of DOHC Cobra Mustang 99 model?
Not as of yet.... so I did a brief search....
http://www.mustangandfords.com/parts/m5lp-0412-ford-four-valve-head-information-guide/
The exhaust side seems to be the limiter on the 99 Ford DOHC heads... as well as not enough short radius on the intake side....
I'm interested..... 
somethings I do are less obvious then others.... cam caps deburred, and buffed for re-assembly
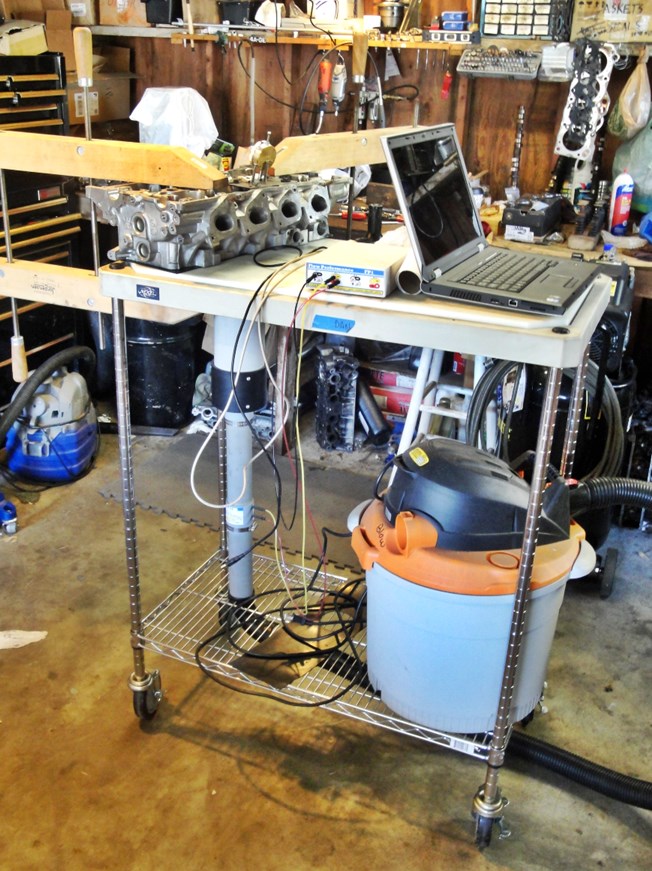
Flowbench testing the SR20DE head
Here is how the dial indicator follows the valve
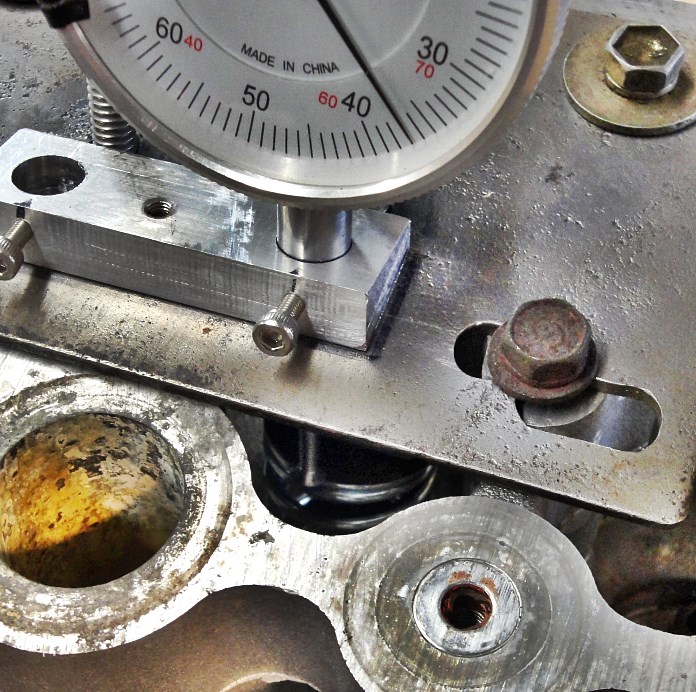
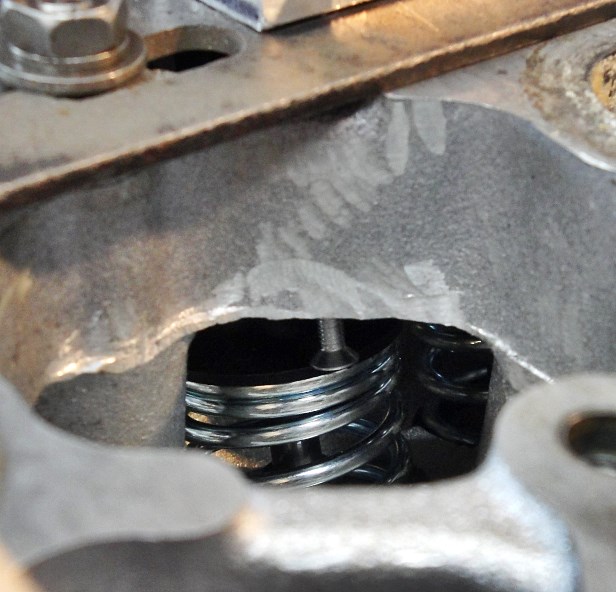
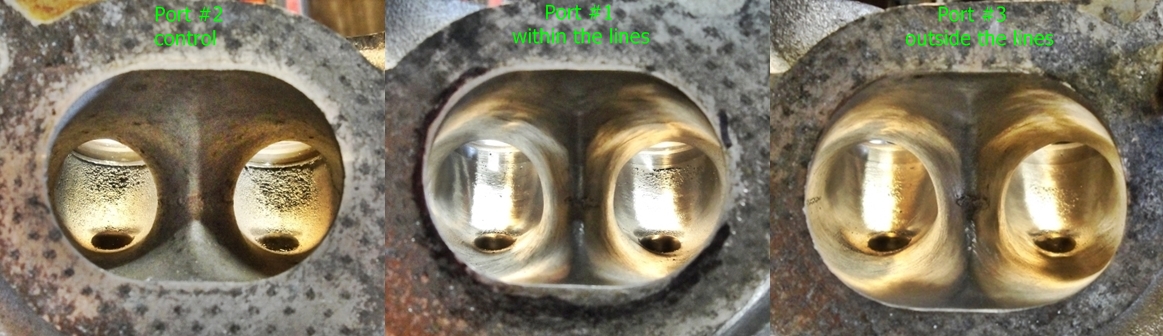
Head is set on the flowbench, #2 is being tested, this is our control` - untouched
The numbers for #2 intake (the control) are
[U]inches - CFM[/U]
.050" - 44.5
.100" - 88.1
.150" - 122.7
.200" - 154.5
.250" - 178.2
.300" - 189.7
.350" - 198.7
.400" - 203.8
.450" - 207.7
The numbers for #1 intake (porting within the lines) are
.050" - 44.2
.100" - 88.7
.150" - 125.6
.200" - 158.9
.250" - 181.6
.300" - 197.2
.350" - 206.2
.400" - 212.5
.450" - 217.5
Finally the numbers for #3 intake (porting outside the lines) are
.050" - 44.1
.100" - 87.8
.150" - 124.5
.200" - 158.9
.250" - 183.3
.300" - 202.1
.350" - 214.7
.400" - 223.3
.450" - 228.3
I'll hopefully have the exhaust side calibrated by this coming weekend.
once the bench is calibrated for exhaust I'll run the 3 below....
"Port #3 - outside the lines" - used an SR20VE exhaust gasket as a guide
Exhaust numbers....
#2 control
.050 - 33.1
.100 - 74.1
.150 - 110.0
.200 - 137.9
.250 - 151.7
.300 - 157.9
.350 - 161.6
.400 - 163.8
.450 - 165.9
#1 inside the lines - this is the exhaust port that stays within the original DE gasket shape
.050 - 33.2
.100 - 73.4
.150 - 111.5
.200 - 139.2
.250 - 157.3
.300 - 166.5
.350 - 173.0
.400 - 176.8
.450 - 181.7
.500 - 184.0
#3 outside the lines - This is the port shaped to fit the VE gasket
.050 - 36.7 (checked twice for I thought this an anomaly)
.100 - 76.6
.150 - 113.2
.200 - 140.9
.250 - 161.2
.300 - 173.1
.350 - 182.9
.400 - 190.0
.450 - 195.5
.500 - 200.2
.550 - 204.0
MASSIVE improvement is available on the exhaust side of the SR20! Note all the numbers are pretty close @ .200 lift, and by .300 lift the evidence of port improvements is crystal clear, and only continues to expand
With the massive improvement on the exhaust side I'm looking into ways to further improve the intake side....

I've moved the opening out to 60mm, raised the opening over each port entrance 4mm, gotten the splitter down to 20mm.
IF you were observant you might have noticed the low lift#s(.050", and .0100") for #3 intake are actually a tiny bit worse than stock. Part of that has to do with the fact that the intake port is now much larger and so velocity has dropped a tiny bit.
How to gain back some velocity.....
Changing perspective helps....
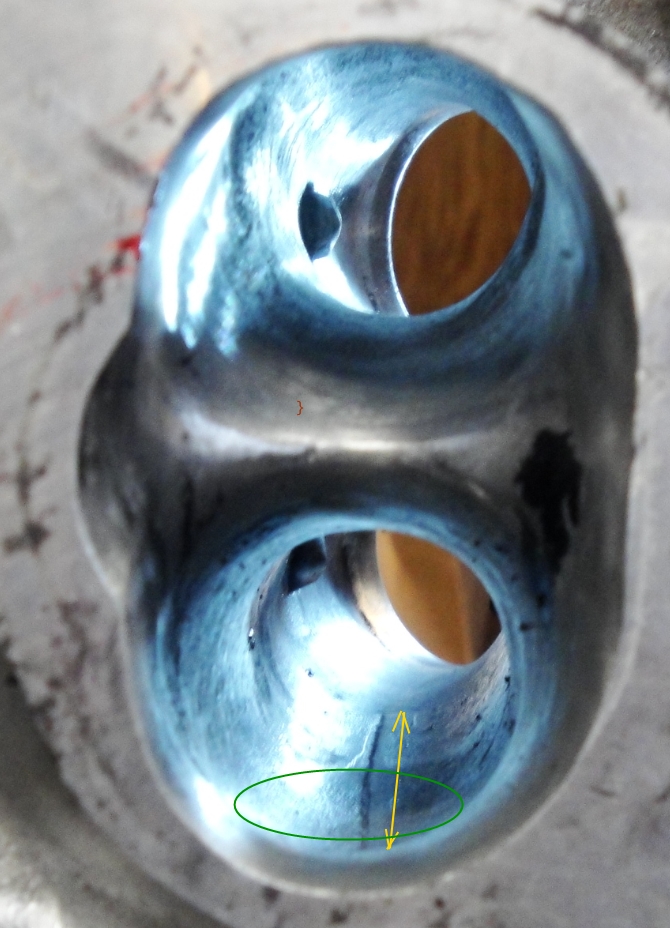
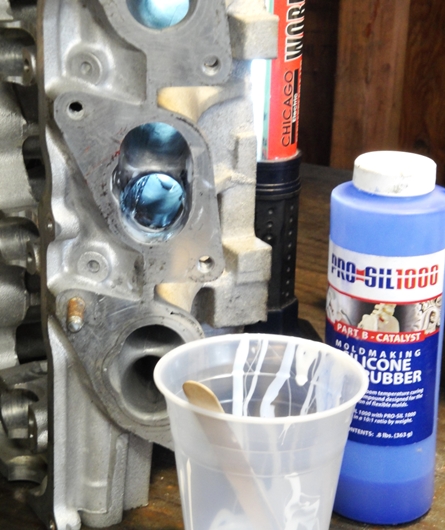
So I mix up some RTV for making molds... and fill #3's outer wall. I'm using a section of rubber to help with making the inner shape.
and the finished piece....
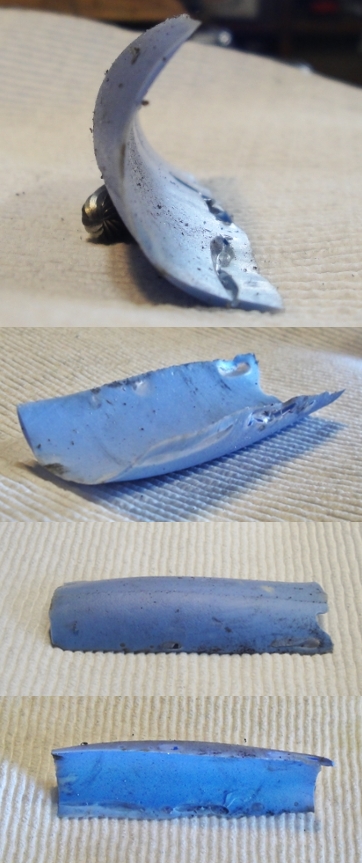
and how it looks installed....
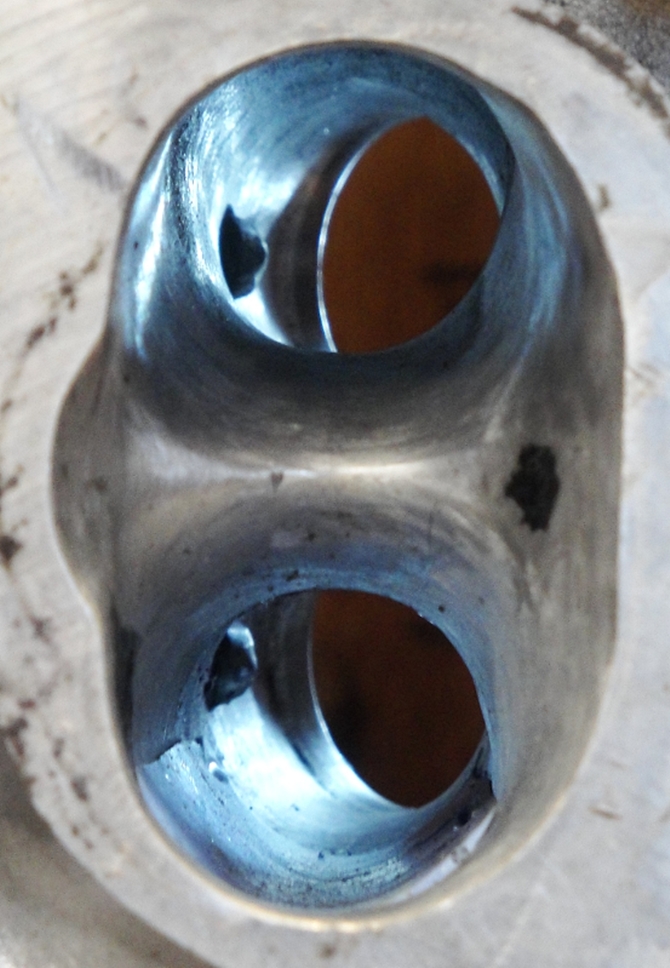
Now that I have the trailing port wall formed, I have to make one for the leading port........ and then take it back to the bench for testing
Noob question here; I get the vibe that when people get into porting and polishing that they are usually already pretty well on their way to being heavily modified, but what if the opposite approach was taken? Could you port and polish without any other mods? Or are supporting mods like aftermarket ECUs or at least a piggy back required to deal with the increased efficiency?
You can do it without any other modifications, and it really depends on the motor/ecu on how it'll behave.
Some old electronics that use say... a flappy AFM/VAF type measuring method will probably respond to the porting better than something that's MAP-based.
Data point: The MX6 picked up an OBSCENE amount of power with porting. I wouldn't expect something more modern to do that.
So... it's one of those "Depends" answers.
Swank Force One wrote:
You can do it without any other modifications, and it really depends on the motor/ecu on how it'll behave.
Some old electronics that use say... a flappy AFM/VAF type measuring method will probably respond to the porting better than something that's MAP-based.
Data point: The MX6 picked up an OBSCENE amount of power with porting. I wouldn't expect something more modern to do that.
So... it's one of those "Depends" answers.
Thanks Ben, that's exactly what motor I had in mind when I asked the question. But seeing how my car is still not registered or insured I'm getting the cart ahead of the horse.
Worth mentioning that you'll probably want a bigger turbo at that point, or at least should consider one haha.
DuctTape&Bondo wrote:
Noob question here; I get the vibe that when people get into porting and polishing that they are usually already pretty well on their way to being heavily modified, but what if the opposite approach was taken? Could you port and polish without any other mods? Or are supporting mods like aftermarket ECUs or at least a piggy back required to deal with the increased efficiency?
as SFO points out....
Swank Force One wrote:
So... it's one of those "Depends" answers.
kinda.... as I see it... it really needs to be one of the first engine mods performed, as it does improve an otherwise stock engine by clearing up individual port flaws that can affect flow.
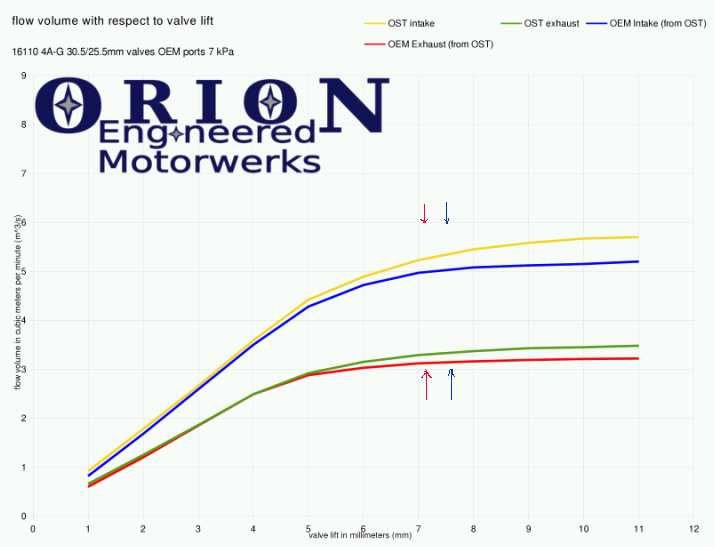
As an example here is a plotted 4AG head before, and after on the flowbench. The arrows are indicating the maximum lift points of the 2 different stock cams that were offered. So even with stock cams more volume is being drawn in, and expelled.
MOST of my work is just removing flaws left behind based on casting techniques, compounds, and costs.
oldeskewltoy wrote:
Nothing drastic, just taking a mass produced part and making it better
With the Nissan SR20 head, the discovery of such a large improvement on the exhaust side, is driving me to see if I can discover something more on the intake side...
and part of what is driving me is the Nissan SR20DE GTi-R head... this doesn't have HLA's to navigate around
you guys should have been around in the 1950s when all a home garage had was a hand held electric drill and a steel rod with a slot in the end, and plenty of cloth backed sanding material, you could cut into strips. no such thing as hi-speed tools or air tools.
altho in post WW2 around the aircraft factories, thay had some long flexible shaft tools,VERY RARE stuff, almost dangerous to use for long periods!
now is porting worth the money? well around 10-15yrs back a prominent F1 team paid a Swiss engineering company. 1 million to rework there heads for a 3% increase in max HP with no loss in mid range torque, and still be within rule book specs.
and absolutely not be a visual change when examined and bench flowed!
there is still some untapped knowledge out there!
The client of the old Toyota inline 6 - 5MGE, picked up his head. I had a 3 angle performed...
back cut the valves....
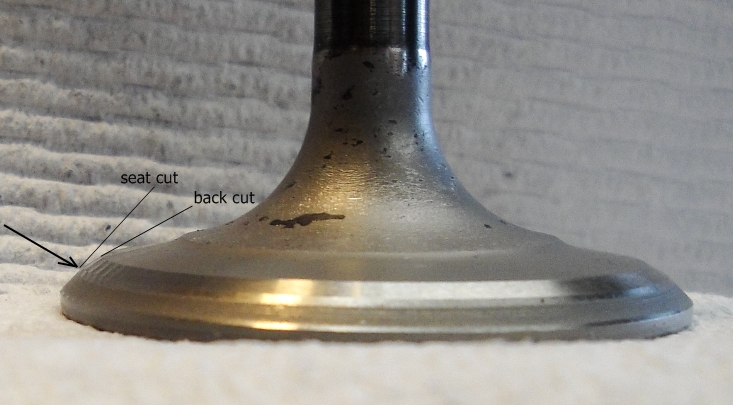
new intake guides installed, machined to present a smaller obstruction
 also viewable in above view is the gap created by the throat cut on the seat, and the back cut on the valve.
Cotton
UltraDork
3/27/15 8:46 p.m.
Very impressive work. Seriously.
Cotton wrote:
Very impressive work. Seriously.

thanks.... I put a lot of effort in to my work.
Back to my "bread and butter" ... 4AGE #1 bowl/seat in transition

It seems like you guys mostly focus on knife edging the split and smoothing the bowl transitions. Is this, if done in moderation, relatively fool proof?
DaewooOfDeath wrote:
It seems like you guys mostly focus on knife edging the split and smoothing the bowl transitions. Is this, if done in moderation, relatively fool proof?
I don't typically knife blade the splitter. As for smoothing the bowl transitions... use a sand drum and go slowly. You may have to hold the Dremel @ an angle to fully get the transitions