


I need to trim so interior windows and have looked at some how to guides online and am now more confused then when I started.


Does anyone have a good step by step guide on what I need to do? I mostly confused on the jambs and jamb reveals.

I need to trim so interior windows and have looked at some how to guides online and am now more confused then when I started.
Does anyone have a good step by step guide on what I need to do? I mostly confused on the jambs and jamb reveals.

In reply to 93EXCivic :
Ok, let's see...
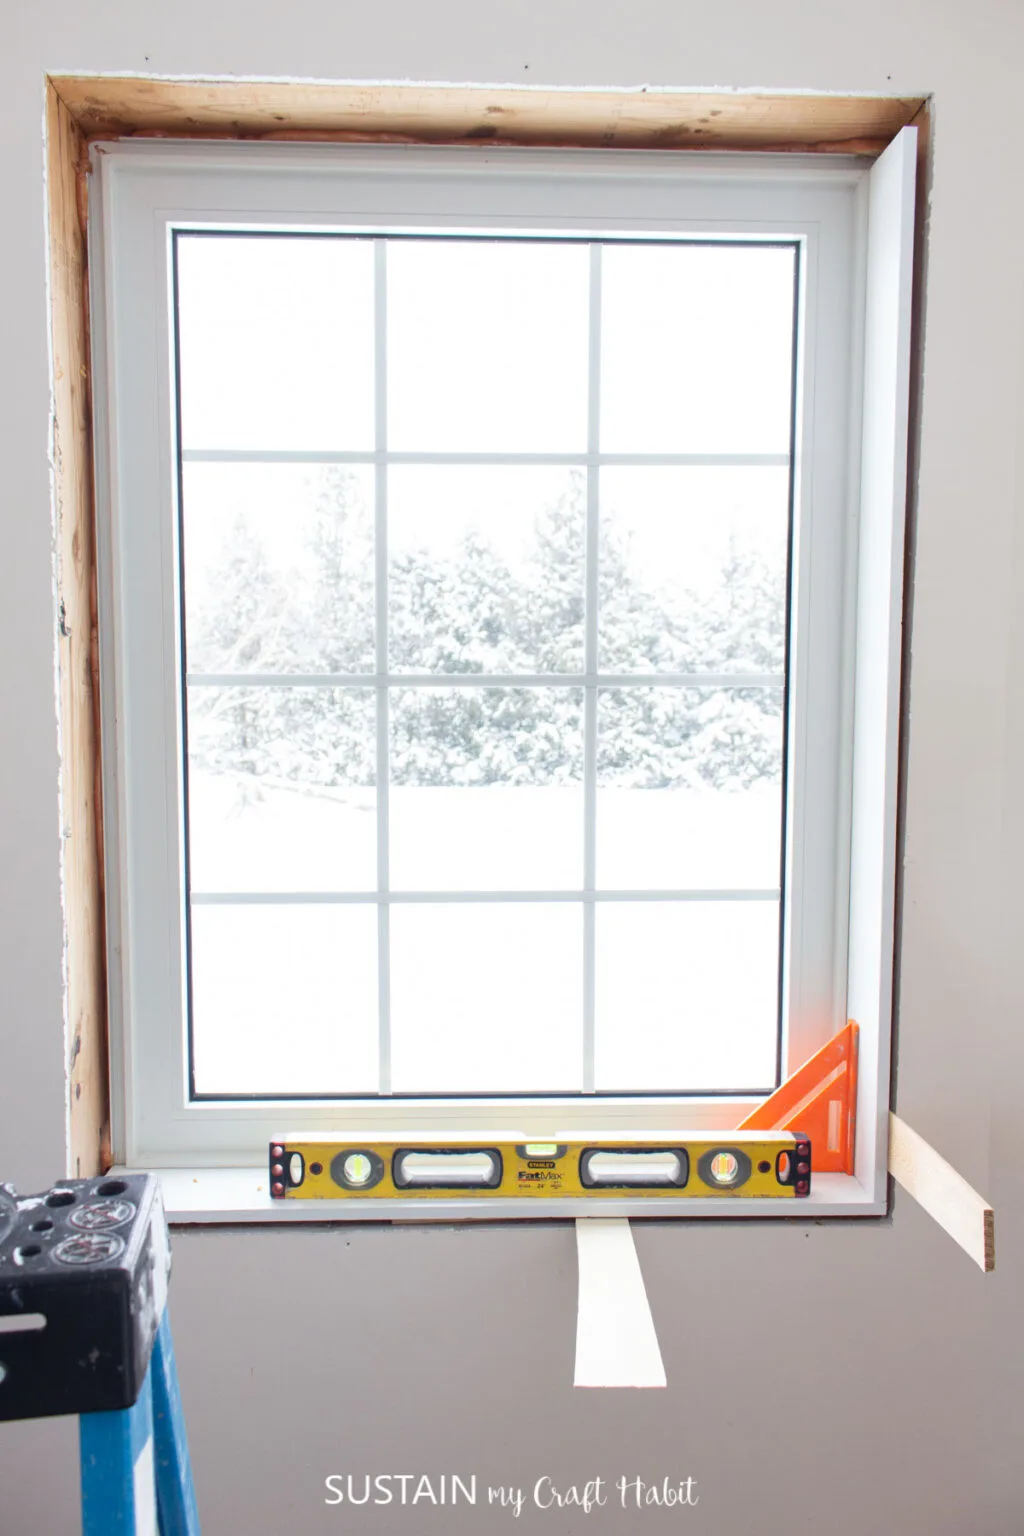
The jambs are the sides. It's where we can currently see wood framing in your pictures. You are gonna cover that wood (and the raw edges of the drywall) with another piece of wood. Prettier wood. It's usually a piece of 1x4 ripped to the right width. You want 1 edge to touch the vinyl window, and the edge closest to you to be FLUSH with the face of the drywall (not protruding at all).
Step 1 will be to decide if you want to "picture frame" it (have casing on all 4 sides like a picture frame), or have a sill (it's called stool- I don't know why). If it's picture frame, you will run your jamb on all 4 sides. If it's gonna have a sill, you will install your stool first, then install the jambs on the sides and top. The stool acts as the bottom Jamb.
Does that make sense?

In reply to SV reX :
Dude, you rock. Straightforward and easy to understand. I'm not the OP, but have some of the same questions with an upcoming garage build. I appreciate the info.
There are actually 2 jamb reveals. The first is when you install the jamb- you want an even reveal to the window frame. If the window is centered in the rough opening, you can nail your jamb material directly to the wood studs. If there is a little variance, you will shim between the jamb and the stud to make an even "reveal" to the window frame- that just means so you will see the same amount of the vinyl window all the way around when finished.
The 2nd reveal is when you add the casing. The casing is usually held back from the face of the jamb by a small amount leaving about 3/16" of the edge of the jamb "revealed".
Does that make sense?
If you decide to add a sill (stool), it goes on first like this:

It gets notched with a jigsaw so it extends past the window a little onto the drywall. The extensions are long enough for the casing to sit on, so when it is finished it looks like this:

Hope that helps
In reply to Flynlow (FS) :
Talking about technical construction details without using technical language is my superpower. ![]()
SV reX said:In reply to 93EXCivic :
Ok, let's see...
The jambs are the sides. It's where we can currently see wood framing in your pictures. You are gonna cover that wood (and the raw edges of the drywall) with another piece of wood. Prettier wood. It's usually a piece of 1x4 ripped to the right width. You want 1 edge to touch the vinyl window, and the edge closest to you to be FLUSH with the face of the drywall (not protruding at all).
Step 1 will be to decide if you want to "picture frame" it (have casing on all 4 sides like a picture frame), or have a sill (it's called stool- I don't know why). If it's picture frame, you will run your jamb on all 4 sides. If it's gonna have a sill, you will install your stool first, then install the jambs on the sides and top. The stool acts as the bottom Jamb.
Does that make sense?
Amazing. That explains it much better then anything else I saw on the internet.
I am going to do a picture frame.
Am I supposed to leave a gap between jambs and the wood framing like this?
In reply to 93EXCivic :
Only if you need it to make the reveal even at the back where the jamb meets the window.
It's a standard that goes back hundreds of years, but isn't always necessary today with improved manufacturing techniques.
BTW...
That looks like a fixed transom window. You don't actually have to put wood moldings at all. You could return the drywall to the window (using drywall as "jambs"). That's more drywall work (which everyone hates), but it's a very clean modern look without moldings.
If you do that, don't touch the window frame with the drywall. It will sweat and the drywall will absorb the moisture. You need to use a vinyl J-trim between the drywall and the window frame. Then add corner beads at the outside corner. Mud, sand, and repaint.
Just another approach...

Installing mitered casing is tricky and is an art. I can do it but I'm slow and not in the same league as a finish carpenter. I also don't own a power miter saw. I use corner rosette moldings and cut the casing with a cheap plastic hand miter box at a 90 degree angle, install the casing first and add the rosette moldings after.
Menards.com: Mastercraft® 7/8 x 3-1/2 x 3-1/2 Unfinished Oak Rosette Moulding


VolvoHeretic said:Installing mitered casing is tricky and is an art. I can do it but I'm slow and not in the same league as a finish carpenter. I also don't own a power miter saw. I use corner rosette moldings and cut the casing with a cheap plastic hand miter box at a 90 degree angle, install the casing first and add the rosette moldings after.
Menards.com: Mastercraft® 7/8 x 3-1/2 x 3-1/2 Unfinished Oak Rosette Moulding
I came here to say this very thing, for I am not a miter master.
Rosettes aren't the only way to trim without miters

In reply to SV reX :
It is a fixed transom window. I probably should have asked before I painted everything but I will just do wood cause that seems like less of a pain in the ass tbh.
Thanks for the advice. I think I have it figured out.
I do have a miter saw so I am not too worrying about getting the miter right.
"Picture framing" is harder than it looks. Since all 4 miters connect around the perimeter, any error in your saw is multiplied by 4. So, if you are off 1*, that's 4* when you reach the last corner. That's a really big gap.
The trick is to be prepared to test fit carefully at each joint. Be patient.
The sill (stool) is probably simplest if you enjoy the look.
Since most drywall sticks out from the window jamb extensions a little amount because that's just how framing works out, the miter angles have to be a little less than 45 degrees, ~44.5. Also, all of the people I know use a carpenters pencil under the casing next to the cut so that the room side edge of the miter cut always touches first. It is always a trial and error effort and is hard to do perfectly. Imagine that the saw blade is turned at an almost 45 degree angel in the crude sketch below.


Not sure how the outside perimeter of that window is sealed but I recommend running a backer rod and caulk joint around the inside edge of that window. (Will be hidden Behind the trim)
In reply to VolvoHeretic :
That's called back-beveling. It clearances the back of the miter so the visible face is tighter. It's a little advanced for the OP... he'll probably do fine with caulk.
I usually back bevel a little differently than what you described. I leave the saw set at 45* and put a shim under only 1 edge of the piece so it is a slight compound angle. By rolling the piece, I am both backbeveling and changing the miter slightly. I'm basically mimicking on the saw table the same thing that is happening on the wall- the finished piece is rolled a little bit due to framing imperfections.
That's where the "art" comes in...
SV reX said:"Picture framing" is harder than it looks. Since all 4 miters connect around the perimeter, any error in your saw is multiplied by 4. So, if you are off 1*, that's 4* when you reach the last corner. That's a really big gap.
The trick is to be prepared to test fit carefully at each joint. Be patient.
The sill (stool) is probably simplest if you enjoy the look.
That is a fair point I hadn't really thought about. I may go the sill direction or using rosette.
It may be easier then my normal method of doing things like this which involves buying materials from Home Depot, cutting, realizing I screwed up, swearing a bunch, going to Home Depot to get more material, kind of get it together, realize I somehow still don't have enough material, swear some more, go to Home Depot again, drink a beer (or four), swear some more, bodge it together enough to look ok from 5 ft and call it done.
In reply to 93EXCivic :
Are you using real wood casing or painting? Either way use Minwax Wood Putty to pretty up your miters. With real wood casing I always buy several shades including white and use a porcelain plate as a palette and mix up the putty to exactly match the wood grain surrounding each individual nail hole by adding a little of this and a little of that. Done right, you will never see any gap or nail hole. Pretend you are Michelangelo. After it dries for a while, slap on a dab of clear finish with a foam paint brush.

In reply to VolvoHeretic :
Painting for sure. I know the magic of that stuff. It was I usually use to get away with my impressive craftsmanship.
In reply to 93EXCivic :
Since they are fixed transoms, you could put rosettes at all 4 corners. That would look great, and have no miters or difficult cuts.

Take the time to do the miters, I think rosettes just look like you chickened out. I'd be tempted to do drywall like Paul suggested earlier, that's a clean look for those types of windows.
In reply to Steve_Jones :
Yeah, except that really is the most difficult approach.
Moldings exist for a reason. To hide discrepancies. No moldings is much harder than adding moldings.
But it's a super clean look.
In reply to SV reX :
Plus you then need to use bullnose rounded corners. Of course, there's no time like your own house to practice new things.

In reply to VolvoHeretic :
You don't NEED to use bullnose, but it's a nice look
You'll need to log in to post.


