4 5 6 7 8
Mr_Clutch42
Mr_Clutch42 New Reader
1/18/14 6:33 a.m.

Great build. Your welding is very good. I went to school for welding and many build projects that I have seen online showing guys doing the welding themselves are not that good. How much did the tools cost to bend the tubing?

Buying tires new is the best way to go. Even for your daily drivers, new tires will perform much better than used ones. I would suggest only buying used tires if you're strapped for cash.

JohnyHachi6
JohnyHachi6 Dork
1/18/14 11:36 a.m.

Thanks!

Mr_Clutch42 wrote: How much did the tools cost to bend the tubing?

That model bender is around $1000, but the manual ones can be retrofitted for hydraulics and are considerably less.

Mr_Clutch42 wrote: I would suggest only buying used tires if you're strapped for cash.

I agree... and buy a lot of used tires.

JohnyHachi6
JohnyHachi6 Dork
1/18/14 12:23 p.m.

Checked a bunch of items off the list last night. For the first time, the car is really starting to feel like a race car, which is great.

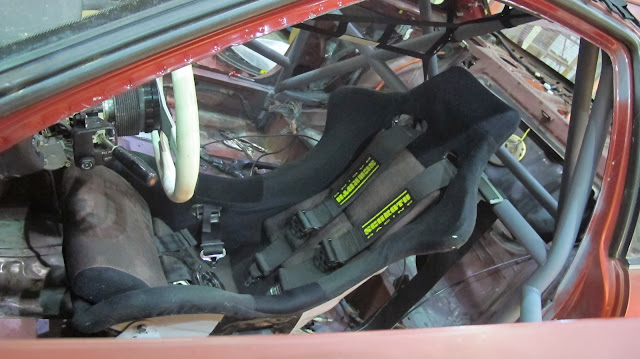
Got the seat cover reinstalled and put in the harness. Sub belts and lap belts are on latching anchors so they can be removed/swapped/adjusted easily for different drivers during the race.
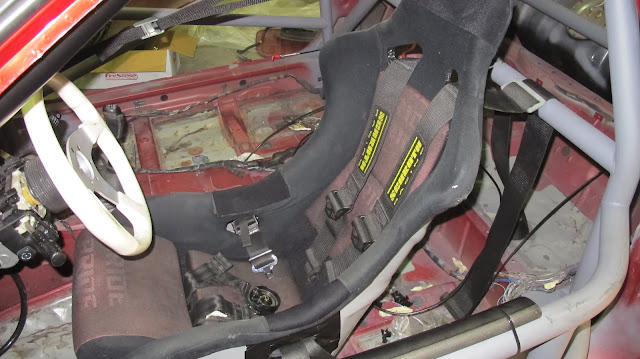
I also installed the cage net. I'll need to figure out better mounting to the dash bar, but wanted to see how it would work out.
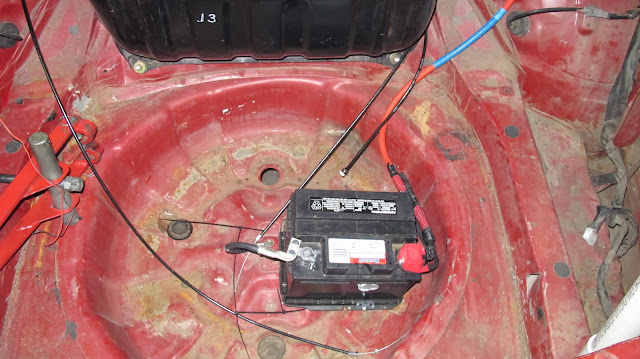
Spent a lot of time working on the battery relocation/kill switch wiring. I want to have the battery in the trunk and needed to run the cables for that.
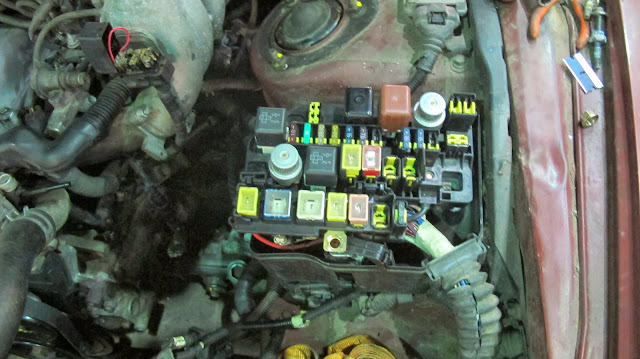
At the front of the car I had to disconnect all high-amp cables for the alternator, OE battery cables, and starter so that everything could be routed through the kill switch.

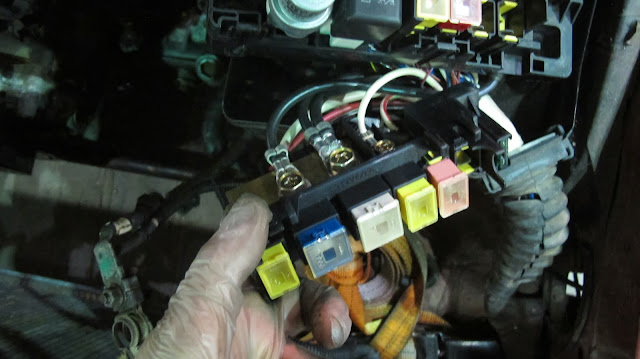
Had to dig into the fuse box to get the alternator cables.

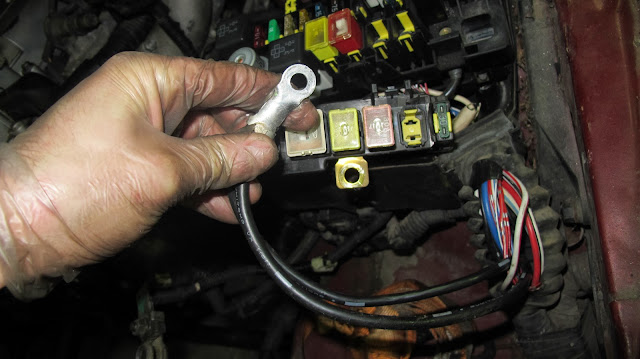
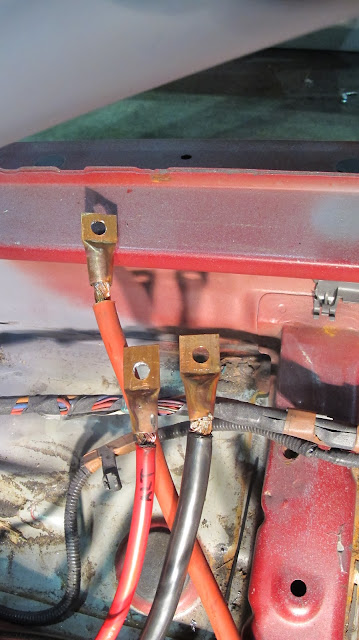
To connect all the load wiring (main harness and starter) and add some length to the various cables, I made up a few copper lugs out of some spare tubing.
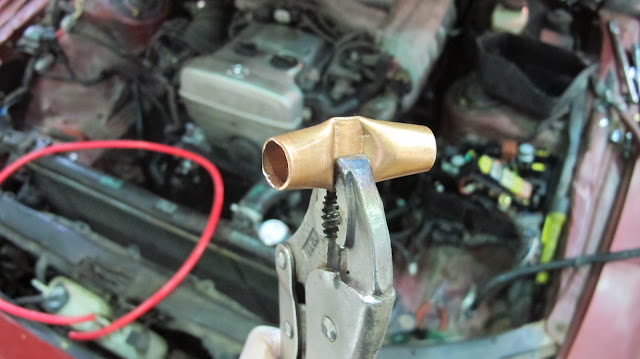
The lugs were heated with a propane torch and filled with solder, then the bare cable ends were inserted to make a solid high-current connection.

Here's the extension for the alternator positive terminal.
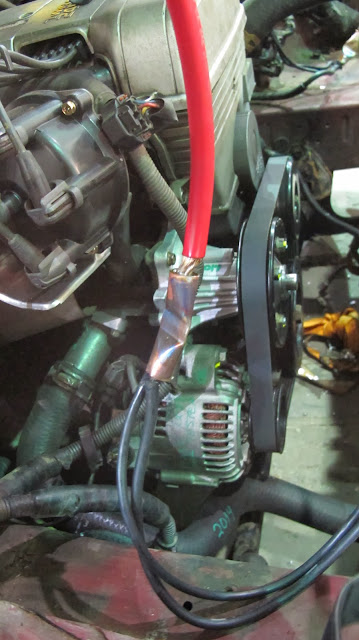
This one joins the starter and main harness loads and extends the cable so it can reach the kill switch.
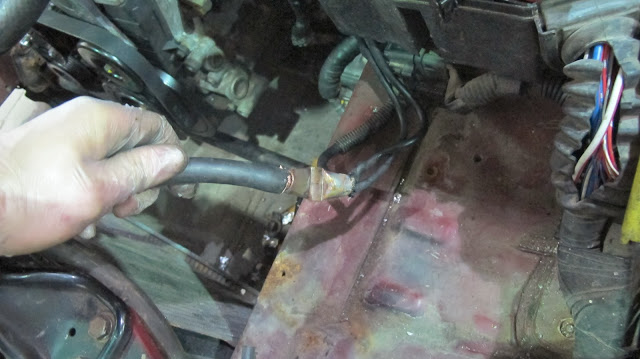
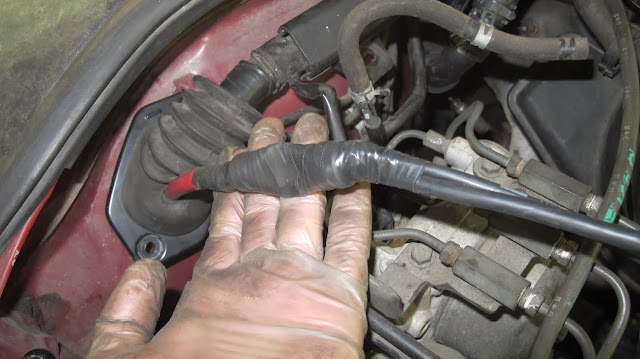
The lugs were wrapped with electrical tape, then plastic loom casing before bring installed. The cables were routed through the firewall through the grommets/boots for the main harness on either side of the engine bay.
In the passenger compartment, the battery cable, alternator cable, and load cable needed to be connected to the kill switch. To do this, I made up three more lugs that I drilled to bolt to the switch.
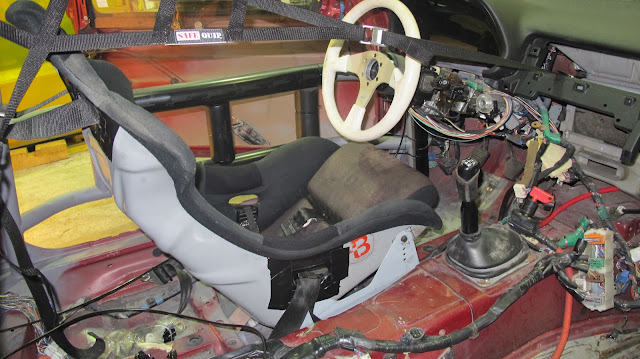
Here you can see the switch in front of the shifter. I still need to make the mounting plate for it, but this shows the rough location. Gave it a test run and it worked fine.
It's a simple setup and there are more complex ways to set this up that offer some additional benefits, but I've used this arrangement on several cars before, 2 of which use the same type of alternator and starter and never had any problems, so I think this should work out well.

I have a second switch and at some point, I'll probably add it in series at the base of the windshield on the driver's side so a safety worker could easily activate it.

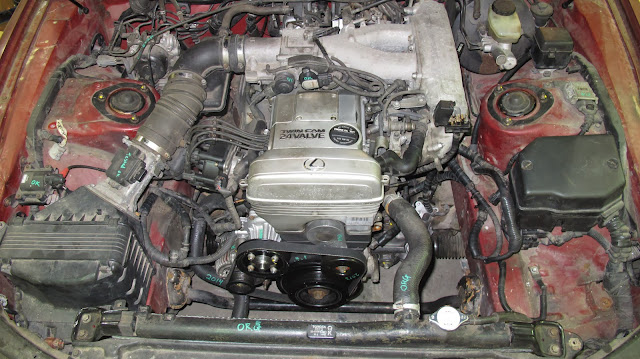
Engine bay, sans battery.
Since I was messing with safety equipment, I got out the fire system and was trying to figure out the best location for that. Obviously, I'm really trying to work on the weight balance and want as much stuff at the rear of the car as possible. Turns out the actuator cables and tubing are plenty long enough to have the tank in the trunk as well.
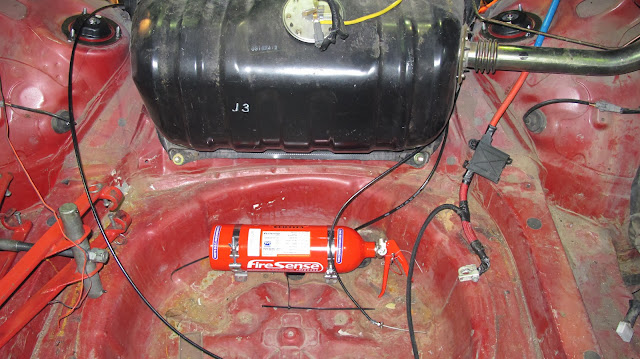
I'm planning to run one of the cable pulls to the passenger's door opening and one to the dash bar on the driver's left, both of which could be activated from outside the car. For the nozzles, one will be aimed at the driver's window area, the other will be in the engine bay aimed at the top of the engine, per ChumpCar rules.

Billy_Bottle_Caps
Billy_Bottle_Caps Dork
1/18/14 3:11 p.m.

In reply to JohnyHachi6:

Great build write up. Thanks for the details and the pics. Wish you the best on the track.

BBC

fried_rice
fried_rice New Reader
1/20/14 9:45 p.m.

I just realized you completely removed power steering. Mine went out this weekend and it was brutal, I had 275 R-comps up front. I was using my leg for bracing, while steering around the carousels and was drenched in sweat after 20 minutes. You guys better start working out.

It was about 50-60 degrees and with the 3-row radiator (stock fan and shroud) and 19 row oil cooler the car stayed at 200F W/140F Oil, pushing it hard. I'm hoping switching to a plastic radiator will be alright in the cooler months. I'm not sure if plastic will make it on the 100F days.

The Ebc yellow LS400 fronts and EBC green rear MKIV supra brakes did amazing compared to my other car, where the abs wouldn't bleed correctly. No brake ducting yet, but never experienced any fade and I was pushing the brakes hard.Going to order 2" ducting. I used Motul RBF 600 which held up great for two days. The Valvoline synthetic, previously used, would boil and be toast by the end of the track weekends, previously.

Hope you don't mind me posting in here, just trying to share info that may help.

JohnyHachi6
JohnyHachi6 Dork
1/20/14 10:03 p.m.

In reply to Billy_Bottle_Caps:

Thanks - much appreciated!

JohnyHachi6
JohnyHachi6 Dork
1/20/14 10:09 p.m.
fried_rice wrote: Hope you don't mind me posting in here, just trying to share info that may help.

Not at all, the more info the better. Glad to see other folks that are interested in this too.

As far as the power steering goes, you really need to remove the seals in the rack or the amount of resistance at the steering wheel will be really high with a de-powered system. I drove the car a couple times between taking out the pump and removing the seals and it was extremely difficult to maneuver. With the seals out, it's easily manageable and not really noticeable at high speed.

Glad to hear the EBC pads worked out ok for a track day. With the right brake fluid, I'd be surprised if fade was an issue. Longevity over the full enduro is definitely a concern though. Do you happen to have any measure of how much pad material (thickness) was worn through during your track day and how much hot lap time that included?

BTW, do you have a roll cage in your car?

JohnyHachi6
JohnyHachi6 Dork
1/20/14 10:56 p.m.

Slow weekend for car work. Think the GF got almost as much done by changing her oil and washing her RX-8. Here's what I did get accomplished.

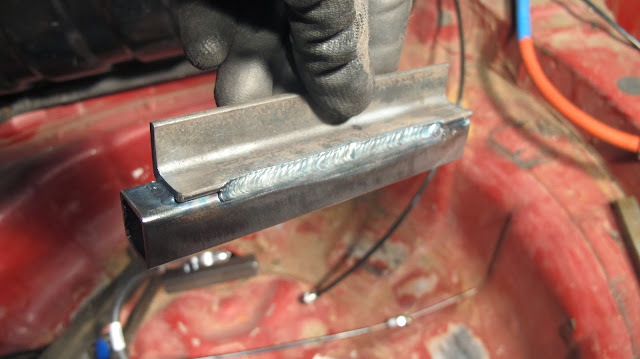
Wanted to get the battery mount finished in the trunk. Fabbed up some brackets for battery to sit on.
Welded those in along with some tabs for mounting some threaded rod. Cleaned up a little of the surface rust that had just started forming in the tire well and rattle canned in some paint real quick. Here's the battery mounted. Used an aluminum L-extrusion for the top bracket. It's quite sturdy and as easy or easier than the OE mounting setup to remove/install.

Decided to put in the fire system bottle as well while I was working in the trunk. Drilled out the holes for the bottle brackets and bolted that in with some big washers on the back side.

I connected the pull cables as well to make sure I had enough room to run the handles were I wanted - looks good. After finalizing that I removed the bottle again. The car is sitting outside for the moment and these systems can freeze at low temps, which can destroy the system, so I brought it back inside.

Mounted the interior kill switch. It's been working just fine, but I had it just hanging by the shifter, which certainly isn't a good idea when all the current from the battery/alternator is flowing through the terminals (though I did wrap them with a ton of electrical tape). Here's the mount for it.

It's easily reachable from the driver's seat with harnesses on, and doesn't come close enough to the shifter to be a problem (shown with the shifter in 1st or 3rd). When I cut the vinyl for the car numbers, I'll make a little decal showing the off position and direction of rotation.

The two switched I got came with some weather caps, which is nice. Here's the switch off with the cap on - good for keeping any junk from falling in there while it's not in use. The key is attached to the panel with some safety wire so it doesn't get lost, though I have spare keys just in case.

fried_rice
fried_rice New Reader
1/21/14 9:31 p.m.

I do not know the pad thickness I started with, as I purchased them used with 800 street miles. I ran about 50 laps at MSR Houston, 4 20 minute sessions. I missed 4 sessions due to two alternators being bad, and gas spilling from my gas cap.

I measured about 11mm thickness on the outside pad, but they look like they haven't worn much at all. I had the doors full weight, stock seat, complete dash with HVAC, and a bunch of other stuff in the car, because I did not have time to strip it completely. I did not have a cage or a race seat. My cage comes in tomorrow and I'll be ordering all the other safety equipment tonight. Running 275/40/17 R-comps up front. You can see how I ground the calipers to fit the rear 9.5" supra wheels on the front. These pads are not too aggressive and I would suspect you could pull off the enduro with them driving the car at a steady pace.

I'm going to keep my power steering, because I plan on using even wider wheels. My arms get a little tired even with the PS working after two days.

http://imageshack.com/a/img716/7177/2di5.jpg

http://imageshack.com/a/img13/7973/yye8.jpg

http://imageshack.com/a/img534/4930/n7q6.jpg

Edit: Thinking of skipping RA and doing Hallet instead. Working all day and night took it's toll on me last week. Is that net on the right side of the seat needed? I have a huge one in my shopping cart for the driver's window. Also how much foam did you buy for the Roll cage?

I'm trying to figure out something for the hood, trunk and doors. I've never done fiberglass, but that's an option for the hood at least, it would definitely help reduce the overweight front end. The trunk I can probably just slap aluminum sheet metal with some hood-pins for removal. Also maybe completely skin the doors and weld them to the body. I hate to ruin the aesthetics of the body though.

JohnyHachi6
JohnyHachi6 Dork
1/24/14 12:20 a.m.
fried_rice wrote: Edit: Thinking of skipping RA and doing Hallet instead. Working all day and night took it's toll on me last week. Is that net on the right side of the seat needed? I have a huge one in my shopping cart for the driver's window. Also how much foam did you buy for the Roll cage? I'm trying to figure out something for the hood, trunk and doors. I've never done fiberglass, but that's an option for the hood at least, it would definitely help reduce the overweight front end. The trunk I can probably just slap aluminum sheet metal with some hood-pins for removal. Also maybe completely skin the doors and weld them to the body. I hate to ruin the aesthetics of the body though.

Yeah, 2 weeks is probably not enough time to comfortably get a car prepped with a full cage.

The interior net (usually called a cage net) is not required. But, without a containment (halo) seat, I think it's a really good idea. Certainly helps reduce risk of head/neck injuries in a side impact.

I ordered 3 sticks (36" ea.) of high-density (required) roll-bar foam and with some scraps I had kicking around from my miata it was barely enough.

Keep in mind, if you do any fiberglass or aluminum body panels it increases the car's value. You'll really quickly be looking at penalty laps if you have any other mods.

JohnyHachi6
JohnyHachi6 Dork
1/24/14 12:31 a.m.

Ok. Spent a couple more hours on the car this evening. Disabled the steering column lock, which is required for ChumpCar now. Needed to weld some bolts to the OE security hardware to extract the ignition switch/lock.
Cut the end of the lock off with a chop-saw and replaced the hardware with some hex-head bolts.
Also did a little work on the window net. I'm using some old arm restraints for the lower straps, which have nice clips to quickly remove the net if needed. Ordered some quick-release hardware for the upper mounts and hope to have everything installed for that this weekend.

I also welded the mounts for the interior mirror and got that set up how I wanted. Pics to come if I remember.

Hoping to finish the rear bulkhead and do the lexan windows and cooling fan this weekend. So, stay tuned for updates.

mazdeuce
mazdeuce UltraDork
1/24/14 6:27 a.m.

Thanks for doing such a good job on this build thread. There's so much small stuff that I've never really thought about when putting together a race car. I especially dig your big power lugs. I'm going to remember that one.

JohnyHachi6
JohnyHachi6 Dork
1/24/14 10:28 a.m.

In reply to mazdeuce:

Thanks! Yeah it's easy to forget about all the little details. I made a fairly comprehensive list of all the items that I would need to purchase and all the tasks that would need to be completed, but there are still things I forgot, or that have taken more time/parts/effort than I expected.

A lot of the nice tips and tricks have, of course, come from other racers and builders. For instance, I saw a youtube video of a couple of guys making those battery cable lugs that way a couple months ago and thought it was brilliant.

wvumtnbkr
wvumtnbkr Dork
1/24/14 11:58 a.m.

I saw in one of your posts how you electrical taped teh copper lugs after connecting them. I usually use some rubber hose split down teh side and then either shrink wrap it or zip tie it in place. This provides MUCH more security when dealing with battery cables.

Rob R.

JohnyHachi6
JohnyHachi6 Dork
1/24/14 12:00 p.m.

In reply to wvumtnbkr:

Yeah, I wrapped them with the OE-style split wiring loom after the electrical tape. I definitely agree that the tape by itself is minimal protection at best.

fried_rice
fried_rice New Reader
1/24/14 3:54 p.m.

Like the other guy said this is very comprehensive and helpful for me. This will be my first racecar so I had no idea of all the little things I needed. I just went through your build thread with the rule book out and ordered everything I needed. I would have forgotten alot of little details without your help. I purchased 9ft of FIA cert foam so I hope that's enough. I plan to run EC with coilovers at first and see how the car does, if It can't win the race with them, no point in me spending money for new OEM stuff. I do know the car was pretty fast this weekend, ran about 1:55, with all the issues and not going 100% balls to the wall. The spec Miata record is like 1:48.

I decided to order a steering column for "safety and driver comfort" because my tilt steering broke. The steering column was only 20lbs, which what I had read and stated earlier was 40(incorrect). As I was driving the wheel started moving up higher and higher until it was hard to drive, lol, not to mention no PS. The plastic gear in the electric tilt is notorious for breaking, especially if the auto tilt button is on, it will get stuck at a random position. Now my dilemma is Tig welding or stick welding my cage or buying a MIG to do it. I'm not really comfortable with TIGing yet.

Also the kill switch wiring was really helpful. Cool ideas with the brass connectors and rubber hose too! I'm going to be removing as much wiring as possible and I bought a switch panel with push button start. I also bought a fuel cell, because my tank was leaking out of the gas cap and I already had the pumps, hose and fittings for multiple 700hp+ fuel setups.

A question for anyone. I see a lot of people mounting the fuel cell underneath the rear of the car where our spare tire is located, a few inches off the ground. This seems a bit unsafe if a rear imapct was to happen or if you hit something off track to rip lines etc off. I'm not an engineer but it would seem the stock location is probably safer as it would take a huge impact to reach the tank. Any mounting suggestions? Exposed under the car with a tube frame around it ok? Inside the trunk where your battery and fire system is. I purchased the 4 Liter fire kit from the site you linked.

JohnyHachi6
JohnyHachi6 Dork
1/24/14 4:08 p.m.

In reply to fried_rice:

Yeah, EC class is probably a great way to get started, especially if you already have a car with some suspension or engine mods.

For the questions about the fuel cell and other preparation items, you'll probably get more/better responses posting a separate thread on the "Grassroots Motorsports" forum. I don't have much experience with fuel cells personally, and haven't looked into the mounting regs and such yet since I'll be running the OE tank for now. A good place to start though, might be to look at the SCCA or NASA road racing rules and see what's required there. They will almost certainly have guidelines above and beyond what ChumpCar and Lemons specify.

fried_rice
fried_rice New Reader
1/24/14 4:34 p.m.

Yea, EC will be good to see how the car does first. Ironically it saves me money to run with mods I already have vs buying new OEM type parts.

I've been searching a bit on the fuel cell, but couldn't really find if it's safer one way or another. I've seen many SCCA and NASA cars running them exposed with square tubing frame under the car, so I would assume it's legal. Just seems sketchy if I went rear end first into a wall at 100mph, or went off and hit a dirt ditch, hitting the cell. These SC's are built like a tank so I'm leaning towards cutting the spare tire well, sheet metal over it and putting it in the trunk for some extra coverage. Thanks!

JohnyHachi6
JohnyHachi6 Dork
1/25/14 12:07 a.m.

Ah! A canoe in a build thread! It really is an invasion.

JohnyHachi6
JohnyHachi6 Dork
1/25/14 12:25 a.m.

Got some more good work done this evening.

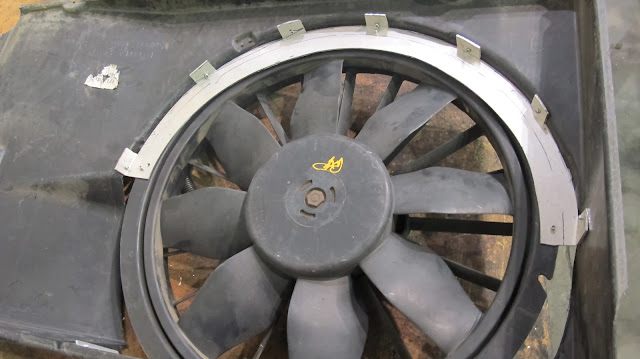
Started with the cooling fan, which needed to be mounted. As mentioned, I really wanted to replace the mechanical cooling fan with an electronic unit, which won't be on spinning at 7,000 RPM when the car is pulling down the straights, wasting power/adding rotating mass like the OE fan.

I already had modified the OE shroud slightly and riveted in an aluminum ring to mount a dual-speed Volvo fan to. I drained some coolant from the radiator and pulled off the upper coolant hose to do a quick test fit.
Looked pretty good. Had a whole inch or so of clearance with the water pump pulley, unlike in my Datsun, where it was nearly touching.

Here's how the fan was mounted to the shroud (looking at the inside of the shroud).
When I pulled the assembly out of the trunk today and tossed it on the workbench, I cracked the shroud. Should have been more careful with a cold piece of plastic (it was a frigid 20 something here in Atlanta today). Good to find these weak links though. I also noticed another crack by one of the mounting tabs. So, while I was riveting in the fan I made some little tabs to reinforce the cracked areas.


Here's everything riveted in place. I trimmed some of the excess plastic around the fan and sealed up the openings with some aluminum tape. I love that stuff for applications like this.

And here it is installed. You can see in this shot that I also moved the coolant overflow tank to the location originally occupied by the A/C and PS components. I'm really trying hard to move as much weight down and back in the chassis. I still need to figure out some mounting brackets for the tank, but it fits well in that location and the OE hoses work fine.
As far as the wiring for the cooling fan, I decided it would really be best to hook it up on a thermostatic relay, so I'll probably pick up one of those at the parts store in the next couple days. IIRC, advance has one with a temperature probe and adjustable relay for ~$10, which is what I used on my Datsun. It wasn't great quality (the relay would sometimes stick closed), but you can't beat the price, so I'll probably get another one of those.

JohnyHachi6
JohnyHachi6 Dork
1/25/14 12:35 a.m.

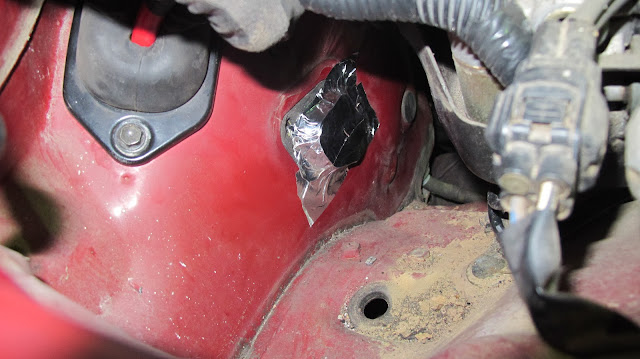
While I had the aluminum tape out, I also sealed up the hole in the firewall that was left when I removed the A/C lines. It was right around 2" diameter, which is the ChumpCar limit for sealing firewall holes without using a piece of metal fixed in place with real hardware (vs. tape).
Now I can finally seal up the HVAC ducts and figure out the fans controls so we can have a defogging system if it rains.
More on that when I can find some extra time though. Not high on the list at the moment.

JohnyHachi6
JohnyHachi6 Dork
1/25/14 12:58 a.m.

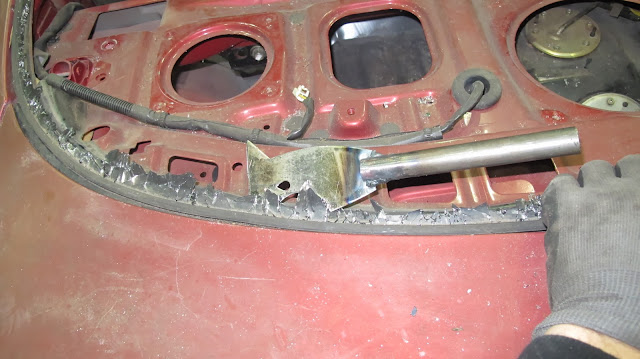
One thing that was high on the list was replacing the rear glass with polycarbonate. While, technically, new teams are allowed to run taped OE glass for their first race in ChumpCar, I felt it was worth removing the OE glass now. I really want to keep some kind of window covering for the rear and side quarter windows to avoid getting huge amounts of water in the car, improve the aerodynamics, and to help improve visibility (vs. taped windows). ChumpCar now raises a car's value for Lexan (or equivalent) windows, but I decided it was worth the budget hit for this. It's only a few bucks anyway, and I don't have many other upgrades that I want to do.

Darius showed up to give a hand with this. First we made a big paper template of the rear and side quarter glass and transferred that to the polycarbonate sheet. I used a scratch and UV resistant polycarbonate, having some of this left from my Miata. I've been impressed with how well it's worked out in that application. I had a sheet of 1/8" which is being used for the back, and some 1/6" left from the Miata, which will be used for the side windows.
We tried removing the quarter glass with some guitar strings.
However, there were some brackets glued to the inside of the window that were bolted into the frame and it made it nearly impossible to get the guitar string around the whole opening. We broke that first window trying to get it out, so we decided it wasn't worth the time to try with the other two windows. So, we smashed an old spark plug and used the ceramic to break the other windows. I never get over how well that works.


Downside of breaking the glass - you have to scrape out all the adhesive.
Here's the rear window frame with that removed, ready for the polycarb to go in.
And for the quarter glass.
Before the new windows go in, I want to seal up the rear bulkhead. I have the OE access panel that goes right in front of the tank and will reinstall that, but there are some large openings that I had to cut for the roll cage and there are openings for the OE speakers and some other crap. So, I'll seal those up with some aluminum panels to isolated any gasoline from the passenger compartment.

Again, more on this when I have the time.

JohnyHachi6
JohnyHachi6 Dork
1/25/14 1:05 a.m.

And, one last thing, the interior mirror mounts welded in as discussed before. Please forgive the terrible-looking welds. There was some paint residue or something burning off the panel which makes everything look nasty.

You might notice that the mirror is at a slight angle. I found that it gave a better view of the passenger's side that the driver's side, so I tilted it somewhat to compensate. Even without the side mirrors, this almost entirely eliminates any blind spot. If I have time, I'll be removing the OE exterior mirrors and installing some golf cart mirrors, mounted to the cage near the doors for side-viewing. This will both reduce drag and eliminate the risk of loosing an exterior mirror to another car.

Sky_Render
Sky_Render Dork
1/25/14 2:03 p.m.

Very comprehensive build. Love it. Keep up the good work.

JohnyHachi6
JohnyHachi6 Dork
1/28/14 11:52 a.m.

Did a driver ingress/egress and fueling training session with the local drivers over the weekend. Also checked everyone's gear to make sure it will pass tech. Everything went well, though we're thinking we'll need to move the seat back a little for the taller drivers at the end of the race.

After training, some of the guys gave a hand bleeding the brakes. Darius wanted to show off his illest moves.
You can see that the rear windows are still out in this picture.

While the wheels were off, I taped up the wheel weights. I've noticed that most race shops do this, and have had weights come flying off before.

4 5 6 7 8

You'll need to log in to post.

Our Preferred Partners
mBLYvaFRZXBlJHYqBIXiso2bCt6V1qQVgfIsQGpz5F1ukYFULdjMua6BgXusim6b