3 4 5 6 7
a_florida_man
a_florida_man Dork
7/4/24 12:52 p.m.

So I think I like the car's new name....

"Lucky Strike"

As the phrase was used inn the 1800's gold rush, and as to the likely hood that it's production spanned the 1969 UAW strike.

I mean, after all, I did find gold in it didn't I?

DeadSkunk  (Warren)
DeadSkunk (Warren) MegaDork
7/4/24 3:17 p.m.

This thread, and others like it, always get me daydreaming and then searching Marketplace for stuff I'll never buy......like this...Marketplace - 1972 Chevrolet Corvette · Stingray Convertible 2D | Facebook..$5000....another cheap Vette "beater". But I'll live vicariously through a_florida_man instead..Product photo of 1972 Chevrolet Corvette · Stingray Convertible 2D

a_florida_man
a_florida_man Dork
7/4/24 3:43 p.m.
DeadSkunk (Warren) said:

This thread, and others like it, always get me daydreaming and then searching Marketplace for stuff I'll never buy......like this...Marketplace - 1972 Chevrolet Corvette · Stingray Convertible 2D | Facebook..$5000....another cheap Vette "beater". But I'll live vicariously through a_florida_man instead..Product photo of 1972 Chevrolet Corvette · Stingray Convertible 2D

Hard to say for sure but it looks like it could be a good deal. Do the dream!

a_florida_man
a_florida_man Dork
7/4/24 4:49 p.m.
a_florida_man said:
DeadSkunk (Warren) said:

This thread, and others like it, always get me daydreaming and then searching Marketplace for stuff I'll never buy......like this...Marketplace - 1972 Chevrolet Corvette · Stingray Convertible 2D | Facebook..$5000....another cheap Vette "beater". But I'll live vicariously through a_florida_man instead..Product photo of 1972 Chevrolet Corvette · Stingray Convertible 2D

Hard to say for sure but it looks like it could be a good deal. Do the dream!

I just read the ad. If that is indeed a factory big block 4 spd... that's a great deal.

a_florida_man
a_florida_man Dork
7/4/24 6:39 p.m.

So I was standing next to the car grilling and took out literally a minute or two to do this:

No amount of buffing compound will touch this paint damage. But it wipes off in seconds with a magic eraser and super clean (purple degreaser).

a_florida_man
a_florida_man Dork
7/4/24 7:58 p.m.

Here is a better demonstraion.

Before:

Same lighting, 5 minutes of magic eraser later...

Be sure to watch out for lines and high spots... it's an aggressive process.


Tony Sestito
Tony Sestito UltimaDork
7/5/24 9:29 a.m.

Loving this thread, the concept, and all the progress so far! One of my uncles (the same one who was into 70's Dodge Power Wagons) had a 1969 LT1/4-speed car when I was growing up, so the early C3's are cool in my book. His was red with T-tops and lots of late 70's/early 80's mods. His had side pipes, which you would ALWAYS burn your legs on getting out of the thing. Can't wait to see how this comes out!

a_florida_man
a_florida_man Dork
7/5/24 1:18 p.m.

Moar yellow!!

This car loves the attention!

This is still the first phase of rough crud removal.

And in case you just tuned in, this is beyond normal oxidation, this paint has been damaged in an unusual way. You almost cant even sand the beige, pale yellow paint, and dirt stains off. Yet they wipe off with purple cleaner and a magic eraser.

Next will likely be to remove all of the trim (locks, door handles, emblems, etc) and go over it again and again with the eraser untill that evens out.

Next, after the crust is off, wet sanding works as you would expect. I'll sand the bad spot paints off of the two doors and try to go after some of the faint staining that is hard to see even n person.

Hopefully after that I'll move to the polisher and use 4 or 5 cutting passes, 4 or 5 polishing passes, and then a glaze...


Norma66-Brent
Norma66-Brent HalfDork
7/5/24 5:46 p.m.

I had this exact thing. Someone sprayed spray paint over single stage and it oxidized like you wouldn't believe.

hobiercr
hobiercr UberDork
7/5/24 5:56 p.m.

I'm sure this is a repost. I LOVE this thread and seeing the refresh!

May be an image of 1 person, car and text

a_florida_man
a_florida_man Dork
7/5/24 7:55 p.m.
Norma66-Brent said:

I had this exact thing. Someone sprayed spray paint over single stage and it oxidized like you wouldn't believe.

So Ive seen that too, and usually lacquer thinner takes it right off.

But on this car, you pretty much cannot sand the top of the failed paint off... it just won't budge.

But if you run over it with a magic eraser and some purple cleaner.. off it goes like a cheap as seen on TV infomercial. After that... sand and buff away...

a_florida_man
a_florida_man Dork
7/5/24 8:02 p.m.

From what I can tell so far, the car may have been painted blue and it was mostly removed OR some one added some kind of a two tone effect by adding some blue accents.

After that, it was painted yellow again... and not very well...

That is most of what you see on the car today.

Then, both doors got a big spot spray at the a pillar,... in the wrong color.. .

This car is supposed to be Daytona Yellow. I think they spot painted with another GM yellow that was much lighter. Like a primrose yellow.

Not sure why.. but im sure ill find out..

a_florida_man
a_florida_man Dork
7/5/24 8:04 p.m.

Starting on the drivers door spot paint removal. 800 grit. 

Rear fender and 2/3 of the door. Like why not paint the whole door?


Fender detail


Door detail. Funny how the phone camera adjusts the color with the smallest changes.

a_florida_man
a_florida_man Dork
7/5/24 8:08 p.m.

Part way done.

Its like 90 degrees and 90pct humidity. So Im taking a break.

Working above the belt line, the fender is 99pct. The door is looking good. Im guessing the spot paint was for the mirror mount repair? We will know for sure when the paint is off of the bottom half of the door.

a_florida_man
a_florida_man Dork
7/6/24 1:50 a.m.

Well, there's two reasons for the shoddy spot paint.

Atleast the oem mirror mount was still there. 
Drilled 2 holes in it and the mirror mounted fine!

The mirror came from the parts stash and is dated July 67... I think.

amg_rx7 (Forum Supporter)
amg_rx7 (Forum Supporter) UltraDork
7/6/24 12:41 p.m.

Cool thread and car. I think this model C3 with the chrome bumpers is a lot nicer looking than the C2.  

a_florida_man
a_florida_man Dork
7/6/24 8:15 p.m.

The new , old emblem arrived.

a_florida_man
a_florida_man Dork
7/6/24 11:41 p.m.

I bought an auxiliary vacuum pump so I could develop enough vacuum to test the wiper, headlight, and climate controls with out the engine installed... it's a lot easier that way ya know...

First test was the wiper door can.... ffsshhhh up poped the wiper door.

Great success! Next on to the headlights. 
Nope.... they were too stiff, so I raised them manually.

They were in good shape overall. They were intact. People really hack these up sometimes. Really they need to be disassembled cleaned and have some rusted hardware and springs replaced.

One interesting point... these are likely the original high beams. "T-3"!

a_florida_man
a_florida_man Dork
7/7/24 3:07 p.m.

The wheel situation:

2 original to the car Kelsey Hayes 1969 rally wheels. 
2 new aftermarket.

OEM wheels are hub centric.

Repo wheels are dual pattern and lug centric. Ugh. Gotta go... 

I mean I'm not being a wheel snob am I?


Stampie
Stampie MegaDork
7/7/24 4:15 p.m.

In reply to a_florida_man :

I love me some T3s.  Actually have a couple that AC gave me.

a_florida_man
a_florida_man Dork
7/7/24 4:58 p.m.

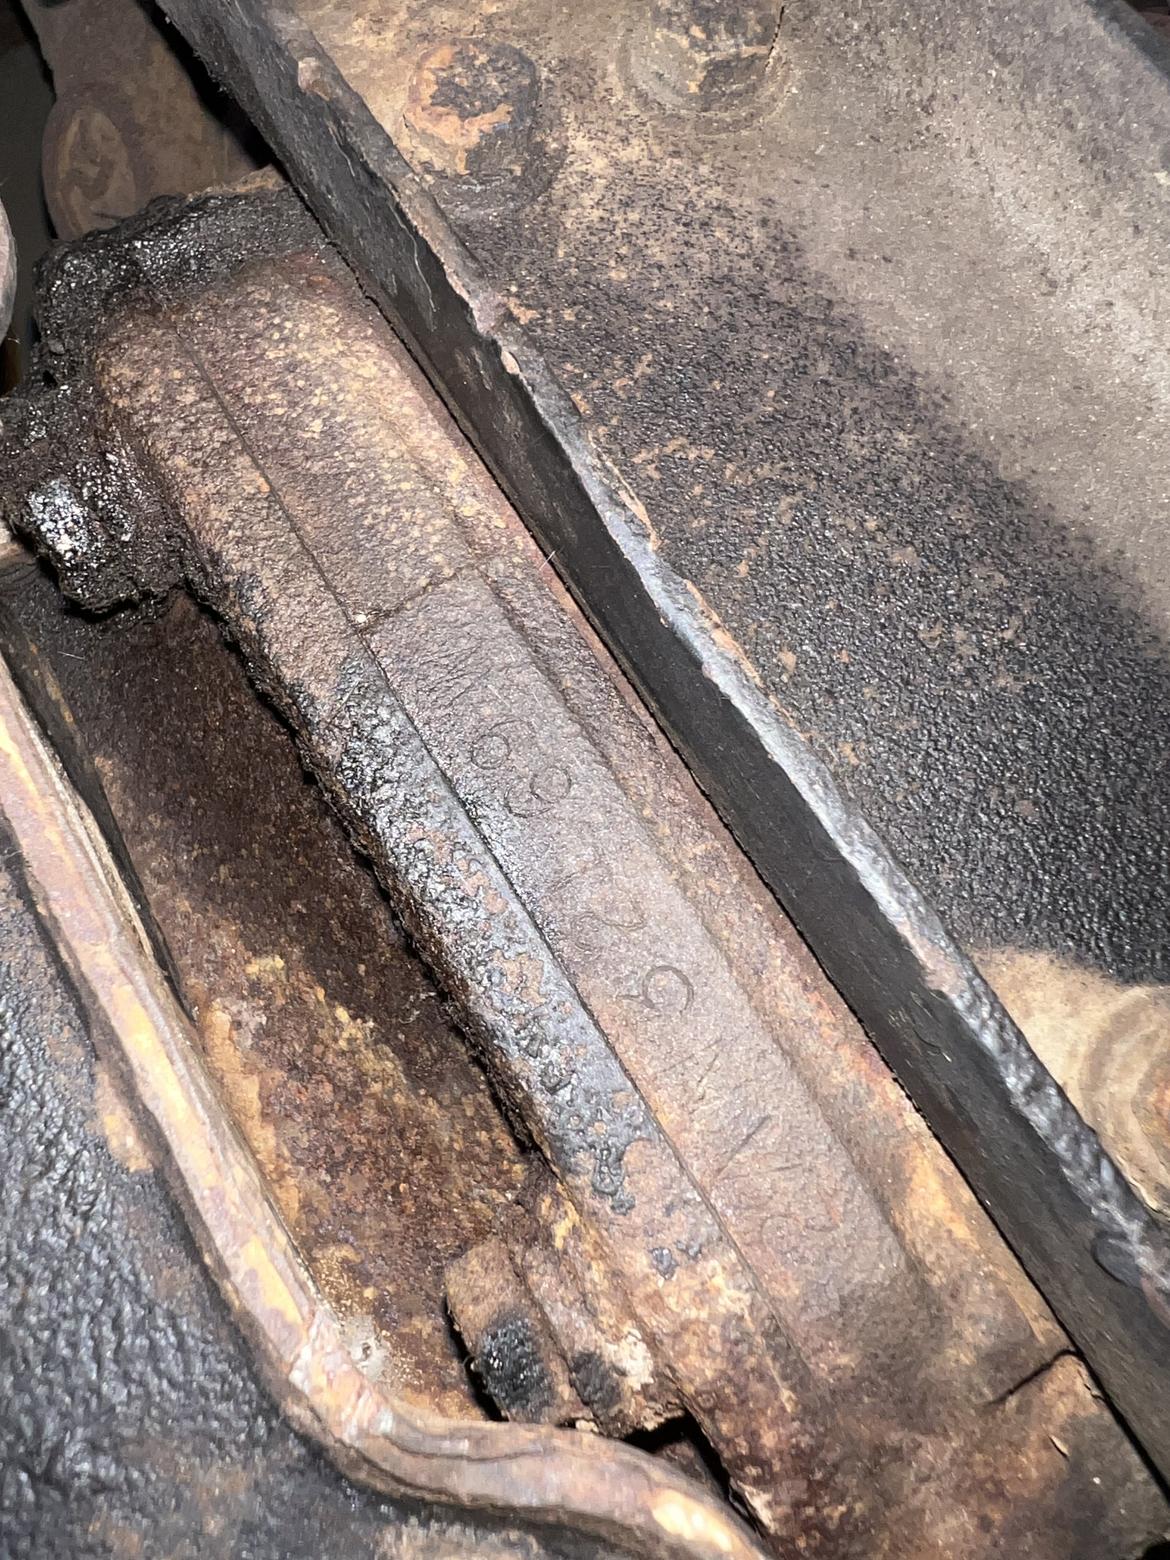
I was under the car today and snapped a pic of the differential date code.

March 21st 1969

AN= 3.55 Positraction

A 401 CJ
A 401 CJ UltraDork
7/7/24 5:23 p.m.

The only thing better than a C2 is an EARLY C3.  And that's one.  '68 - '72 or forget it.  I might take a '73 in a pinch but no later until you get to the C5 years.  

A 401 CJ
A 401 CJ UltraDork
7/7/24 5:32 p.m.
madmrak351 said:

Nice score! Had. 69 t top for 5 years. Greatly enjoyed it. Many body reinforcements added that year to cure problems found on the 68s. Enjoy!

Although they look nearly identical, the '69 is a far superior automobile to the '68.

A 401 CJ
A 401 CJ UltraDork
7/7/24 5:54 p.m.
TurnerX19 said:

I'll chime in on Pertronix too, as I've sold quite a few to customers since they came on market....They used to be perfect... Ian's 20 year old one will last forever. About 15 years ago the quality nose dived, and since then I have had several warantee claims. Usually within 6 months of instal. 

I'm hearing the same thing about new HEI's.  They used to be as reliable as gravity but not anymore.

a_florida_man
a_florida_man Dork
7/7/24 6:02 p.m.


You might recall.. body bolts 2 and 3, R and L came out with little effort.... and that was great because if they don't, its time to pull the body all of the way off of the frame.

Well, here we go with #4 R and L. There is zero percent chance that they will come out normally. They are rusted. They will be broken off, cut in two, and driven out. Its ok. I'm ready.

The first step is to under stand the the caged nut for the the #4 mount, lives in the well of souls be hind the decklid hinge and spring assembly, and that it is guarded by demons.

In this picture, just look to the right of the hinge tower and imagine plummeting down into the pit of darkness and dispair  right behind it.

The hinge tower is held in place by a big bolt on the bottom (removed), and two smaller bolts at the top (the head of the inboard one is just visible. They are nearly impossible to get to. Unless you cheat and snaek up on them.

They are best accessed drilling through the bulkhead between the storage compartment and the gas tank well with a 1" hole saw. 

In this picture you can just see where I drilled a small pilot hole (from the gas tank side , with the tank removed) to indicate the center for the hole saw. I did this just to be sure I was in the right place before drilling the big hole.

Drilling the access hole.

So, now with an extension you can get the bolts out easily. 

Yes it is possible to get these out IF yours are pristine. If yours are a little rusted, then you need to work them in and out to get them out without spinning the captured nut that holds them in. There is no way you are going to do that on the outboard (fender) side of the mount tower.

This is the bolt. you can see 4 or 5 threads have been exposed to moisture and were quite rusty. I had to work the bolt in and out 5 or 6 times with wd-40 to slowly clean the rust off and get the bolt out with out buggering up the nut.

If you bugger up the nut, you have to go in from the outside to fix it. And that is a lot of work to clean up.

With the hinge tower out, you can see the holes. I'll fill them with rubber gromets,

There is the nut. Rusted badly. Note that the cage is completely missing, having rusted away long ago.

FYI I had to vacuum this out to even be able to see the nut...

3 4 5 6 7

You'll need to log in to post.

Our Preferred Partners
tWEWZsmiOJvQjrXLDGg6ixqvYjK5toEP1yg2kaE940RFQv0sOj0UMrAFjdOgHw8h