Berck
Berck Reader
8/30/22 8:57 p.m.

Crankshaft end play on the new engine: .005" measured on a dial gauge.  I can't find any E30-specific specs, but that seems reasonable on other engines?  More BMW frustrations--There's nothing in the Bentley manuals about rebuilds or specs like crankshaft end play.  Is there an actual factory service manual available for these things, or is that in German?

So, yeah, my 1/8"+ end play on the old engine revealed a totally destroyed thrust bearing that in turn trashed the crankshaft.

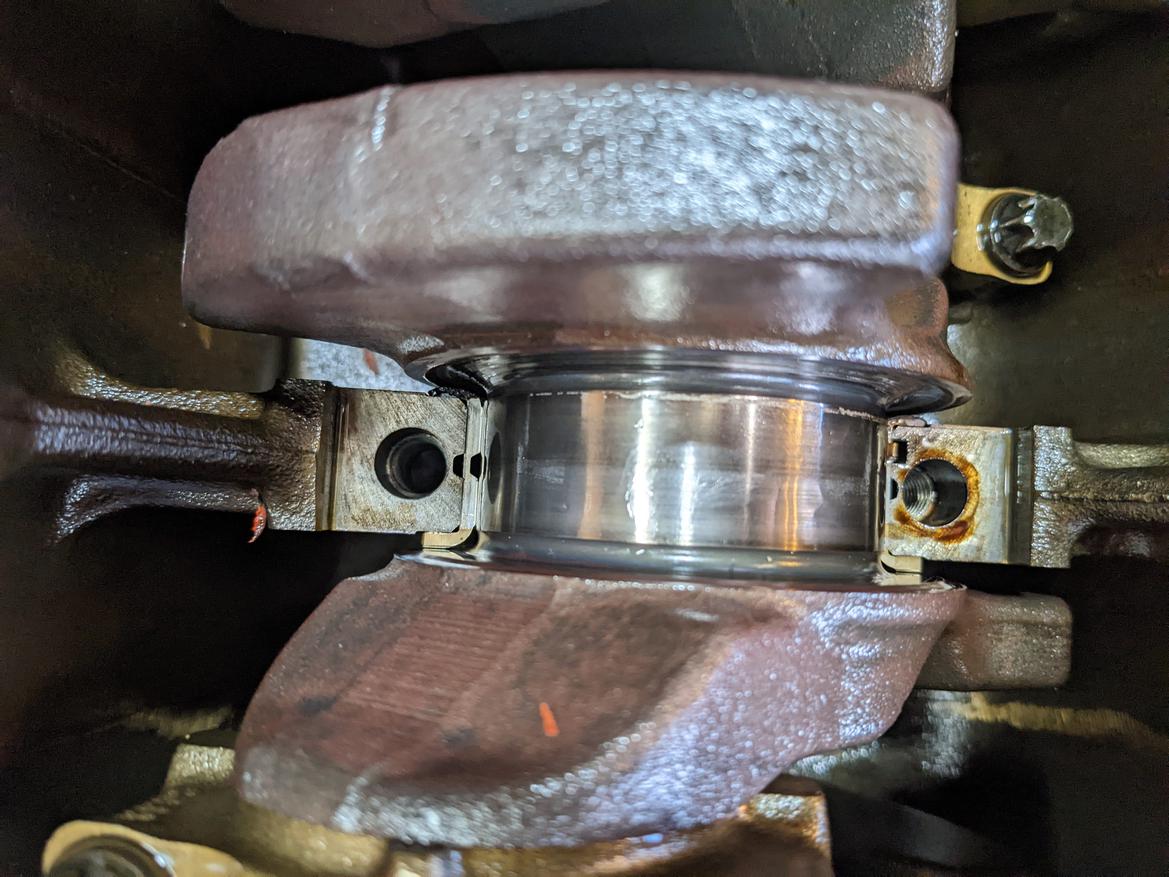
It's, of course, trashed on the flywheel side.  I wonder how much of this can be attributed to running an E36 M3 clutch on an M42?  The pedal didn't feel heavy at all, but it's got to have more clamping force than the M42 clutch did?

In any case, the valve failure was just the first thing to go.  I don't know how long you can run with no thrust bearing or what the failure mode is, but I'm guessing I would have found out in short order.

I note that new bearing sets come with a 360 degree thrust bearing shell, instead of the 180 degrees BMW saw fit to provide initially.  This makes me wonder if it's worth doing this upgrade since I'm going to pull the new engine apart somewhat anyway.  If it were simply a matter of buying a bearing set, pulling the crank, putting the bearings in and bolting it back together that would be fine.  But, from what I can tell, that's now how this engine stuff works.  There's 3 different colors of bearings... you have to put the yellow ones in with some plastigauge, measure the clearance, then order different bearing colors based on the current clearance.  This sounds like something I'm sure to screw up?  Can't I just replace the existing bearing with one of the same color, or do the crank journals wear?  Could I do just the thrust bearing?  Even better--could I do just the bottom half of the thrust bearing, which is the half that's missing the thrust facing?  Then I wouldn't have to pull the crank and buy new rod bolts and such.

Berck
Berck Reader
8/30/22 9:13 p.m.

Hmm...  Bimmerworld sells just the half I'd need.  https://www.bimmerworld.com/Engine/BMW-Engine-Internals/Lower-Thrust-Bearing-60mm-White-BMW-11211705817.html

The photo is wrong and the description says "upper" even though the title says "lower", but I'm leaning toward just buying this, popping it in and hoping for the best.... 

irish44j (Forum Supporter)
irish44j (Forum Supporter) MegaDork
8/31/22 4:49 p.m.

In reply to Berck :

Of all the BMW engines that I have put new crank bangs in I just ordered the OEM size and put them in and they all were within spec on the plastigauge. Unless there is some sign of excessive wear that's probably what I would do. Also yes the 360° bearing is the fix to the problem of premature thrust bearing wear on the crank.... Kind of amazed it was never retrofitted prior to your getting that engine!

irish44j (Forum Supporter)
irish44j (Forum Supporter) MegaDork
8/31/22 4:50 p.m.

That reminds me that the one I just dropped into my project car I never opened up the check the thrust bearing..... :/ Ill juat roll the dice lol

Berck
Berck Reader
8/31/22 4:55 p.m.

Okay, cool.  I'll just replace that lower shell and call it good.  Might want to at least check the end play on yours before you send it?  I'm stuck on the fact that replacing the the bearing isn't that big a deal, but you have to catch it before it trashes the crank.  Any idea what the eventual failure scenario is?  I'm guessing mine ran for quite awhile like this.  I'd guess that eventually the metal from the crank destroys other bearings? Maybe the piston skirts start scraping the cylinders when you press the clutch, but it probably takes a long time?

Berck
Berck Reader
8/31/22 4:57 p.m.

Also, what's your vote on whether replacing the 2 bolts on the crank bearing caps is necessary?

irish44j (Forum Supporter)
irish44j (Forum Supporter) MegaDork
8/31/22 9:46 p.m.
Berck said:

Okay, cool.  I'll just replace that lower shell and call it good.  Might want to at least check the end play on yours before you send it?  I'm stuck on the fact that replacing the the bearing isn't that big a deal, but you have to catch it before it trashes the crank.  Any idea what the eventual failure scenario is?  I'm guessing mine ran for quite awhile like this.  I'd guess that eventually the metal from the crank destroys other bearings? Maybe the piston skirts start scraping the cylinders when you press the clutch, but it probably takes a long time?

yeah, not sure. On the last M42 I built (for my e21 project) the crank thrust bearing surface was pretty much trashed and I ended up finding a crank in better shape and just replacing it. That said, I didn't see any evidence of piston skirts scraping or anything like that, nor any evidence of metal in the oil or other bearings. They were all in fine shape. In reality, the real issue is starting the car with the clutch pedal pushed in, since there's no oiling happening. I'm generally in the habit of starting my e30(s) in neutral with no clutch - and that all goes back to having an M42 in the rally car previously and not wanting to put pressure on the thrust bearing without oiling. 

As for the one in my project car, not gonna bother. I'm not going to do a full rebuild on it, so no point in even knowing if I need to lol. It's not a race car, so figure it'll be fine. And if it blows up, I'll just put the rally car's junkyard (never-rebuilt) M50 into it and built a fresher engine for the rally car. Or something like that. 

irish44j (Forum Supporter)
irish44j (Forum Supporter) MegaDork
8/31/22 9:51 p.m.
Berck said:

Also, what's your vote on whether replacing the 2 bolts on the crank bearing caps is necessary?

My recollection is on the M42 I did the bottom end on, I *did* replace them, per recommendation from "the forums" and because that was my first engine "full" rebuild so I wanted a lot of new stuff. Of course the irony is that I sold the e21 with that engine in it before I ever even fired it up. I did hear it ran fine at a Chumpcar race a year later, so I guess I built it ok :)

 Also, I feel like the bolts were reasonably cheap (IIRC like $50-60 for a set at the time).  That said, they didn't seem to be stretch bolts so I'm not all that sure it's necessary to replace them. In short, I have no fact-based advice to give lol. 

Berck
Berck Reader
10/4/22 1:06 a.m.

Finally started taking the "new" engine apart.  Good thing I decided to take it apart instead of just drop it in.

The top of the timing guide on the right hand side is broken off and just floating around in there.  Presumably because the weird inexplicable threaded standoff bolt thing is... just completely missing.  I'm assuming that whoever took this apart and put it back together didn't see fit to install it.

Given the giant amounts of RTV on just about everything, I'm not impressed with the mechanical ability of whoever worked on this last.  Can't wait to see what the oil pickup on this thing looks like.

I pulled the head and will take it to a machine shop to be reconditioned.  Some of the cam lobes have scoring that's bad enough that I can catch a fingernail in them, and the cam caps don't look great either.  Fortunately, all of that looked perfect on my destroyed engine, so I'll use those.  Not great:

But it makes me wonder if there were oil issues and the bearings on the bottom end are just as questionable.  I think I'll pull the one bearing cap I was planning on pulling to install the 360 thrust bearing and see what it looks like.  If it's bad, I may consider replacing all the bearings.  But I haven't pulled anything off the bottom yet.

I cleaned up the mating surface on the block, and it's... not great.  Some corrosion/pitting in places.  It's not terrible, and I assume the head gasket will still seal?

Also, a Miata trunk may not hold much, but an M42 head fits perfectly:

irish44j (Forum Supporter)
irish44j (Forum Supporter) MegaDork
10/4/22 8:21 p.m.

That's the "old-style" chain guide I was talking about earlier in the thread. They all delaminate/break like that eventually, regardless of whether that bolt is missing or not. The updated style is made totally differently and doesn't have the problem (but isn't cheap). 

Sucks that it's broken, BUT it saves you from the tempation of saying "well, it looks fine" and leaving it in there, and then having to fix it later. 

When you pull the pan, there's a 50-50 chance you'll see a bolt or two in the oil pan. And if that's the case, the oil pressure relief valve (?) gasket probaly slid over and left an air-gap there, which would then not allow full suction of oil.....possibly accounting for oil starvation symptoms. When you put it all back together, make sure to loctite the oil pan bolts that are actually up inside the upper pan, so they don't fall out again. 

Mating surface looks ok in the most important areas for sealing, IMO.  The last few I've done I used some of the CRC spray-on gasket sealant (possibly the copper stuff, I don't recall offhand) with the HG and never had any issues. 

Berck
Berck Reader
10/4/22 8:36 p.m.

Cool. Loctite on the bolts that go into the timing case from the bottom, or just oil pan bolts?  There were no bolts in the bottom of the blown engine, we'll see what this one has in store.

I did buy all new timing chain guides ahead of time, including the two very expensive ones.  Also, I'm swapping to the later style timing case that was in my blown engine, which has different guides. The one on the left isn't even available for the original M42-style timing case, but is available for the newer style case I'm using from the blown engine.  At least, I think I have one of everything, if my googling and parts-ordering worked.  I didn't even understand that there *was* an old/new timing case thing going on until I pulled the engine I had and discovered that it very much didn't match the parts diagrams I'd ordered from.  Fortunately I was able to return the $300ish of timing parts that I'm not going to use.

A bit apprehensive about what I might find on the bottom end, which I wasn't planning on touching.  But if those bearings look anything like the cam journals, I'm thinking I'll need to do something.  Or maybe not, since they'll last long enough for me to drive it into a tree?

Pete. (l33t FS)
Pete. (l33t FS) MegaDork
10/4/22 8:42 p.m.

Concur.... I don't like all the scratches on the deck, when I clean a deck I use a carbide scraper and scrape it flat, discoloration from the old gasket does not hurt a thing but scratches do.


BUT I have also reused MLS gaskets multiple times by cleaning them with denatured alcohol (wear gloves unless you want to get tipsy from spraying ethanol all over your skin) and spraying with a good layer of Copper-Kote.   That stuff is pretty good and will cover sins like rough deck surfaces.

Unless you're using a composition type gasket, in which case ship it.

Berck
Berck Reader
10/4/22 8:54 p.m.

Hmm.  I did clean it with 3M scotchbrite pads on a drill, which probably caused a lot of those scratches.  I've done a few head gaskets in my life and never had a problem with the visible scratches from scotchbrite.  You can't feel them.  Maybe I've just gotten lucky?  I can polish them out with a sanding block, but there's pitting that's *way* deeper than those visible scratches.  I have no idea what the replacement gasket I ordered is made of?


Berck
Berck Reader
10/4/22 8:58 p.m.

It feels like composite, it's definitely not all metal...

irish44j (Forum Supporter)
irish44j (Forum Supporter) MegaDork
10/4/22 9:17 p.m.
Berck said:

Cool. Loctite on the bolts that go into the timing case from the bottom, or just oil pan bolts?  There were no bolts in the bottom of the blown engine, we'll see what this one has in store.

I did buy all new timing chain guides ahead of time, including the two very expensive ones.  Also, I'm swapping to the later style timing case that was in my blown engine, which has different guides. The one on the left isn't even available for the original M42-style timing case, but is available for the newer style case I'm using from the blown engine.  At least, I think I have one of everything, if my googling and parts-ordering worked.  I didn't even understand that there *was* an old/new timing case thing going on until I pulled the engine I had and discovered that it very much didn't match the parts diagrams I'd ordered from.  Fortunately I was able to return the $300ish of timing parts that I'm not going to use.

A bit apprehensive about what I might find on the bottom end, which I wasn't planning on touching.  But if those bearings look anything like the cam journals, I'm thinking I'll need to do something.  Or maybe not, since they'll last long enough for me to drive it into a tree?

ah ok, you're using the e36 timing case with the serpentine belt setup, rather than the e30 setup with three separate belts. The e36 case is said to be more reliable due to the different internal setup and no idler sprocket (or whatever it's called). 

The bolts I'm talking about are the upper oil pan bolts that attach it to the block. Theryre the same as all the other oil pan bolts, but you can only access them with the lower pan taken off, since they're inside. 

Pete. (l33t FS)
Pete. (l33t FS) MegaDork
10/4/22 9:19 p.m.

I have killed two engines because of Scotchbrite pads.  The 429 in my first car, and a customer's 3.8 in a Sable.  THAT was when I was told to never use Scotchbrite on anything exposed to oil, because the abrasives that slough off get in there and grind the bearings away.

Gee, NOW ya tell me.

Anyway, long story short, you almost can't get too clean, I bought carbide scrapers, that is ultimately why I bought my first import car (a 4wd Subaru), and now is the time to pull the oil pan off per Josh to clean allllllll that stuff out.

irish44j (Forum Supporter)
irish44j (Forum Supporter) MegaDork
10/4/22 9:32 p.m.

I use scotchbrite pads to clean my surfaces, but I put tape around the inside to make sure none of the stuff gets into the engine and am *very* careful. 

Berck
Berck Reader
10/4/22 11:02 p.m.

This is very good information.  Thank you.  About a decade ago when I did my first head gasket, an auto parts employee recommended Scotchbrite to clean the old gasket off, so that's what I've always done.  Whoops.

The first one was on a Miata that I got another 100,000 miles out of until I crashed it on ice.  The most recent is an Audi A4 that I still have.  It's been a couple years, but I haven't driven it much.  I'll probably go change the oil again just in case.  And order some carbide scrapers.  I suspect most of the debris wound up in the water jacket rather than the oil passages, but I probably wasn't that careful.  Don't worry, I'll blame stupid German engineering rather than my own stupidity when it does blow up:)

I was planning on pulling the oil pans anyway to, at the very least, replace the lower bearing shell with the half of the the thrust bearing BMW couldn't be bothered with.  I'll be sure to flush out all the oil passages while I'm at it.

Berck
Berck Reader
1/29/23 7:51 p.m.

I may not have been wrenching much on this thing in the last 3 months, but there has been some progress.  My goal is to be ready for attempt 2 at Rally Colorado in August, but I really would like to give Temple Canyon Hill Climb another shot this year.  First up, I got the head back from a machine shop here in town.  $500ish to have the whole thing disassembled, cleaned, decked, valves ground, valve guides replaced (worn past limits).  It looks pretty, and I'm starting to wonder if I shouldn't have just left them with the bottom end, too.  


I pulled the upper and lower oil pans, flipped the engine on the stand and pulled a single main bearing cap.  You know the one.

Unlike the last engine, this looks fine to me.  I was expecting it to be okay given that I measured reasonable crank end play.  I didn't get a picture, but the wear on the bearing looked quite minimal, which was a nice surprise.  I replaced it with the new updated part that has the thrust bearing all the way around.  

Bolted it together with some plastigauge and got just under .038mm.  The Bentley manual doesn't seem to mention bearing clearances at all, but a rando on some internet forum posted some and that's in range.  So... okay.  Against all recommendations, I reused the bolts, and am moving on.  Given the lifespan of the previous engine, if 2 main bearing cap bolts being reused takes out this engine, I'll be shocked and go find a 6 cylinder.

Removed the early style timing case to replace it with my newer one.  Some pretty good corrosion behind it, beneath the water pump.  Not worried about this at all, since the mating surface is still fine.

Thanks to Josh for this idea.  Should have done it for the stuff in front, too...

Newer timing case from the old engine bolted up:


I intend to use the steel lower oil pan my car came with.  It's rare, will dent (is dented), and it turns out, is shallower.  Since my skid plate has basically zero clearance to that oil pan, I'd have to modify it to use the stock oil pan even if I wanted to.  It's enough shallower, that the oil pickup was modified:


When putting this stuff together, I noticed that the oil pan has a nice witness mark from the oil pickup hitting the pan.  The dent in my oil pan apparently took a rather small clearance and made it negative.  The oil pickup appears to have cracked in protest:


I put the steel pan on my garage floor and hammered out the dent.  I modified my unmodified oil pickup (other than the cracks), and then got my wife to make me some playdough, since I don't have any modeling clay or anything else appropriate to measure the clearance.  That worked great, and...  there's only about 1/8" clearance.  This seems still too small, but further modification of the oil pickup would involve a custom screen solution.  The steel pan isn't terribly flat on the mating surface, so I'm thinking that doubling the gasket will get me another 1/16" of an inch and make it more likely to seal.  Open to opinions/options, here...

irish44j (Forum Supporter)
irish44j (Forum Supporter) MegaDork
1/29/23 9:26 p.m.

No real advice on the oil pan clearance part, but just came here to say that the engine looks great!


Berck
Berck Reader
2/19/23 9:40 p.m.

Forward progress.  I'd forgotten, initially, to loctite the bolts that Josh said to loctite.  I remembered to do it before the lower oil pan though, so I went back and did that, as well as the oil pickup bolts since apparently they're problematic as well.  I went ahead and doubled the lower oil pan gasket and hope that it works out.

Other frustrations--the Bentley manual talks about an oil supply check valve that goes in the block, but neither of mine had any such thing.  Some internet searching found lots of other perplexed people.  Apparently the part is listed, but it doesn't actually fit unless you machine the threads in the block.  Not having any interest in that, I've chosen to believe the parts of the internet that say such a valve was only for later years.  It probably does need a valve--possibly related tow hy it takes 20+ seconds on a cold start to get oil pressure?  Or maybe that's because my oil pickup was smashed into the bottom of the pan.

I feel like there *must* have been more than one alignment sleeve between the block and the head, but the head came back with only one in the baggy of bits of they removed.  Possible it stayed with the block and I lost it.  Possible there was only one.  I put it back together with one..  How misaligned could this get, anyway?

I used the cams and caps that came with my car, because the ones that came with the replacement engine looked servicable, but noticeably more worn.  Some of the hydraulic lifters that came with my car had some pretty significant pitting on the surface, so I swapped the questionable ones out.  They have different part numbers.  I hope that works out.

I thought I'd ordered new bits for all the timing chain stuff.  The old version of the guide that goes against the tensioner is NLA, but the new one is still available.  Only, for some reason, it appears my new timing case had the old style installed.  The difference appears to only be that the stud it pivots on is much, much larger on the new version.  Not having a new stud, I used the better of my two worn ones.  I'm sure it will last long enough for me to drive into a tree, right?

Berck
Berck Reader
2/21/23 11:57 a.m.

The timing covers on the front were leaking profusely from both engines.  As others have mentioned on this thread, "they do that."  That's disappointing and annoying, but I'm not here to solve age-old BMW problems.  The engine my car came with managed to completely coat the inside of my skidpan with about 5 miles of driving so, hopefully I can do better than that?  The way these timing covers seal with a fiddly "profile" gasket in some places and a super thin paper/composite gasket in others is problematic.  I'm normally not one to use RTV on gaskets, but it seems like anything might help here.  The replacement M42 came completely coated in RTV squeeze-out as well as oil leaks, so it's clear that RTV alone doesn't solve the problem.  I used a very thin layer on both sides of the gasket, and a bit more where the rubber profile gaskets join.  The inner part of the profile gasket protruded a bit on one side after torquing the head down, so I trimmed it flush with a razer blade.  The outer section of the gasket that rides between the timing covers is more problematic.  It's clearly meant to be compressed downward to (1) seal the forward edge of the gasket, and (2) provide a flush surface for the valve cover to mount to.  Only, there's no good way to apply downward tension on it.  Worse, the holes in the upper timing cover are oblong, which means that you can line up the holes and bolt it together completely misaligned.  I used some vice grips to compress the upper timing cover such that its top surface was level with the valve cover while I torqued down the bolts.  I don't think I'd recommend this technique as it put some ugly gouges in the timing cover, but you won't be able to see them over the inevitable oil and dirt covering anyway:)  The whole thing is a pretty unimpressive maintenance-unfriendly design.

I told myself I wasn't going to clean any of this stuff up and just stick all back together with the outsides dirt and oil covered as long as the inside was clean, but I just couldn't help myself and even wire-wheeled the valve cover a little bit.  In any case, the engine is mostly reassembled, minus the intake and cooling stuff on this side.


I wasted a stupid amount of time removing this:

I know how these block heaters are held in place, yet like an idiot, I went ahead and completely removed the bolt on the front before thinking it through.  That left the nut and expanding wing bit to drop into the water jacket.  And of course they're stainless, so I couldn't fish them out with a magnet.  I spent an hour and got one piece out by tilting the engine over on the stand.  I got the other one out by duct taping a piece of tiny silicone hose to my shop vac, which let me fish it out.


Anyway, shiny freeze plug installed.  I also removed the German-tastic studs-welded-to-a-flange thing the exhaust header has going on.  I now have 2 of these in my possession, and on both 2/3 studs break loose, but the third stays firm.  There is absolutely no reason that these should be studs welded to a flange as bolt heads are perfectly accessible even when this is installed in the car.  Fixed.

Pete. (l33t FS)
Pete. (l33t FS) MegaDork
2/21/23 1:16 p.m.

I put it back together with one.. How misaligned could this get, anyway?

About three heat cycles before the head gasket blows, in my experience.

Head gaskets are kind of amazing, they have to seal while allowing the head to slide around on the block as it expands and contracts at a different rate with temperature, especially with an aluminum head/iron block combo.  That is why the head bolts are so long - longer bolts allows more lateral displacement.

Berck
Berck Reader
2/21/23 1:22 p.m.
Pete. (l33t FS) said:

I put it back together with one.. How misaligned could this get, anyway?

About three heat cycles before the head gasket blows, in my experience.

Sigh.  Well that's awesome.  So your thought is even if I got it aligned, those sleeves *also* keep the head gasket in alignment even after the head torqued down?

Pete. (l33t FS)
Pete. (l33t FS) MegaDork
2/21/23 1:29 p.m.

In reply to Berck :

And the head aligned with the block.


At this point, the gasket has not been heat cycled, you can pull it apart and re-use the gasket.

You'll need to log in to post.

Our Preferred Partners
NULNFiZtmWlsTNiByijddEecxvtfrK2xce96dlqT8JnkxT1KYuSmsR9XpQL60P6b