6 7 8 9 10
Hungary Bill (Forum Supporter)
Hungary Bill (Forum Supporter) PowerDork
9/13/21 9:59 a.m.

Still playing catchup on my posts, I was pretty thrilled with progress when I got things installed with more afternoon to kill on Thursday so I decided then that I was going to go after that head bolt as well.


I figured I'd do it by drilling the heads off the other head bolts I have and then welding them onto the stuck bolt in the engine.  I've got enough "nub" sticking up to do so and the heat applied should be localized enough that I can heat the bolt a bit without hurting the aluminum so I toss a bolt in the vice and got about this far:


Before I started wondering if there wasn't a smarter/easier way to be doing things...  It turns out there was.  The idea now is to find three nuts in my coffee can that will fit over the shank of the bolt with minimal effort, and weld those to the nub instead of wasting a bunch of time drilling things that don't need drilling.


These were my candidates:


Pictured above are the two pieces I'll use as test units, and one nut to weld on to the nub itself for the real run.


Welding the nut was both easier and harder than I thought.  It's easier in the sense that it wants to melt together when I tell it to, it's harder because I need the weld to go deeper than the nut is wide (if that makes sense).  I'm almost certain that I'm not penetrating anywhere near as deep as I need to be, but I go forward with the real-deal welding on the truck anways.


Now, I've learned my lesson about cheater bars and breaking stuff, so I'm going to use a freshly purchased pneumatic impact gun to zap this thing off.  Out comes the air compressor, and out of the box comes my new air gun.


This has GOT to work, because it ALWAYS works.  The hammer smacking action of this beast doing what it does is going to break up that carbon that's coked on that bolt and I'll have it out in no time.

The gun has 4 settings, and I decide to set it at its second lowest.  Once the compressor gets up to 110psi, I pull the trigger for all it's worth and BRDRBRDRBRDRBRDRBRDRBRDR goes the gun, but the bolt doesnt move...

The compressor's dropped a few PSI so I let it catch back up and up the setting on the gun by one notch.

BRDRBRDRBRDRBRDRBRDRBRDR goes the gun, and the nut doesn't move.

Ok, maximum setting, 110psi, here goes:

BRDRBRDRBRDRBRDRBRDRBRDRBRDRBRDRBRDRBRDRBRDRBRDRBRDRBRDRBRDRBRDRBRDRBRDRBRDRBRDRBRDRBRDRBRDRBRDRBRDRBRDRBRDRBRDRBRDRBRDRBRDR (inhales deeply)  BRDRBRDRBRDRBRDRBRDRBRDRBRDRBRDRBRDRBRDRBRDRBRDRBRDRBRDRBRDRBRDRBRDRBRDRBRDRBRDRBRDRBRDRBRDR!!!!!!!!!!!!!!!!!!!!!!!!!!!!

Goes the gun, but nothing moves...  at all.

I'm thinking quick at this point.  I cant afford a more powerful gun, and I'd never use the darn thing even if I did buy one.  But tire shops always seem to have beefy lug slinging units on hand, maybe I can visit one of them.

I have a liter of plum squeezings still in my cabinet from last year, so I pour about a quarter liter in a bottle and toss everything in my car and high-tail it to the nearest tire shop in town:


When I get to the shop the door is unexpectedly locked.  I'm right in the middle of shifting things from one hand to the other while stepping back to look for a sign that might say when business might be back when the door unexpectedly opens.  Of course, the bottle of plum squeezins picked that exact moment for the stopper to pop out so a little alcohol spilled on my hands while I'm simultaneously trying to greet the employee, stop spilling alcohol, get the stopper back in the bottle, and explain what I'm here for and what I need.  I think I could best describe my behavior as an doc Brown, with a bit of Rick (from rick and morty) mixed in.

But, it turns out that the employee had a good sense of humor so I left with a real-deal beefy ass "Ingersoll Rand" unit of tire shop variety and without my quarter-liter of alcohol.
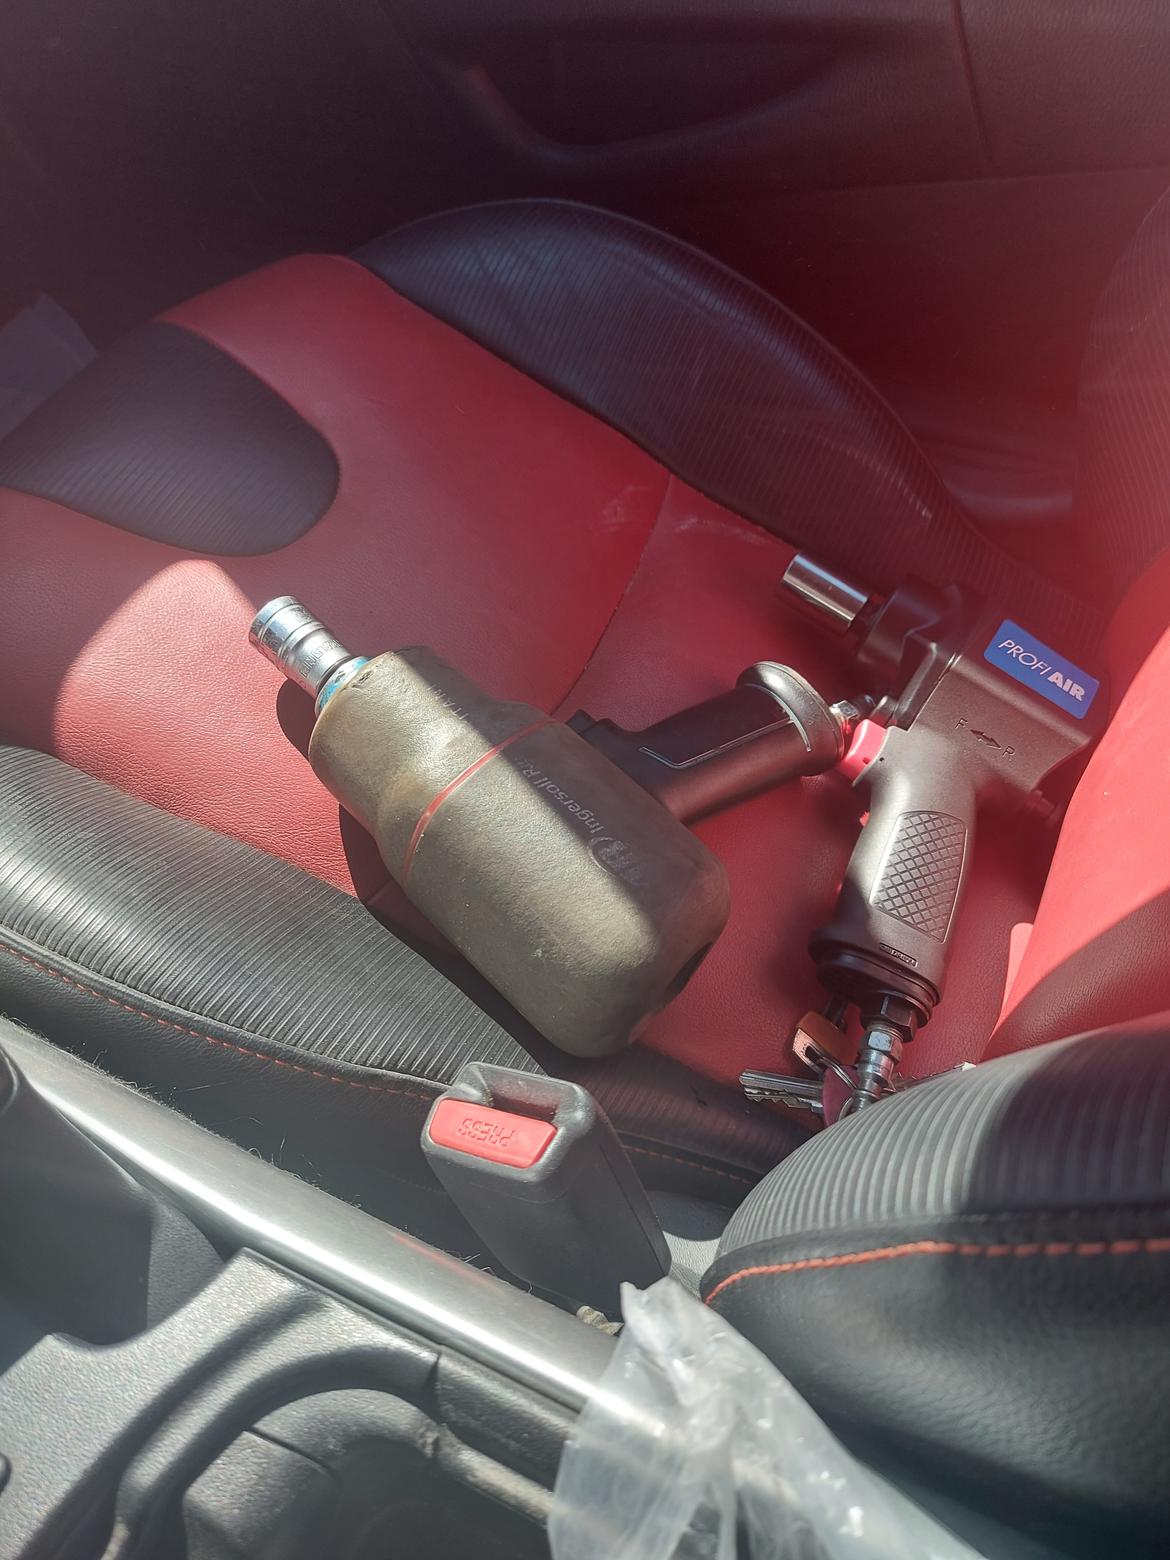


No messing around this time.  I crank the Rand unit up to its maximum setting, pump the compressor up to 120 psi, aaaaaaaaaannnnnnnd.

(come on, you know where this is heading)


Drat and double drat.

Told ya that penetration sucked.  I'll work on that more later.

First, I return the borrowed tool and show them the broken bolt.  We all have a good laugh, and they say that when I get a new head welded back on to come by and I can borrow the driver again.

Time to regroup and formulate a new plan.


Hungary Bill (Forum Supporter)
Hungary Bill (Forum Supporter) PowerDork
9/13/21 10:37 a.m.

I mentioned that things have been busier than a busy thing lately, but Friday mornings are all for me.  With the weather being nice, I'll walk the kids to school in the morning and on the way home I'll stop by the farmers market (they meet every friday and wednesday) to grab some goodies and maybe breakfast.  It looks something like this:


I kicked around and bought eggs, smoked paprika, some blueberries, and some bread.  it was a nice way to start the day.

Plus I bought a breakfast fit for the garage:


A morning to unwind and now with a clear mind, I have a few ideas.  First, I'm going to weld another nut back on that nub but this time I'm going to make sure I melt things deep enough that I can actually get some torque on this beast.  To add insult to injury, I'm going to shoot some WD40 down between the shank and the cylinder head to try to get things moving.


Instead of borrowing the tire shop's gun again, I'm just going to slap a cheater bar on my breaker bar and snap this off right away.


Good.  Now there's not enough nub to weld on to anymore.

What I do from here is set my tig on about 20-amps and really start to cook the top of that nub.  I get things glowing good and hot and then I shoot WD40 at it once I think it's cooled enough not to explode.  I repeat this about 4 times.  (I'm doing this because i saw a youtube video of someone doing something similar with acetylene, and it worked for them).

Once done, I take out the magic bolt from the cylinder head (it's at the front, in the pool of oil):


They call it that because everyone forgets it's there.  After countless hours of not being able to remove the head, people magically discover it afterwards.  Embarrassingly enough, it's gotten me more than once.

Anyhoo, I think you'll know where this is going based on the next three pictures


Look at that... I can pick the entire front end of the truck up, and that dang head didn't give not one inch...  angry


I'm really losing my sense of humor with this thing at this point.  I've soaked it in dot4 for a month, heated it red-hot a half dozen times, hit it while hot with WD40....  EVERYTHING on the internet tells me that this should have let go by now!!!

Alright, well I've got one more trick up my sleeve.  Back in 2009, I started working with a master aircraft metalsmith named Elliot.  From about 2013 to 2016, I followed him around anytime I could to get some metal bending training.  When I left the gig we both worked at, I could drill friction fit holes with an electric drill, using a snap-on drill index while laying on my back and drilling over my head.  I'm going to center punch this bolt, and I'm going to drill it out whether it likes it or not.

First, I head to the local hardware store "I've got this bolt.  I want every bit you have between 3mm and this bolt size"


Here goes. 

I use scraps of an old shirt to catch my shavings.  I've got WD40 for cutting lube... I've got this.  Nice and slow, one bit at a time.


First off, I cant believe how centered I got this thing.  I'm stoked as I drill down just a little over half an inch.  If I can keep everything lined up, I should have most of the bolt removed in no time.  From there, I'll leave a little nub towards the end, near the block so I can have something to work with once the head is off.  Maybe I can try a pipe wrench on it like I saw in youtube, or maybe weld another head on.  Either way...


SPAP!!!!!


The mother-berkeleying drill bit I just bought just mother-berkeleying broke in the mother-berkeleying head bolt...

That's it...

I'm stuck...

I've got nothing that can get that out of there.  That mother-berkeleying piece of mother-berkeleying hardened steel isn't going to be scratched by any of my bits, or by any bits I can purchase locally...  That head has to come off, and it has to do so while still attached to the shank of the bolt that's still holding it on...

All intelligence stops at this point.  I grab the cherry picker and proceed to pick up the front end of the truck.

I've got my ball-peen hammer out with a piece of wood to protect the aluminum, but I am absolutely HULK-SMASHING that thing into any spot I think will further my cause.  I'm about eleventy wacks in when

SNAP!!!!


Look at that casting near the # 3 and 4 exhaust port...  Luckily for me that bolt hole isn't used with the header I own, but I'm good and mad now.  I decide I had better move on to other ideas before I break something that I WILL need. 

I start by poking and probing with my snap-on awl thingie.  In doing so, I manage to remove one chuck of the drill bit:


But as you can see, there's still a chunk imbeded in there..

I have a couple rotary files, but I'm pretty sure they're not going to work as they dont have any teeth on the leading edge (only on the sides)


It goes about as well as expected.  it chews right through the bolt material, but isnt able to file "down" into the drill bit material.

Going back to square I decide some strategic prying is in order.  Out comes to the "key-to-the-city" and a handfull of anthing non-ferrous (mostly just wire brushes) that I plan on wedging in anywhere I can:


It works to some degree.  I pry up with the key to the city until I can wedge in the wire brush.  Once installed, I wack the hell out of it with the ball peen and by the end of the session I have just under 1/2" clearance on the passenger side (about 1/8" clearance on the driver's side @ the #1 cyl).

Well passed my planned stopping time, I pull everything out and fill the bolt hole with WD40.

I'm really not liking this thing right now...

Hungary Bill (Forum Supporter)
Hungary Bill (Forum Supporter) PowerDork
9/13/21 10:41 a.m.

Hungary Bill (Forum Supporter)
Hungary Bill (Forum Supporter) PowerDork
9/13/21 10:55 a.m.

Ok, monday now, and I'm supposed to be working on the house but I convince myself that an hour with the truck needs to happen. 

I start in with the rotary files again, and I've pretty much got all the ferrous material down to that bit removed from the hole.  It looks something like this when it comes out:


I try the cherry picker again, but instantly snap off a bolt (no, I didnt have the front end off the ground again, i swear!)


berkeley.

From there I make a wedge from some wood I had laying around in the shop:


And I Hulk-smashed it in wherever I could...  Right now, that's yielding me the best results. 

You can see the nub of a wire brush I Hulk-smashed in there as well.  I can now get over 1/2" clearance in the front passenger side, but nearly nothing on the passenger side.  I get that having the bolt work in tension is to its advantage, but I've now broken off three separate bolts in shear trying to get this damn thing off...

Only one thing left for it.  Time to twist it in torsion.

I take that chunk of wood you see wedged in there and lay it against the side of the head.  I then proceed to wack the hell out of it until the front of the head moves as far as it can to the driver's side. 

THEN I move to the drivers side and smash it towards the passenger side...

I can get it to move about 1/4-1/2 inch, but the timing chain stops me from moving it too much.  That'll be my next project:  Remove the timing chain so I can beat the head sideways enough to either break the bolt, or break free from it...

Heck.  After I get the timing cover off and back on again, I'll be piston rings and bearings away from a complete engine rebuild on this thing!

Anyhoo, that's a task for tomorrow when I'll have another hour to play with her.  If anyone has any ideas or suggestions before then please speak up because this thing is kicking my butt...


Good times.

Hungary Bill (Forum Supporter)
Hungary Bill (Forum Supporter) PowerDork
9/16/21 2:02 p.m.

Tuesday now, and I'm still getting my butt kicked.  This time by the crank pulley...

To get the timing cover off, you've gotta remove the crank pulley, oil pump, and water pump.  I've been here before, so I kind of knew what to expect.  This crank pulley is the reason that Sears near my house in San Antonio knew me by name.  I think I broke three 3/4" breaker bars the last time I had to take one of these off.  This time I went straight to the 1-incher (with the appropriate amount of cheater bar added)


Maaaaan, I was REALLY reaming on this thing.  It was getting to the point that I was getting worried about breaking the head off of this beast as well.  I mean, lets face it...  My luck with bolts on this old girl hasn't exactly been what we would call "spectacular".

To keep the truck from moving, I have it in 4th gear.  The parking brake is set and the wheels are chocked (And I promise you, this bolt was so tight that the passenger side wheel started driving up its chock when I was cranking on this thing).

Figuring I'd better quit while I'm ahead, I went and got out that new fangled torch thingie I had.


I held that on there until it got good and hot.  There's no real risk of damaging the front main seal as that sits WAY back behind the timing cover (the oil pump is the next item immediately behind the pulley)

After I thought I'd applied sufficient heat, I gave the breaker bar another try.  It moved slightly, then...


Snap.

It was at this point, I started googling "22re long block"... 

Prices go from anywhere between $1900, and $5000 depending on who you buy from and what goodies you want with.  LCE engineering gets pretty steep as they offer 22re's with extra "oomph".  Unfortunately the lead time was going to be about 10-weeks, and I really want this done sooner so I put the phone down and went back to work.

Somehow the chain had gotten pinched at the bottom of things and then just cut itself right off..

Since the e-brake/chock scheme wasn't working, I got what I thought was a genius idea.  I went and got that blue rope I still have and I threaded as much as I could into the #3 spark plug hole.  I figured if the engine was going to try to turn on me, then at least I'd see if that piston couldnt push up on the cylinder head and maybe I'd get lucky.

It worked.... sort of.

The rope did push up on the head, but it didnt free it of the bolt it was still stuck to.  Instead it opened up a 1" gap on the passenger side between the head and block.  Having no more rope, I decided to stuff some socks into the #4 cylinder (I use old clothes as garage rags.  Socks are a common rag around my garage).


You know, at this point I didnt care which gave first.  If the head popped off, good.  If the crank popped off, then I'm ok with that too.

I'll admit, I was actually a little disappointed that the crank bolt broke itself loose first.  But here she is:


After that it was just nuts and bolts until the engine looked like this:


Good times.

Hungary Bill (Forum Supporter)
Hungary Bill (Forum Supporter) PowerDork
9/16/21 2:07 p.m.

If the 22R/RE engines had an Achilles heel, this would probably be it:


You can see that the upper bolt hole is broken out on my timing chain guide.  I'm pretty sure I caused this one with all my head-bolt shenanigans, but in the wild these things are known to fail in a similar fashion.  If left unattended for too long, the timing chain will wear against the timing cover until coolant leaks out and floods the oil pan.

The solution is to order a metal backed unit from an aftermarket supplier.  Unfortunately, none of those suppliers have "Hungary" listed as a shipping location.  Rock Auto, however, came through like a champ.  I ordered a metal-backed timing chain kit (with new tensioner, guides, and chain), 2 fuel filters, and an air filter for just under $100.

Even better?  The filters arrived today (thursday) while I was tinkering with the truck this morning!

Frickin Rock-Auto rocks.  yes

Hungary Bill (Forum Supporter)
Hungary Bill (Forum Supporter) PowerDork
9/16/21 2:11 p.m.

Back to Tuesday though.  So if you remember, my idea was to twist the head left to right in an effort to stress the bolt in torsion.  Hopefully the darn thing will just snap right off...

Here goes:


That seems like a lot of movement side to side to me, and it didnt take a WHOLE lot of effort to do that...

I'm hoping this means that the bolt threads are loose in the block (having no head to "pull" on them), and that once I get this unstuck from my head, that life will get infinitely easier (another triumph of home over reality).  Anyhoo, that obviously didnt work at all like I was expecting, so now the engine sits like this:


I DID, however, come up with a new coctail with which to soak my bolt.  I am now using a 50/50 mix of acetone and automatic transmission fluid.  Fingers crossed this turns out to be the magic potion I need.


Good times

Hungary Bill (Forum Supporter)
Hungary Bill (Forum Supporter) PowerDork
9/16/21 2:16 p.m.

Whilst working in the area of the water pump, I was noticing a bit of sediment caked up in some areas:


The radiator was in pretty bad shape as well:


I dropped the radiator off on my way to work to see about getting it re-cored.  The place I buy metal from performs such services, which is odd considering the owner is a big Volkswagen Bug guy...


Hungary Bill (Forum Supporter)
Hungary Bill (Forum Supporter) PowerDork
9/16/21 2:28 p.m.

It's Thursday now, and like I mentioned THE ROCK AUTO PARTS ARRIVED!!!!  (I'm still stoked about that).  Well not all of them, it was just the filters.  I'm still waiting on the timing chain kit.

Anyhoo, I've had enoug with ripping out threaded holes and breaking fasteners, today I'm going to use a ratchet strap that really isn't rated for anything near what I'm about to do with it:


That's an old pillow protector you see wrapped around the front there.  It turns out the edges of that cylinder head are SHARP!  My hands have about eleventy billion cuts that scream like the dickens every time I use hand sanitizer...

Going about things this way, had exactly zero effect on the head removal though.  The fabric on the ratchet strap is really just too thin to crank on it too much, so I decided to stuff another sock in the #4 hole and crank on the crank shaft a bit:


That's sock #5 you see in there...  I put the crank bolt back in and spun the engine in the "righty tighty" direction until I couldn't move it anymore...  I don't want to snap this thing off, but more important I DO want to be able to remove this bolt when the head finally comes off.

Not much progress to report really, the darn thing is stuck, but now I can at least see daylight on both sides...  I've got about 2" of clearance on the passenger side, and about 1/4" clearance on the driver side.

Which kind of gave me an idea:


Yeah... that worked about as well as you'd expect.  I did make a slight notch in the bolt, but it'd take me all year to get through at this rate. 

More importantly I was SUPER careful not to touch the aluminum with the saw.  I was really hoping for enough room to get the danger wheel in there (as that makes super short work of these bolts) but there's no way there's enough room to do that safely...  I'd destroy the heads for sure, if I tried it.

Here's the end of the day photo of the progress.


Goodnight Toyota, sleep well.  I shall most likely kill you in the morning.

Gzwg
Gzwg New Reader
9/16/21 3:09 p.m.

At this point, isn't it very likely that head is already warped way beyond anything resembling straight? 
That bolt removal definitely sounds like a nightmare! 
Best of luck to get it out one of these days!

Mezzanine
Mezzanine Dork
9/16/21 5:08 p.m.

Yeah, what's a new or unberkeleyed cylinder head going to cost you? I'd have quotes and options for that in my back pocket as I plugged the death wheel in. That crazy gleam in my eye as I sidled over to the truck...

I don't have high hopes for this head recovering...and just what is it stuck on, exactly? The broken bolt is just a straight shaft, right? Galvanic corrosion against the cylinder head, seized the bolt to the head? If so, it won't be coming loose with any penetrant. It's effectively welded to the head. It's sparklewrench time, buddy. 

Mezzanine
Mezzanine Dork
9/16/21 5:09 p.m.
Hungary Bill (Forum Supporter) said:

Goodnight Toyota, sleep well.  I shall most likely kill you in the morning.

Best moment in the thread right there. And that's saying a lot because I always love it when you post pics from the local market, so it's a high bar to start with. 

mjlogan
mjlogan New Reader
9/16/21 5:29 p.m.

Wow you are giving me flashbacks.  I developed a serious 22re hate from a similar experience.

I hope the following pics of my 22re crank bolt removal process help ease your pain.  This is what I came up with working in the street with no electric or air tools


Step 1 wedge cheater bar on frame and put in gear/4x4/lock hubs


Step 2 slack drop with F250


Good luck man and keep fighting the good fight

paul_s0
paul_s0 Reader
9/16/21 6:41 p.m.

You've got a lot more patience than me Bill...  Would it be possible to get a reciprocating saw in there without too much collateral damage?


I must admit I'd be worried too now about if that head was usable... Good luck whatever the outcome!

preach (fs)
preach (fs) Dork
9/17/21 7:52 a.m.

When you broke that drill bit was it close the the carbide size I sent you? A little too late now on my part but that carbide would have ate.

I have had to drill many bolts to the root and peel out the threads at work. It friggin sucks.

Not being a jerk but the Hungarian shenanigans is very entertaining and has pics!

Hungary Bill (Forum Supporter)
Hungary Bill (Forum Supporter) PowerDork
9/17/21 1:26 p.m.
Gzwg said:

At this point, isn't it very likely that head is already warped way beyond anything resembling straight? 
That bolt removal definitely sounds like a nightmare! 
Best of luck to get it out one of these days!

You know, I have a lot of faith that things aren't as finicky as the internet says they are about such things laugh   I was pretty sure going into all this that I could get this thing removed without doing exactly what I'm doing now, but dang if I didnt try.

I mean that soaked in various fluids for over a month.  It was heated repeated times.  I tried pulling straight up, in a balanced fashion with the cherry picker.  I tried drilling...

I'm not positive this will be unusable when it comes off, but I'm betting it's going to need some milling to get it back into service.

All because I said to myself "Hey, I bet I can improve this with a $200 cam shaft!" wink

Hungary Bill (Forum Supporter)
Hungary Bill (Forum Supporter) PowerDork
9/17/21 1:29 p.m.
Mezzanine said:

Yeah, what's a new or unberkeleyed cylinder head going to cost you? I'd have quotes and options for that in my back pocket as I plugged the death wheel in. That crazy gleam in my eye as I sidled over to the truck...

I don't have high hopes for this head recovering...and just what is it stuck on, exactly? The broken bolt is just a straight shaft, right? Galvanic corrosion against the cylinder head, seized the bolt to the head? If so, it won't be coming loose with any penetrant. It's effectively welded to the head. It's sparklewrench time, buddy. 

Dunno yet, but I am already dangerously close to grabbing the danger wheel.  I decided days ago that that thing would make short work of this aluminum.

I figure I could save the valves, springs, and keepers.  Then I could cut out the valve seats and recycle the aluminum to recoup a bit of my costs...

The broken bolt is just a straight shaft, but I dont know if it's galvanic corrosion that's causing this or not.  Carbon coking is notorious on this bolt, and the one located between the #1 and 2 exhaust valves as well.  Not sure if I'm man enough to drop a sparkle wrench in there.  I still have hope that I can save this casting.

Hungary Bill (Forum Supporter)
Hungary Bill (Forum Supporter) PowerDork
9/17/21 1:30 p.m.
mjlogan said:

Wow you are giving me flashbacks.  I developed a serious 22re hate from a similar experience.

I hope the following pics of my 22re crank bolt removal process help ease your pain.  This is what I came up with working in the street with no electric or air tools


Step 1 wedge cheater bar on frame and put in gear/4x4/lock hubs


Step 2 slack drop with F250


Good luck man and keep fighting the good fight

That....

oh my god.  That is AMAZING!!!! 

I've heard of people bracing their wrenches and giving the starter a kick, but that is just AWESOME!!!!

Hungary Bill (Forum Supporter)
Hungary Bill (Forum Supporter) PowerDork
9/17/21 1:46 p.m.
paul_s0 said:

You've got a lot more patience than me Bill...  Would it be possible to get a reciprocating saw in there without too much collateral damage?


I must admit I'd be worried too now about if that head was usable... Good luck whatever the outcome!

Paul, you've read my mind sir.  This post is just for you laugh

So, Bill decided he was done being nice to the truck today.

It all started when I woke up late and had to "Mad-dash" it to get the kids ready for school in time.  We barely made, it.

After that, I had a few hours of manual labor at the new house to get me in just the right mood.  Before leaving I grabbed the power converter I use to run my stereo, and my Dewalt Sawzall devil

Every day, I go out to the truck and I hope that somehow some magic happened overnight and that this pool of fluid would somehow magically find itself drained through whatever it dissolved that WAS previously holding this bolt in place.

And every day that puddle stays right where it was the night before, having done nothing...

Well, then.  I call this "berkeley you bolt, you should have listened when I was asking nicely"


The sawzall blades are labeled "wood/metal" but honestly, the teeth are so long it'd have to be some soft metal for it to work.
I fire it up anways and get the tip into action.  I'm trying to cut the bolt without chewing up the head any more than I have to (hey, my denial is strong.  I still think I'm going to be able to use this pig when I finally get it off).

The blade does a terrible job.  I'm able to cut a good notch, abotu 1/4 of the way in, but after that it bites and sends me all cattywampus.  After the third or so time that happens, I decide it's time to revisit the cherry picker...

First, I swap out that rachet strap for a tow rope with a d-ring.  I just wrap the tow rop around and around and around until I get both ends to meet and secure them with the d-ring.

I start cranking and things start coming up.  The head to some degree, and the suspension as well.

I really dont care at this point, I've got this thing LOADED with potential energy to the point I start to duck kind of behind the front pumper.

pump. pump. pump.

This thing's stretched so tight it looks like it is going to throw that head through the hood when it goes.  Still dont care.  I'm pumping until everything is verticle, or the head comes off.

pump. pump. pump...

BAM!


She's off!!!!!


Meh.  A little scratched up, but not as bad as I expected

Here's some shots with a straight edge for reference (nothing's been cleaned or anything, I just wanted a rough idea)

A little daylight there on the timing chain side, but nowhere near as bad as I was expecing.

and last but not least, here's the bolt (still stuck in the head)


Good times


Hungary Bill (Forum Supporter)
Hungary Bill (Forum Supporter) PowerDork
9/17/21 1:47 p.m.

As proof of how strong my denial is, here I am soaking the bolt remnants that are still stuck in the block:

Hungary Bill (Forum Supporter)
Hungary Bill (Forum Supporter) PowerDork
9/17/21 1:48 p.m.

This headgasket... It's still usable... right?

Hungary Bill (Forum Supporter)
Hungary Bill (Forum Supporter) PowerDork
9/17/21 1:52 p.m.
preach (fs) said:

When you broke that drill bit was it close the the carbide size I sent you? A little too late now on my part but that carbide would have ate.

I have had to drill many bolts to the root and peel out the threads at work. It friggin sucks.

Not being a jerk but the Hungarian shenanigans is very entertaining and has pics!

Dang it!

I set that aside so it wouldn't get mixed in with all my cheap-o's and completely forgot about it.

Good thing you reminded me though, I figure I can go back at the head bolt from the other side now and punch out the drill bit remnant from behind.  PLUS I still have to remove the bolt from the block and that might have to be drilled out as well.

Crap, I wasn't going to go back into the garage after work, but that might drive me nuts if I don't go find it...

java230
java230 UberDork
9/17/21 2:14 p.m.

In reply to Hungary Bill (Forum Supporter) :

Spray the HG with the copper stuff, good to go laugh

preach (fs)
preach (fs) Dork
9/17/21 3:41 p.m.
java230 said:

In reply to Hungary Bill (Forum Supporter) :

Spray the HG with the copper stuff, good to go laugh

Add some flex seal and give it 30psi.

Hungary Bill (Forum Supporter)
Hungary Bill (Forum Supporter) PowerDork
9/20/21 11:06 a.m.

Whelp, kinda a slow monday...

I've got a new cylinder head on order, so while I wait for that to arrive I figured I'd do the easiest fuel and oil filter change ever:


I finished with a little spare time, so I thought I'd top up the trans and transfer case.  I was able to do both with just under one liter of oil left over. 

Good times, and easy money.

6 7 8 9 10

You'll need to log in to post.

Our Preferred Partners
HfDV48VK6Z0WPAb1kPRFrV53mbnS9vwfExBahchTkEY5bNvPBoFb7wLI4P4m6R1m