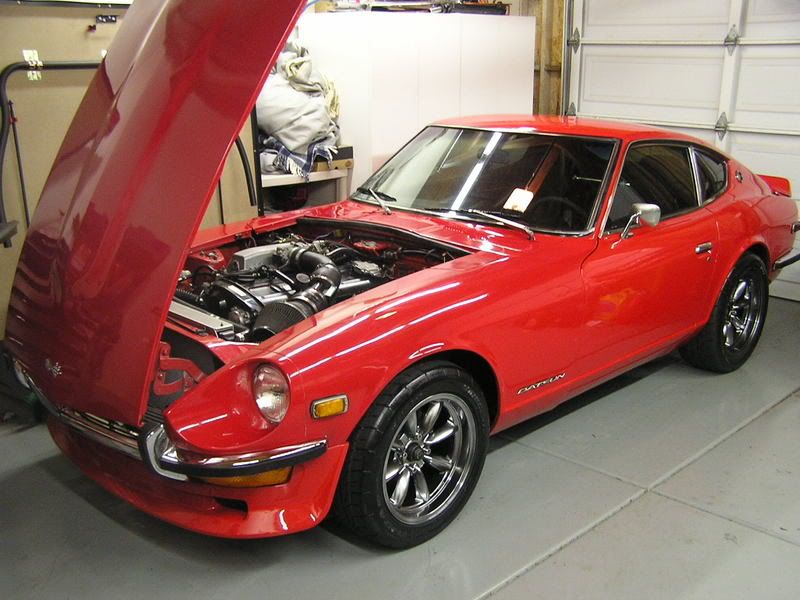
I love this thread! Get the tank under the car already! We want to see tire smoke![]()
DukeOfUndersteer wrote: PseudoSport, I DEMAND BOX FLARES ON THIS CAR, OR I WILL CAPS LOCK YOU TO DEATH!!
Box flares do not compute.
ZG flares do!

Javelin wrote:DukeOfUndersteer wrote: PseudoSport, I DEMAND BOX FLARES ON THIS CAR, OR I WILL CAPS LOCK YOU TO DEATH!!Box flares do not compute. ZG flares do!
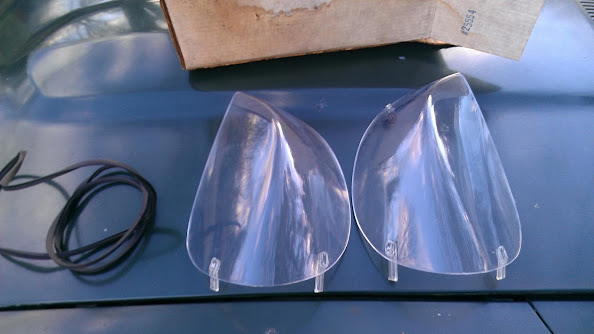
Already fought this battle with Pseudosport and lost. He doesn't like bolt-on flares, or the sweet headlight covers that the car came with. To the car's credit, it does look great without the flares too.
Although I do like Z cars with flares, I just prefer the clean look without them.


Now if I find more rust then I was expecting in the rear quarters we’ll see what happens
PseudoSport wrote: Although I do like Z cars with flares, I just prefer the clean look without them.
Now if I find more rust then I was expecting in the rear quarters we’ll see what happens
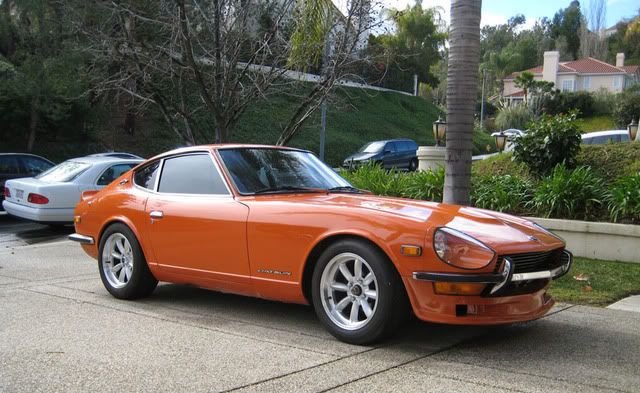
That orange one looks GREAT! Please put the headlight covers on yours! I told you they look good.
Fine, here is a picture of the silly headlight covers to please the masses. What's next, fender mirrors?![]()

Looks great with the random rust hole.

Finally got the gas tank back in. It took longer then I expected since the undercoating took forever to dry and the filler hose didn’t want to go back on. It was also raining which didn’t help much. I added 5 gallon of fresh gas, turned the pump on and checked for leaks. Everything looked fine. Even the gas gauge works again since I cleaned and adjusted the sending unit. I waited till 11pm when it was dark with fewer cars on the road and went for a test drive. The car finally accelerates! No more bog and hesitation! Down side is when I accelerate hard there is still a huge cloud of blue smoke. Hopefully now that I can drive the car more I can burn the oil out of the exhaust. This might also give me an excuse to build a new exhaust system. Also during my short drive I did not hear the pump buzz once. It was nice and quiet the whole time.
Here is what still needs to be fixed:
-Make wipers move for state inspection. If they actually function enough to clear water that a plus.
-Mount driver’s side mirror for inspection.
-Find drivetrain clunk when getting on and off throttle.
-Sounds like the front diff mount.
-Rear shocks feel blown, find a cheap fix or start sourcing parts for coilovers.
I’m sure there is more stuff but I don’t want to fix everything or make the car look any better since MA$$hole and I are officially signed up for the BABE Rally.
Drove the car around my neighborhood a few more times. The blue smoke is getting better. No more huge clouds but there is still some while driving. The new problem I’ve noticed is the inside of the car is filling with exhaust. I need to track down a new hatch seal at the junkyard this week and check for other leaks around the tail lights and other grommets. For now I might seal the outside of the hatch with duck tape to see if that improves things.
My hunt for turbo parts continues. Over the weekend I tracked down a 280zx turbo exhaust manifold. That’s one less thing to worry about.

damn I like headlight covers. and fender mirrors. and ZG flares. lol. is there something wrong with me?
Took the Datsun out yesterday and it’s having trouble accelerating again. It’s acting like fuel cut but if I accelerate lightly I can still drive the car. When I pull out of an intersection it will buck and chip tires but in higher gears it will bog but I can power though it but its still down on power. It’s still lot better then before I cleaned the tank. Only thing left in the fuel system is the injectors. This weekend I’m going to pull them then build something to test and flush the injectors off the car.
Good new is I fixed the wipers. I pulled the motor and linkage and found the pivot for the drivers side wiper was rusted completely solid. I disassembled both pivots, cleaned up all the rust with some steel wool and acid, greased everything and put it all back together. I was going to grease up the wiper motor but it was in some kind of sealed bag. It tested fine off the car so I left it alone. I put everything back together and the wipers work fine on both low and high speed.
Motor and linkage have been removed.

This is the rusted pivot which the wiper arm connects to. Linkage connected to it looks worse then it really is.

Nicely done on the wipers! This is my new favorite thread now that Woody sold the dirty 911. On the bucking/fuel cut issue, there can definitely be crud in the injectors. FYI, NAPA, etc have re-seal kits with new pintle caps and o-rings for cheap. I just had my 944 injectors done (I had them clean them, too, they were really gunked up).
Don't know if this is any help to your fuel issue, but my 240Z had a similar problem. It drove me crazy until I figured it out, but it was issues with the return and vent hoses. They both had issues, as in, clogged and with line damage both. Once that was solved, it ran correctly.
On a sad note, I sold my 240Z on Saturday...sad days indeed.
Earlier this week I removed the injectors so I could clean and test them. I wired up a 9V battery to an extra injector clip and used that to pulse the injector while I flushed carb clean thought it. The little screens in the top of the injectors were perfect and there were no signs of rust or other crap. Looks like the fuel filter has been doing its job but to be safe I back flushed them anyway.
After they were all clean I wanted to check their spray pattern. I started to rig up a spare pump but I had trouble getting the pump and didn’t have enough fuel hose. Plan “B” was a little more grassroots. I know the pump in the car works so I took the fuel hose that went between the filter and the rail and hooked it up to the fuel pressure regulator. I then connected a hose from the regulator right to the injector. With the key on I can turn the pump on and off by moving the door in the AFM. To pulse the injector I used the connector and 9V battery while a Dunkin Donuts ice coffee cup caught the fuel. With the lid on the cup the injector fits the straw hole pretty good.
All the spray patterns looked fine and none of the injectors leaked. Unfortunately I didn’t get any pictures of the cleaning or testing process since I didn’t want to get fuel or carb clean on my camera. The car is not back together yet so I’ll mock it up again and take some pictures this weekend.
While disassembling the fuel rail I noticed that there was a fair amount of fuel pressure on the return line and gas kept pouring out. I had bleed off the feel line and no fuel came out when that was disconnected. Maybe I do have a venting issue like racerdave600. Since it was warm and sunny out pressure must have built up in the tank. I removed the gas cap and bleed off a lot of pressure which stopped the gas flowing out the return line. Now the charcoal canister is still hooked up along with all the vent lines. I would think that the pressure would not build up as much if the EVAP system was working. Does anyone know if there is a check valve anywhere in the vent lines? FSM doesn’t give me much info.
It’s been a few weeks but the fuel issue is finally sorted out. Even though I cleaned the inside of the tank with acid and it looked spotless, the pickup screen was still clogged up. Unfortunately on the Z the screen is built into the tank and can’t not be removed. When I filled the tank with water it would only tickle out the feed line. I used a piece of copper tube and chased the feed line back to the screen. A bunch of rusty crap came out and water started flowing freely. I then drained the water and flushed the line and screen with acid 2 hours. After it dried out I reinstalled the tank and put the new fuel pump back in. Pump has a low hum now like it should and I’ve been able to drive the car. So far I’ve put 50 miles on it.
Here are some pictures of what the 280Z fuel tank screen looks like incase you want to see what I’m dealing with. I went looking for pictures incase I had to cut the tank open to fix it and found these on another Z site.


Last weekend I pulled the driver’s side wheel off to inspect the brakes. I’ve been getting some squealing noise and the car is pulling to the right. Rotor still had some rust on it from sitting and the outside pad was no moving freely. I also noticed the wheel bearings had some play and when I removed the rotor I saw the outer bearing was in poor shape. I cleaned up the brakes and repacked the bearings for now. Brakes now work better but now the steering wheel shakes over 40 mph. So far it’s not related to the brakes so I’m thinking the wheel might not have not seated fully when I put it back on. I really hope it’s that easy. I’ll find out more when I replace the wheel bearings this weekend.
Oh I was also looking for a way to take some videos while I drove to prove to my friends the car actually works and came up with this. I found this clip under the seat and it holds my cell phone to the passenger visor. It actually worked really well and the picture didn’t shake at all.

Finally went to the junk yard and grabbed a pair of horns from an E30. I had to flip the stock Z brackets so the BMW horns would bolt on and not collect water inside them. Soldered in the new connectors and now I have working horns.
Next I looked into mounting a new driver’s side mirror. I broke off the rest of the old crappy one so I could see how bad the rust is. After grinding it down it’s just as bad as I thought.


If I cut it out I have to trim an extra 1 inch around what you can see to get decent metal. At some point I’m going to fab up a patch panel or find a new door but for now I’m just going to fiberglass over it. I need to pass state inspection and the BABE rally is coming up quick.
One other thing I wanted to take care of was that annoying clunk I get when shifting. I jacked the car up and checked to see if the diff strap was still there. It was still intact but I could fit my hand between it and the diff. Next I lifted up on the front of the diff and watched for play in the mount. It looked sloppy so I removed it to see how bad it was.
One side has started to rip but it’s usable for now if I limit the upward movement. I don’t have time to make an R/T mount so I sucked it up and bought one from TechnoVersions.


This mount replaces the strap and uses a urethane stop to limit diff movement or I can use a GM poly transmission mount to hold the diff from the top eliminating the bottom mount all together. If possable I'm going to use another bolt to holt the mount in.
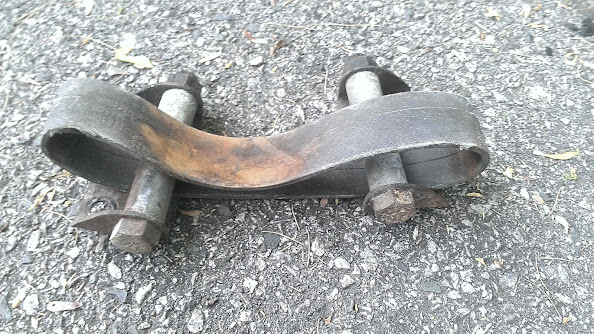
Here is the strap it’s going to replace. I still find it odd that this was Datsun’s solution to limit diff movement.

Last small update I have is I picked up a free pair of seats from a Plymouth laser. They are much more comfortable then the destroyed stock seats and should be great for a long road trip. They do sit about an inch or 2 higher then stock so I might have to modify the mounts. Later in the summer I’m going to pull the covers off and try to dye them black so they match the interior.
Yeah, that diff strap was about a chickenE36 M3 setup even when new. Glad your car is coming along so well! Makes me want my old 280 back.
New diff mount is installed and I took the car for a quick drive last night. Clunk/bang noise is better but now it’s just a clunk when shifting. I parked the car in gear and rocked it back and forth. I can hear slop/clunk in the drive train but when I look at the diff its mounted solid. If I grab the driveshaft I can feel the clunk. While I was doing the mount I unbolted the driveshaft and checked the joints. There was very slight play in the rear joint but not enough to cause the clunk and movement I felt. I kept rocking the car back and forth while checking different drivetrain parts. Transmission mounts felt solid and with my hand on the transmission I could only slightly feel the clunk. Same went for the diff. I then grabbed the slip yoke and when I rocked I could feel the clunk pretty good. Now it could have just been slop in the gears but the yoke was lifting up and down when rocking the car and the transmission was steady. I can actually grab the yoke and give it a slight shake. Looks like the tailhousing bushing is worn or the splines? From what I’ve read I can’t replace the bushing so I think I’m just going to leave it for now till I find a 5 speed.
I’m still working on getting the seats in the car. It rained most of the day Wed so I didn’t get as much as I wanted to done. Passenger side seat bracket has is almost gone. One small piece left and I can make some new mounts.
Seats were really dirty and had hair gel all over the head rests. Cleaning by had just made them slimy so I decided to pull the covers off and run them through the washing machine.
Since they were already off I decided to try and dye them black. I picked up some Black liquid Rit dye at CVS and gave it a shot.
GF is gone for 2 weeks so I decided to dye them in the sink. I filled the sink ½ way with boiling water then topped it off with just hot tap water. I added a full bottle of dye then placed one set of seat covers in.
Instructions said to keep them covered in dye for 30-60 minutes. The covers kept floating up so I filled some 2 liter bottles with water and used them as weights. I also added ½ a cup of white vinegar. I read that it helps make the color more bold. Guess its worth a shot.
After an hour I pulled them out and rinsed them till the water came out clear. I then did a quick wash in the washing machine and laid them out to dry.
Color came out nice and even. Much better then my cell phone pictures show. The blotchy gray spots are just the shine off the fabric.
I rubbed them with an old white T-shirt and it did pick up some dye but the covers were still wet and it took some effort. I’m going to wash them again and see what happens. Hopefully tonight I can get the passenger side done and start putting the seats back together.
Started some light body work today. I cut out the rust around the mirror and made up a patch panel.


I tacked it in place in a few spots so I'd stop messing with it then cleaned up for the night. Patch was the best I could do by hand with limited tools.Today I hope to finish tacking it in, grind down the welds, and spray some primer on it. My goal is to find another door but for now I can at least bolt the mirror back on so I can pass inspection.
Right outer wheel bearing was gone so I installed new bearings and cleaned up the brakes. Old seat brackets have been removed and new ones have been welded in. Seats are pretty much bolted to the floor but the seating position is great. I can even sit in the car with a helmet on with a little room to spare.
Hopefully everything will be back together by Saturday and I can finally get an inspection sticker. Then I can take the car out on the highway for a shake down. Still have some work ahead of me since this is the cars current state.
Covers are back on the driver’s seat. It’s hard to tell in the picture but in the daylight the covers are more of a dark purple color. I was reading that I should have used an acid dye instead of the cheap Rit stuff. Oh well I’m only out $3 and some time. Glad I didn’t bother with the passenger seat. Maybe later this summer I’ll try again.
Next project is installing a radio and speakers. From the factory the car only came with one speaker mounted in the back on the driver’s side. The speaker was gone but the stock bracket was still there. On the passenger side there are holes in the trim for a speaker but no bracket or wires. Looks like I’ll have to make my own.
I had some 20 gauge metal left over from the door patch. The stock bracket was thicker but this is all I had for now. I traced the general shape of the stock bracket onto the metal and started cutting.

Few minutes later I ended up with this. As I was cutting the metal it liked to bend so I kept some extra material around some of the straight edges then folded it over to make it stronger. I didn’t go too crazy but it’s simple and effective.

I still need to run a pair of wires to the new speaker and run a constant power wire from the battery to the radio. Factory radio one only had ignition on since it had no memory or presets.
Also as of yesterday my car passed state inspection.

You'll need to log in to post.