Exactly my thoughts. Urethane windows are typically shimmer anyway. So make some that work. Nobody but you will ever know.
And don't forget seam sealer in there.

Exactly my thoughts. Urethane windows are typically shimmer anyway. So make some that work. Nobody but you will ever know.
And don't forget seam sealer in there.

That's the plan. Before I start going crazy, how much gap will the urethane eat up and still hold? My worst gap is 1/4", if I get it down to 1/8" can the urethane tolerate that?
Edit: went straight to the source and called 3M, they say the urethane can handle a max gap of 1/4". So i'll probably try to shim the channel up to a 1/8" gap and call it good
They say if you have 10min, do a 10min job. So this morning I made a template to redrill my brake booster to adapt it to the Ventura (originally from an 80's camaro)

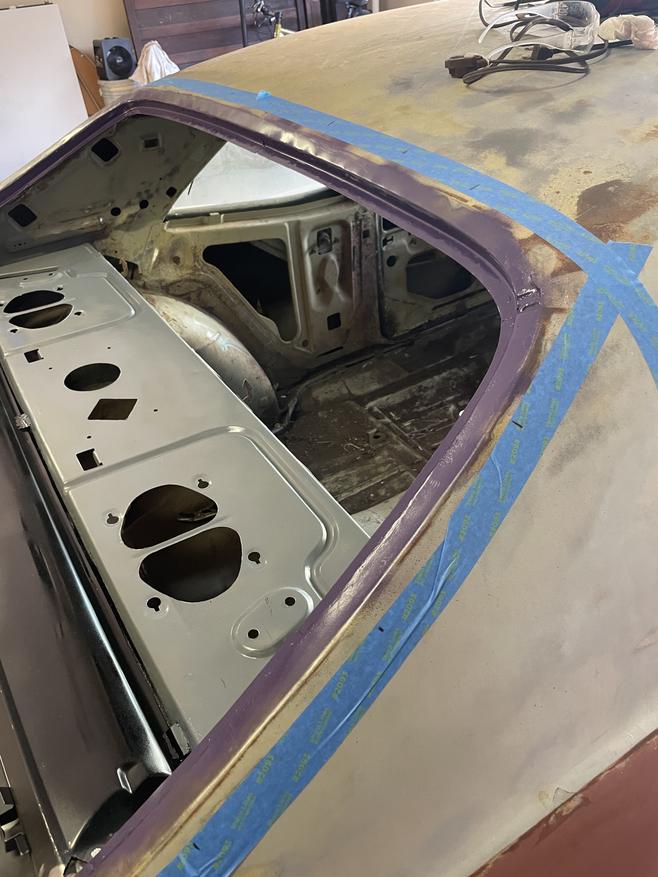
A few days ago, I made some "shims" to raise the height of the window channel to match-ish the deck filler panel and got those welded in.

Hit the spot under the deck filler with a quick lick of paint

and stuck on the new deck filler. I got it spot welded along the rear edge, still need to weld the sides and front, and then patch the access hole I cut trying to get it to fit lol


LOVE seeing this project updated.

Looking great, keep it up!

Hell yeah!
Thanks for the love, fellas. I think about this car almost every day, but i've been working two jobs since August so progress has not been as fast as I wanted. Thankfully, i'm singly employed again, so now I only have to balance between this project and my desire to spend every weekend outside camping lol

Good progress! Glad to see that you have the rear window situation figured out. My oldest son had to do similar repairs to both the windshield and rear window channels on his 66 Caddie. This is looking good.
Tonight I got the deck filler welded in the rest of the way. The front lip is supposed to weld onto the rear flange of the package tray, but that metal was too thin and wasn't playing nice with the welder. So i made these little "outriggers" to move the weld upwards to better metal. Obviously they need to be ground down and prettied up, but they shouldn't be visible once the window is installed.

That's a good solution. Im stealing that

All the metalwork around the rear window is done! Threw a lick of paint on it, and after it cures, i'm sticking the window back in tomorrow or i'm gonna die trying.
Good to see you back at it!
berkeley yes!!!
And purple for the motherberkeleying WIN!!!
I was just thinking about this car and hoping it wasn't lost into the ether!
Thanks fellas!
I really was going to put the windshield in on Sunday, but it was pissing rain. I have the super special pinchweld primer for the urethane, and i got nervous with that much humidity in the air. It quit raining this afternoon, so hopefully tomorrow conditions will be favorable.
In the meantime i finished modifying my brake booster to fit and installed that! 
It's from an '82-'92 F-body and came from a disk/drum car so it should work perfect in this application. Now i need to acquire a proportioning block and i can order brake lines and fittings and plumb the brakes
Well the weather was favorable, but I realized that I needed to install the studs for the window trim clips before i put the glass in, or i wouldnt be able to fit my drill in. So i laid them out and popped them in.

Didnt have enough time after that to finish the window install and i didnt want to get halfway through. Next time

Love seeing the progress.
Keep it up!

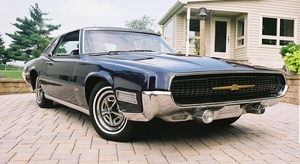
This is cool. I didn't even know GM made an X-Body Pontiac.
I also didn't know there were screw-in versions of those trim studs. That's handy to know.
Took the day off and went shopping in the junkyard. Grabbed a proportioning valve from an 80s blazer that was disc/drum, and a DBW throttle pedal/TCM from a 5.3 silverado

I wanted to measure rack and pinions from rear steer FWD hondas/toyotas but i forgot my tape measure :(
After much ado, the weather got nice and the glass is in!
Really not an awful job. The two things i would do differently: 1) the fancy pinchweld primer is super thin and hard to apply in a nice line freehand. I would mask off a line with tape next time and 2) the urethane is so thick, it was really painful to squeeze my caulk gun enough to make a bead around the whole window. I think a battery powered gun would be worth it (i think racetruckron suggested that? He was right)
I wanted to get the seat mounted before I started positioning the pedals so I wouldn't put them in an awkward spot, so I started working on that. I put the steering column back in and rigged up a plumb bob to mark the center of the column.

Then I set the seat to halfway of it's fwd/aft adjustment in and sat in it to see where I like it, and marked that.

This was originally a bench seat car, so there are some raised sections on the outboard side where the original seat mounted, but nothing on the inbd sides. My plan is to fab some simple pedestals for the inbd floor to make it level with the outbd side. I was just getting started on that when my angle grinder started acting weird. I pulled it apart and the bottom bearing is totally smoked.

probably just going to get the HF one for $14.99 and press on

In reply to budget_bandit :
Nice progress.
Go ahead and buy a second one from HF while you're there.
Years ago, someone on here suggested it. That way you have one dedicated to cutting and the other one to grinding. It saved me a ton of time and effort swapping disc's back and forth.

Indy - Guy said:In reply to budget_bandit :
Nice progress.
Go ahead and buy a second one from HF while you're there.
Years ago, someone on here suggested it. That way you have one dedicated to cutting and the other one to grinding. It saved me a ton of time and effort swapping disc's back and forth.
And get a third one.
Cut, grind, tigerpaw.
Ive subscribed to the different grinder for every task. Love it.
You'll need to log in to post.