3 4 5 6
maschinenbau
maschinenbau PowerDork
12/11/24 8:40 a.m.

I think the custom frame is an awesome idea and I really hope you do it, eventually, but that's a lot to accomplish in 3 months. Even an engine swap is a lot for most people in that timeframe. It would be really cool to show up in 2025 with "just" the engine swap, then come back a year later with the crazy custom chassis for the A-B comparison.  

One step at a time. Personally I would be focused on getting the swap running, driving, and sorted, but I'm happy to follow along whatever you do.

maschinenbau
maschinenbau PowerDork
12/11/24 8:57 a.m.

Couldn't resist...

nocones
nocones PowerDork
12/11/24 9:16 a.m.

Another option.  Start looking for a rust free cheap S10 in FL.  Got to 2025 challenge for the party.  Drag rust free S10 home.  

eastsideTim
eastsideTim UltimaDork
12/11/24 9:59 a.m.
maschinenbau said:

Couldn't resist...

Amusingly enough, I threw this together back in July.  
 

Edit:  Having done the swap before, I think part of it is I don't consider completing another to be much of an achievement, and am inclined to put that time towards 2026.  Which means I may just head down to Gainesville for a couple days to hang out in 2025.

eastsideTim
eastsideTim UltimaDork
12/11/24 10:02 a.m.

In reply to nocones :

I did that once.  The black 1st gen came from Jacksonville.  I suspect I won't get a deal like that one ever again.  Will keep my eyes open, though.

I also have a $500 Dodge Ram 50 in my backyard that is considerably more solid.  Don't think I want to cut it up as much as I would need to in order to make it a winning car, though.

Toot
Toot Reader
12/11/24 1:58 p.m.

In reply to nocones :

I have found rust free 2nd gen s10s free all over Georgia if you will just haul them away.  My son has picked up 6 vehicles this year alone because people want them removed from their property so they don't have to pay to have them removed.   I would start there

maschinenbau
maschinenbau PowerDork
12/11/24 2:13 p.m.

The Xtreme with that paint and body kit is so cool though...

eastsideTim
eastsideTim UltimaDork
12/11/24 4:40 p.m.

Having to borrow access to a truck/trailer does inhibit me a bit. 

But anyway:

eastsideTim
eastsideTim UltimaDork
12/11/24 4:41 p.m.
maschinenbau said:

The Xtreme with that paint and body kit is so cool though...

Part of the body kit is still likely to be used.  Paint, eh, not as likely, unless I can get a perfect match cheap.

eastsideTim
eastsideTim UltimaDork
12/12/24 8:28 p.m.

While separating the engine and transmission today, I may have found part of why it wasn't running well.  One of the hold down screws for the distributor cap was completely loose.  I don't think I'm going to put everything back together to see if that was the only issue.

Pete. (l33t FS)
Pete. (l33t FS) MegaDork
12/13/24 2:38 p.m.

In reply to eastsideTim :

Betcha the distributor was broken.

They are plastic.  When you install a new distributor cap and rotor (a regular thing on those engines) you must reuse the old screws.  The new screws have a dab of Loctite and the added thickness of the Loctite is stronger than the distributor body, and the distributor cracks.


Very very very common.

eastsideTim
eastsideTim UltimaDork
12/13/24 7:48 p.m.

In reply to Pete. (l33t FS) :

From a glance, that appears to be what happened.

eastsideTim
eastsideTim UltimaDork
12/16/24 6:50 p.m.

The 4.3 is up for sale cheap, and I am hoping it goes fast, as it is taking enough space that a lot of heavy work will be on hold until it is gone.  I also need to do a little carpentry, and build a platform for the 4L60Es, to make it easy to disassemble them, and frankenstein them together.  I also have a shift kit I intend to install, and am debating whether to spend the money on a Corvette servo while everything is apart.  Should help performance and durability, but it's another hit to the budget.

Meanwhile, I retrieved what I managed to salvage of the Trailblazer's main body harness:

And disassembled enough of it to get the only part needed for the swap:

Accelerator to TAC module cable.  As I understand, it's separated from the harness in a GMT800, so a lot easier to get a hold of in the full size trucks.  I will still use part of the main harness.  There is some nice heavy gauge wire that ran to the rear fuse box, so I may not need to purchase anything additional when setting up the cut off switch.  It's also nice to have decent quality spare wire in multiple colors.

Speaking of wiring, I've started looking at diagrams.  If I re-use the S10's fuse box(which I hope to move to inside the cab), I think I can alter the Trailblazer engine harness to plug right into it, and make the wiring look a lot cleaner.  I'll also need to make a few changes to the S10 body harness to allow it to connect to the Trailblazer PCM.  If I have been reading things right, I think I can get the speedometer and tach working, and may even be able to get the other gauges operational, too, but I still need to dig around the Trailblazer wiring diagrams a bit to see if the signals from the PCM need to be conditioned through a BCM first or not.  I think the Current Performance conversion harness keeps the gauges, so I am guessing it doesn't.

The rough plan will be to have the PCM and the fusebox in the passenger side of the cab, where the heater core used to be.  While I'll try to come up with conversion plans, I'll wait to mess with the wiring until any chassis hacking and body relocation is done, to make sure everything ends up being the right length.  So, it'll be a while.

madmrak351
madmrak351 HalfDork
12/19/24 4:30 p.m.

I have grabbed several of the TAC to pedal harnesses from the full size trucks and suvs. I never paid attention to how they are set up on the Trailblazers. Interesting.

eastsideTim
eastsideTim UltimaDork
12/21/24 7:58 p.m.

The 4.3 went goodbye yesterday, and there is another $80 recouped. 

I started in on the interior again, since I am pretty sure I'll need to drill through the floorboard with a hole saw to get to the cage nuts for the body mounts.  Destroyed a T50 socket trying to get the driver's seat unbolted.   Today, I attacked it with a drill, dremel, and a hammer and chisel.  I'm guessing the passenger seat will require the same work, as it looked even crustier.  At least there is only one bolt per seat, the other three mounting points are nuts on studs welded to the floor.  Those came loose just fine.

Since the truck is pushed up against the wall, there's not a lot of room to work on the passenger side, so I decided to see how bad the driver side body mounts bolts are.  Unsurprisingly, the front one snapped with almost no force.  In an effort to not replicate that elsewhere, I hit all 5 remaining mounts with Kroil.  The center driver side mount actually managed to come loose, and seemed to be going fine, then I felt it give way more quickly and heard a crunch.  Cage nut gave out.  I stood back, and tried to decide if it was time to stop wrenching for the day, or try my luck on the third mount.  Then I heard it.

Every few seconds, the cab was making a quiet clunking noise.  I couldn't isolate it perfectly, but I think it was coming from the roof or windshield frame.  This went on for several minutes.  Best I can figure is the cab was slowly flexing.  I'm a little more concerned at this point, and started thinking about other challenge options.  I came up with a plan to try to pull the passenger seat next, then maybe weld a brace in behind the doors(or maybe not), then try to get all of the cab mounts unbolted.  If I can lift the cab up off the frame with a jack without the windshield or sunroof cracking, I'll probably stay with the S10.  Looking at it more, though, I will definitely need to replace at least 4 of the 6 mounting points on the cab.  I'm sure I can make them stronger than stock if I try.  They may be ugly, but at least they wouldn't be highly visible.  I was also able to punch through part of the floor on the drivers side near the front mount.  At least I saved the Trailblazer's hood, so we have a bunch of spare sheet metal.

If the S10 is not to be, I'll pursue one of the aforementioned options.  One I hadn't mentioned explicitly yet, is wae and I are picking up Toyman's Infiniti G35 in the near future.  The plan was to rebuild/replace the engine, but it could end up being a challenge car, instead.  When I first committed to getting it, I did some research on cheap LS swaps in G35s/350Zs.  It looks like it is a case of either buy a lot of expensive parts or do a lot of fabrication, including with tools I don't have and am not sure I have the budget/space for.  May still revisit the idea, though.  The handling would be a lot better from the get go, but the G35 is kind of a pig, and I don't think I could drop the weight to anywhere near what the S10 would be.  Budgeting would also limit the amount of engine/transmission performance improvements.

eastsideTim
eastsideTim UltimaDork
12/24/24 9:21 p.m.

Had to cut the passenger seat bolt out.  Afterwards, interior removal went fairly smoothly.  Hit a minor snag on the jump seat area, but cutting a slot in the panel to slide the passenger seat belt through meant I didn't have to hack up a third bolt.  So, here it is in all its glory:

Not great, but I think our first challenge effort, a 1st gen CRX back in 2005 may have been worse.  I keep reminding myself I do not need to do a perfect restoration.  Safe and looking good in concours is the goal.  It doesn't matter if it looks ugly where no one can see it.

Next step is drilling a hole for each body mount, so we can either vise grip the cage nut while loosening the bolt, or cut everything free if it is too far gone, like in the driver's front.  Measure once, cut twice:

After this one, I switched to a larger hole saw, so lack of precision would not be as risky.  I have three drilled open and soaking in kroil for now.  Will try to get the remainder dealt with soon.  The Trailblazer will likely donate some of its hood for the floorpan, and I think I cut out a brace up front that should be great for rebuilding any body mounts that are too far gone.  I may also go along with what Pete mentioned earlier, and bolt the body to the frame in a few additional locations, if I have any concerns.  For now, I just want to make sure it won't flex too bad once it is lifted a bit.


eastsideTim
eastsideTim UltimaDork
1/2/25 10:20 a.m.

84FSP and I got the cab unbolted.  Placed a jack with about half a dozen boards on it under the transmission tunnel, and lifted.  A little creaky, but nothing seems to have broken.  Set it back down, and the driver's door still opens and closes fine.

Next step will be unpiling all the stuff that has been piled on the chassis and cab, then moving it into position for a longer term separation.  Due to space limitations, I'll have to work on the chassis while the cab of Damocles is hanging over it, supported by jackstands.  Going to try to have the clean up done today, so everything can be moved into place in the next few days.

I am hoping this will be the start of picking momentum back up after the holiday slowdown.  I'm also trying to decide if I should work on the transmission first or not, so some test fitting can be done before I hack up the chassis, or if I should push forward, knowing that I have an angle grinder and a welder, so I can make everything fit.

maschinenbau
maschinenbau PowerDork
1/2/25 11:24 a.m.

That cab is totally worth saving. Like you said, it doesn't need to be a perfect restoration, just solid enough for racecar. 

eastsideTim
eastsideTim UltimaDork
1/2/25 3:03 p.m.

Definitely good enough for the challenge.

As much as I want to Leroy Jenkins the frame shortening, since there is a minimal chance of making it for 2025, I need to mock up the engine to get the distance between it and the rear axle.  For that, I'll still need the cab pushed back a bit, so the front bed mount will need to go.  Seeing as it is part of the rear cab mount, I may see about grinding the whole assembly off together.  Just need to take measurements for the relative locations of all the cab mounts before I get too far ahead of myself.  Could just lift the front of the cab, too.  I also need to snag the swap oil pan out of my storage locker, as there is no way the Trailblazer pan will let the engine sit low enough.  Might hack up the crossmember similarly to the way I did in the 92 S10, to make sure there is plenty of room.  I can cut it before test fitting, then weld up the hole after the engine is back out.

I still need to do a bit more digging, but I may be able to switch my swap mounts side to side and get an additional 1.25" of rearward engine travel without having to modify any mounts.  The instructions are pretty bad, so it may actually be the reverse, though.  If it works, that'd be enough of a weight shift to make me happy, and would likely gain me a bunch of clearance in several locations that are usually pretty tight in an S10 LS swap.

eastsideTim
eastsideTim UltimaDork
1/3/25 4:46 p.m.

Exhaust, driveshaft, and fuel tank are removed.  Now to continue cleaning up the garage, shuffle the chassis away from the wall, and do a little test fitting.  The swap oil pan is not in my storage locker, so it must be buried in the garage somewhere.

eastsideTim
eastsideTim UltimaDork
1/5/25 5:48 p.m.

Organized the garage a bit (assembled shelves and piled them with junk I'm not willing to get rid of yet), and moved the S10 into a better position to work on.  Still needs a bit of tweaking to make it easier to work around.  Also, marked and cut a piece of the crossmember out to make installing and uninstalling the engine easier.  If it was going to stay in the stock location, it would've needed this cut for clearance, but with it going to be set back, this should just make life easier when test fitting everything.  I'll weld the piece back in upside down once all the fitting work is completed.

Next step will be prepping the engine to go into the bay to see what other changes I need to make.

I've also been thinking on how to deal with keeping the cab separated, and mostly out of my way.  Maybe some angle iron fabbed up to allow the cab mounts to bolt to it or rest on it on either side would effectively allow for a rail to set onto jackstands, or I could throw together a frame with spare lumber, and set it on a couple of wheel dollies, to keep it above the chassis and allow it to be shuffled a little when needed.


eastsideTim
eastsideTim UltimaDork
1/6/25 5:26 p.m.

Had to dig out from snowmageddon, so didn't get a lot of garage time.  I did mange to remove the exhaust manifolds, and lucked into not breaking a single bolt.  Next work session, will try to swap oil pans.

eastsideTim
eastsideTim UltimaDork
1/10/25 11:46 a.m.

Way too much time and energy in the last few days was spent digging out from the snow.  On Tuesday, I did get outside for a few minutes, and took some rough measurements of the cab mount locations.  I had also searched online, but had only found some upfitter diagrams which did not have values I need.  What I have should be close enough for anything I do to lift the cab.  I can take more precise measurements once it is off the frame.

This has also made me realize I should really grab a freeware CAD program instead of using paint.net.

With that completed, yesterday, I pulled the oil pan and prepared to install the new one.  With the old pan having a hole for the dipstick tube, the new dipstick would have to go in the hole in the engine block instead.

Umm...

Turns out 03-04 Trailblazer V8s did not have their dipstick holes drilled at the factory, among a few other LS variants.  Others had it drilled, then a plug inserted that could be popped out from underneath.  I'm sure the hole is supposed to be a metric size, but a little measuring of the dipstick tube, and it looked like 3/8" would do the trick.

Being a bit nervous about drilling into an assembled long block, I took several steps:

  1. Cut up some cardboard and inserted it up in the dipstick recess in the windage tray, to hopefully redirect any wayward flakes of aluminum.
  2. Made sure to grease the drill bits, and take breaks to clear chips and re-apply grease.
  3. Used a punch to keep the pilot drill bit centered.
  4. Starting with a smaller pilot bit, I worked my way up to 3/8" in three steps.  Used a lower powered right angle drill, because it gave me a bit more maneuvering room.
  5. Finished by adding a small chamfer with a 1/2" drill bit, in the hopes of keeping the tube o-ring from getting torn.
  6. Wiped the inside of the block by hand to make sure nothing was caught at the back of the hole.
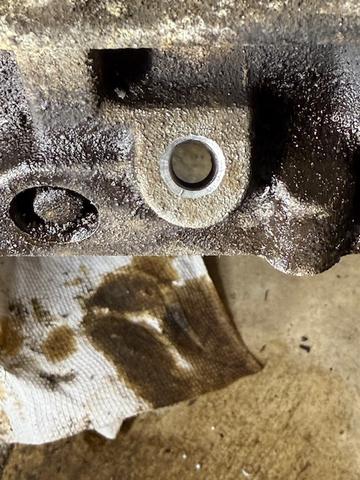
Did a quick test fit, and once the o-ring hit the block, there was some resistance, so it should be okay.  If not, well, RTV is a thing.  Can't leave the tube in place, as it'll get in the way of testing exhaust options.

Finally, installed new pickup tube and oil pan.  Not completely without drama, as one of the holes in the block appeared to have messed up threads from the factory.  Cleaned it up as best as I could and got it all together.   Tons more room for this to fit in the chassis now:


I'm seriously considering a few more parts orders ahead of any price increases.  One is the exhaust.  Right now, it looks like a par of single chamber race mufflers is about the same price as a pair of glasspacks.  Not sure which will be the better option for power and sound, or if it'll make much of a difference.  I suspect the glasspacks will be a bit easier to mount up.  When I test fit the long tube headers, that may give me any idea of how much space I have to work with.  I already have a decent amount of straight 2.5" exhaust pipe laying around, just need to get some numbers to FMV it.  Second, I may grab a cheap generic 4 link kit.  I could use the parts as designed to build a four link, I could fab up a bracket to convert it to a 3 link, or even come up with some way to convert back and forth for drag and autox work, if time allows.  Would definitely not start in on that till after March, if the truck manages to make it this year.


eastsideTim
eastsideTim UltimaDork
1/10/25 5:01 p.m.

eastsideTim
eastsideTim UltimaDork
1/11/25 12:02 p.m.

Quick notes on the above picture.  Engine is resting partially on the mounting plates, but not all the way down, it is probably .5"-1" too high.  It is also resting against the firewall.  A quick measurement to the transmission mount says it is about 0.25" back from where the 4.3 sat.  Also, the mount plates are on opposite sides from where they belong.  The mounting slots are still about 0.25" behind where the holes are on the block.  There is also approximately 1.25" of adjustment in them.  All in total, if I keep the plates in the "wrong" position, I can set the engine back ~1.75" from stock without having to do any fab work.  That is close enough to 2" for me to be happy.

Today, I'm hoping to get back out to the garage, take more measurements, and maybe swap the mounts to the correct sides to get some more precise numbers.  If I can get how much the frame needs to be shortened, and how low the headers sit, I'll be happy.

3 4 5 6

You'll need to log in to post.

Our Preferred Partners
AqkZtTyGhL8JHSTfZtmzzxb7coQjwJBeP6PldQ0gss9ynunz5IN7oFufyMaSb80F