1 2
ditchdigger
ditchdigger HalfDork
2/20/11 10:30 p.m.

Time to learn a new skill.

I am in the process of building a new motor for the eight and a half. I have been thinking about the valves a lot lately. Wondering just what all is involved in a simple 3 angle valve job and how difficult the actual act is and what equipment is neccesary.

I have a co-worker who is some kind of idiot savant/mechanical genius/epic bodger. In his current list of cars is a Vespa 400, 53 Studebaker pickup, 78 Corvette, a 50's Studebaker Hawk and a 69 Camaro. He also collects antique tractors and all sorts of other vintage things. If anyone had the info I needed it would be him. I asked about valve seat grinding and the next day he showed up at work with this box

Photobucket

This awesome 1950's cantilever box is stuffed full with equally old valve seat grinding tools.

Photobucket

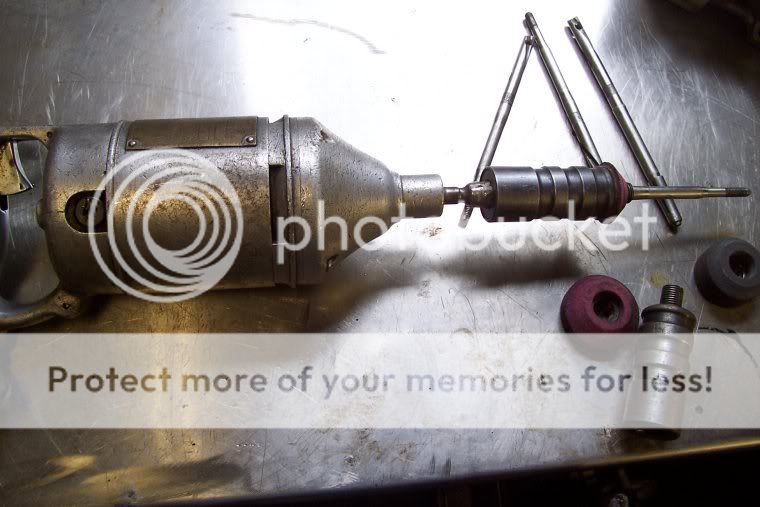
The grinder itself is just an old drill motor with a hex drive

Photobucket

The arbors are pretty much what I expected them to be

Photobucket

The pilots were a bit of a suprise. They wedge themselves into the valve guides. Since this setup is so old it does not have any pilots that would fit anything as small as a 7mm valve guide. So I cannot use this, but I can learn from it.

Photobucket

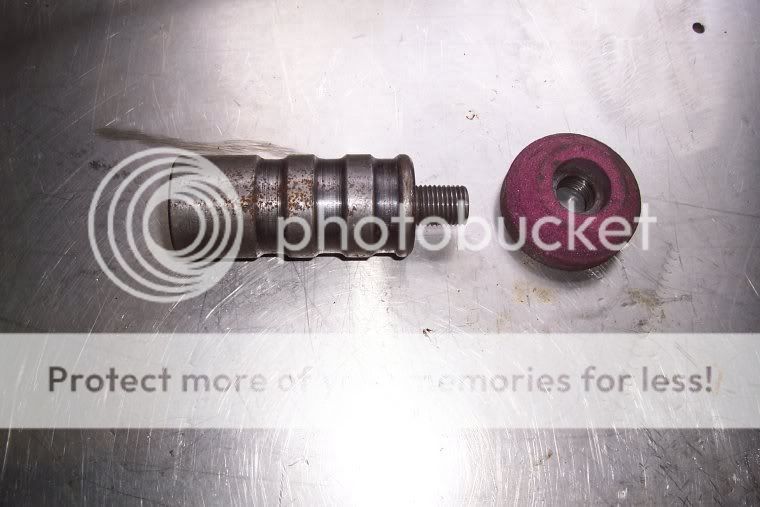
And the stone shaper is simpler yet better than I had imagined.

I aqcuired a few items earlier this week when I decided to try this

Photobucket

The Die is a very odd size. That makes them either very expensive or very cheap. I got lucky and found it cheap. 9/16"-16 to suit grinding stones made for old black and decker valve seat grinders. A 1.125" stone, a new 7mm drill bit and some 7mm drill rod.

Photobucket

Some scrap 1" aluminum rod sacrificed itself to the lathe to become my arbor

Put it all together and I have this

Photobucket

The end is smiply 3/8" so it fits into a right angle pneumatic drill

Ready the junker cylinder head.

Photobucket

Eeewww! Yet another 850 head that was stored for decades uncovered outside with no carb.

I did a bit of googling and found this picture of the three angles

Photobucket

Shaped the stone to 30 degrees and made a cut

Photobucket

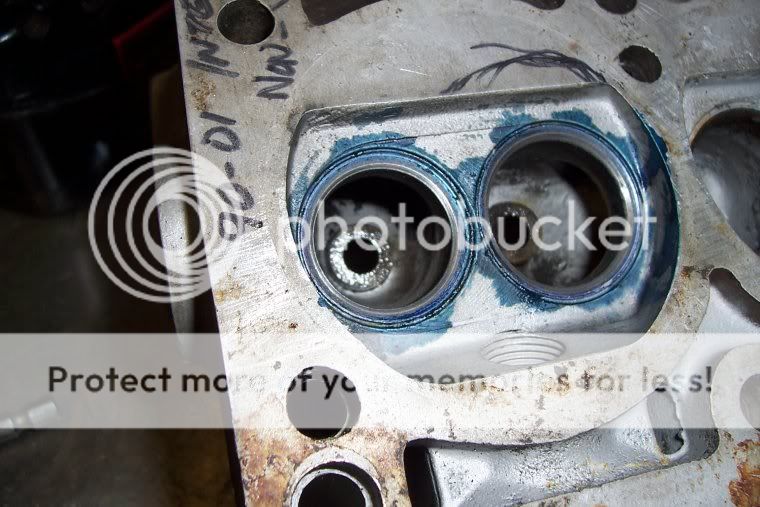
Next was some Dykem and 45 degrees

Photobucket

And finally 60 degrees and some more layout fluid to show where I am removing material

Photobucket

And finally all three angles after removing the dykem

Photobucket

I used a rough "general purpose" stone and I think for the good head I would step up to a finer finishing stone.

I am going to take this head to some more knowledgeable people than I to get their opinions on the viability of my homebrewed valve job and hardware. I am pretty convinced that I can do this. Hell I already have, but I think I might need to learn a bit more about the angles and their locations/widths.

OK OK I know that these days valve seats are cut with carbide and no longer ground to shape, but a neway carbide cutter itself costs several orders of magnitude more than my total engine rebuild. Yes I am sure that grinding is far inferior for many super awesome reasons but This has cost me about $25 so far and looks to be working.

Any comments on this? I am interested to hear opinions and constructive criticism/tips.

novaderrik
novaderrik HalfDork
2/20/11 10:37 p.m.

looks exactly like the ancient equipment we used in the vo-tech auto mechanics class i took in high school in the '91/'92 school year.

m4ff3w
m4ff3w SuperDork
2/20/11 11:31 p.m.

Awesome!

Zomby woof
Zomby woof Dork
2/21/11 4:52 a.m.

Grinding seats is still common today.

You'll want 3 cuts on the valve, then lap it to see how your contact is.

Kramer
Kramer HalfDork
2/21/11 6:31 a.m.

I thought it was one cut on the valve (you can't cut it concave), as well as grinding the opposite end.

Kramer
Kramer HalfDork
2/21/11 6:34 a.m.

Also, check your guides to see how sloppy they are. Knurling them may help, but if they're too sloppy, they'll need to be replaced. Definitely not a DIY job...

914Driver
914Driver SuperDork
2/21/11 7:41 a.m.

http://www.cylinderheadsupply.com/neway-valve-seat-cutters.html?gclid=CLS2r-uvmacCFRVx5QodmWkCew

I borrow my friend's Neway kit,it does seats and the valves. Very nice, easy to use. I wonder if one can be rented.

Dan

16vCorey
16vCorey SuperDork
2/21/11 7:54 a.m.
Kramer wrote: Also, check your guides to see how sloppy they are. Knurling them may help, but if they're too sloppy, they'll need to be replaced. Definitely not a DIY job...

Why not? If he can turn down some aluminum to make an arbor, I'm sure he can handle valve guides. I used a brass rod and turned half of it down to the size of the valve stem, and the other half to slightly smaller than the guide. Heat the head up in the oven, then drive the guides right out. Installation is the reverse of removal, except it helps to put the new guides in the freezer and put a little locktite on them before driving them in. It's actually best to use a press to put them back it, but the driver works just fine. You just have to be careful not to mushroom the end of the guide. Just touch it up with a dremel to make sure the valve goes through it and the stem seal will still fit.

porksboy
porksboy SuperDork
2/21/11 8:24 a.m.

Done guides the same way that Corey says. In fact Mercedes had a steel driver for it. Of course I put the guides in a coffe cup full of Freon to chill them. (that was a long time ago) BFH for the win.

16vCorey
16vCorey SuperDork
2/21/11 8:38 a.m.
porksboy wrote: Done guides the same way that Corey says. In fact Mercedes had a steel driver for it. Of course I put the guides in a coffe cup full of Freon to chill them. (that was a long time ago) BFH for the win.

I actually made a steel driver first, but it took a bit more work to touch up the ends to fit the stem seals onto the guides. The brass one doesn't mushroom the ends as much.

ditchdigger
ditchdigger HalfDork
2/21/11 8:49 a.m.

I did the valve guides in the head currently on the car. Pretty easy, Turned a 1/2" aluminum rod down just a hair for clearance and gave it nipple to keep it centered on the guide. tapped them in and out with no need for heating or cooling.

iceracer
iceracer Dork
2/21/11 9:17 a.m.

Back in the day, I did hundreds of valve seats with similar equipment. New valves, or have the old ones faced ?

Streetwiseguy
Streetwiseguy Dork
2/21/11 9:18 a.m.

Your 45* cut has to be at the right spot to match up with the valve. I used to do valve and seat grinds as a kid, with an old Sioux machine from a garage in the small town I grew up in. The sequence I was taught was to grind the valves first, Then cut the 45 on the seat, followed by the 30 and 60 cuts to place contact about 1/16" down from the top edge of the valve face. More 30 cut moves it down, then finish with the 60 to make it the right width. A quick spin of the valve with some lapping compound would show the contact on the valve face, then touch up the cuts to move the seat to the right spot on the face.

Probably simpler to show than write.....

ditchdigger
ditchdigger HalfDork
2/21/11 10:41 a.m.

That is exactly the kind of info I was hoping to get.

oldeskewltoy
oldeskewltoy Reader
2/21/11 11:10 a.m.

Check for the 3 angle that is BEST for your application.

NOT all angles work well with all engines.

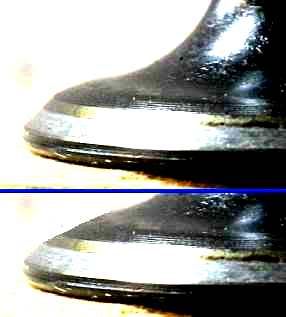
The 3 angle valve job is 70% of the issue, back cutting the valve will go along way to boost performance further

The above photo is "artistically enhanced" to show how a back cut valve appears.

44Dwarf
44Dwarf Dork
2/21/11 3:23 p.m.

I have basicly same kit except mine in Black an Decker in a Wooden case. You can still get "ruby" stones from B&D (there a factory store in boston ma and you can get them from Goodsons.

I have a "Blue Point" valve facer to go with it.

When i was drag racing i used it all the time now i don't think i've poped the box open in 10 years...

Streetwiseguy
Streetwiseguy Dork
2/21/11 4:14 p.m.

I just remembered one more thing- If the valves were cut at 45, the seats would be ground at 46*. Something about a finer edge, or the carbon being forced out the bottom, or something....Its been a while.

alfadriver
alfadriver SuperDork
2/21/11 4:57 p.m.

I did the seats and the valves on my Challenge Spider.

I would do the cutter and not the stones, though- easier to cut by hand.

Fun work- could do a killer multi angle seat set up.

Zomby woof
Zomby woof Dork
2/21/11 6:38 p.m.

I should have clarified.

The 3 cuts on the valve are the 45, the back cut, and the edge where the face turns 90 degrees into the margin. You'll want a relief cut there.

If you want to do guides, make a mandrel for pushing them out, and use an air chisel/air hammer. No need for heat, or pressing. I machined a standard chisel down that fits into my air tool. There's no easier way to do it, and you can have all 8 guides out in 30 seconds. Don't forget to measure the height before you start pushing them out.

TR7
TR7 New Reader
7/14/16 6:53 p.m.

Dragging this thread up from the grave. It seems that if I can machine an arbor and a pilot, buy some stones, I would have a DIY 3 angle valve job. I can get a used machine off Craigslist that looks like the one above, but is there any benefit there? It only needs to be done on an extra MGB head that's kicking around. I wanted to do some porting myself and this would be great too.

alfadriver
alfadriver MegaDork
7/15/16 7:09 a.m.
TR7 wrote: Dragging this thread up from the grave. It seems that if I can machine an arbor and a pilot, buy some stones, I would have a DIY 3 angle valve job. I can get a used machine off Craigslist that looks like the one above, but is there any benefit there? It only needs to be done on an extra MGB head that's kicking around. I wanted to do some porting myself and this would be great too.

Having done it for two engines, yes, it's worth it.

Take your time, and you will then find out why good head work that requires seat grinding is so expensive. But worth it.

(took out a comment I ended up repeating from 5 years ago...)

TR7
TR7 New Reader
7/15/16 2:10 p.m.

In reply to alfadriver:

But is it worth actually buying an old machine like the black and decker posted above? Better Sioux machines are prohibitively expensive and still the arbors and pilots will likely be worn out of tolerance. Unless I'm missing something, and by the looks of the video its relatively straightforward, with some patience I can have the same (or even better) results using a drill and some carefully machined attachments.

https://m.youtube.com/watch?v=7ednYqpAgxU

alfadriver
alfadriver MegaDork
7/15/16 2:17 p.m.

The video you posted is the same thing as the B&D one. Just a different version.

If you like that, then the stone one from above should work, too. The most important part is to find an arbor to properly center, and then make sure the stone is properly dressed.

Otherwise, find a used Newway seat cutter. Those are really nice. I used those by hand.

44Dwarf
44Dwarf UltraDork
7/16/16 10:00 a.m.

I just sold from a friends family a full B&D set up in the oem wooden case for $250. I still have mine. The B&D store in Boston was closed up last time I drove by but so many on-line place to get stones and parts but never cheap.... If I had more work for the stuff i'd go New-Way units. I used them as a teenager and always loved how quick and clean you could do a 3 way seat cut.

devina
devina Reader
8/18/16 9:38 p.m.

This is great info but curious how you know when to relapping the valves vs regrind the seats??

1 2

You'll need to log in to post.

Our Preferred Partners
zsFUATXGR39mk7MNS3PLviZGQzlzxaotSIFvCyG4KG9txyV8eozED4ea7eyhkF1i