Bravo, sir. Well done. This could be your Sistine Chapel.

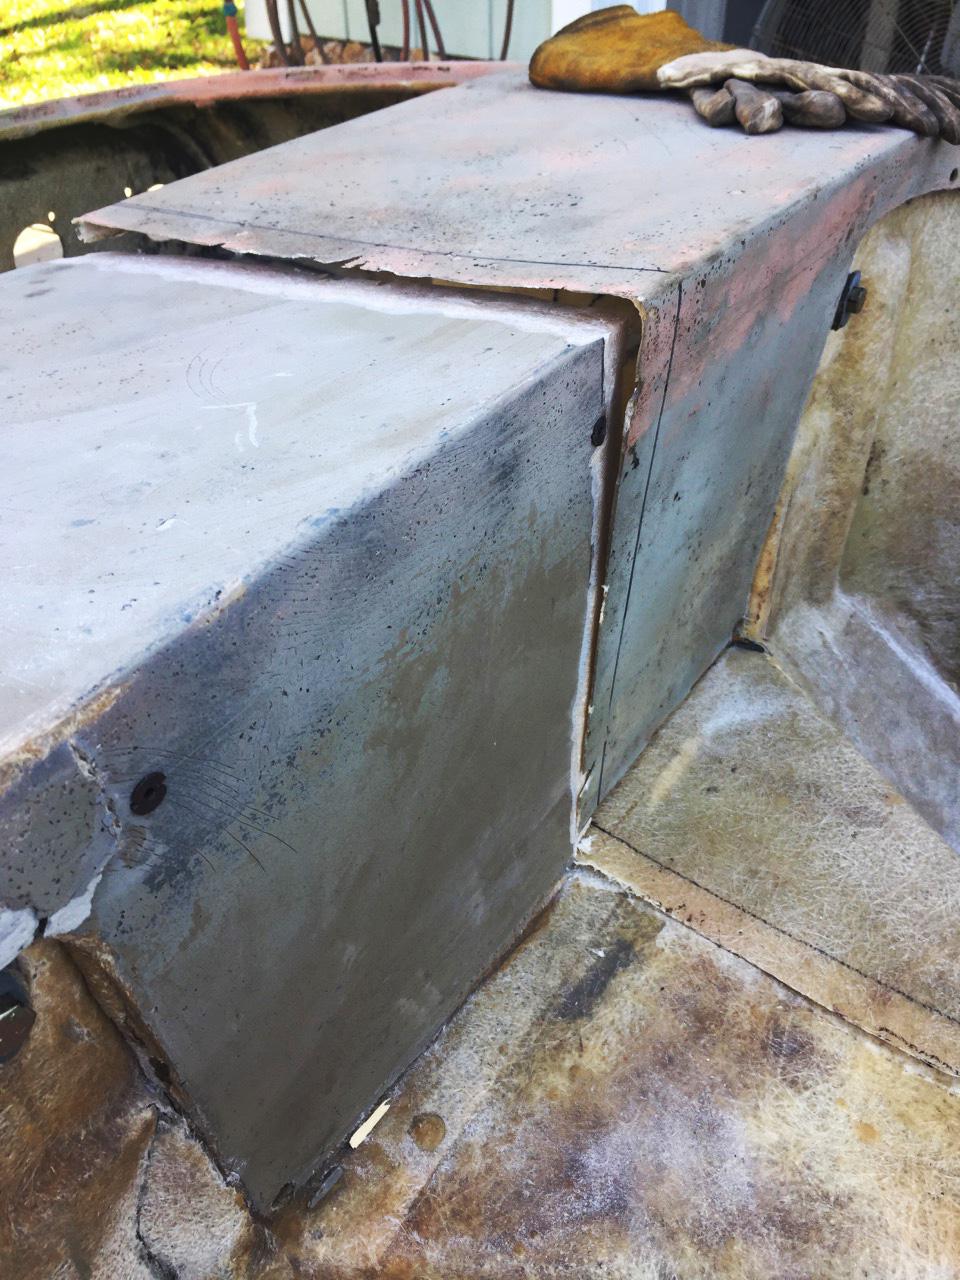
First, the finished product. From here we will finish the right side, then repair all the minor imperfections in the body before we gelcoat the car.

Here you can see how the two halves of the repair are feathered, so that the thickness of the material stays uniform when the repair is complete. This style of repair is very strong, and virtually imperceptible when done right.

Here you can see the way the quarter is bonded and screwed to the rest of the body. Out on the quarter panel, we screwed strips of metal down to place more even pressure on the joint.

Even before removing the self-tapping screws and covering our repair with fiberglass work, the repair looks smooth and uniform.
We decided to tackle one of the most glaring issues on our 1964 Elan project first: Replacing the badly damaged left rear quarter. We felt that getting this panel correct would set the tone for the rest of the project.
We searched for almost a year and found a nearly perfect used Series 2 Elan left rear quarter panel in the hands of a friend of a reader in the upper Midwest. For $350 we could get most of our Elan’s body damage repaired with one relatively easy chunk.
Before installation we would send this piece—along with the rest of the body—to Blast Masters, where they expertly media blasted it back to nearly new condition. Taking the time to media blast the entire body makes this project much easier to work on and gives us clean, dry surfaces for all of our cutting, bonding and fiberglass work.
With the measuring of our body done, we looked for an inconspicuous place to mate the used quarter panel to the rest of the body. We decided right down the center of the car would be inconspicuous and easy to get straight. We would start cutting at the slight rise in the floor where the seats mount and continue it right out into the rocker panel.
There are various ways you can bond fiberglass. You can butt two pieces together, but we chose to overlap our panels.
It is imperative that you do not make your new joint any thicker than the original material. To this end we built in a yardstick’s width (about 1.25 inches) of overlap into each side of the joint and then feathered both sides of the two areas to be joined so that the material’s thickness remained even throughout.
From here we placed the quarter panel into position, trimmed, measured and adjusted as needed, and then clamped the panel into place.
Once we were happy that we had everything in place, we bolted the quarter panel to the frame. The rest of the body had already been bolted to the frame and properly shimmed. From here we put our deck lid into place and tried shutting our newly installed door.
to get the right body gaps, we pressed pieces of paint stick all around our door and deck lid gaps.
Once satisfied we had everything perfect, we lifted our overlapped areas with a flat bladed screwdriver and squirted in 3M #80115 panel bonding adhesive.
From there we used self-tapping screws to temporarily connect the quarter panel until the bonding adhesive dried.
In places where we felt it would help, we cut 1-inch strips of metal that we could screw down on both sides of the joint.
Once dry, we will remove the screws, grind down along the joint and then lay fiberglass over it to further strengthen and finish the repair.
Get all the latest Classic Motorsports project car news in your mailbox six times a year. Subscribe now.
In reply to Tim Suddard:
I thought this was a six tail light car...are you converting to a later tail, or were two of those original lights just reflectors?
Jerry,
Thanks!
Woody, The car originally had four tailights and two reflectors and will again. The quarter panel I used was from a Series 2, which is identical, except for the tailights. We have already filled those tailight holes, since this photo was taken.
Good Job. You guys can restore anything. I suppose I can wait 'till you get to that point, but what kind of top coat products are you thinking about using on the bare fiberglass?
We will sand the entire body down to the bare fiberglass, spread fiberglass resin over any minor star cracks and then gelcoat the entire body. From there we will do our body work as needed and then paint the car in two part (base coat/clear coat) PPG paint.
Sounds good. I have done much fiberglass repair but I have never sprayed Gelcoat. Most my repairs were very localized. I'll be curious about your experience with the gelcoat. Dave.
Displaying 1-9 of 9 commentsView all comments on the CMS forums
You'll need to log in to post.