
nocones
PowerDork
4/21/25 1:02 p.m.
Big props to the $2000 tundra for dragging the LS400 home.

My kids have lovingly named this car swamp thing.

I'm really lichen the finish

The car "ran when parked" but the left rear upright is broken and it does not currently run. The Turbo and associated crap was hastily removed, as was the seat and then the car parked under some trees and loaded with scrap for the last 9 years.
It was destined for scrap so I gave Singleslammer $250 instead of the Junkyard giving him $150. I am hopeful the ECU and engine still work but mice are real and being open to the elements for 9 years has a way of destroying things.
I unloaded the car which was dramatic because it couldn't roll with the rear suspension messed up and the left rear wheel crooked. I just sort of dropped the back of the car onto the ground and then put dolleys under the rear. The front rolled but unfortunately the trailer hitch came undone halfway through and the trailer tipped up and rolled forward punching the back of the tundra. It now has another dent in the tailgate but the car was on the ground and no one died.
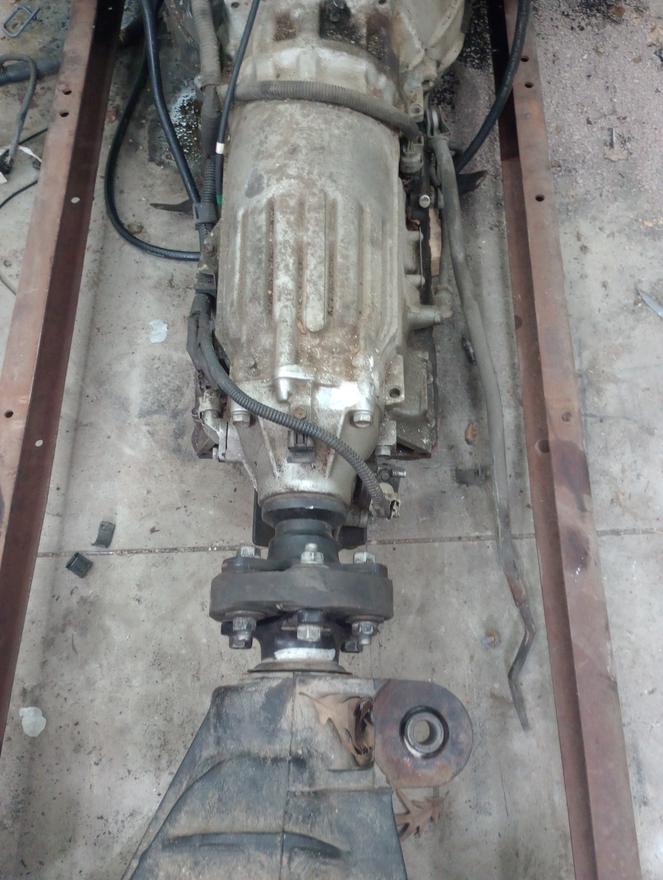
I put it in the air and had time to measure the drivetrain.
Engine + Trans 53"
Diff input 13" forward of axle.
Total length ~66".
I think I can make that work, however I will likely put the wheels 4" forward of the diff centerline making the front of the engine 62" from the rear axle centerline (at the uprights).
Next step is drivetrain removal.

Piguin
HalfDork
4/21/25 4:41 p.m.
wvumtnbkr said:
Omg. This is ridiculous.
It is. In all the right ways.
I remember that car! 2016 Challenge. I recall the passenger-seat-turbo-setup having some very...creative...solutions.
maschinenbau said:
I remember that car! 2016 Challenge. I recall the passenger-seat-turbo-setup having some very...creative...solutions.
As creative as the backwards turbo on the skeletal car in the parking lot at the challenge this year?
That car doesn't just have patina, it has an ecosystem.
nocones
PowerDork
4/27/25 5:36 p.m.
It's clown car disfigurement day!

Step 1. Remove front of car for easy access.

Step 2. Remove rear of car because it makes the car 4' shorter in the garage so it will store better while I keep it around for wiring and stuff.

LS400 Compact anyone? It actually looks pretty cool like this.. I would literally give it away.. Throw a LS in it with a stick axle.. build a battle front bumper.. I'm just saying..

Step 3. Remove Rear end.
This is about 8 bolts plus the driveshaft bolts. Very simple to remove took about 25 minutes.

Step 4. Remove Engine
This was slightly more complicated and took about 1.5 hours because I used the engine hoist to tensile test all the grounds and find them as I yanked.. OOPS..

YAY liberated 1UZ drivetrain. Now to clean up the garage so I can mock everything up and see if the plan will work or not..
nocones
PowerDork
4/27/25 10:44 p.m.

The first thing to mock up was Guibo to Guibo action. The trans and diff have this centering pin that the driveshaft aligns to. I'm assuming it's to limit any ecentricity in the Guibo. So I cut it down in half and then cut the end off of the driveshaft and used it for alignment. I will lathe a longer bushing for permanent use but this worked for mockup.

With that done we get this

nocones
PowerDork
4/27/25 10:56 p.m.
So then it was time to kinda try to fit everything together..

So initially I had the chassis upside down as I was planning to cut and flip the front cross member.

The engine is the as expected 66" from axle centerline. I was planning to re-do all the rear arms and cheat another 3" out of that to get down to 66" but I might just extend the wheelbase slightly and use the subframe.
I realized that the chassis would work really well in it's normal upright orientation except it wouldn't be the "bottom" of the car. That's okay because it will actually make building the added on chassis much easier and ALLOW ME TO USE THE T CHASSIS UNMODIFIED.
Well at least as far as crossmembers are concerned. It will be a stock T chassis at stock width with a notch/hole in it for the oil filter to escape as it wants ot occupy the same space as the chassis rail. I will add brackets and tabs as required to bolt the subframe on and add triangulation with some upper rails. The motor mounts will be easy as they basically line up with the chassis already.

Seating position will work excellently with the stock drop cross member that supported the leaf spring.

This seat is for mockup only but you get the idea. There are also holes that already exist that I can use to bolt the chassis in. Which will be neat.

Similarly the rear works great as it will just come up and meet the subframe. I won't use the 4 OEM subframe mounts. I plan to rigid mount the subframe then in lue of a transmission mount use something similar to the Miata PPF to tie the transmission to the diffrential mounts. That way the Guibo won't be stressed and the engine and diff will move around on their own.

The lower link that runs forward to react acceleration I may extend to meet the chassis so that entire node can kinda be cut off.
The subframe doesn't look the best but It would mean I would be much further along quickly.
Overall though. This is gonna work. Saturday I am traveling to Gumby's shop so we can bend the roll bar hoops. I don't have a 1-3/4 die.

Mr_Asa
MegaDork
4/27/25 11:21 p.m.
I am fairly sure you are already planning it, but a hefty firewall between engine and driver is probably in order.
nocones
PowerDork
4/27/25 11:45 p.m.
In reply to Mr_Asa :
Yep. Not my first Mid engine DIY build rodeo. Firewall with a deflection lid/flange will be built.
Also a few extra bars to keep engine from comming at me bro in a wall kiss.
There are kits available to convert spin-on oil filter to remote filter if it saves altering the chassis. Just a thought.
Maybe.. small fuel tank mounted above the diff?
Use tubes for new chassis as conduits for coolant to and from rads?
Following with interest. Reminds me of thought process trying to build Outlaw Bug years ago. 
nocones
PowerDork
5/4/25 11:37 a.m.
Progress! Roll bar day. But a few tasks first.
Like with the 360 it was important to figure out seating position so I mocked up a quick seat in the morning.

In progress frame.

And "finished". The seat base under your thighs will be slightly bent to just avoid the front cross member on the frame.
Mock-up done it was time to head to Gumbys but I stopped to get a few parts at the junkyard on the way. What ensued was a 3 hour fight with a rear upright for a LS400. But Victory eventually was mine.

Then it was on to Gumby's for roll bar time.
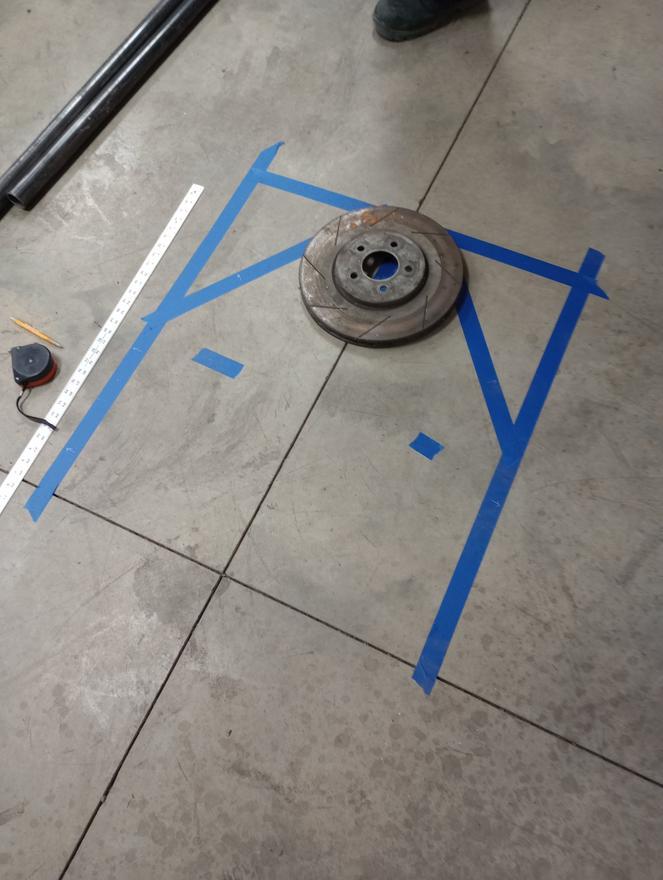
We masked the profile of the bars on the ground and tried to figure out how to estimate the bend radius. We knew it was 5.5 centerline but it turns out these 12.75" rotars are exactly right.

Gumby and I both have done a fair amount of tube bending but most of the time it's solo. It was great having 2 sets of hands and the result was near perfect roll bars in about 2 hours of casual working.

They will get trimmed to length when the forward chassis gets fabricated this week.
Yay things are really getting rolling on this project now.
Interesting choice of headrest material
nocones
PowerDork
5/5/25 11:03 a.m.
Finally unloaded the truck. Couldn't resist a quick mock-up.
I think I need to trim the rear roll hoop.

In reply to nocones :
Are you sure? You could shorten the wheelbase AND improve safety by a new, innovative standing-upright driving position.
The key is using hand controls for the accelerator and brake, and stand on a see-saw so you lean left or right to turn the car.
nocones said:
Finally unloaded the truck. Couldn't resist a quick mock-up.
I think I need to trim the rear roll hoop.
I would just sit in that and make "vroom, vroom" noises all day...
nocones
PowerDork
5/9/25 11:23 a.m.
I got the headers last night and OMG these are awesome.


I will have to rework the pipes after the collectors as the automatic is a little wider then the manual Steve was using but overall they are going to be excellent.
nocones
PowerDork
5/9/25 12:10 p.m.
Okay inspired by stampie a receipt dump and a budget update for parts ordered and purchased in the last few days.


5% coupon on this purchase.. not sure this will work but worth an attempt.
So that brings the budget to..

I need to find the receipt from the scrapyard I've already scrapped like $30 of metal that was in the trunk of the Lexus. I also have some recoup to do in the drag slicks and front runners.
I won't use all of the fiberglass probably and I haven't started my steel list yet. So this number will fluctuate. But I'm happy that it's still under $1500 and is including most of what it will take to make a complete car.
In reply to nocones :
Glad they fit up without much issue. Hopefully the side trip to pick them up was entertaining.
I originally had the post collector bits going under the gearbox, so when you get the chassis up in the air a bit that might be an option. The box I am using has the shifter rods external on the drivers side so they are a little asymmetric.
On another note, if you need to close up a little more room in the wheelbase I saw an application recently that used a metal plate in place of the guibo on the driveshaft to differential interface. It was thinned between the bolts to give a little compliance. Since you will have everything close to rigidly mounted that could get you another inch or so reduction in drivetrain length. Sorry no pictures of the part (work stuff).
In reply to stafford1500 :
I've considered just bolting the flanges to each other. It seems extreme. An 1/8" metal plate from Send Cut Send isn't a terrible idea.
I originally thought I would rubber mount the drivetrain but I realized without the driveshaft it's going to get unhappy so everything will be rigid mounted so a plate might work fine..
nocones
PowerDork
5/12/25 12:47 p.m.
Weekend mock-up. Spent some time removing the diff from the subframe and dropping accessories off the engine and really looking at the mock-up.

I put a few marks on the floor and adjusted things so the crack on my floor is the front axle.

I think with this engine spacing and unmodified Guibo I can get a 118" wheelbase.
I looked at the Guibo and think I will attempt to make a plate.

The Guibo has these 6 metal sleeves. I think I will remove the sleeves from the rubber and then Send cut send a 1/4 plate that they will weld into. I can just use the online shape creator with correct dimensions and get a part made. I used some preliminary measurements to get a price and .. dang it's cheap.

I'm debating cutting the Guibo to leave about a 1/8" of rubber around the bushings. Then weld a tube to alternating sides of the plate that the rubber bushing would go in. This would give a little bit of miss alignment and flexibility while still removing 1" of Guibo.
I need to measure but I think that's the best approach.
Quick SketchUp of that..


Seems like inviting potential failure just to save 1".
This is great but 1 inch of wheelbase isn't going to make a big difference in the overall finished product... prioritization and all.
sitting up much straighter could net you like 6 inches? Not that anyone loves that option, I'm just saying for a relatively easier example of a place to get 1 inch back.


