
Coder
New Reader
5/8/21 2:52 p.m.
The next day I was at the local farm supply store browsing the hardware section, as one will do, and found what amazon and google couldn't: 9/16 OD x 3/8 ID nylon bushings. Huzzah!
I bought their entire stock of 16 bushings and a couple of 1x0.25" steel bar stock, just in case.

Exciting times!
Except.
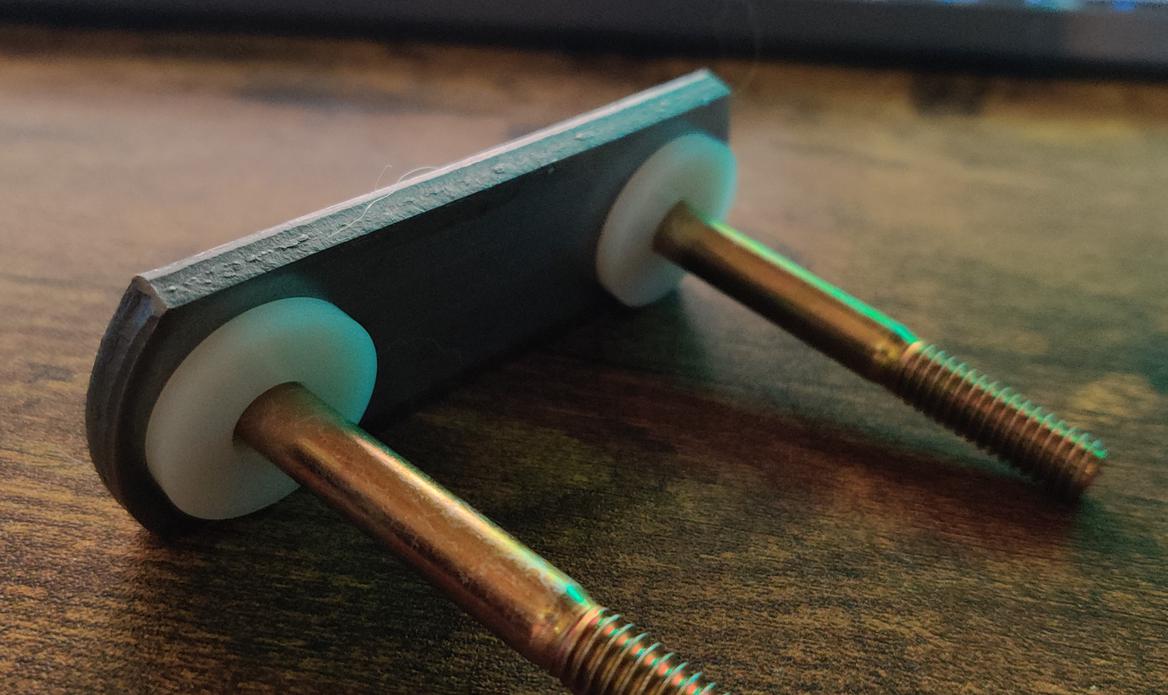
Another problem. My frame rails are 1x3 tube. My leaf springs are 1 5/8" wide. Poo. I was now going to need to bend my shackles to fit the narrow frame rails. That was the last straw. If I'm going to bend all of these and have to use bushings that may or may not be able to handle the weight, I might as well just make my own shackles. Good thing I bought that bar stock.
After an hour or so of thinking, measuring, cutting, grinding, and hammering, I wound up with this:


Copy and paste for the other side and add a couple holes and my first set of shackles are complete! Only 14 more to go! Sigh.


With that figured out, it was on to the next delivery from my lovely mail person.

Mr_Asa
UberDork
5/8/21 3:07 p.m.
In reply to Coder :
Regarding vertical welds, I do whatever I can to turn them into horizontal welds. Once you tacked that in and did the same for the rear you could easily turn the frame on its side. Still, they look pretty decent
Coder
New Reader
5/9/21 12:37 a.m.
That's something I hadn't considered. I feel a little bit silly now. Oh well, won't be the last mistake I make along the way! I just spent the past who knows how long today using a die to cut threads into a 3/4" steel rod. Afterwards, I learned that the hex shaped dies, like the one I used, are for chasing threads that have been damaged or need to be cleaned and that I should have used a round die. I also didn't get it perfectly straight on the rod. So, although my nut threads on just fine, it's not going to give even force on the wheel. I do have a second rod and I may have enough length left on this one to cut off the part I threaded improperly, but man it's hard to throw away that much work. My hands hurrrrt.
If anyone's expecting to see an example of top notch craftsmanship, they've come to the wrong place! I'm learning as I go!
Mr_Asa
UberDork
5/9/21 2:06 a.m.
Nah, not a mistake. Just an oversight. Like I said, they still look pretty decent.
While you're at it, don't forget to install crush tubes in the frame for those bolts. May not need them, but it never hurts to put them in and its a good habit to get into.

Coder
New Reader
5/9/21 2:07 p.m.
In reply to Mr_Asa :
Good advice. I was looking at that when I bolted on the first shackle because it did crush a little. I'll have to see what the farm supply store has in stock.
In reply to Coder :
You could put 1 5/8" crush tubes in and not have to make bent shackles.
Welds will hold for what it is and you're getting good practice. Very little of what I get to weld can be done in "perfect conditions" and just takes time.
Overall its a cool little project love to see where it ends up... cough street bike engine... cough racing cart slicks haha
Coder
New Reader
4/3/22 12:28 a.m.
So I had a few life events. Since the last time I posted, I've bought a house, entered into a lawsuit over said house, lost a brother at the tender age of 35, and broke up with my girlfriend of 2+ years. Life's been a rollercoaster. But I have been making some progress.
Try as I may, I couldn't come up with a good way to drive the cart wheels. The more I looked at the spokes, the less confidence I had they could withstand any torque whatsoever. They were designed for light duty cart service, not to be used as drive wheels. Looking back at the cyclekart community for alternative wheels, I ran across these pit bike wheels on Amazon. They have the advantage of a hub meant to take torque. They were the subject of this thread and so, learning from my past mistake, bought a single wheel to see if I could make it work. I also bought the same Go Kart axle/sprocket from the thread and a 110x4 to 100x4 wheel adapter.


The wheel studs where unceremoniously whacked out with a hammer.

Hey, everything matches up pretty well!
Coder
New Reader
4/3/22 12:55 a.m.
At first, this seemed like a great solution. I could bolt the go kart axle hub to the adapter and the adapter to the wheel. But pretty much immediately, I ran into two problems.
First, the bolt holes on the adapter were meant to take "acorn" lugnuts, not standard bolts and the bolt holes were much larger than the bolt holes for the wheel.
Second, the adapter was chonky. Thick with two c's.

This added thickness became a problem when I was trying to figure out the best way to support the wheel. I was afraid that if the wheel was just bolted to the hub, it would eventually break the small m10 bolts holding the wheel to the adapter. After all, they were designed to attach a disk brake rotor to, not to hold the weight of a vehicle. My plan was to have the axle come all the way through the wheel, through the adapter, and then finally, through the axle hub. But with an adapter that thick, the track of the wheels would be too far inboard to work with my frame.

Coder
New Reader
4/3/22 1:08 a.m.
I went back and forth on what to do for a while. I looked for 100x4 bolt pattern hubs so I wouldn't need an adapter, I looked for thinner 110x4 to 100x4 adapters, but no luck. Then I had a thought. DIY is big now. Maybe there's some website I can have waterjet parts for me. And after a quick google, I found my new best friend. Send Cut Send. After a few minutes in their "part builder", I had a custom made adapter on order. Within the week, these arrived at my door:


Not bad! $30.10 + Free shipping for custom cut 0.25 mild steel! I'll take it! The fit was excellent. I did have to enlarge one set of the holes as I didn't think to measure both bolt sizes. Luckily the one I measured was the smaller of the two!

Here it is with the hub mounted to the wheel using the new adapter.
Coder
New Reader
4/3/22 2:04 a.m.
That helped, but with the axle going through the wheel, the track was still too small. I considered scrapping the axle and getting something wider, but I'd already spent quite a bit on this setup. So I started to think of what I could do to extend the axle.
This is what I came up with:

5/8-18 coupler

My plan was to use the coupler to thread on to the end of the axle then have Send Cut Send cut out a 34.8mm round plate with a 5/8 hole in it. My belief is that this would significantly reduce the strain on the inner hub bolts by allowing some of the force to transfered to the outer hub surface.

I have the "Outer hub alignment bushing" and the "Outer hub cover" both being cut by Send Cut Send right now.
Coder
New Reader
4/3/22 2:30 a.m.
Eventually, I plan to make the 5/8 bolt on the outer hub into a "Spinner" knock-off style fastener. I think that would be coooool.
The coupler worked well except for two small problems. First, the axle isn't actually 5/8-18. It appears to be 5/8-16. Whoops. It's not a common size. At least not here in the US. So I did the right thing and just torqued it on there anyway. I know that's not the best answer, but it's what I did. ¯\_(ツ)_/¯ I will eventually weld the coupler to the axle anyway, so I figured why not?
The second problem I encountered was the coupler did not fit through the splined hole for the axle hub. Which I needed it to do in order to be able to take the wheel off without having fuss a bunch to remove the hub from the adapter. I wanted this to be easy to maintain. The fix, of course, was to grind down the coupler until it fit through. Yes, I'm a hack. But also, it worked.

If this was going to be a high-speed application, I'd worry about it being unbalanced. But this things going to have a top speed of "putt putt putt".
I know I just said that I have fancy custom parts coming, but I was really itching to put things together. While looking for a washer or something I could use in place of my "Outer hub alignment bushing", I found I had a 5/8 ID 35mm OD bearing that worked perfect! I'm not sure I even need the custom parts!


And that brings us up to current. I'm now researching "right angle gear boxes" as used in Joey Verpoorten's 1929 DeSoto Cyclekart as I also plan to use a front-mounted engine. I want a truely usable bed, so I don't want the engine back there! Oh, I also found a cheaper supplier of wheels. They look identical except they have the disk brake mounting bosses on both sides, which makes things even more interesting! I ordered 3.
Mr_Asa
PowerDork
4/3/22 7:07 a.m.
Sorry to hear about your brother.
Nice to see progress on this. I've been using SendCutSend to get parts for an intake and it has turned out fantastic. Such a good resource.
Coder
New Reader
4/7/22 4:27 p.m.
Thanks. It's been tough. SendCutSend is my new favorite thing. Suddenly the sky's the limit.
Speaking of which, my spacers came in today and fit great!


Coder
New Reader
4/25/22 10:12 p.m.
Not much to report. Life's busy as hell. I did move the project down to the basement where I have a lot more room to spread out.
I put the body in place and mocked up the wheel locations. I think I might move the rear axle a little forward. It's going to have a wooden truck bed on the back, so I'm still on the fence.


