
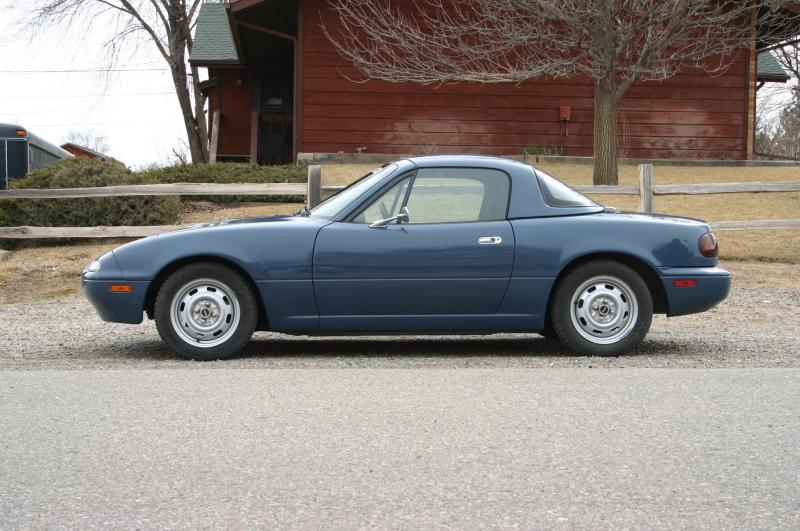
Here's a Miata I put together for my friend Eric.
His goal was a fun daily driver that was comfortable for a long commute in different weather, sporty and easily serviced. He doesn't do his own mechanical work and has owned a modified Miata in the past that was difficult to find help on, so the latter is more important to him than it might be for some others. AC was also a requirement.
He also wanted it to feel special. He loves vintage cars, but knows he doesn't have the ability to take care of them and needs the reliability of a modern car. He's a particular fan of 356 "Outlaws". I built this car for him in my home garage as a favor - he lives about 2000 miles from here.
First, the base car. A coworker of mine was selling a Miata with a very colorful history. The shell was a 1990 that we'd purchased as a development car at FM. It was rough looking - we called it "Scruffy". A (different) coworker bought it, transplanted a Mazdaspeed engine and Torsen, then sold it to a friend. Who then ran it without oil and trashed the engine. So we bought it at FM salvage and stripped the car of all the good stuff. The shell was pushed into the corner, as it was a straight chassis with a clean title. Just with bad paint and dents.
When we first bought the car:

Now, my coworker Mike bought himself a 1996 Miata with the intent of building a track car. He put in a roll bar, upgraded the suspension and generally fixed the car up.
The day after he got it all roadworthy and registered, this happened. That's actually Scruffy's front bumper.


So, we have a good 1996 drivetrain and suspension, and a bare 1990 shell. You can see where this is going.
After some prodding from the rest of us, Mike bowed to the inevitable and did it. First, he seam-welded the chassis.

The complete drivetrain was dropped out of the wrecked 1996 body and wheeled under the 1990. The wiring harness, seats, interior, doors - everything got transferred as everything that could be pulled off the 1990 had been pulled off. 
Mike worked to get the car up and running, ran a local track day and then decided to do something else. Mike has automotive ADD. So Eric bought it. To recap: we have here a 1990 chassis (and title) with a complete 1996 stuffed inside. And quite a mix of body panels.

Coming next: the vision.

Shoot- I saw "vintage flair" and thought that you had all put a Miata rollerskate under either an Alfa or Fiat Spider body/chassis. Darn. ![]()
Hey, I'm not done ![]() But I seem to recall suggesting a Miata engine in a GTV chassis a while back and being greeted with boos and flying produce.
But I seem to recall suggesting a Miata engine in a GTV chassis a while back and being greeted with boos and flying produce.
Now, the important thing for a good modified car is to know what you're building. I know, this seems really obvious and basic. But you've seen the difference between a car where the builder could describe the desired end goal clearly and one that is a collection of "ooh, this is an interesting idea" mods. I've described Eric's a bit in the first post. One of his "reference" cars was this one, if memory serves.
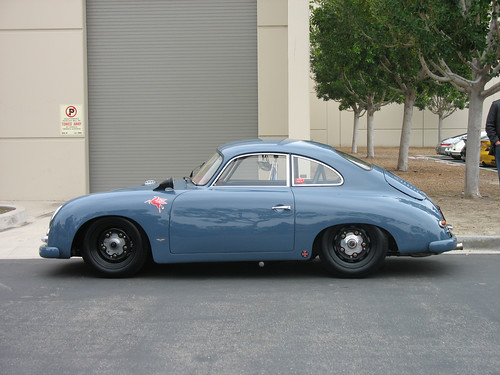
In particular, the color really worked for him. It took some digging around to figure out what it was - Porsche Aquamarine off a 1957-59 356. Porsche code BT5, I think. Unfortunately, you couldn't really get it anymore in the original formulation. Glasurit has a version (5707 or just 707) but there are no Glasurit dealers anywhere near here and all my chemicals are PPG. To make things more interesting, it's a color that is hard to photograph so it can be difficult to identify if that's actually the color on a given car.
Turns out PPG had a formula on file, so I had a sample mixed up and shot it. I took pictures of it in different light to see how it looked. Hmm, not quite right. It looked too grey. But it sure looked like Land Rover Arles Blue.
So I had some of that mixed up and shot it. Hmm, still not quite right. Too modern.
Then we found a restoration shop that would ship a freshly shot paint swatch. Eric ordered one and we compared it against the samples. Not quite right - but the magic eyeball at the PPG shop was able to match it exactly.
From left: PPG original estimate, new PPG formula, Arles Blue. Depending on the lighting, our new formula looked close to Arles or to the original PPG mix. It was given the nod. 
Compared to Miata "smurf blue". This is not a modern color.

Want to mix your own?

Now, before the car got painted, there were a few other jobs to do. One of the small items that can make a big difference to how a car looks is the mirrors. There's a nice aero mirror from Porsche 356s that Eric picked out, and I made the body modifications to mount it to the car.

Eric never planned on running the car on a track and was going to run a hardtop full-time. So out came the (newly installed) roll bar and the top. I had to patch a number of holes in the body from the two roll bars that had been installed in the car's history.

Pro tip: shoot a bit of black paint on the edge of the metal under the carpet when you remove the top. This will make it look more finished.

Some sound control under the rear carpet. This isn't Dynomat, it's a felt-backed pad for more sound absorption. As a bonus, it's also considerably less expensive and lighter than Dynomat. And naturally, I put the interior back together before taking it apart to do this.

In the meantime, I was also driving and debugging the car. Mike put it together in quite a hurry so there were a number of mis-routed wires and loose/missing connectors. Pulling out the wiring for the AC relay and rerouting it ensured fewer problems down the road, for example. This is just a matter of spending time poking around the car and saying "does that look right? What's that anchor point for?"

Keith wrote: Hey, I'm not doneBut I seem to recall suggesting a Miata engine in a GTV chassis a while back and being greeted with boos and flying produce.
I don't think that was from my arm. I've got a friend who has a Berlina that I've thought about doing it to.
But the Spider would be the easiest, by far- same wheelbase and all. And it's not as if Spider bodies are all that uncommon. Heck, I know of a chassis in Chicago that's been for sale for a couple of months for cheap.
I digress- move on- this is interesting.
A short detour into the interior before we get to paint. The 1990 shell was now wearing a 1996 dashboard - but the 1990 part looks more vintage. It's also significantly lighter than the 1996 unit. So out came the 1996 dash, and a 1990 one went back in. The 1990 dash came from a car that was getting a 2005 dash. Sheesh. The before shot. There will be quite a few changes here down the road.

Swapping wiring harnesses.

1990 dash in place! Pro tip: transfer the VIN tag to the new dash before installation. It's impossible to access otherwise and you really don't want a different VIN showing...

Since the 1996 wiring harness means OBD-II, the data port had to be mounted somewhere. I could have just ziptied it, but I was able to mount it nicely by reusing some stock fasteners.

Okay, that'll do on the interior for now.
I did find a little bit of rust on the car in two spots: the rocker and the rear wheel well. Now, I've never done any real bodywork before. But Eric understands that I'm using this car to learn, so learn I shall. The wheel well corrosion was quite small, so I just cut it out and welded in a piece of good metal from a donor car. I used my bead blaster to clean up the new metal first.


The rocker had me more worried. This is typically much deeper cancer and I thought about getting a pro to do it. But I cut off the outer layer just to see and got a surprise. The structure wasn't touched. So I cleaned it all off with a wire wheel, hit it with rust converter and then some 3M inner panel rustproofing.

The patch panel was made of a piece of flat sheet steel, cut with tin snips and shaped by hand. Yay simple curves!


I keep getting excited by ideas on how to "Age" the interior, but I will shut my pie hole because this is your build thread. ![]()
Well, this is a "built" thread, not a build thread. The car's in Eric's hands and is a daily driver, so don't expect to see much in response to your suggestions ![]() . Discussions and opinions are what make these threads more interesting than just reading an article, though, so have it it. Time for paint prep. Again, this is a learning car. And there was lots to learn from. That paint was hammered! I replaced the worst panels with ones from salvage cars, but here's the starting point. We discussed a few exterior body modifications such as side marker lights, but they all ended up getting vetoed. I did remove the "toilet seat" badge from the nose though.
. Discussions and opinions are what make these threads more interesting than just reading an article, though, so have it it. Time for paint prep. Again, this is a learning car. And there was lots to learn from. That paint was hammered! I replaced the worst panels with ones from salvage cars, but here's the starting point. We discussed a few exterior body modifications such as side marker lights, but they all ended up getting vetoed. I did remove the "toilet seat" badge from the nose though.

The rear bumper was off a car with a dual exhaust, and I cut out the section between the two holes for a lighter look. It's an easy thing to do and makes the back of the car look pretty cool - you'll see it again later.

Paint prep. The engine bay was painted black when Mike did the drivetrain swap, which makes life easy. Both doors were black too. This made my life easier because I could just paint the outside surface of the doors instead of tearing them completely apart and it was easy to mask off the engine bay.

The windshield was cracked and needed to be replaced, so I cut the rubber seal off. This gets rid of a difficult-to-mask seam.

Masked and ready for paint. All of the removable panels are off. Again. This car got assembled and disassembled quite a few times during the process. It could have been a little smoother! You can see the black stone guard sprayed over the repairs on the lower half of the car. This matches the factory texture pretty much perfectly.

High tech paint booth.

Step one: epoxy primer/sealer. I had black and white, so I mixed them to make medium grey.

Step two: Aquamarine! And step three, clearcoat. This was the first clearcoat paint job I'd shot, and it gave me some real hassles dealing with the different material. I also found out that the color coat leaves a lot of dust on the floor, so it's important to clean up between color and clear. Single stage paints are more forgiving.

The body panels were painted separately.

And out of the garage!


That is pretty! I love that color on the NA

Wow awesome color

This is a sweet built thread Keith!

Please Sir, may I have some mohr?

Yes, mohr pleez!!!!
More to come soon!

I've seen something very much like this somewhere else...![]()

Man, I love that color. More pix ASAP.
cghstang wrote: I've seen something very much like this somewhere else...
Yup, the build was documented on the FM website at the time. I make no apologies for that - I document my builds on my own sites instead of on various forums. This is a recap for those who don't hang out on the FM site or Facebook page. (2024 edit: and since it's no longer on the FM website, this is the only place to see it)
Back to our story... In case anyone's wondering, there have been two different hardtops on the car. One was borrowed to cover the car after the roof was pulled, but before I was able to lay my hands on the white one. More pictures of the complete paint job. (nose is not attached here, pardon the panel gap!)

The color shifts in the light, as you'll see. Here it is in overcast light.


Oh yes, that last picture was before I painted the sills black. This makes a huge difference to how good the car looks. I used easily-sourced rattlecan black here so Eric can touch it up in the future after the inevitable sandblasting.

Eric isn't the sort who is constrained by convention. He's not a part of the Miata community, even though he's driven a reasonably well-known Miata as a daily driver for some time. So he doesn't necessarily know what he shouldn't be able to do. I'm not much help in this regard, as I'm usually a little too interested in a challenge. This kind of explains the whole car.
One thing he understands is that a big part of the experience of driving a car comes from your points of contact - the steering wheel, the shift knob and the seats. Seats are often a bit of a challenge in a Miata, as there isn't much space. Eric talked about seats from a 1973 911 RS, but a more reasonable option presented itself in the form of 914 seats. There's a very good Porsche shop here in town, so I stopped by to see what he had - and to talk about running the Targa and the Mille Miglia and all that sort of stuff. It was a good chat, and I learned that 914 seats are strong but need a bit of modification to give good lateral support. That was a relatively low priority for Eric.
The seat on the left is a bare shell that's been covered with fabric. Middle is a stock seat, right is a stock seat with the base cushion pulled. They're light enough that I can easily carry them three at a time.

Test fit in the car (pre-paint).

The seat rails were easy. I took a set of stock Miata rails and added a couple of cross bars. The seats where then bolted to the bars through the very thick 'glass bottoms with fender washers. The rails are from an NB Miata, so the seatbelts bolt to the rail. This makes it easy to reach the buckle no matter how the seat is adjusted.

I de-upholstered the bottom cushion and took out some of the foam to make the seat a bit more contoured. The stock cushion is pretty flat. The end result was a seat that was about as low as you can get while still having adjustability. Eric says they're perfect - comfortable, with just enough discomfort for a vintage feel. That's his description, not mine!

In the car with the roof on.

With the roof off. The car has the hardtop permanently bolted in place usually so you never see this. The square shape of the top of the seats is a bit odd with the roof down, but looks fine with the roof on.

So there's the seats sorted. The wheel was easy: Eric had a Momo Prototipo that he wanted to use. One of the best looking wheels out there, and surprisingly rare outside the Porsche community. (2024 note: they are more popular in Miatas now)

The shift knob is a black aluminum Voodoo knob with an engraved pattern.

OK-you asked for it so here are my retro interior ideas (I have probably seen these all somewhere so there's your disclaimer you ninnys):
-thinner rim steering wheel with lighter weight spokes
-retro upholstery patterns on seats
-version of your half dash to lighten up the dashboard (possibly combine with a glovebox rail or pocket like a spitfire)
-eliminate center console from bottom of radio plate
-eliminate tunnel console
-expose shifter by either using a very short shift boot or only the rubber boot
-period correct shift knob and possibly lengthen shift rod
-chrome trim rings on AC vents (so so on this one)
-dash mirror for rearview
Those are the quick ones. There are more I am sure
Well, you've seen the wheel and the seats. If a 1970's 914 isn't retro, I'm not sure what is ![]() Houndstooth seats would have been fun, but were not immediately available nor in budget.
Houndstooth seats would have been fun, but were not immediately available nor in budget.
This is a budget build, both in terms of time and money. I'll post the totals later, but a set of $2000 RS seats weren't really in the budget. I think the total outlay for the seats after selling the originals was $30 or so.
Eric wanted full HVAC, and doing a half dash leads to very ugly plastic bits being exposed in that case. Keeping the lower half looks more vintage in that regard - well, to me anyhow. Again with the daily driver aspect, the tunnel console is nice because it gives an armrest. And my 1972 MGB has one ![]()
He actually considered a dash mirror, but it didn't fit into how he wanted the car to look. Same with the AC rings - they're bulkier than you think, not the delicate rings you really want.
Not a bit of criticism intended in any of my ideas. ![]() The concept got me excited is all. I like the way it came out very much!
The concept got me excited is all. I like the way it came out very much!
No criticism on the response either, just explaining why we made the decisions we did. Eric's actually a GRM lurker, he might pop in and provide a bit more detail.
I believe he spent a fair bit of time drooling over some of the AWD gauges, and it's possible those will end up on the car in the future. A set of DIY gauge faces would be an interesting project. I'm a sucker for having a rest position at 6 o'clock.
I'll post more later, but I'm at the track for the next three days so there might be a wait. It'll build the antici

Lotus elan interior

You'll need to log in to post.


