1 2 3
slowride
slowride HalfDork
4/23/15 6:35 p.m.

The first package of parts arrived today, pedals and the bottom bracket (what the cranks attach to). I've been highly distracted this week so it was nice to do a little work, even if it only took 15 minutes.

Today's task is the bottom bracket install. This is essentially the bearing that attaches the crank to the bike and allows them to turn. There are sealed bearings inside and then an interface for the cranks. Way back when, the only choice for the interface was a square taper, essentially a square press fit. When it worked it was good, but sometimes the taper would get damaged, your crank bolt would fall out, and then you be trying to pedal home with one leg. So there have been numerous attempted replacements: ISIS is an industry standard that was popular for a while, then some people wanted bigger bearings so there is an external type, and so on. For budget's sake and because I'm familiar with it, I stuck with ISIS.

So I found my tools, a big old 1/2 inch socket wrench, an ISIS install tool, and a beam style torque wrench.

And here is what the thing looks like uninstalled.

For frame prep all I did was smear grease on the threads. Most manufacturers will tell you to face the bottom bracket (essentially, remove some material so the faces on either side are square to each other) but I generally haven't found it to be necessary with the newer style bottom brackets.

Install is easy, first start the left side cup, then install the bottom bracket itself through the right side, and torque everything down. The threads are a little goofy; both sides thread towards the back of the bike. Installed:

gamby
gamby UltimaDork
4/24/15 12:40 a.m.

In for more updates.

I've focused my gear energy on my road bikes and cyclocross bike. The 11 year-old 26" FS MTB just gets used sporadically and doesn't get much thought put into it. I think it'll see a bit more use this summer, though.

slowride
slowride HalfDork
4/24/15 6:56 p.m.

Got the rest of my parts in today, so I set about hanging them on the bike.

I installed the headset (steerer bearing essentially) at some point in the past, so I just had to pound the crown race onto the fork and then attach the stem:

You adjust the tension on the headset by using this "star fangled nut" which is pressed into the steer tube of the fork, and then the headset cap is tightened or loosened to adjust the tension:

And then since I had the stem on, the handlebar was next. The handlebar, grips, and shifter were stuff I had; the brake levers are new:

And then I did the cranks. I'm running 1x9 so I replaced the small ring with this CNCd guard I had already:

And then installing the cranks is easy too, you just grease everything up and torque them down.

Next I think are the wheels, which I'll at least start on tomorrow.

2002colossalfailure
2002colossalfailure New Reader
4/24/15 8:33 p.m.

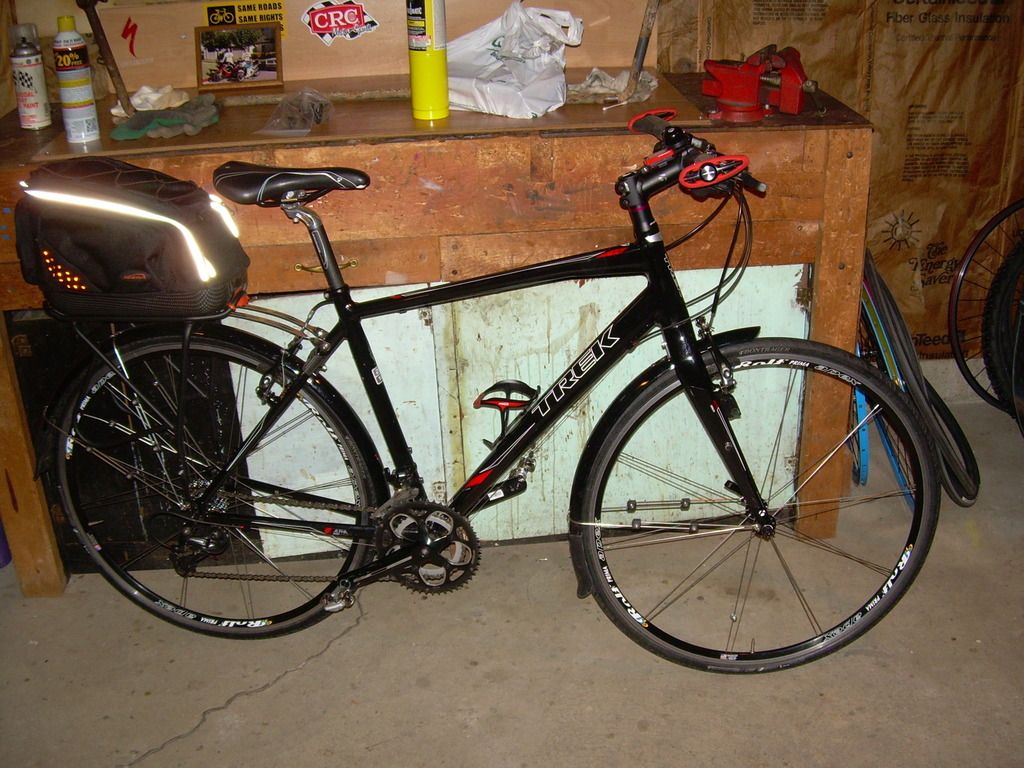
Just put this together for a 450 mile tour of the Erie Canal in July 2014 Trek FX7.5 I found in CL for a giveaway price. I slapped on a set of old Rolf's I had lying around and cleaned it up. Nice!

slowride
slowride HalfDork
4/25/15 6:47 a.m.

Nice! I like it. Do you think you have enough space for everything? Or is this a supported trip/are you towing a trailer?

ProDarwin
ProDarwin UberDork
4/25/15 10:11 a.m.

Following this.

I'm running a 1x9 too. No bash guard inside or outside (but this is a hardtail)

I just installed a OneUp 40T on a 9 new cassette too. Works pretty well, but the 16->21 shift takes about 1/8-1/4 rotation more than I'd like. Now I need to figure out how to get just a bit more tension on the rear derailleur with the longer chain.

I need to learn how to deal-hunt like some of you e-bay pros. I need to score a better front fork.

slowride
slowride HalfDork
4/25/15 3:19 p.m.

I'm not really sure the bashguards are necessary at all, but I had them so I figured I would use them.

So on to the wheelbuilding...

The first step is to decide which hubs and rims you want to use, and then figure out the spoke length. I had some picked out 6 years ago, but the hubs never got ordered so I had rims and spokes and no hubs. The hubs I was going to get are no longer readily available, so I had to search around for something that would work with the spokes I had. There are all kinds of spoke length calculators out there; I haven't found one to be better or more accurate than the other, but if you find one with your hub and rim dimensions already entered, that's better. I tried measuring my own once and it didn't work out at all. So here's the kind of numbers you need and what you'll get:

I used 262 and 265 for my spoke lengths. Before we go further, I've used this website for most of my info: http://sheldonbrown.com/wheelbuild.html Really a great resource, too bad he died in 2008. He has all kinds of info on wheels, but the standard these days is 32 spokes, 3-cross configuration. You can either use single butted (same dimensions for the whole spoke) or double-butted (narrower in the middle) spokes and a variety of nipples. I used double butted spokes and brass nipples. The threads are standard so you can use different brands of spokes and nipples; my spokes are Sapim and the nipples are DT Swiss.

So I got out my truing stand, set it up with the spokes on the right side and little notes to myself:

I use a nipple threaded onto a spoke to grease the nipple seats in the rim:

I'm not sure the kind of grease really matters.

There are lots of things you could put on the spoke threads. There is a commercial product called Spoke Prep, linseed oil, grease, threadlocker (not recommended), and antiseize, which is what I've always used. Note: this stuff will get everywhere! Not much is needed:

And then I just follow the Sheldon Brown website and put the spokes in. Note that the first spoke can take some figuring before you put it in; I spent maybe 10 minutes deciding where it goes. After that the spokes go in easy:

And then before you know it, they're all in. Now it's time to tension the spokes. Again, I follow the website here: screw the nipples down until the threads just disappear, and then go 1 full turn at a time until there gets to be some tension.

I do hammer on the spokes to get them to bend more like the website says. I also use a screwdriver to kind of bend them more where they intertwine (which I'm doing backwards for the benefit of the pic):

I will admit to not being super worried about having a super true rim. With a big fat tire on there, it's not super important. Dish is important though:

And then just keep building the tension. It's good to tweak the spokes with your fingers occasionally just to get everything going together good. I keep going until I feel like I might be about to strip the nipple:

And then eventually you're done! I will go back at some point and work on truing a bit (maybe).

Since I was working on it, I cleaned off the rim with rubbing alcohol (that Permatex gets everywhere), put on the rim tape, tube, and tire, and installed the disc brake rotor. All done!

It seems super techy, but it's really not that hard. For me the hardest part is turning the spoke wrench the same amount on each spoke.

ProDarwin
ProDarwin UberDork
4/25/15 7:13 p.m.

How much did that truing stand cost? Would you recommend it?

Taking my wheels to the shop is tiresome. Being able to true (& build) them at home on my own time would be ideal.

2002colossalfailure
2002colossalfailure New Reader
4/25/15 7:32 p.m.

In reply to ProDarwin:

I've had that same truing stand for years and think it's a great middle ground between the expensive pro-level equipment and a DIY hack. I think I paid $80 for it.

slowride
slowride HalfDork
4/25/15 8:56 p.m.

Yes, I like it and would recommend it. The indicators for truing have plastic adjusters that seem a little cheap, but they work fine and I've had no problems yet. Also, being able to leave tires on if you want is pretty convenient.

It's sold under the brand Feedback Sports now. Looks like $75-$80. FWIW, I had the Performance Bike stand before this one. The Performance was not nearly as nice.

XLR99
XLR99 Reader
4/26/15 3:03 a.m.

I love wheel building! For me it's one of those relaxing zen things. People seem scared of it, but you can teach yourself, and if you screw it up, just take it apart and start over again. If anyone else is interested, you can download a PDF version of Gerd Schraner's 'Art of Wheelbuilding' .

That's a pretty cool stand! I like that you can leave tires on for touch-ups. I have an old Park consumer model that works well for building, but I need to unmount mtb or cx tires, which are the ones that need re-truing the most.

e46potenza
e46potenza Reader
4/26/15 9:03 a.m.

Wow awesome work. Makes me want to try my hand at building a set. Maybe next time I need a set I'll give it a go

slowride
slowride HalfDork
4/26/15 3:03 p.m.

Yeah, it's that way for me too. I need to find a similar activity to calm my mind down, I can't build wheels every day!

You definitely should build your own next time, it's very satisfying.

So today was a pretty productive day. I built the rear wheel, mounted the brake rotor, the cartridge, the rim tape, tube and tire:

Then I mounted the brakes:

Then I moved on to the brake cables. Since these are cable actuated disc brakes, you have to run cables. I had the inner cables and outer housing ready to go. Then I realized I would need ferrules (stops for the outer housing), which I thought I had but couldn't find. I sat down at the computer to order up some new ones, only to find the ones I thought I had under something else on my desk, covered in dust. Maybe sitting there since 2009! I really need to clean the desk sometime.

So anyway, then I ran the brake cables:

And then I started getting a little clumsy, which is always my hint to stop for the day. I don't know how much time I'll have during this coming week, but I'm probably 3-4 hours away from being done. And then I just have to wait for the ground to dry out!

Toyman01
Toyman01 MegaDork
4/26/15 5:37 p.m.

Seriously cool build. Thanks for posting this up.

slowride
slowride HalfDork
4/26/15 6:02 p.m.

No problem, and thanks!

Skervey
Skervey Reader
4/26/15 8:46 p.m.

Nice to see a bike build! I run a BBG ultra light bash-guard on my bike, but I have tore the crap out of it! I should have gotten a thicker one... Or I could be nice to my bikes but that's not as fun!

slowride
slowride HalfDork
4/27/15 1:49 p.m.

Thanks! I don't actually bash anything with it, it's mostly to keep the chain from falling off (which also only rarely happens without it).

gamby
gamby UltimaDork
4/27/15 2:26 p.m.

Even though I've built quite a few bikes up in my life (as well as assembling/repairing thousands), I love this thread.

I also like that it's a 26'er, as those have been almost completely shunned by the "cool kids" in the MTB world. Also good to see mechanical disc brakes. I'd much rather work on those than hydraulics.

Please get it on a scale when it's complete.

slowride
slowride HalfDork
4/27/15 5:07 p.m.

Yeah, I'm not exactly on the cutting edge with this one... :)

I spent thousands chasing bike trends years ago. I may start up again at some point in the future too. But for now, 26" was good enough in 1988 (year of my first mtb) so it's good enough now. And I hear you on the brakes. I had some hydraulics previously, man what a pain to bleed them in a condo without making a mess.

I'll see what I can do about a scale. Mine recently started malfunctioning (says I weigh 99.5 pounds, which clearly isn't the case) and I doubt I'll buy a new one soon since they have a good one at the gym I go to. But I expect it to be 32-33 pounds.

gamby
gamby UltimaDork
4/27/15 11:35 p.m.

In reply to slowride:

FWIW, my MTB is an old full suspension 26er with Hayes mechanical discs. I still have a triple on it--3x9 One day I'll do a 2x9 conversion, when the drivetrain finally wears out. It's still got a good amount of life in it.

I'm way more of a roadie (and lately a cyclocrosser), so the MTB tends to get little attention in terms of use/love/mods. It does its job just fine at the moment--my first proper MTB was in 1991--no suspension, neon pink Shogun.

slowride
slowride HalfDork
4/28/15 10:11 a.m.

Ooh, a Prairie Breaker? I remember those!

Mine was a Cyclepro Rendezvous. It had the rear brake under the chainstay, and I replaced the tires with Specialized Ground Controls.

Also, I have a 3x9 setup on my "29er" (AKA townie bike).

slowride
slowride HalfDork
5/2/15 11:32 a.m.

OK, just had a few items to clean up and adjust. I installed all the cables (2 brake and 1 derailleur). For adjusting the brakes I just followed the Avid directions: install cable, squeeze lever 5 times and then hold it while tightening the bolts. The bolts have pretty ingenious conical washers that allow the calipers to move around as they need to. Then after that you adjust the pads; these brakes have dials that move the pads in and out as needed.

Then the rear derailleur cable was installed. There is a whole procedure for setting the limits of the derailleur so your chain doesn't go off the rear cogs when you shift; other sites describe this much better than I could. Luckily for me, this derailleur was previously installed and those adjustments were already done (probably by me in 2008 or earlier). Otherwise, the main thing is to get the cable tension good. It took me 2 tries. Hint: use vise-grips and really crank on the cable before tightening. These cables will all stretch a bit; luckily there are barrel adjusters on the shifter and brake levers to take care of that.

Then I installed the chain:

For chain length, I've always put the chain around the 2 biggest cogs (not through the derailleur) and then added 2 links. Sometimes you need more to account for rear suspension travel; this chain was the right length using the above measurement +3 links. So I went with that, figuring I can always shorten it later. I used a ziptie and a chain tool to install the chain. Make sure to adjust the pin to eliminate the stiff link after joining the chain.

Then I installed the pedals: Note: red was a few dollars cheaper than the other colors.

And then the headset adjustment: For this, you loosen the stem bolts, grab the front brake, and put your other hand around the headset. Rock the bike forward and feel for any play. To remove the play, you tighten the headset cap bolt:

It's a delicate balance, and sometimes there is play in your fork that feels like play in your headset. But once you have it right, tighten the stem bolts back down. You will need to re-adjust it anyway, once the bearings break in.

Then I went through the whole thing making sure my bolts were tight. Then added air to the rear shock and fork. Then I added this ridiculous sticker that came with my pedals because the derailleur cable is contacting the frame there:

Added air to the tires, grabbed my helmet and other stuff, and it was time to ride!

Just a short 2.5 miler down to the library and farmer's market and back as a break in. I need to work on the front brake a bit and true the front wheel some more, but otherwise, no problems! I even rode down the gravel road next to the train tracks on the way back to see how the suspension works-awesome! Possibly will ride real trails next weekend!

Thanks for following along!

Toyman01
Toyman01 MegaDork
5/2/15 7:40 p.m.

Nice! Makes me want to build one. Maybe in a year or so if I stick with it.

slowride
slowride HalfDork
5/3/15 7:33 a.m.

It's definitely worth it to learn if you're going to spend any time riding bikes. Thanks!

slowride
slowride HalfDork
5/23/15 6:00 p.m.

So, now that the bike is built, all that was left to do was to ride it. We've had some pretty wet weekends recently, and I'm also getting my condo ready to sell/shopping for a house, but I managed to find some time today for a real off road ride. This bike has no way to attach a water bottle cage, so I got out my Dakine hydro pack and the bladder, gave it a wash, and threw the bladder in the freezer (partway full; this way, cold water on the trail! I usually fill it more before the ride) this morning. Packed some stuff, then had lunch and then it was time to go. Got the pack all set and put it by the door, went to get the bike, and then when I came back, there was a puddle on the floor. After a bit of messing around, I determined that the bladder now leaks (I'd say it's been 10 years since it was used). So, I grabbed a water bottle and put it in the pack.

The trail I rode is called Three Ravines. There are various other trails to get to 3 Ravines; when I first rode this area, it was always 3 Ravines. There are other newer trails now, but I went with what I knew this time. Some of it is exactly the same as I remember; other parts are completely new. But, the bike performed well, and amazingly enough, I seem to have more stamina now than I did 10 years ago.

Anyway, here's a pic:

And I recently got this POV cam from Monoprice (not the best quality, but cheap) so I have video too. It's not too exciting but it gives you an idea of the trail.

https://youtu.be/BvrAo8zP5Hc

Also, I forgot to mention that I found some dirty socks from 10 years ago inside my pack.

1 2 3

You'll need to log in to post.

Our Preferred Partners
zF937fAA3JB23QI4DPXC0bYGmPLLmpd9L8T6BXiFYMDWMv2zhrFvXNHE6MiHafeX