Today was the first day to put the grill shell hood and cowl on a car that moves under its own power. They're there temporarily, but I was really happy with the overall look. There's a lot of work to do, but it looks like a car and that makes me happy. The transmission cooler on the front of the radiator has moved the grill shell forward a bit, and that means that I'll either need to modify the hood so it fills the space between the grill shell and the cowl. The other option is to build an entirely new hood.
Here's a photo with me holding up one of the fenders that Andrew Nelson brought all the way to the $2017 challenge for me to use. I think they'll look great.

We expect this to be at The Mitty. I’ll drive down from Lockport, IL if you come.
It said - Calling all Datsun’s..........
I will try, but that the dates are difficult. Our semester ends May 2, which means that is the middle of the finals that I'm supposed to give and grade.
I'm going to have to either modify the hood or build a new one anyway. What do you folks think about doing it Z-style; i.e. lifting upwards and forwards. (that's probably a down the road project. The easy thing right now is to just run without a hood.)
In reply to Crackers :
OK, that means I need to look at the permission settings on google photoss. In the mean time, here are the same two pics uploaded to twitter. Let me know if you can see those
I shop vacuumed the interior, put the passenger seat back in, mounted the grill, and took my mom and dad each on a drive around the block
The car didn't have a radiator overflow tank, so I fixed that using one of these tanks from speedway. They think it should be mounted directly to the radiator, which seems sort of fragile. I now have a new tube on the chassis, with a tank mounted to it.
If the image doesn't show, you can see it here: https://www.instagram.com/p/BdBxaNtDNWv/
Joey, for some reason some of your pictures aren't visible. The only one on this page I can see is the the one with the overflow tank. Which looks very nice by the way.
Toyman01 said:Joey, for some reason some of your pictures aren't visible. The only one on this page I can see is the the one with the overflow tank. Which looks very nice by the way.
OK, I tried sticking some of them in a publicly available post on facebook, then linking to them. Let me know if that's working.
What if you kick the bottom of the grill shell out forward and lean the top back closer to the hood, will that get you the clearance you need without having to re-do the hood too much? Would add a little hot rod flair ala 33 Ford.
CLynn85 said:What if you kick the bottom of the grill shell out forward and lean the top back closer to the hood, will that get you the clearance you need without having to re-do the hood too much? Would add a little hot rod flair ala 33 Ford.
Hmmmm....I'll have to think about that. It definitely would help reduce the gap, and would also provide more clearance for the transmission cooler. OTOH, I have a pair of water heater skins and some refrigerator parts on hand already, and the first hood (the one shown above) has some annoying oil canning caused by overheating it when welding the sides together; i.e. I would probably eventually build a new hood anyway because it would be less work than making this one work.
Honestly, I think it is easier to drive (i.e. has better visability) without a hood, and I may do that for a while.
I can't find the maxima speedometer cable I pulled when parting out the 1982 maxima (910 blue bird) that was the donor of the drive train (....and the floor pan, BTW....it was made out of the station wagon's hood.) I'm trying to hook the transmission to the mechanical speedometer from this gauge cluster because I bought it a few years back on the logic that I thought the tan gauges were pretty and vintage looking.
I just ordered this speedometer cable on the possibly erroneous idea that since the drive train had an L24e (Z car-ish) engine, the automatic transmission was was probably Z-car-ish, too, or at least similar enough to be compatible with a 240Z cable. If that cable DOES fit the replica's transmission, the next step is to see if the other end will hook to the speedometer. If that doesn't work, I'll probably try using a cable adapter.
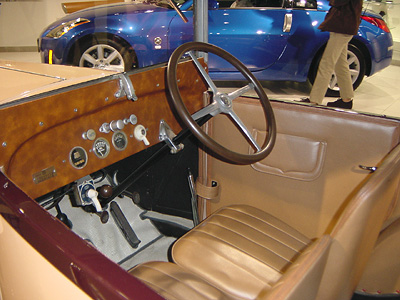
I've also been modifying a chassis tube to make room to mount the dash the way I want. I'm trying to replicate the wooden dash of this car:

Today was productive, WRT the car.
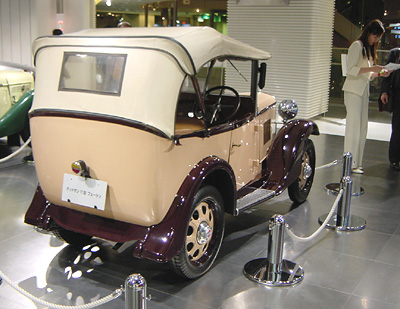
I'm archiving the build photos from my website. (The idea is that between there and here I should have enough photos to create a decent build book) In the process of archiving, I came across these photos which might be useful.

Obviously, this is a much better photo of the interior I'd like to mimic
....and the back end, with the single central tail light

The photos are from here
The 240Z speedometer cable from Z Car Depot has arrived
I can hook it to the 0mega Mechanical Speedometer Gauge,
and the needle moves when the cable spins.
I still need to try hooking the other end of the cable to the Maxima transmission, but I am feeling optimistic about this working
I was wrong. It is tight, but the end of the cable DOES fit into the transmission. A small amount of persuasion may have been involved.
I ordered a matching pair of keychains from amazon, with the plan to use the emblem as a door pull. Have I ever built a door pull assembly before? No, but there was a time when I'd never built a door before, either.

I started this over a decade ago, hoping to build something cool that both my dad and I could drive and enjoy. By 2013 his arthritis was forcing him to drive with very little bend in his knees, and it became apparent that he was unable to drive the car. I dreamed up some drastic measures, like mounting the pedals so far forward that they would move past intended firewall location, then creating a bulge in the firewall to accommodated them.
It was ugly, kludgey, and caused me to engage in some major butchery of the frame rails from the dodge dakota front end I'm using. The resulting butchery was highly regrettable, and one of the reasons why the build was ignored for years afterward
Well, I finally have capped that butchered tube
Here's the cap welded into place
....and painted
You'll need to log in to post.