nocones
nocones PowerDork
9/27/23 2:51 p.m.

So as Sleepy has been putting lots into the aero thread I thought I would give the overview of the plan for between now and UTCC. 

The word of the day is Optimize.  I am not trying to fundamentally change anything just optimize.   That will be in 3 areas, Aero, Setup, and Comfort.  The only required change to the car is the addition of a second set of silencing mufflers.  That is a NCM thing and I'll cover that when I make them. 

For Aero, the largest goals are reducing drag while maintaining or slightly increasing front end grip.  I have a fair amount of track experience with the car as is and I don't want to make it fundamentally different.   

Aero will involve a new revised front element, cleaning up the insides of the tunnels, reinstalling the flat floor, building a roof and sealing the engine floor between the diffusers.   

Setup will simply be an alignment, corner weighting, and adjusting the shock damping to be a bit stiffer as I got some jumping at Heartland Park.  I've never aligned or corner weighted the car something always came up.   It's just set "good enough" as it has at every event.  

Comfort is permanently installing the rear view camera, mounting the gauge cluster, and adding head bracing to the driver's seat. 

that should be everything planned.  It seems like a bunch but it's not that much and other then the exhaust it all could not happen if push came to shove. 

For the front wing for those not following the aero thread the idea is to replace the main span with a better profile, put real second elements on, seal the middle to the hood, clean up airflow outside the wing bellow rhe headlights and put better diveplanes on.  

The result will be a subtle change but the car will look a little more like the Pugueot 905 Evo 2 then it does now.

pictures because everyone loves pictures 

Patrick
Patrick MegaDork
9/27/23 5:47 p.m.

Has anyone mentioned the lmp360 is in the latest PRI magazine?

nocones
nocones PowerDork
9/27/23 7:12 p.m.

In reply to Patrick :

No you are right it is!  I knew it was going to be and that picture they used has been my desktop background for a few months.  I didn't know when though.  That's pretty cool!  Pretty good exposure for our hosts also!


nocones
nocones PowerDork
9/28/23 4:49 p.m.

Rob Wilkinson with another banger.  

Here we see the LMP360 being hunted by a gigantic hulking predator..    the FRSBRZ?

Man the car looks small in this picture.  

preach
preach UltraDork
9/28/23 5:16 p.m.

In reply to nocones :

Recon1342
Recon1342 SuperDork
10/2/23 11:01 a.m.

I wonder...

Could you bend up some thin lexan to cover the fog lights? That would clean up the Aero in that area and still maintain the Kool factor of the fogs.

nocones
nocones PowerDork
10/9/23 1:38 p.m.

Front element update post.  


In order to implement the new front element airfoil shape Sleepyhead developed in the Aero Thread I took apart the existing front element.  Before I disassembled it I weighed it.  

I knew it was heavy from lugging it around but I was surprised to learn it was ~52lb!!  


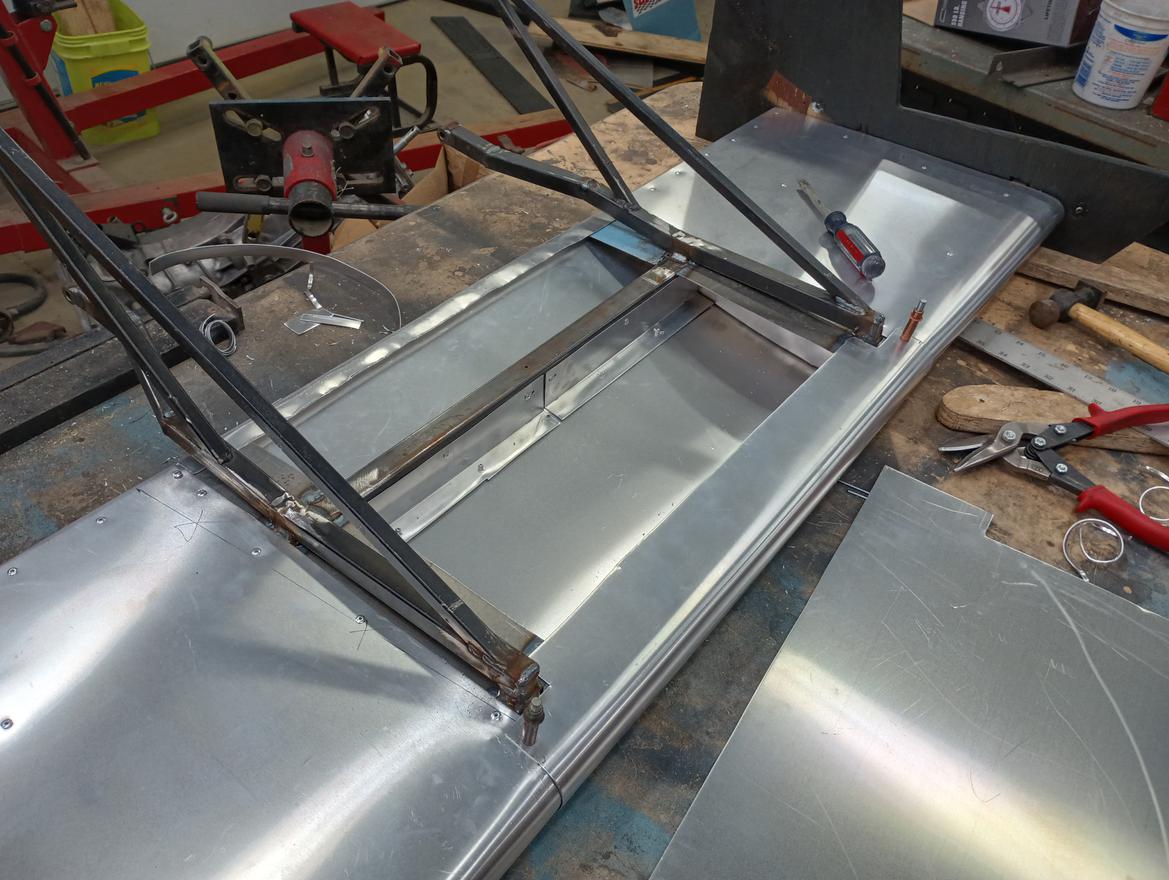
For the new Wing I decided to build it using ribs and sheeting just like a aluminum airplane wing.  I left the tubular steel frame (which only weighs about 5 lbs).  To make the ribs I blew up the picture of the Airfoil shape and printed it on paper.  I then cut a scrap piece of ¾” plywood to match.  I rough cut a second piece of plywood then screwed them together and used a flush cut router bit to make them identical.  Making the ribs was a simple matter of cutting a template ~¾ larger then the profile clamp it between the forms and hammer the metal over 90 degrees.  

I then attached the ribs (2 rights, 2 lefts) to some tabs I welded onto the frame.

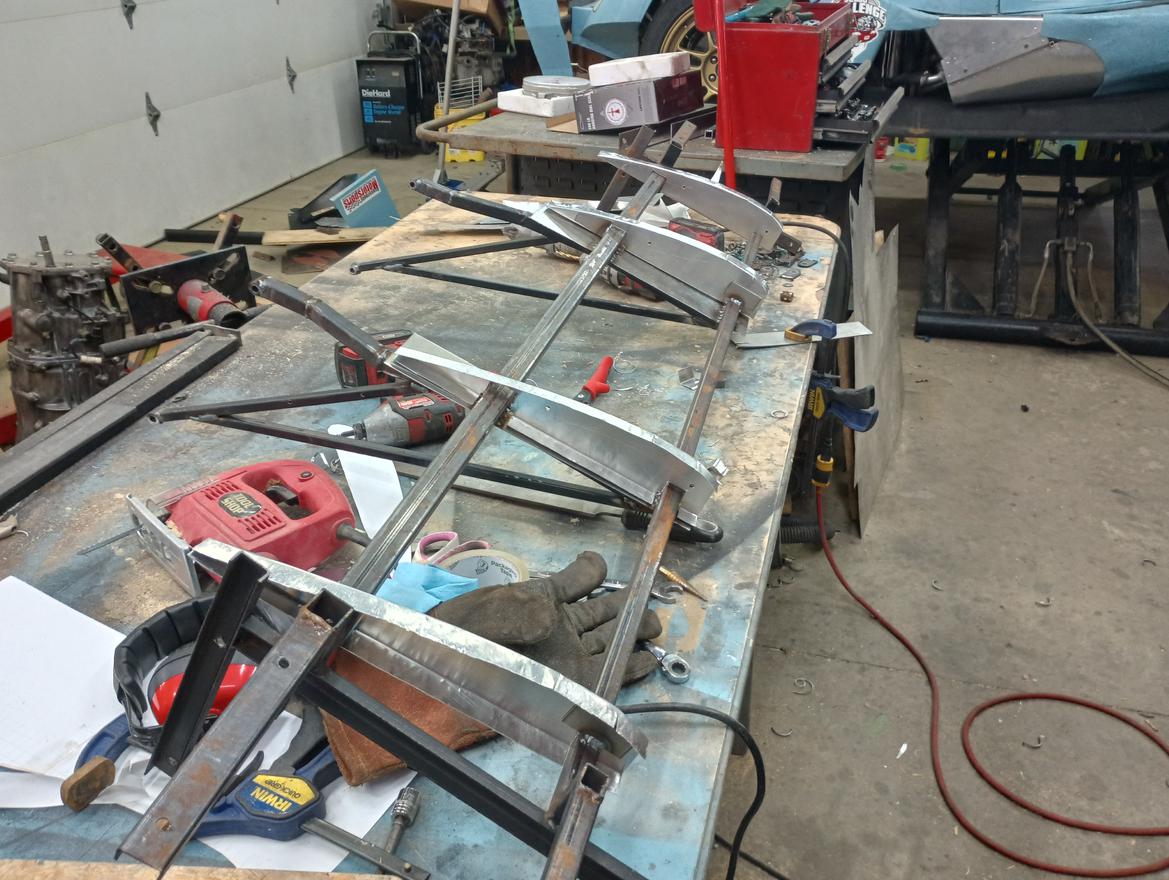
I was concerned that just having the aluminum sheeting between the ribs on the underside would lead to to much buffeting so I added some flanges.   Normally on an airplane these would be the spars and carry all of the weight along the wing.  With this wing the steel frame is the spar so these flanges are just kinda roughly attached to be flush with the profile.

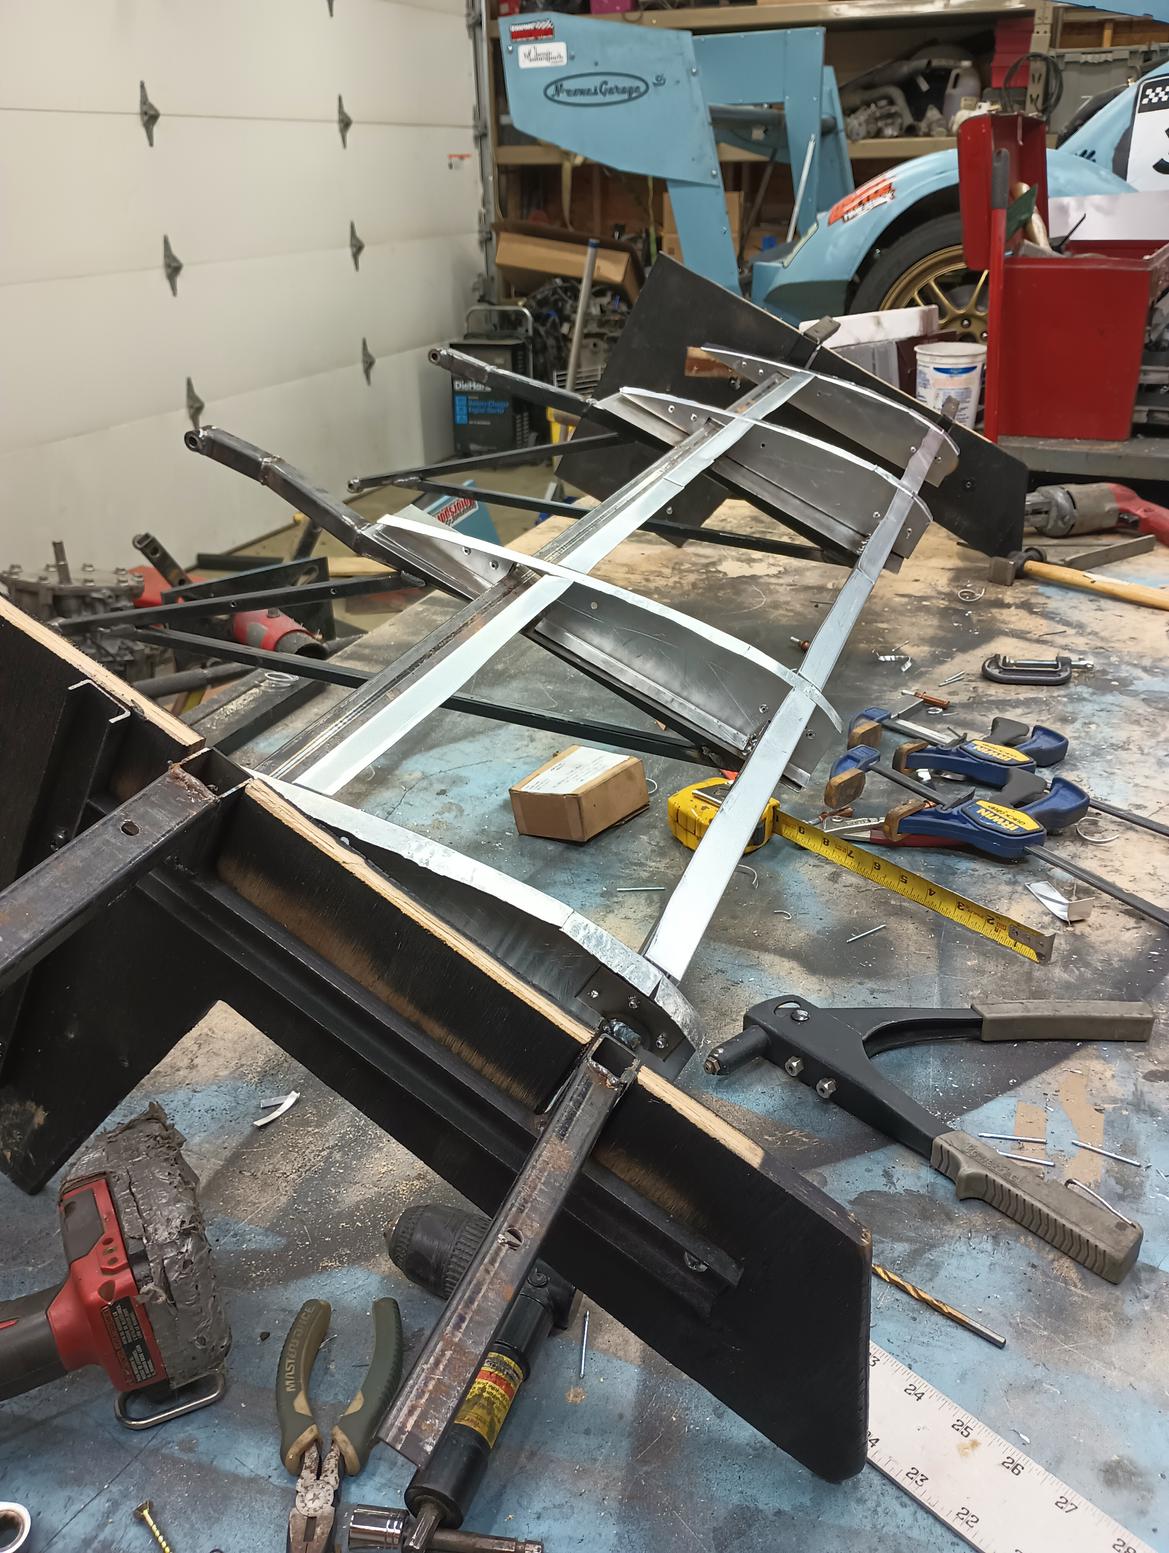
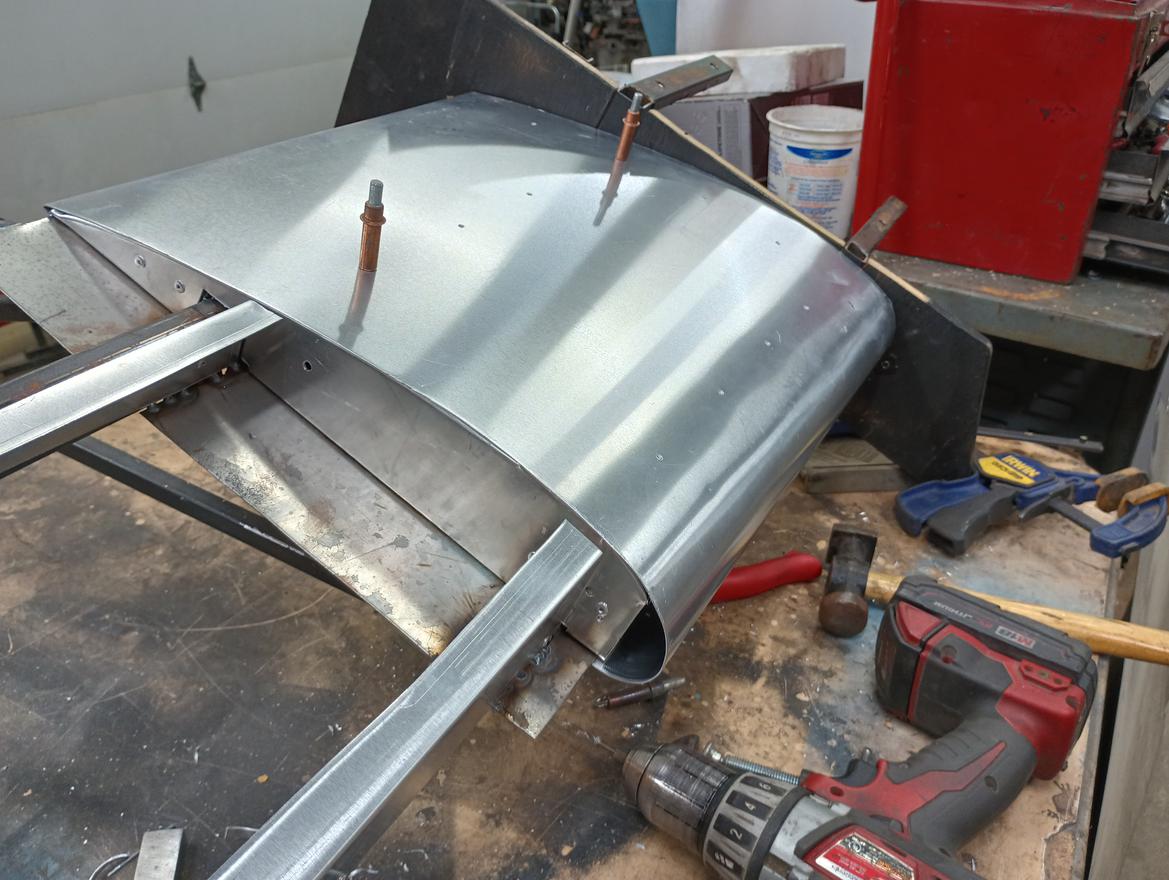
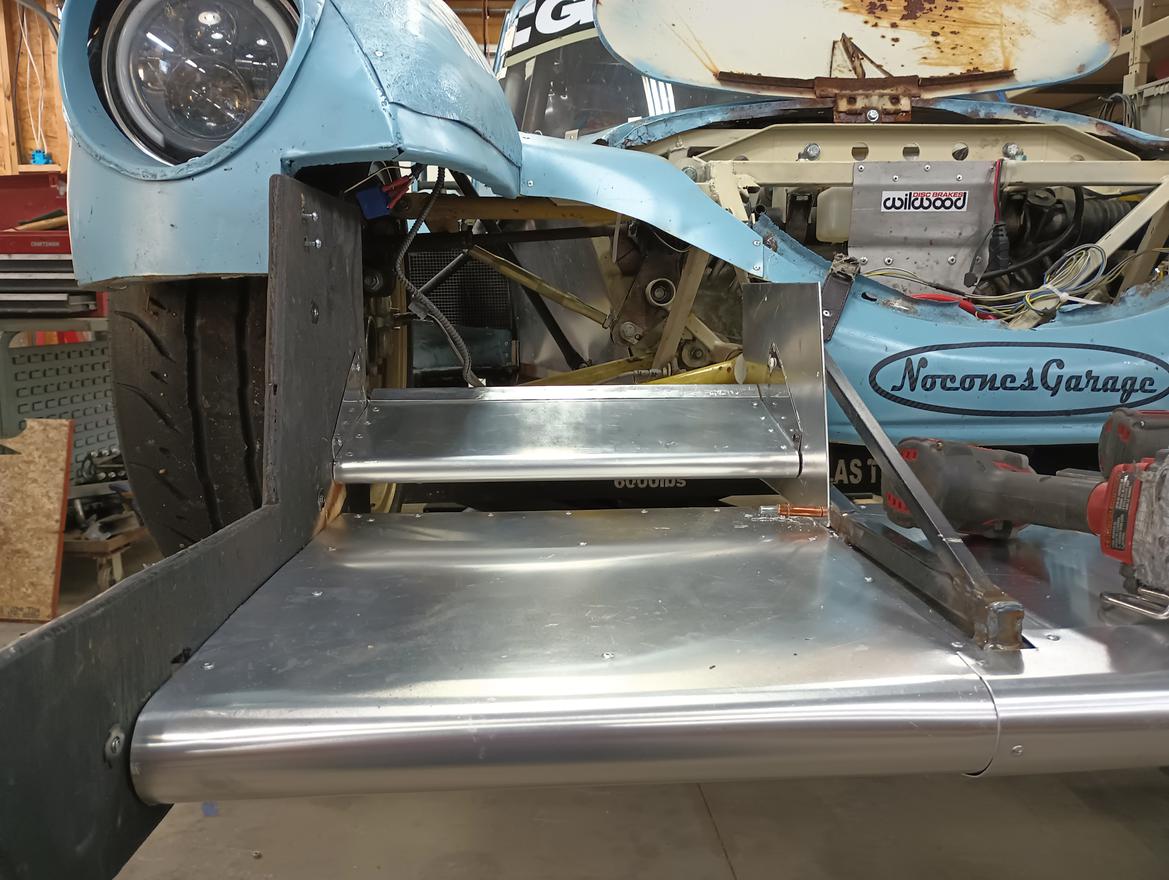
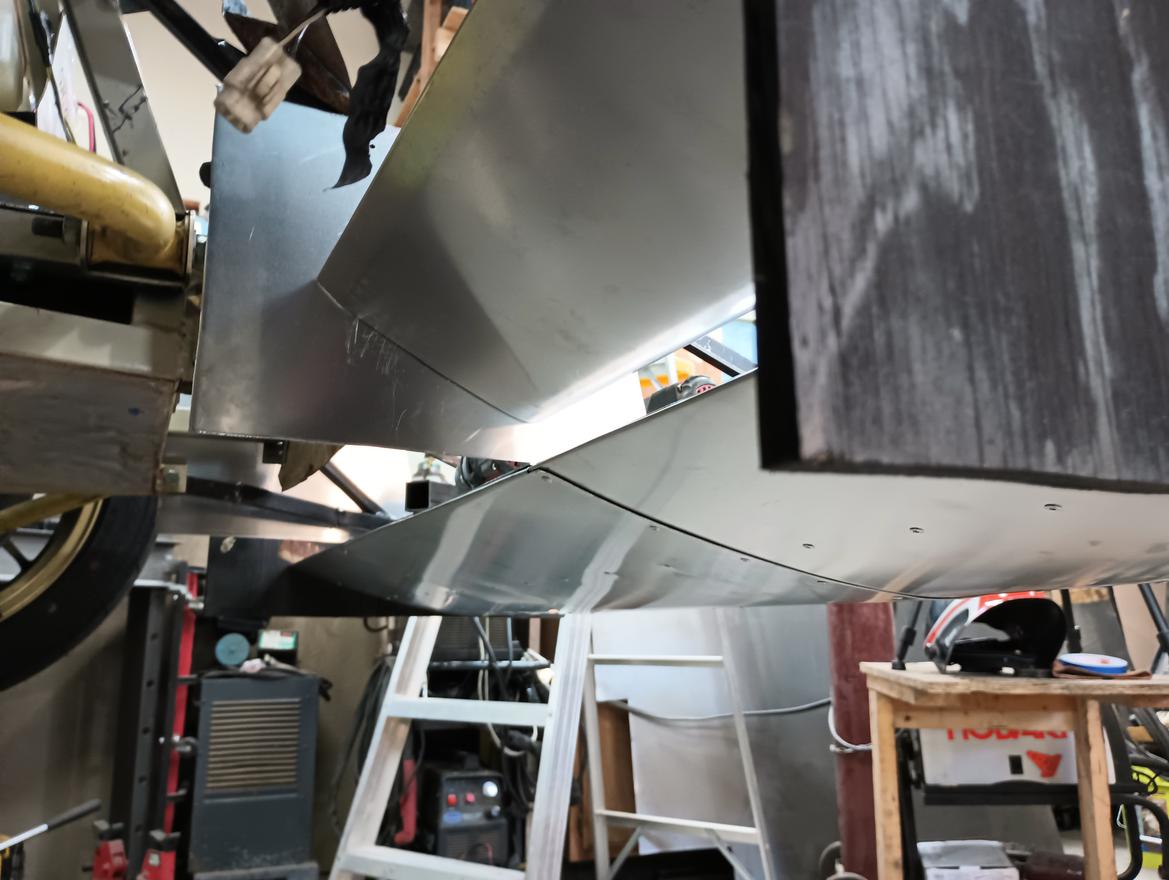
Once the frame and ribs where complete it was time to sheet it.  I used 3 strips (More on why in a bit) to do the sheeting in sections.  The outsides are entirely 1 piece of .030 aluminum.  I put the round on the aluminum by clamping some various diameter tubes to a table sandwiching the metal and then by hand just folded it over.  I started with the flat top to get the spacing right and have a nice rear edge.  Once it was basically the right shape, I lid it on and then let the ribs create the arc for the bottom.  At the back of the wing I marked the part from the top and then bent metal over creating a sharp point.  I was able to run a line of rivets down from the top at the trailing edge.  The nice thing about this technique is there aren’t exposed rivets on the underside like I have on the rear wing.  

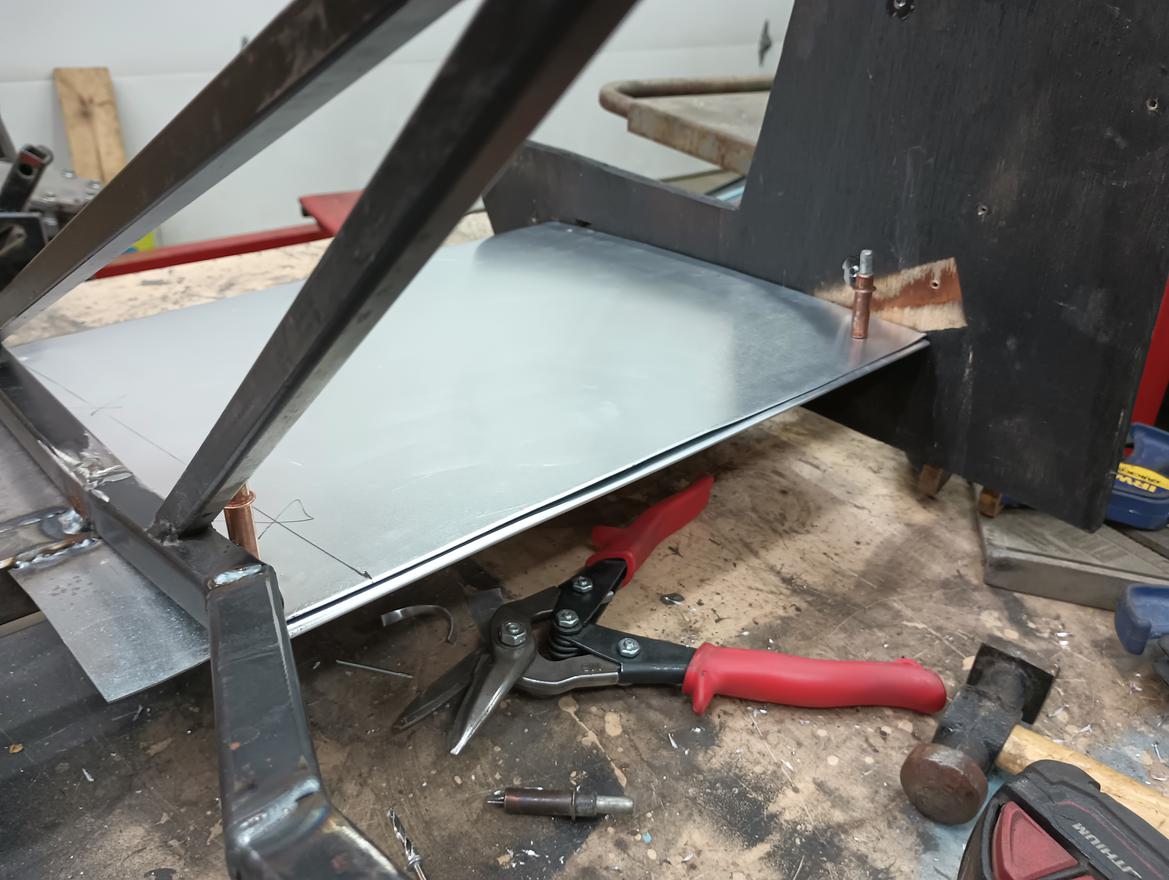
For the middle section I have made a habit of standing on the wing.  There are some maintenance items I need to do that require it.  The old wing had the durability to walk on but the .030 Aluminum would get pretty bent up doing that.  So rather then force myself to be super careful about only standing on the steel tubes, I just put some of the .090 on the center of the wing.  

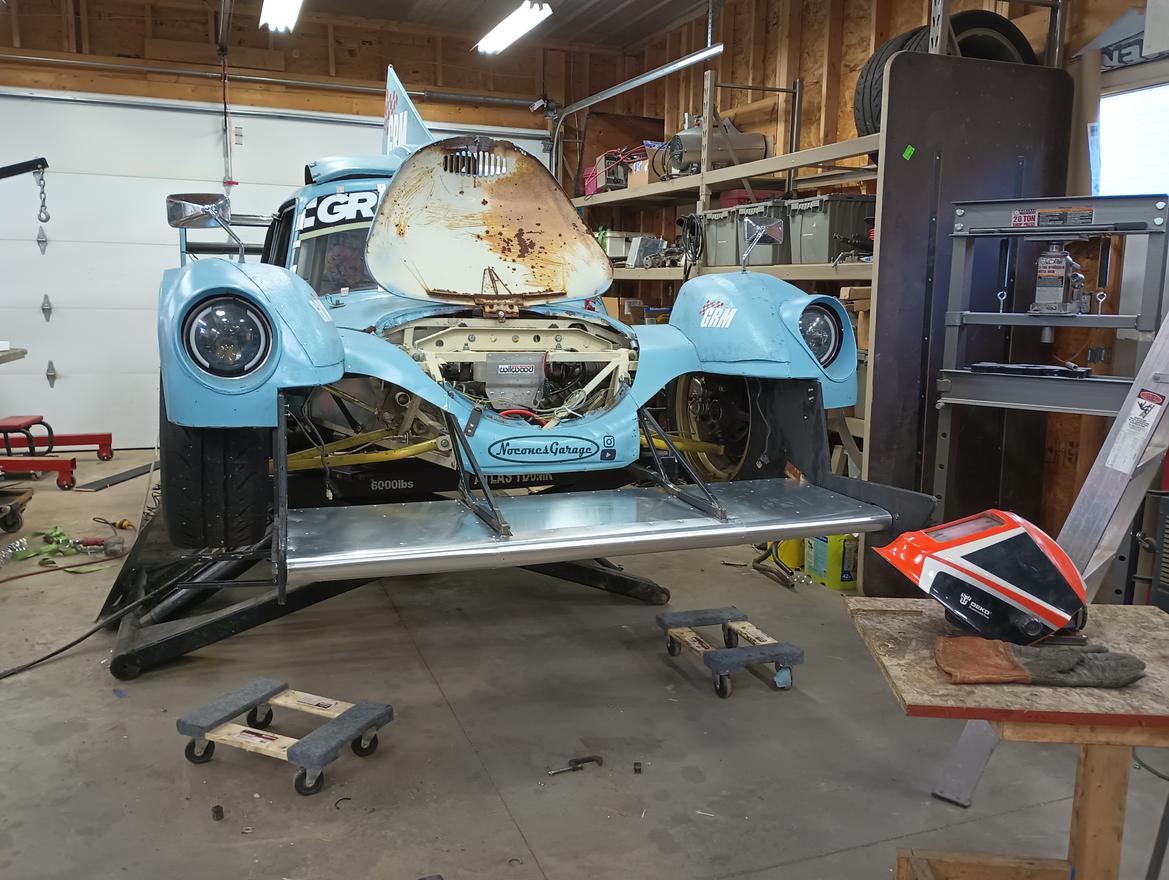
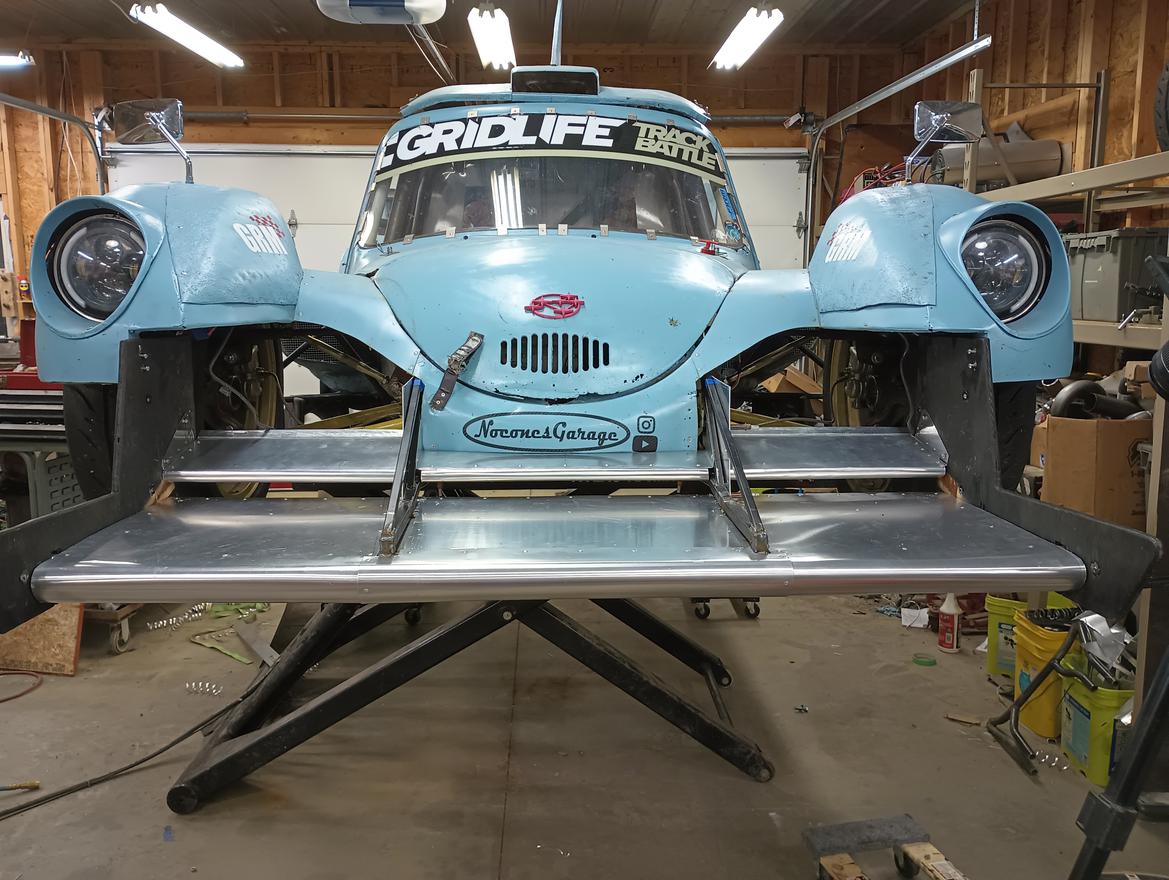
So sheeted and mounted on the car the wing looked like this. 

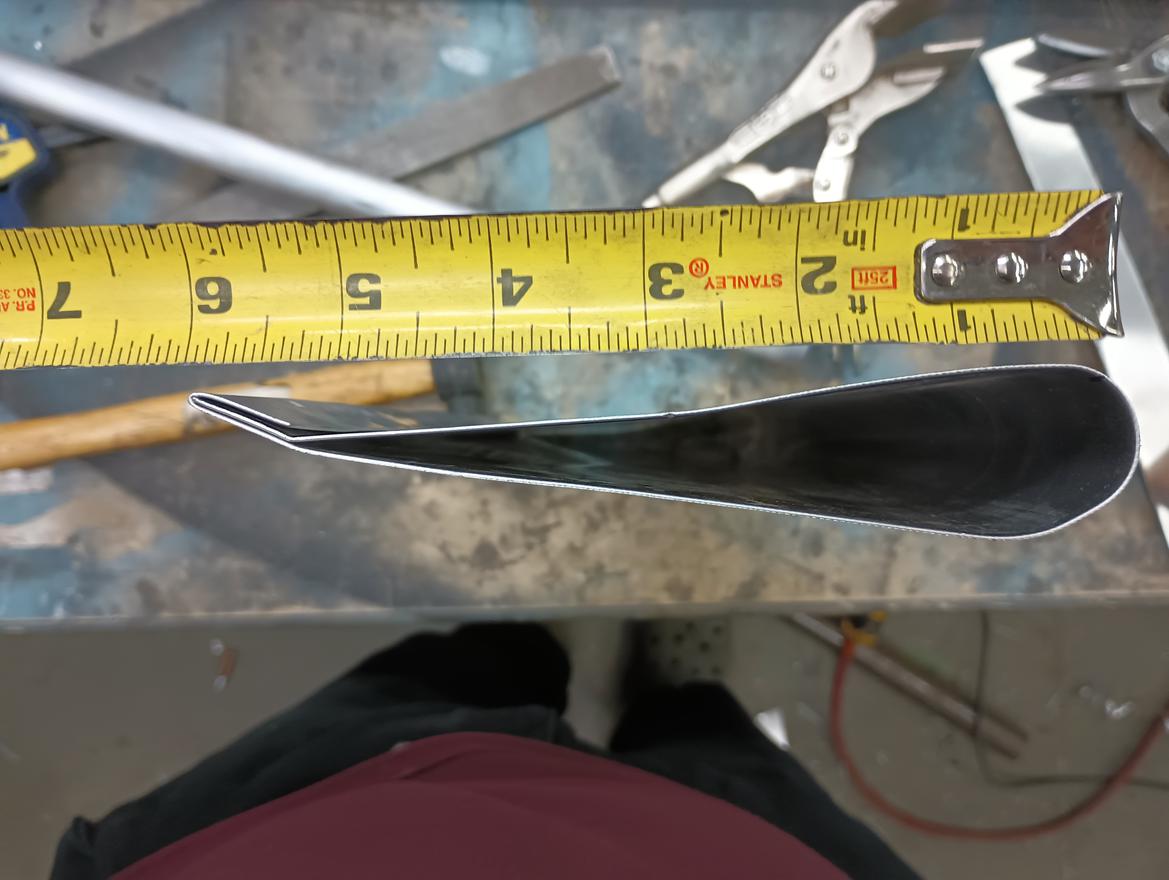
It was time to add the second elements.  The second elements are made from .030 that I bent around a 1” tube.  For the top I added a ~10 degree bend and then folded over a flange from the underside.  That is all there is to them.  They are just aluminum, and they are ~14” long, ~6” Chord.  The ¼’ plywood ones survived so I think these will also.  I re-used my stainless grill door based brackets from the old wing.

These got bolted onto the supports with 1” gap, and about ¾” overlap viewed from above.  I added an inner endplate as well.

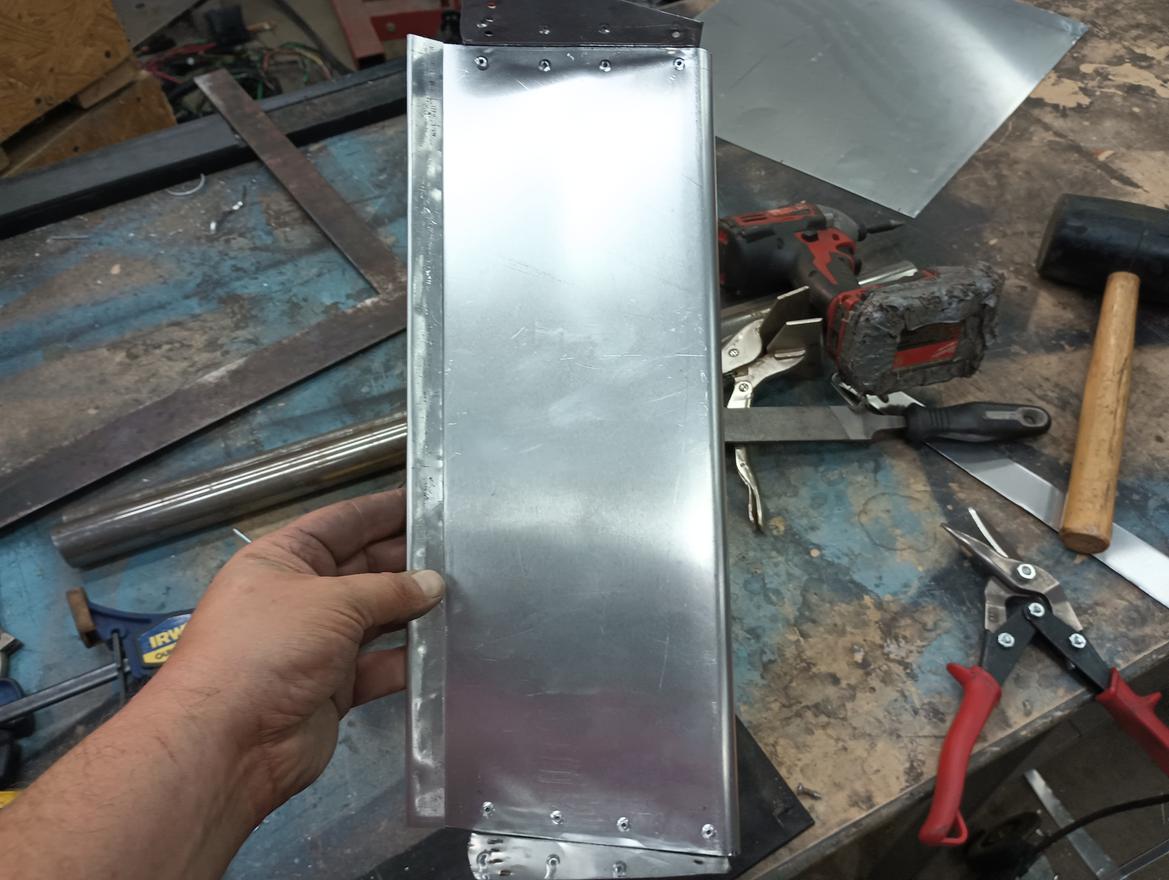
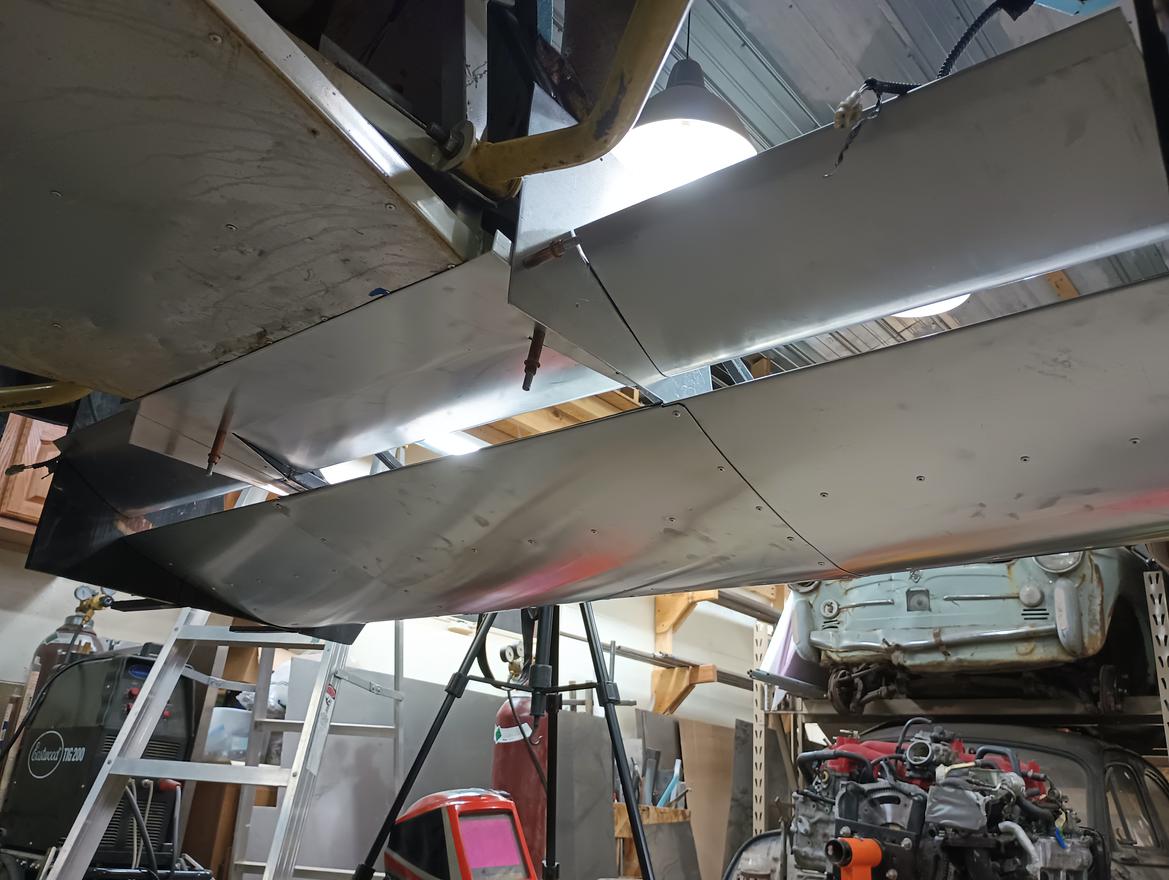
Now I had to deal with the “Middle” of the wing below the body.  Originally Sleepyhead had recommended just sealing the top of the wing, but I realized that the floor was ~1” above the wing and discussed with him letting some air through like the 2nd elements do.  He said that this would work but I should address the underside of the chassis where it is open.  

I added a sheet and wrapped the front to the same 1” radius as the 2nd elements.  On top of this I just made a finish panel that fits tightly against the body right below the “Nocones Garage”.  

So that is the new “front wing” portion of the front element.  In the next post I will document what I did for the outer portions in front of the wheels.


4cylndrfury
4cylndrfury MegaDork
10/9/23 1:47 p.m.

seks

GameboyRMH
GameboyRMH MegaDork
10/9/23 2:44 p.m.

Lookin' good! I especially like the new 2nd element winglets, big improvement over the old ones.

Some Radical SR3/Caparo T1 streamlined headlight covers would look cool but with the amount of time left, some sticker headlights could be a good temporary compromise...


fouckhest
fouckhest New Reader
10/9/23 3:00 p.m.

Super cool progress, love this build!!

captainawesome
captainawesome Dork
10/9/23 3:40 p.m.

Looking forward to seeing how much weight you were able to dump. The new elements look really nice.

nocones
nocones PowerDork
10/9/23 4:58 p.m.

I realized I didn't take many pictures of the outsides as I built them.  The general plan became simple.  Re-use the general canard, endplate, and plywood bottom, and replace the fog light with a smooth metal panel (Sad panda no more foglights for now).   The smooth panels are aluminum with dual returns that I shrank with the HF shrinker to make the radius.  

I cut down the original finish panel above the canard to be a retention strip.  I also modified the endplates.  I figured with more air being pushed under the canard and outboard by the smooth panel I may want a little more area for it to exit.  I had noticed a lot of flex on this part when it was full lenght so I added a slight bend to give it strength and possibly promote air extraction.  

I wasn't quite done.  Sleepyhead suggested I round the front edge of the canards.  I also needed to stiffen them as they had bent from Aero loads and where supported by the foglights.   

I bent a 6" strip of aluminum into a curve with a ramp.  This was riveted to the front of the existing canard extending it by about an 1", adding a ~1/2" round to it and tapering that back into the underside.  

I then painted everything and this it the new look of the LMP360 front end.  It's a subtle change but it just looks cleaner and more finished.

Once it was finished the last step was to weigh it.  Revised weight 36lbs!   That's a little over 15lbs removed, with what should be a non trivial amount of downforce gained and a big loss of drag.  

Tonight wierd second exhaust and reinstall the flat floor and then the car is pretty much ready to go.  I don't think I will get the roof done at this time nor add the headrests.  I just ran out of time as I was Sick again last week so lost several days to that.  

759NRNG
759NRNG PowerDork
10/9/23 7:22 p.m.

Amazing work where will you shake this version down nearby I hope

nocones
nocones PowerDork
10/19/23 8:29 p.m.

A bit of in-car from NCM.  This isn't my best lap but is the best one that the camera worked on.  

TT nationals was super fun, as was the UTCC.  NCM was not kind to my low HP.   Based on the challenge 1/4 mile and elevation correction it's likely that the car has ~116whp.   That's..  not much but explains why it only does 106mph.  

That said I did manage to pull of 2nd place in U2.  That place was attrition assisted, however when the absolute homebuilt manages to make every session and run when going on the trailer that is a big win.  

That said It is time for a little break from this one.  It's been a huge push constantly.  I have goals that I want to complete this off season but I need a little break.  

I know the achievements the car has had are really impressive but I definitely feel it's time for the car to be able to accelerate like it looks.  Mainly because it would be nice for the car to circulate a track more similar to the way other cars do.   Looking at incars my cornering speeds are basically the same as the fastest cars on hoosiers, but my straight line speed is just so much slower.  Even 220whp Miatas make 120-125 on the straights.  I want that too.   So that's the big focus this off season.   That and a roof.  But first a break.  

Recon1342
Recon1342 SuperDork
10/19/23 10:47 p.m.

I've been waiting for this update to pop up. You've accomplished a ton with this car, and it's been really impressive to watch you develop it from a design in a computer to a living, breathing racecar. I look forward to what happens after your well-deserved break.

4cylndrfury
4cylndrfury MegaDork
10/20/23 12:17 p.m.

Awesome update! And congrats on the hardware.

HP woes aside, and not in comparison to other vehicles there, how did the aero enhancements do? Was there a noticeable difference in corner grip? Any negative effects on straight line speeds? Inquiring minds want to know!

sleepyhead the buffalo
sleepyhead the buffalo PowerDork
10/22/23 10:48 a.m.
4cylndrfury said:

HP woes aside, and not in comparison to other vehicles there, how did the aero enhancements do? Was there a noticeable difference in corner grip? Any negative effects on straight line speeds? Inquiring minds want to know!

I reckon I can probably begin some of the discussion of that... and assuage nocones a bit.  I reckon he's a bit concerned about how this is going to come across;  I put a fair amount of effort into trying to think-through and analyze things, and the results were decidedly mixed / bad.

the good news is:  the aero balance shifted forward, enough that the car became slightly oversteery... although perhaps not as much as the JavaFoil simulations exepected.  So, again, something about my modeling is underpredicting either the front downforce, or the moment arm to the CG (or perhaps the rear moment arm is off?).

the bad news, is apparent from nocones report; although it's a bit subliminal.  You'll recall that the car was doing ~110mph Vmax at Autobahn, and the rear wing change improved that to ~115mph at Heartland, while at NCM it dropped back to 106mph.  So, despite making a better balance, something (or somethings) about the changes significantly increased the drag coefficient.

My working suspicion is that the lower 2nd element angles means that more of the "ambient high speed / high pressure flow" from the front of the car is now getting back into the front suspension components which are a pretty high drag shape.  It's possible that other influences from the old flat 2nd elements at high angle were diverting flow over the "nose to fender supports" and there being additional drag created there.  A final thought is, that the other tweaks to the center 2nd element encouraged too much flow to go up and over the cab and get slowed down on the nose too much.

Potentially I've reached the limit of what I can effectively improve through computational/remote means only.  Further potentialities are that the best place to figure this stuff out, would be in a tunnel.  Aero isn't "hard", but it is complex... and a tunnel is one of the best (albeit expensive) places to limit some of the complexity and raise the repeatability/measurability of what's going on.

Real world, though, is that while (as noted above) I've put a fair amount of effort into improvements, those efforts seem to have had unintended/realized negative impacts.  Which, frustrates me greatly;  and I apologize that my advice and analysis were contributing factors in sub-optimal performance at TT.Nats/UTCC/NCM.

nocones
nocones PowerDork
10/22/23 12:22 p.m.

In reply to sleepyhead the buffalo :

Don't beat yourself up.   I may have misrepresented the speed at heartland park.  Revisiting the data, 2nd element aggressive was 104 mph,  lowered was 106.  At NCM I got a VMax of 107.   So it's basically in the noise but it didn't make it worse.  

VMax was equal or slightly higher then the old front (obviously assuming the engine has not lost any HP), but Front downforce improved.  

I would love to do some tunnel work with the car but I don't know that it's realistic.   That said I am hopeful that there is the FIRM trackday post challenge again.   That event would be an excellent opportunity to do some tuft testing and other dedicated things.  

I have been quite overwhelmed just getting the car ready so I know your inputs and data set were compromised by my inability to provide better information to you.   I genuinely appreciate the effort and know the car produces better performance now through you involvement then if I had just kept making Aero Cosplay on my own.  

Cornering speeds on the corners where I have enough power to drive through the corner seem to match or exceed what I've seen online for instrumented laps at NCM.   The garage made, Forum assisted aero seems to at least match the capabilities of what other people are achieving with largely commercially available stuff.  I'm VERY satisfied with that performance as the basic unmodified unoptimized baseline for future development of the car, and input from you and Stafford are more responsible for that than me.  Yes I physically built it but you guys helped tell me what to build and where to put it.   I think as a baseline we've managed to build a good thing.  Development hopefully will unlock some improvements but I can't be disappointed in what it is now.  

sleepyhead the buffalo
sleepyhead the buffalo PowerDork
10/22/23 12:54 p.m.
nocones said:

In reply to sleepyhead the buffalo :

I would love to do some tunnel work with the car but I don't know that it's realistic.   That said I am hopeful that there is the FIRM trackday post challenge again.   That event would be an excellent opportunity to do some tuft testing and other dedicated things.  

The A2 Wind Tunnel by stafford is ~$600/hour, with a 2hr minimum.  I dunno if there's any "deal" to be had, and/or other means of helping offload the cost of putting it in.  It's been ~20 years since I was in a tunnel, so I'll defer to stafford on whether 2hours would be enough... or if trying to 3 or 4 would be better.  Your car, though, would be a better fit than most other production cars, because its blockage effect will be less.  There's a number of GRMers in that area, and it's not too far from my in-laws that I could make being down there "easily convinceable".  Something to keep in mind.

Purple Frog (Forum Supporter)
Purple Frog (Forum Supporter) Dork
10/22/23 2:39 p.m.

My tunnel experience.  You go in with a plan (a decision tree).  You have all the bits you are going to change planned out, and most importantly you and the crew have already been practicing changing out the parts.  Know what tools and fasteners are needed when.  When the clock starts its intense, but very doable.  Sometimes just having a video person in the background taking a video can help with a post-tunnel debrief.

stafford1500
stafford1500 Dork
10/23/23 6:36 a.m.

In reply to nocones and sleepyhead :

The inevitable unintended consequences of aero changes can be frustrating. Glad to hear the balance is in a happiervspot. A2 is probably closer to $500 per hour (last quote I had was $480). If this is something that starts to take shape definitely let me know and I can see what the owner is willing to do. I would absolutely tag in to help, and may be able to support a lot of the local logistics. Purple frog is dead on with photos/video support for post analysis help. That is how I currently write my reports, in addition to the numerical reporting.

APEowner
APEowner UltraDork
10/23/23 8:13 a.m.

I wonder if our hosts would be interested in writing about the tunnel testing enough to help cover some of the cost.

maschinenbau
maschinenbau UberDork
10/31/23 2:06 p.m.

I've been reading through the early parts of your build regarding the roll cage design and tube selection, and looking to do something very similar with the Free Europa. Like you, I want something actually safe, NHRA legal for the Challenge, and legal for any time trial/time attack event with SCCA/NASA/Gridlife. So, probably a 2x2 floor with 1.625 x .120 mild steel cage tubing (or thinner wall chromoly if I can find a deal like you did). 

Is there anything you would do differently with regards to cage and chassis construction, now that you've won the Challenge and been doing time trials?

nocones
nocones PowerDork
11/1/23 10:27 a.m.

In reply to maschinenbau :

I shared som thoughts on your thread but thought I would answer your question here directly.

The big change I would make would be the side impact beams.  I went "by the book" for what NHRA cage specs say.   I would of preferred a "FIA" style joined tube X since NASCAR style beams would not likely work well in my application.   NHRA doesn't officially allow the FIA type, however NASCAR type are fairly common, so I think provided the tube sizes met specs that I would of been hassled at all for the FIA style tubes.  IF I was fast enough that I needed any kind of certified NHRA cage I would of contacted a regional tech inspector and worked it out with them.  Since my car was and always will be slow enough that the cage doesn't need certified I should of built it exactly for what I wanted it to be long term.  

Eventually one winter I will cut out the side impact bars, and convert it to use a FIA downtube and FIA style door bars and add a roof diagonal.  I will also add the Gussets and Corner Tubes required to upgrade the cage to full FIA specs which would make it legal everywhere including places like pikes peak.  That may result in it being no longer "legal" for NHRA but the car will likely never go down a strip again.  

Other then that I am pretty satisfied with the chassis design.   Welding tabs and additions to mine is made a little more complicated because I have to remember to TIG any time I am welding on the Cage when it would just be so easy to MIG things but such is 4130 life.  

nocones
nocones PowerDork
11/10/23 6:32 p.m.

 I may be on a break with this but that doesn't mean others aren't hard at work doing stuff with it.

Gridlife shot some video during the Autobahn event and apparently that video drops Tomorrow at 9am CST.

https://www.instagram.com/reel/CzebIYVRD_t/?utm_source=ig_web_button_share_sheet&igshid=MzRlODBiNWFlZA==

The Hype reel is a pretty awesome.  IIRC correctly the words before the clip where "Started out as a $2000 challenge car and" evolved a little since then.  

Always nervous and excited to see what I sound like on video.

You'll need to log in to post.

Our Preferred Partners
xnQArfsEeaf7TytdVDIJzIJCbeEUBNEuumVdJWmdeY6jCbPG8ELEeDIG51Um1Lrk