5 6 7
dps214
dps214 SuperDork
4/10/25 2:12 p.m.

Next up, some brake maintenance. It's been on my radar for a while that the front caliper piston boots were cooked, but in replacing the rear rotors last year I noticed the rear boots were starting to be rough too, so I figured it was finally time. I replaced them with mild upgrade girodisc parts, hopefully these handle heat a bit better. I bought the whole rebuild kit (partially because the seals can't be bought separately) but really didn't want to do a full rebuild do I decided not to unless there was some signs of the seals being bad. As I pulled everything apart there wasn't any signs of leakage and all the pistons moved fairly freely, so I went ahead with just replacing the boots. Looking at the calipers more closely there's some signs they've been serviced in some capacity before, which made me feel better about that decision.

Front boots from one side, the other side might have actually been worse:

And all the rears, not as bad but not great:

Since the rear calipers are top-load and I didn't convert them to caliper studs, I tried to leave them on the car. I managed to remove the old boots from one caliper this way, but it was quickly evident that installing the new ones wasn't going to work so I gave in and pulled the calipers which made it much easier.

Here's a front caliper with new seals. The seal fit into the caliper wasn't super tight so I let them sit overnight with the pistons extended to check that they stayed seated.

The current fluid has been in there for three years I think. It hasn't really shown any signs of deterioration but I don't love it and want to try something different. I happened across a good deal on SRF so I'm going to give that a try. I uh...haven't actually gotten around to that step yet even now like a month later.

dps214
dps214 SuperDork
4/10/25 4:25 p.m.

The last bit of maintenance for now was spark plugs, something I'd been dreading for a while. If I was smart I would have done this last spring while the exhaust was off, but I'm not always that smart. With some creative use of extensions, swivel joints, and swivel spark plug sockets, the job ended up really not being that bad. While worse than the exhaust being completely out of the way, I think the headers did create a bit more room to work with than the stock manifolds did. Really the middle plug on either side ended up being the most annoying, needing two long exnenstions and two swivel joints to reach and have decent throw on the ratchet. No photos because there's not much to take photos of and most everything is in tight quarters, but here's my organization and tracking of which plugs have been replaced.

I knew the coils had been replaced when the plugs were last replaced, and they all looked basically new other than being a bit dirty externally when I pulled them out.

I have a new pair of air filters waiting to go in, and at some point the serpentine belt is going to need to be replaced, but that job looks like a pain and the belt looks to still be in okay condition so I'm not in too much of a hurry.

docwyte
docwyte UltimaDork
4/10/25 6:24 p.m.

I need to replace the caliper piston boots on my front calipers too.  Been sitting on a rebuild kit for awhile.  Did you just pull out the old seals and pop in new ones?

dps214
dps214 SuperDork
4/10/25 10:55 p.m.

Yep. The pistons need to be extended a bit to access the groove to pull the boots off, but otherwise it's very straightforward.

Small update: I finally had motivation to start the air filter replacement process tonight. i don't know what the replacement interval is supposed to be, but uh it looks like 40k miles is too long.

New filter, for reference:

One downside to mid/rear engine cars is that the engine bays are really good at collecting road debris. Probably part of the reason why 911s generally draw air from the decklid as much as possible versus the sides or bottom of the car. Inside the intact duct (pre-filter) was some general dirt, along with several leaves and a chunk of tire rubber. So yeah those mesh inserts were a good idea.

I vacuumed that out as best I could, cleaned and lubed the filter housing o-rings, and installed the new filter. The other side is a bit harder to get to, requiring moving the DME out of the way. That's a job for tomorrow night.

loosecannon
loosecannon UltraDork
4/11/25 9:12 a.m.

I am a huge fan of these cars (had and autocrossed a 986 for years) and am also a fan of cars that do it all, which is what I built my Camaro for. I'll pass on some things I learned. The driveshaft bolts on the drivers side tend to come loose, make sure you loctite those things. Also, at autocross the weakness is the lack of limited slip diff and the answer is to put a GT3 sway bar on the front, which plants the rear tires and then put the biggest front tires you can fit to combat understeer. Suncoast Porsche has a complete M030 suspension package (if your car doesn't have it) for these cars that is all Porsche part numbers and legal for AStreet competition, and affordable. It lowers the car and adds stiffer sway bars and better damping. I'm sure you have realized this already but fuel level has big effect on handling balance and can be used to your advantage. The exhaust is very heavy and surprisingly, straight pipes after the cats will still be quiet enough to make sound(at least our car was). If you loosen all the suspension bolts and suck the car down onto the bump stops and tighten the bolts back up, the car will ride lower. Max out the front camber then take what ever that number is and add 1 degree of negative camber to rear. Example, if all you can get is -.6 in the front, make the rear -1.6. You don't need toe in front or rear but adjust these to taste. We ran zero front and rear but it does make a little wandery on the street. We had the quickest Boxster at Nationals when we competed so the set up worked.

dps214
dps214 SuperDork
4/11/25 1:16 p.m.

Winter work the final part: some actual upgrades!

I finally decided ~2.5* front camber just isn't cutting it and gave in and ordered some camber plates. The secondary benefit is being able to suck the whole wheel/tire inboard, creating better wheel/tire clearance.

The nice part about these vorshlag plates is that the upper spring seat articulates on the spherical bearing. With the base ohlins setup using the stock upper mounts the only thing that absorbs angular misalignment of the spring is a 2mm thick rubber spring pad and the strut tower, which I never loved. Having properly articulating upper mounts made me feel better about the reduced isolation of damper forces from the strut towers.

The less nice part about the vorshlag plates is that they're designed to reduce caster slightly. I'm not exactly sure I want that, and having the strut offset towards the front of the tower opening makes for some clearance/adjustment issues especially with the tower reinforcement brackets. It also moves the wheel forward in the fender opening which I also don't love aesthetically or for tire clearance at large steering angles. So the first thing I did was disassemble one camber plate and create a CAD model of the baseplate so I can get my own made with whatever caster offset I want in the future if needed. For now they're going in as delivered and we'll see how it goes.

Of course like my modifications to the ohlins, these aren't quite a direct fit with the nonstandard spring setup I'm using. The upper spring seat actually lands within 2mm of the existing setup, so despite needing to modify some shiny new camber plate parts I'll come out not needing to move the other spring perches at all. The primary modification needed is shortening the piece that the strut rod sits on to get the travel correct. I forgot to take a before photo but here's the after; the before was this, but about 18mm taller. Only the slightly larger diameter part press fits into the upper spring seat, so there's no functional impact.

And for better understanding, the spring seat with that piece installed.

The ohlins are an inverted monotube design, the top of the "rod" (which is actually the man damper body) necks down at the top to a normal strut rod shape. The ohlins setup uses a spacer to make the right total length with stock upper mounts, this piece basically replaces that spacer and then seats into the spherical bearing.

As is maybe visible in the spring seat photo, the necked down part of the strut actually nests into the bearing ID a bit. Clearance is tight but it does clear.

And there's (barely) enough room for the dust cover. Fully assembled it looks like it was intended to be this way:

And one final modification: because of the significant shortening of that spacer/adapter piece, the collar nut is a little bit too long and would have bottomed out on the end of the threads before tightening. I solved that by removing a few mm of thread from the end, leaving the collar functionality. Before and after:

After install there's a slightly comical amount of thread sticking out the top, but the total height from the strut tower isn't any more than with stock upper mounts, so no trouble there. I ended up adding the normal nuts on top just to be safe.

And installed to the car:

While I was in there with the suspension mostly apart I figured it was a good time to swap in the matching low mileage right steering knuckle to go with the left side that I replaced a year or two ago. This bearing doesn't feel quite as crispy new as the left side but it's definitely nicer than the one it's replacing. I installed the leftover pair of new caliper studs and cleaned it all up:

And here's the right front corner looking very empty, waiting for parts to be reinstalled:

Also while I had everything apart, that tie rod end was looking particularly crusty and the ball joint feeling a bit soft. I had a lightly used one with a super nice feeling ball joint sitting around so I decided to swap that in. Old versus new(er):

And the final upgrade, hinted at earlier: when I swapped back to the X73 front swaybar I used stock endlinks for simplicity. The stock bars on these cars have odd, basically L shaped ends that drop the lower end of the endlink super low, like below the nottom of the control arm. I learned the hard way that the link/bar end make contact with the inner lip of the autocross wheels at full lock. Not a huge deal but enough of an annoyance to investigate shorter links. The adjustable links from the GT3 bar were too short for comfort even set as long as I felt confident with. So I did some measuring, contacted tarett, and was able to get some longer link bodies for a surprisingly reasonable price. Here's the GT3 bar link, the new body version, and the stock link.

So the new setup is basically splitting the difference between the two other options. With the mid-length links installed, wheel clearance should be a non-issue, and the swaybar arm angle is actually probably a bit closer to horizontal which is a nice bonus.

Put everything back together and did my best at setting camber back to what it was and the tie rod length correctly so that I could drive to do an alignment without dying or wrecking the front tires. Turns out I way missed on total toe and it was something like a quarter inch off, but the steering wheel was straighter than some purposeful alignments I've done. I also loosened the left tie rod end and moved it through a bit of travel to make sure I wouldn't run into any issues during the alignment process so I guess i missed equally on resetting both sides.

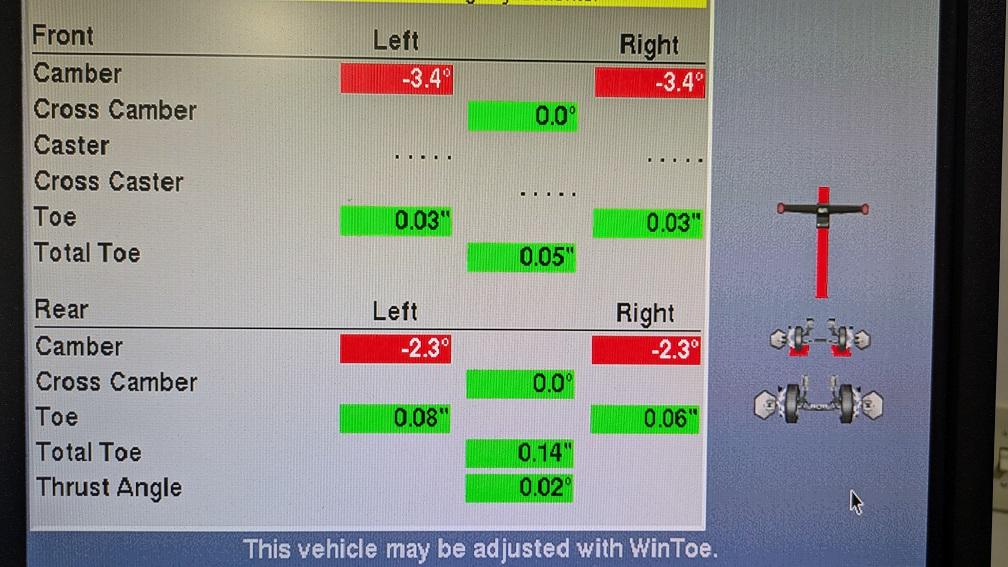
After a bit of effort to get everything even, this is the alignment I ended up with. I also changed from slight toe out to slight toe in in the hopes of not being too hard on the tires with the extra camber.

In the alignment process I also pulled 3mm of spacer out of the control arms, to move the whole wheel/tire assembly inboard. Fitment looks better, the autocross wheels look kind of natural in there and I had to move from 7mm to 10mm spacers on the street wheels to not be too sunk in. So naturally now I'm contemplating moving up to 10" wide autocross wheels. I'm guessing I'll end up making some further adjustments once I get some time on this setup but this seems like a good, if maybe a touch aggressive, starting point.

So the car is back together and driving now, waiting for good weather and/or the first event of the season. Initial assessment is that there's shockingly little NVH impact from the camber plates. I had softened the front struts a click just to be safe, I'll probably undo that now. I finally remembered to take a photo as the car sits now; the low light was nice because it hides that the car is actually fairly filthy laugh

dps214
dps214 SuperDork
4/25/25 2:05 p.m.

Well I guess I can say this thing has officially done "everything" as it's now done a rallycross event...technically. This was a tarmac rallycross event at milan dragway, so basically an autocross on a slightly worse than normal surface using rallycross classing and scoring, but it still counts. It was a good test of the camber plates, if they survived that abuse they should tolerate just about anything. And the car did a 5hr round trip to michigan and the event without any issues, so that's always nice. It ended up raining the morning of the event and that doesn't mix well with dead tires and a narrow course, so I spent the morning wet session doing mediocre times and knocking down the course in the process. In the afternoon session it dried up and I was second fastest of everyone on single run time and had the fastest cumulative time of everyone which managed to salvage a relatively close third in class.

The night before, cleaned and waxed thoroughly, probably the nicest it's going to look all season especially after approaching double digit cone hits at this event.

At the event:

And upon arriving home I found this on the right front tire...I don't think I can blame my performance on this entirely but it certainly wasn't helping. Time to give in and mount the new tires.

5 6 7

You'll need to log in to post.

Our Preferred Partners
sYTGMnsUQO7TpBI91JtTzPiI3tvChCXEAzPiBmrk7tYHO7qzUXmQBYxpjdfzONTf