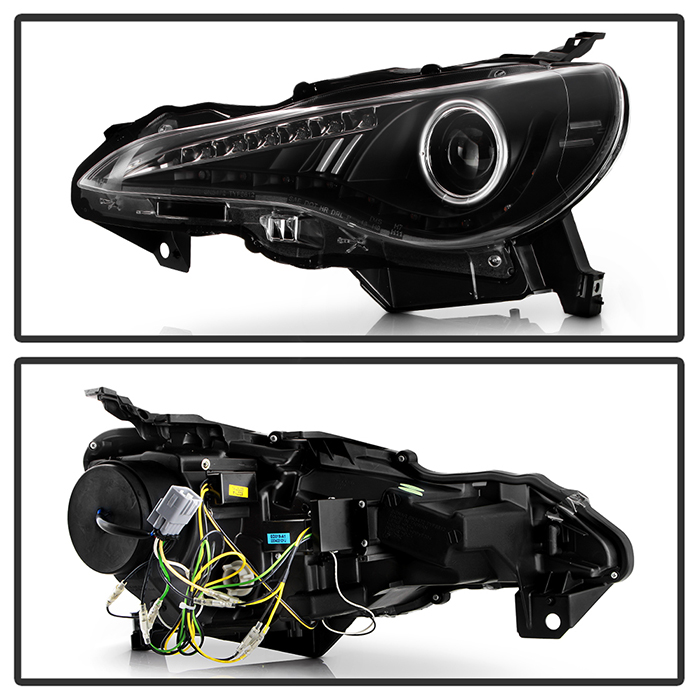
I'm fixing up a headlight like this one that got some crash damage:

An idea of what the rear looks like from this similar aftermarket headlight:

The two big problems (other than a cracked lens) are:
1. The tab on the outside at the top is cracked off, it's a very clean break, in fact it kind of holds itself together if I perch it back on.
2. All of the lower mounting tabs have some cracks, fairly clean breaks but not perfect.
What's the best approach? I was thinking epoxy glue but should I consider plastic welding? Replacement headlights typically start around $250 used or $650 new, I can get an aftermarket replacement lens for about $60 and install that myself so I'm hoping to make this headlight usable for under $100.
For some reason I seem to get plastic repair videos in my YouTube. The hot ticket seems to be plastic welding with wire (like screen door mesh), or steel wool as a reinforcer. Epoxy is nice, but it really does not take any twisting stress (at the joint).
Just look up plastic repair on YouTube. Lots of videos. It seems like zip ties are the preferred cheap source of the plastic. No need to buy a kit, they show you how to make a "paste" out of the zip ties, or you can just melt them with a soldering iron.
Yep, if its not visible, use a soldering iron and some scrap plastic. Probably want to do it outdoors or with a fan nearby because those fumes are some nasty E36 M3.
If you have a 3d printer and a roll of ABS, just feed filament to the iron and you have yourself a plastic TIG welder. If you do it often, different shaped tips are helpful.
The damage youve described is pretty much a perfect use case for this.
Some cars, I know Toyota is one and there are many others, sell a mounting tab repair kit. On the Toyotas there are two or three molded-in mounting points next to the OE tab that are made for self-tapping screws to attach the replacement repair tab. Search "mounting tab repair kit (car name)". They are sold so that a minor bump that only breaks the mounting tab does not require a whole lamp assembly.
There's no mounting tab repair kit for 2017-2020 Toyobarus unfortunately, there are some aftermarket kits for the earlier models but those have a slightly different headlight shape from what I can find.
Update: Trying to get moving on this soon, the headlight has a handy material sheet on the back but I'm not sure if the mounting tabs are "housing" or "bracket" or maybe even "extension":

I also noticed that a headlight that I thought was undamaged has one tab snapped clean off (the one near the pointy end) that I'll need to replace with either some sheet material or by making a replacement out of metal and then screwing or bonding it to the plastic.
I'm wondering if "bracket" could be referring to a completely separate part, this piece that goes around the headlight:

One last bump before I pick up some polypropylene filler rods from the local Princess Auto and see how they work...
I've had 100% success with permatex plastic weld. It smells exactly like whatever epoxy dentists use for fillings. But man does it work well. I've used it on black plastic brackets as well as motorcycle plastics and it's been great.
I tried plastic welding first with the polypropylene filler rod and it was a success, the welds aren't pretty but the mounts seem as strong as they ever were. I found that a big piece of the pointy-end lower mount was missing on the passenger-side headlight as well, so I just need to get some 2mm PP sheet to patch that up on both sides.
Most noticeable difference is that the top outer mount is reattached:

Pointy end mounts left to fix:

I got a scrap of polypropylene sheet of the right thickness from a nearby plastics supplier. First step to patching up the right-side headlight's pointy-end mount was cutting out a piece of roughly the right shape:

Welded in:

I also did some welding on the polycarbonate lens which was much easier to work on. I think I'll try to just patch up the lens instead of removing and replacing it, the cracked area will be just about entirely hidden so I'd only need to worry about keeping moisture out. Next thing to do is to replace the left side headlight's completely missing pointy-end mount.
Finished up and dropped off at the shop. I used a loose shard of Lexan as a filler rod to patch or at least terminate the cracks in the lenses as best I could, then sealed over them with aluminum tape or clear nail polish where the cracks could be visible:

Completed pointy-end mounts:

The damage on the passenger-side headlight will be pretty much completely hidden once installed:

Looks good! Nice job with the welding rod!
I've also had good luck with "plastic weld" as well as welding plastic, I don' t know that using the solvent would have been any better here..


