1 2 3 4
NOHOME
NOHOME SuperDork
6/24/14 3:53 p.m.
ssswitch wrote: My hat is off to you. As soon as someone handed me a hand-built Ferrari and then went "okay, go cut into it" I'd be sweating bullets.

I in no way mean to detract from the excellent work that Ditchdigger is doing here, but there is an irony...

If you can get your head past the concept that you are working on a "Ferrari", you will notice that the panels are straightforward as far as metal-shaping is concerned. As Mr Digger points out..he is using basic tools for the sheet-metal.

If anything, what this thread illustrates is the very low standard of work you can expect from a production body-shop such as as the one(s) who did the previous work on this car.

MichaelYount
MichaelYount Reader
6/24/14 4:05 p.m.

Following along - got a buddy with a 250 GTE 2+2, thankfully in better shape than this one.

ssswitch
ssswitch Reader
6/24/14 5:06 p.m.

In reply to NOHOME: Obviously the previous bodyshop just kept going through their panelbeaters until they found someone cocky enough to not be nervous about cutting up a Ferrari.

But yeah, I've heard stories about the factory quality of Italian bodywork. I guess there's no problem they couldn't solve with lead filler.

MichaelYount
MichaelYount Reader
6/25/14 6:15 a.m.

Back then, Pininfarina was doing the bodywork for these Ferraris. They were each essentially hand built -- no two are exactly the same when it comes to fitment of exterior and interior panels. With panels that were essentially hand built, just as this restorer is doing, even new, the cars took lots of 'adjustments' and a skim coat to come out looking nice. Most restored cars come out looking MUCH better than anything new did back in the day.

Here's some more shots of the restoration --- http://www.sportscarshop.com/restorations/ferrari-250gte-restoration/

Kenny_McCormic
Kenny_McCormic PowerDork
8/11/14 12:17 a.m.

Update?

gamby
gamby UltimaDork
8/11/14 12:18 p.m.

Boy, this is fantastic!!!

I can't even imagine the final bill on it, but for a car of that caliber, it's worth it.

You have an incredible job and do amazing work, Ditchdigger.

Ditchdigger
Ditchdigger UltraDork
8/11/14 2:27 p.m.

I forgot about this thread. I need to skim through it to see where I left off and then dig through the 10GB of photos and load up some choice ones to photobucket and start it up again. Gimme a day or two.

dyintorace
dyintorace UberDork
8/11/14 2:41 p.m.

I can't believe I missed this thread the first time. Wow! How incredibly impressive. I'll echo other's comment regarding your mad skillz Ditchdigger!!

wheelsmithy
wheelsmithy Reader
8/11/14 3:03 p.m.
Ditchdigger wrote: Nohome nailed it. What you are describing is the type of welding blacksmiths do and I have never seen that done on auto sheet metal. It is possible they are both called the same thing. I got a brief course in what I do from a 79 year old guy who was a sheet metal worker in the late 50's and 60's. Very time consuming, labor intensive and LOUD. Wear earplugs because you don't have time to switch from your welding hood to earmuffs. I do a quarter inch weld and immediately back it up with a dolly and start planishing. It only takes a few seconds for each bit but the constant switching really drags the process out.
NOHOME said: Note that the common advice of "go slow and don't let the heat build up" has no effect on this phenomena. This is issue with shrinkage of the weld bead itself. It is often stated that only gas or TIG welds can be hammer welded, but it is not true. Just use the correct wire.
Exactly! It is physics. At 2000F. That metal you added is a lot different size than when it gets to room temperature. Going slow and tacking all over doesn't change that.

Forge welding=easy. Work in this thread=Amazing

conesare2seconds
conesare2seconds HalfDork
8/11/14 4:40 p.m.

When I was a kid, a friend's dad had one of these briefly and took us for a ride in it once, which was quite a thrill. I think the ride was a reward for my expression of shock upon his opening the hood that a car could have 3 carburetors [edited keypad typo], a revelation to me at the time. The dad was a retired racer who I later saw write a well-informed letter to the editor of Road & Track regarding their retrospective on racing the GT-40s (his take: beautiful, but troubled, cars). He found rust in the trunk of the Ferrari and sold it because repair would affect originality, his highest consideration. I wondered at the time if he shouldn't have kept it, but an Aston DB5 looking straight out of Thunderball took its place, so I suppose he did well in the subsequent run-up years regardless.

MichaelYount
MichaelYount Reader
8/11/14 4:53 p.m.

Those kinds of memories are priceless. These particular models only had 3 carbs -- but with 12 cylinders, who's counting carbs? LOL

Back in '85, my friend took possession of his from his father-in-law and it hadn't run in 11 years as I recall. Over the course of a few months we worked on the various fluid systems and electrical components. And around midnight one Sat. night - that V12 came to life in his single car garage. 11 years worth of smoke/debris -- but the more we drove it over the following month, the better it ran and the more electrical stuff just started working. Sounds weird, but that's the way it was. And once it started running decent, man the sound of that thing....it was worth the wait.

Ditchdigger
Ditchdigger UltraDork
8/11/14 8:36 p.m.

OK. So we left off with the floors, quarters and trunk repaired. At that point we sent it off for paint and body. They did an excellent job massaging any flaws out of the sheet metal. Up front they started pulling it back into shape from some vintage repairs made in its homeland. It had clearly taken a hit to the passenger front fender at some point in its life. After making all the sheet metal symmetrical they realized the egg crate grill no longer fit. Some inspection revealed it had been modified to fit the bent bodywork. We opted to send the whole car up to A&M Deluxe customs where they hand fabricated a whole new grill and surround to fit the now perfect bodywork.

 photo grill3_zpsb2b09d78.jpg

 photo grill6_zps937d2727.jpg

And then the car disappeared again while it got its final paint.

 photo IMG_4879_zpsaf8df3aa.jpg

 photo IMG_4872_zps16657c71.jpg

I was pretty rushed to make it a roller. We had an open house the next weekend so I got to it.

There is an absurd amount of preload to the rear springs. So much that I had to build a jig to open them up enough to mount them.

 photo IMG_4965_zps8a9f2bf1.jpg

We respect potential energy. This was treated like a bomb.

little comparison of on and free arches

 photo IMG_4968_zpsf379030c.jpg

It was one of those jobs that took 2 hours to do one side and 20 minutes for the other. Once you had the order of assembly it went pretty smoothly.

Notice that it is a leaf sprung four link suspension? Shackles on each side of the springs let them float but the four links hold it in place. Strange, evolutionary and cool.

Looks like I forgot photos of the front suspension. I will get some later. It is cool and strange. A gimbled spring mount and solid bushings everywhere. No rubber whatsoever.

I spent some time in the bay installing steering and brakes

 photo IMG_0911_zps243dade0.jpg

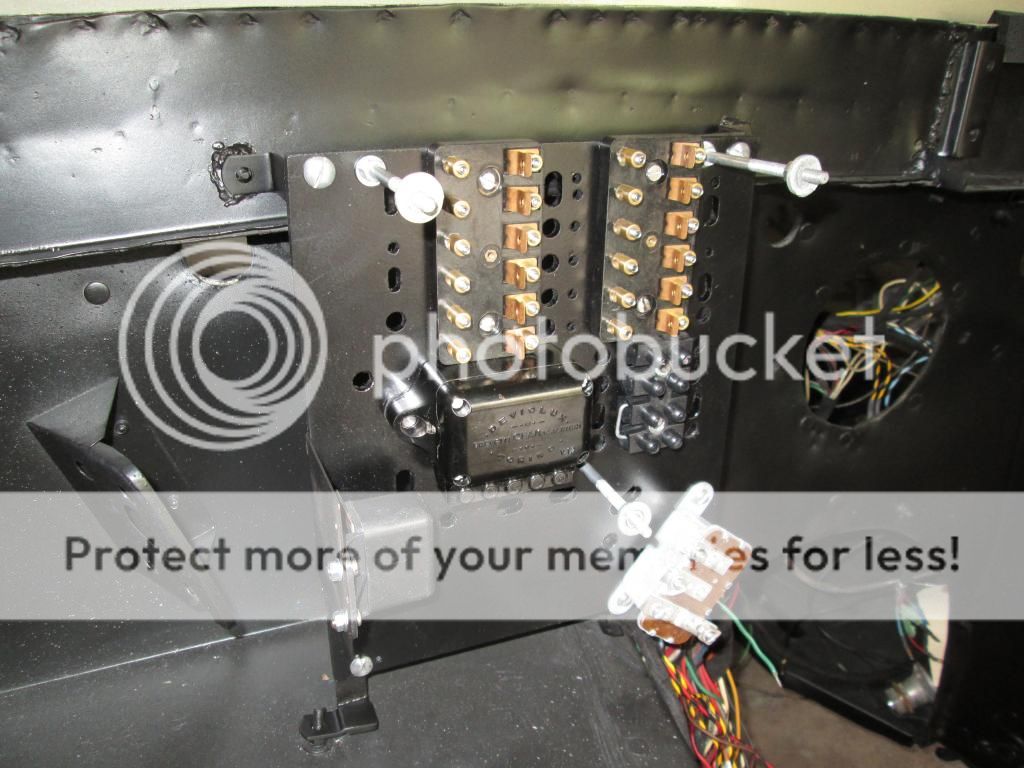
And then the nightmare started. Sadly I was not the person who removed the fuse panel. The person who did has a more cavalier attitude than I.

I remember seeing this

 photo IMG_1264_zps93671230.jpg

note the GM voltage regulator scabbed in. There was a matching alternator on "farm implement style" brackets

But when I got to it I found this

 photo IMG_1283_zps722cb0c4.jpg

The harness was stripped, repaired, rewrapped and reinstalled. The fuse panel was a piece of masonite and the extra holes were considered unwanted. I made a new one out of modern fire resistant board.

 photo IMG_0769_zps529c141b.jpg

and slotted it in

 photo IMG_0771_zpsb029a6b9.jpg

I was missing one of the thumb wheels that hold the fuse panel cover on so I duplicated one in brass and sent it off to be chromed.

 photo IMG_0767_zps33d09d67.jpg

5 days of comparing photos, blurry handwritten diagrams from the 60's and a lot of tracing wires and I had 75% of it hooked up. Then I could do one thing.

 photo IMG_5195_zps9eb15623.jpg

Ok more later.

Thanks for the interest guys. I am also working on other cars of possible interest. Should I toss updates and teasers into this thread or start a work thread? I am building an MGA Coupe for SOVREN vintage racing, restoring a 1959 Abarth Allemano spider, building a twinspark powered, quaiffe sequential six speed, ITB'd, AEM ecu'ed Alfa Romeo GTaM, ect..

Yeah. Dream job.

Woody
Woody MegaDork
8/11/14 9:19 p.m.

Thank you.

dj06482
dj06482 Dork
8/11/14 10:14 p.m.

I missed this thread the first time around, but after reading it tonight it's one of my favorite. Thanks for sharing, you are an amazing craftsman!

Kenny_McCormic
Kenny_McCormic PowerDork
8/11/14 10:24 p.m.

If I kill you, do I gain your job?

gamby
gamby UltimaDork
8/12/14 12:33 a.m.

This thread is nuts. Definitely up there with one of my favorites ever.

That wiring is terrifying and the 4-link leaf spring setup is fascinating.

This is all too cool for words.

NOHOME
NOHOME SuperDork
8/12/14 6:10 a.m.

Love these updates and the peek into the well healed side of the hobby. Reminds me of when I worked for a shop that did performance offshore boat building and maintenance. Quality and Kool ruled over budget and I got to do neat stuff.

Please post the other builds in any format you want, I will look forward to them.

chandlerGTi
chandlerGTi SuperDork
8/12/14 9:25 a.m.

It would be cool to have a "work build thread" since you see some fantastic machinery and are able to take an active role in their rebirth. We will live vicariously through you.

Mezzanine
Mezzanine Reader
8/12/14 10:04 a.m.
Ditchdigger wrote: Thanks for the interest guys. I am also working on other cars of possible interest. Should I toss updates and teasers into this thread or start a work thread? I am building an MGA Coupe for SOVREN vintage racing, restoring a 1959 Abarth Allemano spider, building a twinspark powered, quaiffe sequential six speed, ITB'd, AEM ecu'ed Alfa Romeo GTaM, ect..

Dude. I would love to hear more about the Alfa and the Abarth. The MGA isn't really my thing, but I'd love to hear more about that too. Threads like this are very educational for someone like me who has lots of tools and a little experience, and someone looking to take their skills a bit higher. Pretty please post more/other projects!

Sky_Render
Sky_Render Dork
8/12/14 3:02 p.m.

I am in awe of that car, your job, and--most of all--your fabrication skills.

dyintorace
dyintorace UberDork
8/12/14 4:38 p.m.

This thread is so cool that I vote you start a new one for each project. Thanks for sharing with us!

Harvey
Harvey Reader
8/12/14 5:01 p.m.

Real cool.

thepope540
thepope540 New Reader
8/12/14 6:53 p.m.

Subscribed!

Ditchdigger
Ditchdigger UltraDork
8/17/14 7:43 p.m.

Random repairs and recreations

The electric fuel pump is an old points style.

I received the kit and went to work.

 photo IMG_5213_zps0665e296.jpg

Tear down. Bugger! the phenolic block is broken. To the lathe and mill to replicate it in Delrin.

 photo IMG_5225_zpscdbcdeb1.jpg

 photo IMG_5223_zps51ae408b.jpg

This really is one of my favorite parts of this new career. All the detail work that no one will ever see.

The body was media blasted and refinished and the new diaphragm installed along with the remade insulator block.

 photo IMG_5226_zpse5e6d467.jpg

It bench tests OK. There are two fuel pumps on this car. The electric one out back by the tank and a mechanical unit on the motor. There is a large FISPA fuel filter near the electric pump and another FISPA filter/sediment bowl and pressure regulator unit under the hood. There is also a return line from the fuel rail for the three Webers back to the tank. The speedometer has an "autoflux" indicator lamp that tells you when the electric pump is on. I am assuming it is always on since it is just on switched power.

Whilst refurbing the fuse panel I took the opportunity to gut a vintage Fiat voltage regulator that was identical in appearance and install a modern transitorized piece inside.

 photo IMG_5194_zps5de0efb2.jpg

What folks don't know can't bother them and a little reliability never hurts.

Some of the hardware for the motor mounts was also AWOL so I set about remaking that from the pieces I had.

Lathe

 photo IMG_5198_zpsaf6f6e2e.jpg

 photo IMG_5197_zps805692fc.jpg

Originals and new

 photo IMG_5199_zps783dfcea.jpg

Black oxide coated

 photo IMG_5200_zpsb382a28d.jpg

I like it when I can hardly tell which is 50 years old and which I made.

Even silly things like the antenna need to be right. This old Autovox unit is something I swore was aftermarket but is factory installed. It had several feet of excess wire and cable bundled up next to it but that is just how it was done.

 photo IMG_0840_zpsa7ab227f.jpg

All the plastic insulators were broken

 photo IMG_0848_zps372046b2.jpg

Makin' new

 photo IMG_0850_zps5f1bccbc.jpg

 photo IMG_0851_zps63312451.jpg

And I am out of pictures again! Gah. I will upload more tomorrow.

Ian F
Ian F UltimaDork
8/17/14 8:39 p.m.

Great work! Thanks for posting!

1 2 3 4

You'll need to log in to post.

Our Preferred Partners
k11ScqrqyAiRsvgdQfhSXSLhPWFJSX7buzQ5oNRJ8mbokha5qvMxTsjEa1MRQTYn