
ahaidet
New Reader
5/21/15 8:56 a.m.
So it has been a few months since I updated and a lot has happened! I did some traveling for work and for pleasure and when I returned home it was time to make a serious push to get the car done for the coming spring/summer weather.
The Megasquirt ECU needed installed into the passenger foot well to replace the stock unit. This was fairly straight forward and went smoothly. The MS3 unit I have is plug and play. The only wiring that needed done was for the wide band O2 sensor. I forgot to snap pictures of the unit fully installed but I will get some soon when I go back in to make some changes.
Next I needed to seal up the cooling system with the re-route. This turned out to be a bit of a choir and still has some lingering issues. I should have read more info on carefully disconnecting the heater hoses from the heater core connections in the engine bay...  Both heater core pipes got a little mangled by me working the cooling hose pick tool around trying to free up the hose. This is a common mistake/problem. The trick is to be more gentle. At any rate there are a variety of options to fix this problem once you've created it. I tried a variety of options. First the drivers side hose was easy enough to massage back round and then I used two hose clamps to be sure it sealed (and it has so far stayed sealed) The passenger side required more attention. I tried sliding sockets down the ID to try and open it back up and remove the dents. This helped some. Finally I bought the following tool:

http://www.homedepot.com/p/HDX-Swaging-Tool-HDX053/204218595?N=5yc1vZc4g6
Which helped. I was concerned that it still wasnt perfectly round and that tightening a hose clamp would make it worse. So the last trick (short of replacing the heater core) is to insert 1/2" copper pipe into the inside to reinforce the heater core outlet. I drove it into the heater core outlet with light taps from a hammer and it fits remarkably well. I then tightened two hose clamps around it again. So far so good and no leaks from this portion of the cooling system.
I put silver heat resistant foil around both heater hoses because of their proximity to the turbo and exhaust manifold.
I also replaced the grommets that the heater core outlets pass through when they meet the firewall. This is a common failure point on older Miatas and is way easier to fix now with everything apart.
Next it was onto finishing the coolant re-route.
ahaidet
New Reader
5/21/15 9:15 a.m.
I am sure many of you are aware of the Miatas history on this forum. The Miata B series engine started life in a FWD chassis. When they installed it into the Miata chassis they wanted the motor set back as far as possible and as close to the firewall as possible. To do this Mazda re-routed the cooling system so both the inlet and outlet are at the front of the motor. Not an ideal arrangement for keeping the temperature even throughout the head and block. A very common modification is to re-route the coolant to the original FWD configuration. Which moves the thermostat to the back of the head. There are a variety of ways to do this. I used a BEGI thermostat spacer as I showed installing in a previous post and a GM radiator hose from AutoZone. Others that have used the same GM SUV hose can just run this hose all the way to the front and connect to the radiator. With the Flying Miata intercooler pipe this creates a territory dispute between these two hoses. So another Autozone hose to the rescue. (I can dig up the part numbers if anyone is interested but simply searching "Easy Coolant Reroute Miata" should find the info) With both hoses connected together, with a 1.25" union from Pegasus Autoracing, ran a little to close to the intake manifold and specifically the throttle body for my tastes. The hose clamps were scary close to the throttle cable and I really wasn't looking forward to a possible stuck throttle situation.

So I ordered a 17" straight aluminum pipe with beads rolled on each end from BEGI.

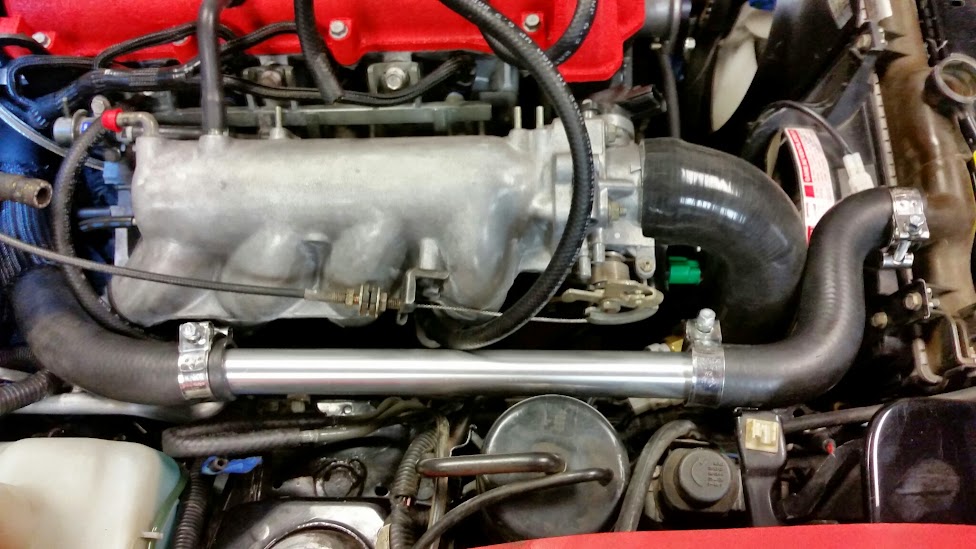
The aluminum pipe was both thinner and straighter than the GM rubber hose. I simply trimmed the excess hose off. This however created a new issue as where the hoses were now trimmed they were not perfectly round. At the time it seemed like a good idea to use T-bolt clamps from McMaster to really cinch down the hoses to help force them round.

Fast forward a month or so to me getting ready to start the car...
Looks great man, but replace that radiator if its not in the plans pronto! Being that brown im surprised it hasnt cracked with na heat, turbo heat sure will. Usually when the plactic turns colors to olive ish (yours is way past that) they are real brittle. Theres cheap all aluminum ebay ones that work just fine. Awesome build im very jealous. I too have a black 93, not nearly as clean as yours and still 1.6 but the le interior spruces her up a bit. Keep up the great work.
ahaidet
New Reader
5/21/15 9:58 a.m.

I always use a no-spill funnel to allow the system to bleed any air out.

I finished filling it and without even pressurizing the system found a leak shortly after...
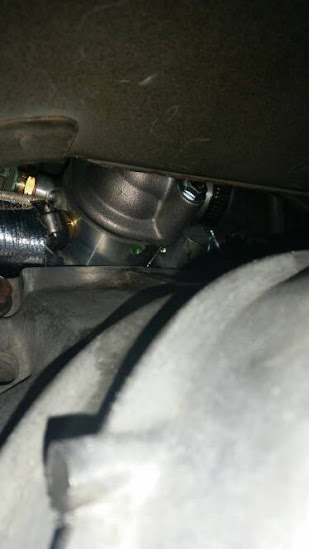
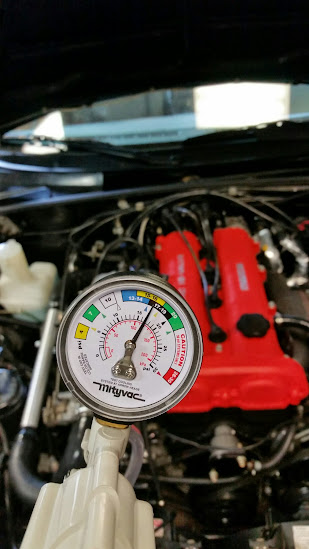
This photo was taken up through the transmission tunnel at the back of the head where the BEGI spacer is located. It was leaking from the NPT fitting that the heater hose connects to. After some investigating I found that the brass hose barb was bottoming out the NPT threads in the spacer. It was not sealing like a pipe thread is designed. I tried using extra teflon tape and had no luck. Finally I used some silicone sealant on the threads. I also contacted BEGI who is sending me a replacement spacer. I am not looking forward to replacing the spacer with the engine in the car but I do not trust the threads and silicone to stay sealed long term. The silicone has held well to allow further testing. Next I pressure tested the system. Using the following MityVac tool:
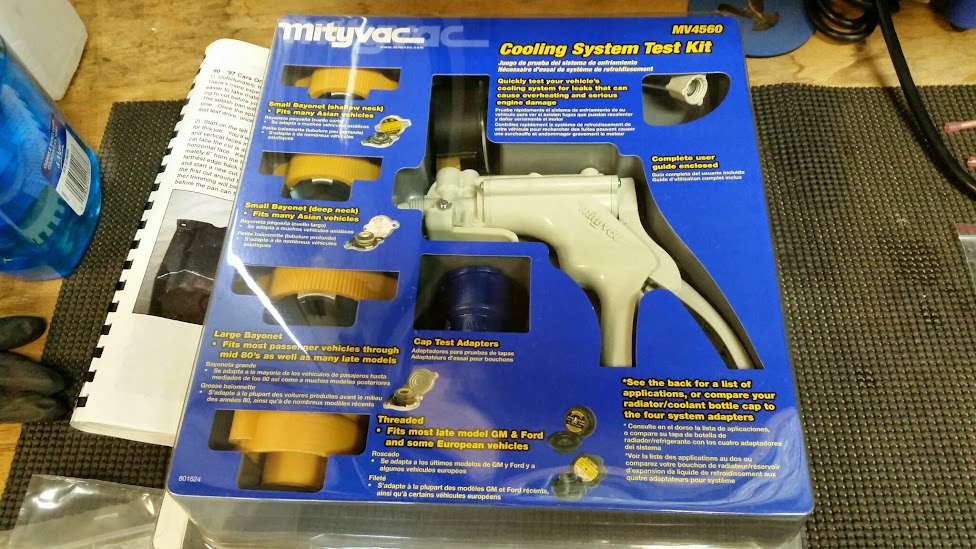
Autozone rents something similar for free but I like having this around to quickly use when needed.
I found another leak at the T-bolt clamps for the re-route.

I then went in search of a better hose clamp. The T-bolt clamps work well when the hose is round but were leaking under the section where the bolt is located. I found what I think is the ideal hose clamp for this situation. Gates Power Grip:

It basically is heat shrink tubing. They advertise it for use in situations where the hose or fitting may be out of round.
Slip the fittings half way over the rubber hose and half way over the aluminum pipe and use a heat gun to shrink the fitting.

Ultimately I think it makes for a much cleaner look.

It also seems to seal very well.
Only downside I have seen so far is the cost; about $5 for one in this size. They also are not re-usable and must be carefully cut off.
ahaidet
New Reader
5/21/15 10:06 a.m.
chiodos wrote:
Looks great man, but replace that radiator if its not in the plans pronto! Being that brown im surprised it hasnt cracked with na heat, turbo heat sure will. Usually when the plactic turns colors to olive ish (yours is way past that) they are real brittle. Theres cheap all aluminum ebay ones that work just fine. Awesome build im very jealous. I too have a black 93, not nearly as clean as yours and still 1.6 but the le interior spruces her up a bit. Keep up the great work.
It's funny you mention this.. and I wondered if I would get comments on the radiator. I have started the car and drove it and its running hot (215-230F) without getting into boost much. I think the radiator is the main culprit here and it looks like I will be ordering a radiator very soon. I like the engineering and testing that went into the FM crossflow unit but the price is a little tough to swallow. Koyo has a new Hyper V unit as well that looks promising at a lower price.
I suspect the Koyo isn't as capable as the FM unit however it is $200 cheaper.
The end goal is to be able to take the car to do track days a few times a year, Auto X maybe once a month, and still drive it to work on sunny summer days in Ohio. All while spending as little time laying under it fixing broken things.
I am open to suggestions/tips on which radiator to buy.
If you're going to be working the car hard, a couple of missed track days due to overheating will make up the cost difference between a good rad and a cheap rad pretty quickly. Getting heat out of the engine and into the coolant is easy, getting heat out of the coolant and into the air is the hard part.
As for those heater hoses - we recommend cutting them off. It's almost impossible to get them off without mangling the pipes, and they're not expensive. That comment's more for the peanut gallery than for ahaidet, as he's already dealt with it.
ahaidet
New Reader
5/21/15 10:54 a.m.
In reply to Keith Tanner:
As usual very wise advise from Keith... Thanks.
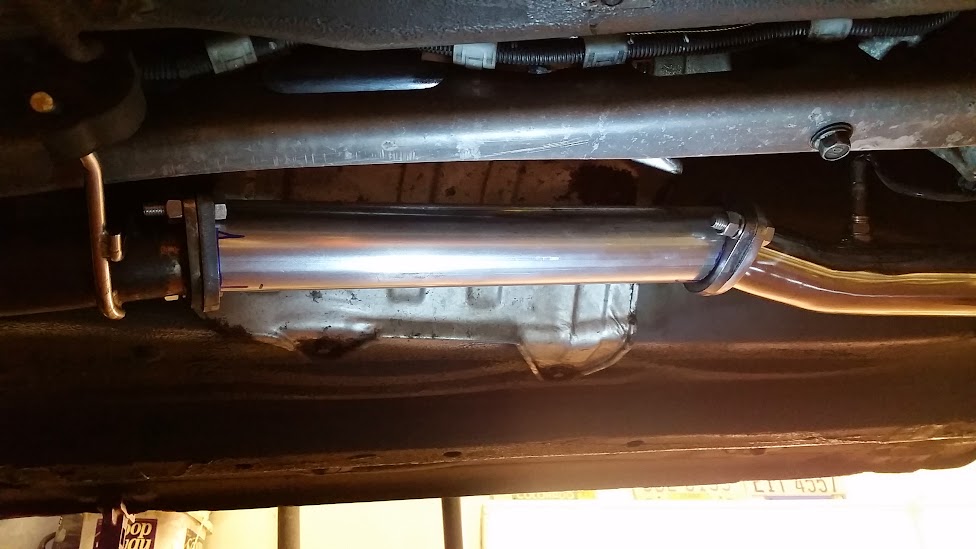
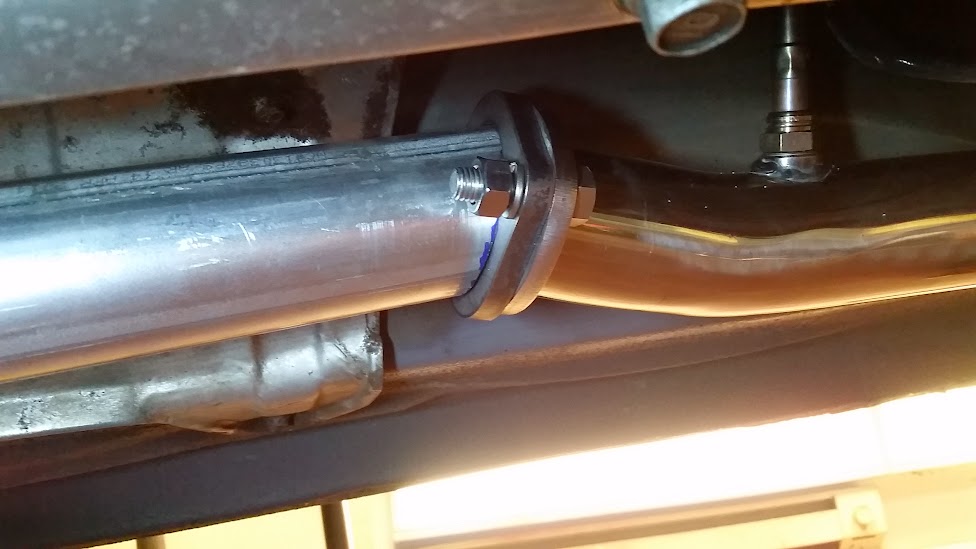
After the cooling system was finished (sorta). I needed to connect the FM downpipe to the old exhaust system a Goodwin Racing RoadsterSport. I had considered installing a catalytic converter but the car doesn't need to be emissions checked in my area. I still may install a CAT to cut back on the smell and to help the environment out but for the sake of getting the car running more quickly I decided to build a test pipe. The test pipe could also serve as the template needed to fab the pipes for a high flow cat down the road. The issue with the Miata CAT is that the flanges are at very akward angles in relation to the direction of the exhaust pipe. I know ideally I would bend the pipes to meet the flanges so that a straight cut could be made but this will do for now. I found steel flanges that would work at Summit Racing and picked up a piece of aluminized 2.5" pipe.
I wanted to figure out what angle to cut the pipe to meet the downpipe. Every method I thought of with involved a lot of trial and error with a grinder, a file and band saw. Then I had an idea...
I whipped up a model in CAD to make a tool for measuring the angle. I then 3d printed it in black ABS plastic and cut TIG welding wire to fit in the smaller holes.

The ID of the bigger circle is just a hair over 2.5"
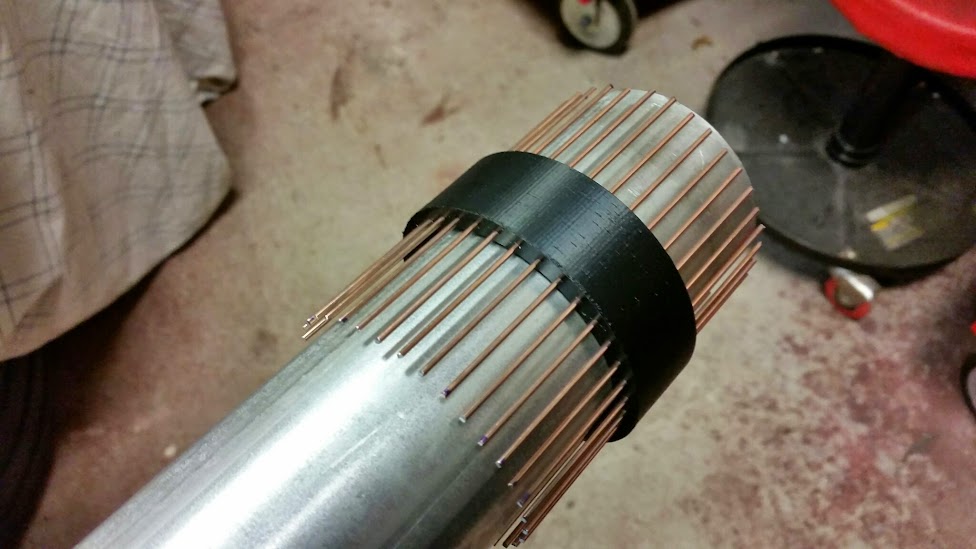
This allowed it to slide over the exhaust pipe. I came up with a few ideas to avoid having to cut a slightly short piece to figure out the first angle but instead just decided it was easier to sacrifice a short piece of cheap exhaust tubing.

This tool allowed me to transfer both cuts and cut them on my bandsaw and do a little finish work with the grinder.
To say I am pleased with the fit would be an understatement!
I had just purchased a TIG welder for a good deal over the winter. I have had only minimal experience TIG welding on the FSAE car in college. But have been practicing on scrap metal with a friend who is an excellent welder watching over my shoulder.
I wasn't confident I could tack weld the flanges to the pipe with the TIG while laying under the car so I used my MIG welder to run a few tacks to hold the pieces together.

I set the test pipe up on the work bench and began TIG welding the flanges to the pipe:
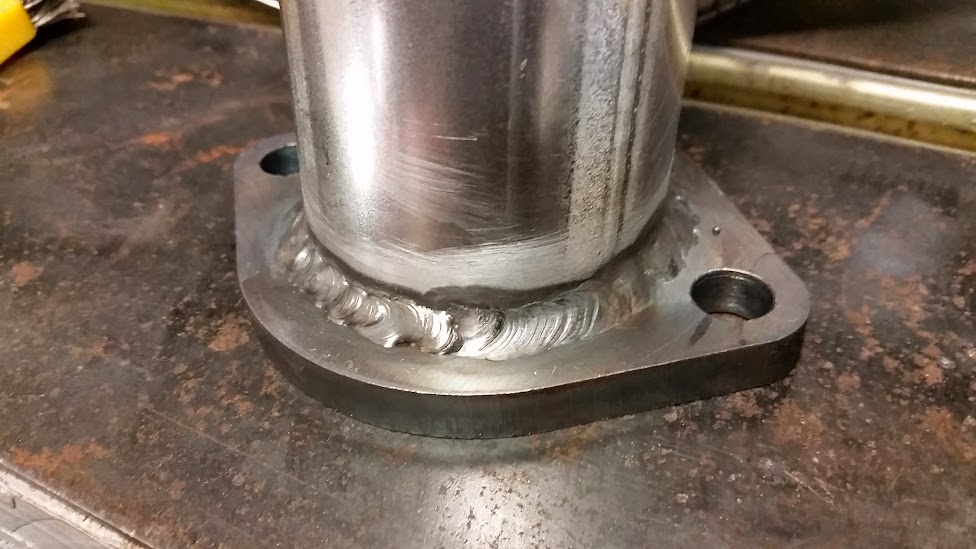
I feel pretty good about my first attempt to make a useful part with the TIG welder...


Still could use a little practice to make it pretty but I think it will hold.
The 1.6L engine that was removed is now for sale along with some of the other parts:
1.6L For Sale GRM Classified
This thread is long overdue for an update... replaced radiator with Flyin' Miata unit and car has been running happily for almost 3000 miles. I will post more pictures and details soon.
I thought this board mind find this photo interesting though:

For once I wasn't the smallest car in the parking deck!
I also have a variety of left over parts from the 1.6L for sale in the challenge forum:
GRM Forum Parts for Sale

calteg
HalfDork
11/17/15 11:13 a.m.
The miata turbo guys found an off-the-shelf hose (from a Tahoe?) that connects from the reroute neck to the radiator without the need for a pipe. Eliminates a few points of failure, and I think it's $7 or $8
That's the GM hose I started with and I couldn't get it to clear the throttle body and connect to the radiator without rubbing on the throttle cable linkage at the throttle body. I had visions of stuck throttles and decided to order the aluminum pipe which is smaller OD than the rubber hose and clears the TB. I am not sure if the reason I had issues with it fitting was because I was using the stock radiator when I was trying to connect to it or if something about the turbo kit and 1.8 swap was making it not work as well as I had hoped.
calteg
HalfDork
11/17/15 12:23 p.m.
Odd, I've got a 1.8L with the stock radiator and it works fine. No turbo (yet) though
The FM intercooler pipe interferes with the hose a good bit. That's the big reason I couldn't use the GM pipe without modification, now that I think about it.
Love the pipe angle replicator. :). If you make a few sizes and want to make a few bucks, let me know!
(Username at yahoo)
Want one? It's basically a contour gauge wrapped in a circle. Available from Pipemaster. Clever piece of work.
http://www.pipemastertools.com/viewall.html


