Ok guys, another somewhat filler post, but this time it's about bows. Right now is around mid-term essay time, and I'll tell ya, if you think college mid terms killed time, try going to graduate school. The one I handed in last week was only 5 pages (limited by the prompt) and it took 20+ hours, and I still think it sucked. and of course, they don't reduce coursework during the week they give you to write it. It's fine, I don't need to sleep. /endrant
Anyhoo, this post is about comparing my early attempts at bow making with a more recent "the more you know" version. Full disclosure, I don't have a chronograph, I haven't back to back shot these in any scientific comparative sense, but just use what I've posted before and you'll understand what's going on.
Remember this one:

I'm comparing that to the one piece oak bow from earlier in this thread.
Here's a shot of the 2 next to each other.

Sorry for all of the crap on the floor, it's the least crappy filled place in my basement (future mancave?) since I have yet to unpack everything after the move a couple months ago. You should notice a couple things. Both bows have similar dimensions. Both are from 1x2x6' boards from Home Depot, one is maple, one is oak. The center 2' of the board is left the full 1.5" wide, then straight tapers cut to the tips. The last 6" or so of the tips remained stiff and were narrowed later. Both bows bend in the handle slightly. The tiller looks similar at full draw, though the maple one has gotten slightly off balance through the years. Also, I was a noob when I made it, so it probably wasn't perfectly spot on when new.
You'll also notice the oak bow (the one I just made a page or 2 ago) is still unfinished looking, and still has the paper tower handle I used while shooting it in. Yeah, I haven't had time to finish it, but functionally it is complete. Both bows are roughly the same draw weight, have similar amounts of set, and so on.
Here's a tip width comparison:
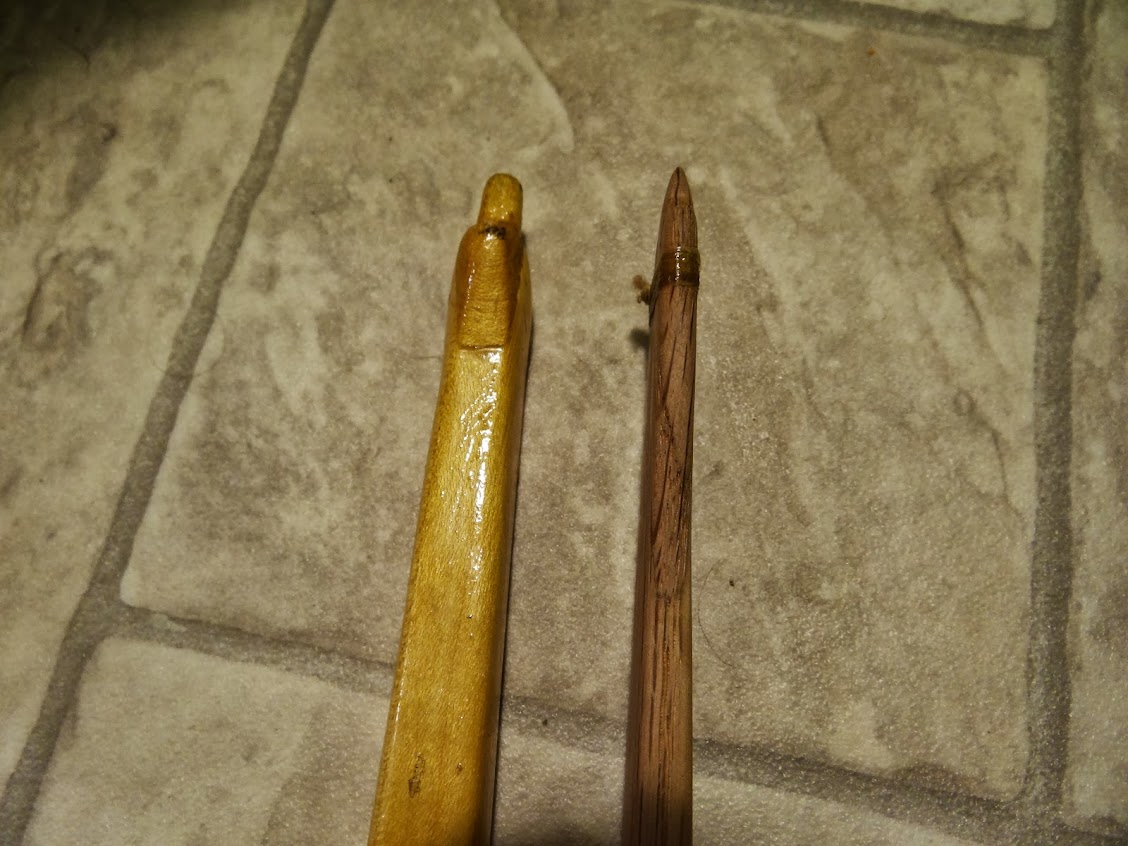
Now the side view:
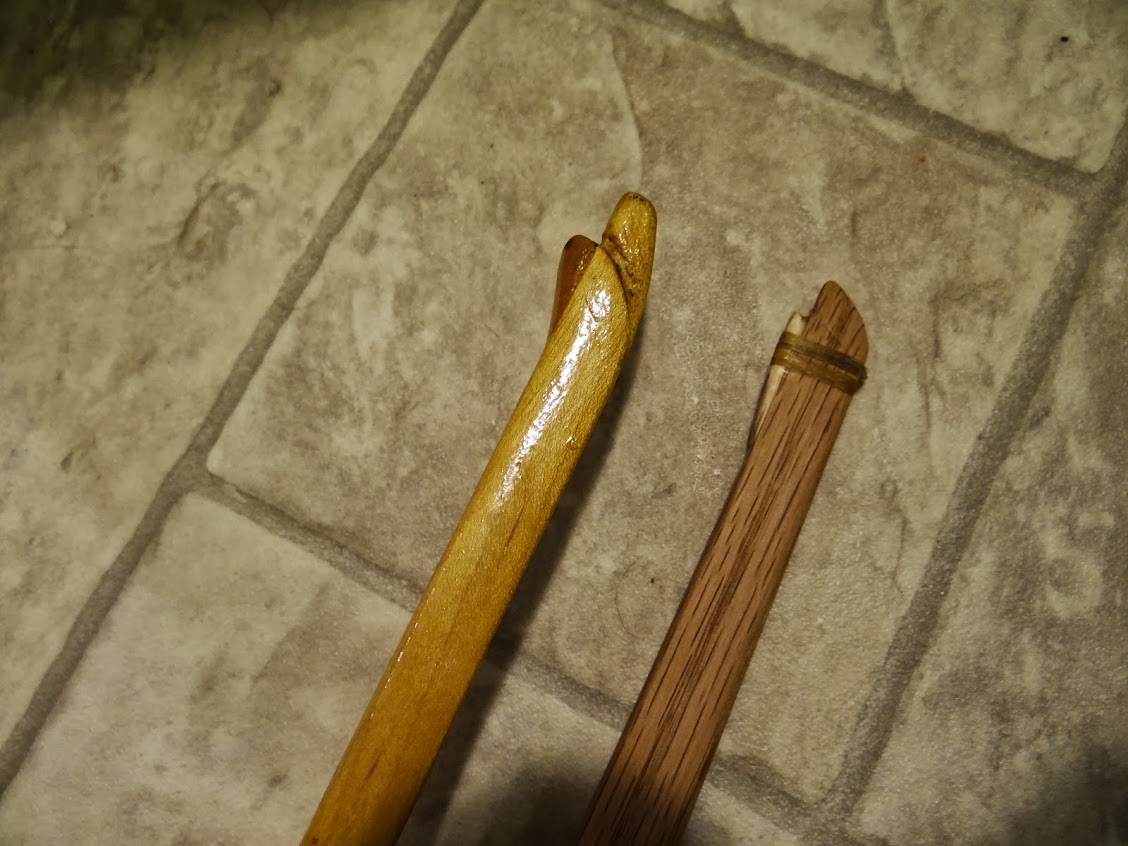
Wow. It's like half the width with the same thickness! To make something stiffer, you can make it wider, or thicker. The maple tips are far wider, but just as thick. Obviously there is some extra wood there. Does anyone remember how I did the tips on the oak one? Did I tell you? I may not have. The last 6" of the oak bow's tips were narrowed to around 3/16". Then I Eiffel tower'ed the tips. Take a look at the Eiffel tower:

Notice how the sides aren't straight up to the top, like, say, the pyramids. They curve inwards. The maple bow's tips ended up about 3/8" wide, double the oak bow's, and I straight tapered them. Remember, the last 6" don't bend. So, the wood 5" from the tip isn't bending at all. Why would it need to be almost as wide as the wood 7" from the tip? It doesn't. If you leave it a little thicker to the point that it doesn't bend, it doesn't have to be so wide. Here's a shot of the whole tips:
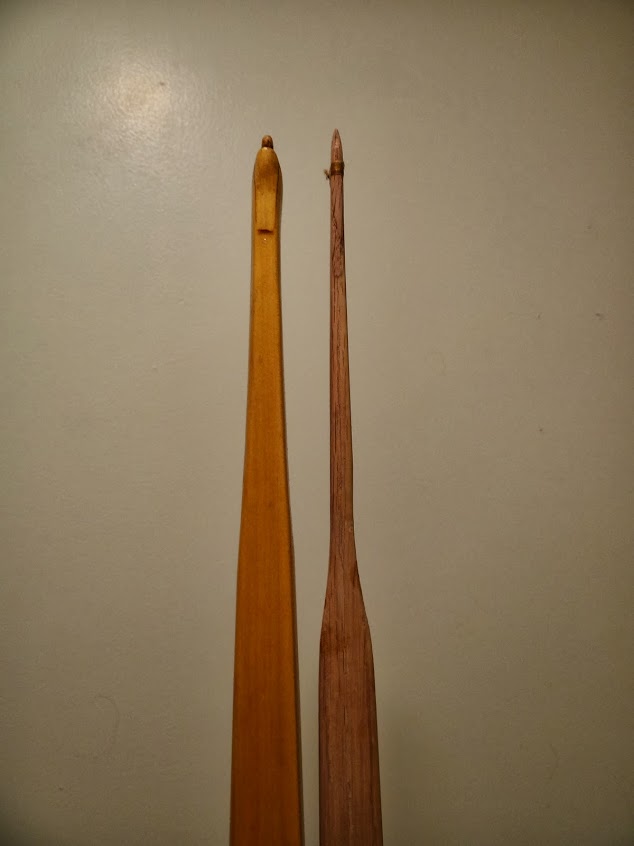
Holy extra tip-weight batman! To understand where the extra weight is (and why it's worthless) here's the other side of the maple bow tips:
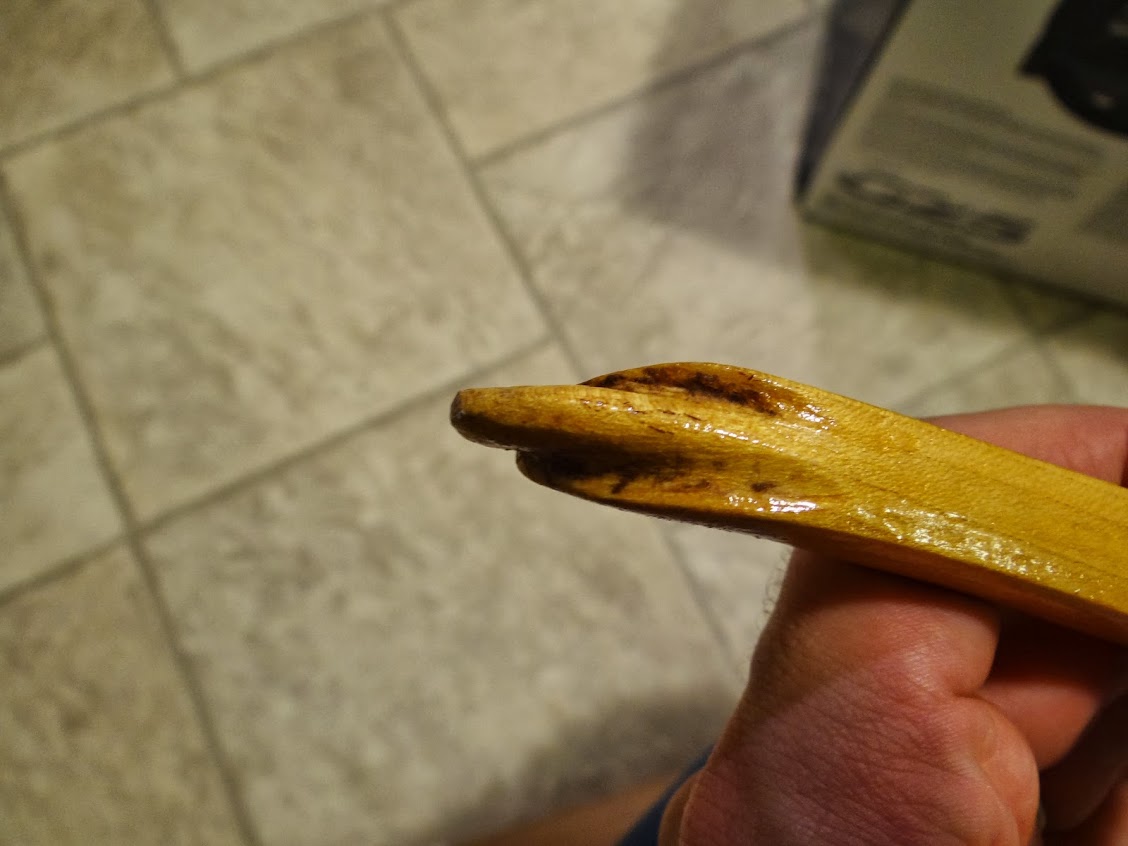
I gave the string loop a ramp, exactly where it doesn't need one. The string barely touches that at brace height, and it certainly doesn't touch it at full draw. It's useless wood. The pin part of the tip where the string loop actually pulls is far narrower, and it hasn't broken. Clearly, all that extra wood isn't necessary. However, remember how the oak bow's tip overlay broke off, requiring the wrap method? This maple bow didn't. There are a couple reasons for that. One is all that extra width which provides more gluing surface. Secondly, maple is a great gluing wood. It's diffuse porous, not ring porous like oak. The one tip overlay on the oak bow was glued on a thin strip of porous spring growth wood. Also, the string pushed against the side of the glued overlay while pulling down on the limb wood. I then had to remake it such that the string groove was cut into the overlay. The string never touches the limb wood. That's how the maple bow tips were glued:
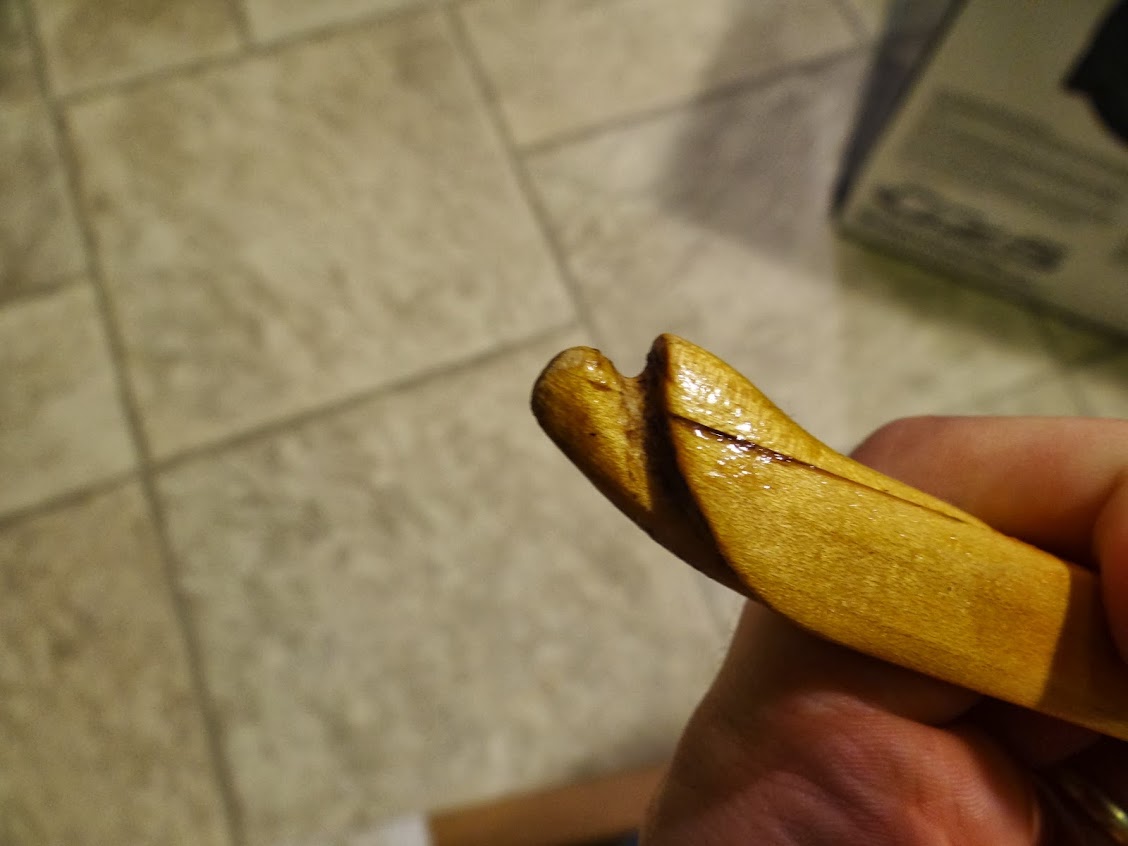
You can see thanks to my crappy glue joint preparation and sloppy finishing job. The string pushes down the glued on overlay, not directly on the bow limb. This is somewhere I shouldn't have changed for the sake of laziness/carelessness.
Now check this out:

That's light reflecting off of some dents in the bow's back! Somehow it never broke. It's even close to the edge, where stress can be focused. You can also see here (and elsewhere in the close up shots) how horrible of a finishing job I did. This stuff is called tru-oil, it's a gunstock finish. It's not really an oil, more of a varnish. When used properly, it's amazingly beautiful. I didn't use it properly. You should just spend a lot of time with surface prep (sanding), dust removal, apply in thin coats, use steel wool between coats, and so on. It'll look great. Don't sloppy sand and just slather 2 thick coats on like me, leaving it outside to dry in the dusty breeze. I can't compare this to other bows i've made, since I didn't use this stuff after this bow. Maybe I'll try it on this unfinished oak bow since I want to try something new once in a while. Plus I have some tru-oil left. I found it when I moved.
When I made that maple bow, I didn't know how to make strings. I used a store purchased one from 3rivers. It was overbuild (invincible) and not exactly the right length. The string had a non-adjustable loop on both ends. The only way to adjust is through twisting and untwisting. 3rivers only makes strings in 1" increments. They suggest a string 3" shorter than the nock to nock measurements on a longbow, but I'm not that exacting, so if my nock to nock measurement is 71 1/4", I can only get a string 1/4" too short, or 3/4" too long. I went with slightly too short, and got this kind of brace:

It doens't look too high, but remember, this is a full 6' longbow. The brace is around 7" or so, maybe higher. The higher brace makes the bow feel stiffer, but gives it a shorter power stroke, with barely more peak power, all while making the bow more likely to break at full draw. Bad news.
I knew that the brace was too high when I made it, so I tried untwisting the string slightly to give it a lower brace, but then this happened:

The loops, when not wrapped, are held together purely by the twist and wax. If you untwist it too far, there is nothing holding it together, and it starts to unwind. I wrap something for a serving around all of my strings to prevent this, but I also make one end adjustable so I don't have to untwist them. My strings are twisted a bit too far (more twist means more stretch means less efficiency) but I can live with that.
When I shoot these bows, the maple bow has more hand shock. Obviously. It also physically weighs more, noticeably so, than the oak one. Remember how different bow woods have different densities? The densities don't mean they should weigh more or less, it means the wood can be narrower or wider accordingly. In a perfect world, a 10% denser wood would make a bow 10% narrower with the same design. The finished procude would have the same draw weight, and the same set. It would also weigh exactly the same. There's a chapter in one of the bowyers bible books about 'tuning' the width of a bow by the weight. The maple bow's extra weight is likely in those massive tips.
I remember shooting the maple bow in a field and feeling like the cast was only mediocre, where the oak bow is probably the fastest bow I've made in this weight range. Obviously, the MUCH more powerful walnut/hickory bow I made earlier in this thread shoots much faster, also possibly the purpleheart/hickory bow that is only pictured on page one of the thread. That bow was also much more powerful, but without the glued in reflex of the walnut one. I don't have that bow here to compare anymore, though.
I should make it clear, these bows are extremely similar, but I had separate goals when making them. With the maple bow, I wanted a bow that wouldn't blow up, and was around 40-50#. It's overbuilt, but it hasn't blown. It's also just over 40# if I remember right. Mission accomplished. If it was a class, I would've gotten a gold star. With the oak bow, I wanted the most draw weight and speed as I could safely get out of this piece of wood without doing too much work (i.e. reflexing, intensive heat treating, drilling 'speed holes' in the tips like homer simpson trying to make his car faster). There is less safety margin here, but I have more bows under my belt, so i felt more confident pushing it. Remember what your goals are, and also remember that they don't have to all be the formula 1 car equivalent of bows. Good luck beating a compound on speed, anyway. I'd rather make the toyota hilux of bows, not particularly fast or pretty, but dead reliable. Compounds need maintenance on all the moving parts, these 2 stick bows won't.
Thats why I think my old E-150 is more reliable than my parent's vw phaeton. CD changer freaking out? In-dash everthing controller glitched out and went blank? ABS sytem error? Tire pressure monitor in the spare tire not realizing that the other 4 tires change pressure with heat? Not a problem in my archaic van. I've never had the automatic trunk opener/closer (that I don't have) break, trapping all of my groceries in the trunk (that I also don't have).
That brings me to the last point. The oak bow isn't as overbuilt as the maple one, but it's not going to break. There is still safety margin built in. Never make a bow that doesn't stand a good chance of lasting. Fragile bows can break, and that can injure people. When using any kind of weaponry, make sure safety is #1.


