


It looks like you're making good progress! I can't remmeber what they did on the MiniTec car had - will you be building a firewall where the rear seats used to be?

It looks like you're making good progress! I can't remmeber what they did on the MiniTec car had - will you be building a firewall where the rear seats used to be?

Yes, some guys put a plexiglass window going up from the bulkhead and leave out the side and rear glass , I'm planning to build an insulated bulkhead "box" over the engine compartment and use the standard side and back windows, so it will be enclosed. Of course I'll have to put a hatch or something over the top for access to things like the dipstick, spark plugs and other maintenance things.
Next I need to carry on removing sheet metal, but it's 12* out right now and will be -12 tomorrow, so I may have to wait a bit.......I do have a heater in my garage, but it's pretty leaky around the garage doors and it costs a lot to run it long enough to get it to a working temp.....right now it's in the high 30's in there......
Cutting out the sheet metal using a cutoff wheel on an angle grinder puts a lot of metal dust and smoke in the air, last night I finally had to open the shop's back door to let some air in and smoke out, even tho it was bitter cold! To get into some of the constricted areas I also have an air powered cutoff saw and a small right angle cutoff wheel.....I've needed all three so far! A lot of the smoke comes from burning thru the sound deadening (like dynamat) as well as actual sprayed on undercoating on the bottom surfaces. Stinks too!
It took just over two weeks, but MiniTec say they got my axles today ![]()
They say they can turn them around to me in a week......we'll see. I hope they return them via FedEx or UPS tho, cause I'm reading that the post office has close to a million undelivered packages, some from before Xmas!
I've been studying my pics above, trying to plan out where/how to cut out the remaining metal so I can start to fit the subframe in. I found that it bolts on where the old subframe did, at the front, and one of those bolts broke off in the captive nut, so I may need to get out the acetylene torch to get that out. I did buy a set of the heel board repair panels just in case, but after looking at them I figured I could have easily made them myself, since instead of using captive nuts in a bracket they simply welded nuts to the back of the new panel - shoot - I could have done that!
The other interesting part is I only need the outermost portion of the heel board, right where those bolts are.....if mine is rusted badly (and it looks like it is) I may do something creative with the new panels to shore up the area a little more. I won't know till I get the rest of the sheet metal out.....
Once the subframe is fit into place and bolted down I can start to replace all the rust with new metal - there will be a LOT of that based on what I'm seeing. Looks like I also need to order a new inner fender/wheel well as the right side has some huge holes in it that I didn't see till I was reviewing the pics. Pic below is of the inner arch, looking up from below.

I'll also need to smooth out some of the sharp edges I left so I don't slice myself to ribbons!
Binky has nothing on this car when it comes to rusty bits!
I did a massive amount of cutting out sheet metal and rust today, still have quite a bit to go but my back called it quits. It was so nice today - mid 50's - warm enough to be able to open the back door and run a fan to suck the smoke and smells out so they don't go into the house.
First I cut out the seat bottom, I thought about trying to save it by drilling out the spot welds then I decided that was just a waste of time and used the saw and cut off wheels on it. I put a new blade in the air powered recip saw and what a huge difference that made - I guess I didn't realize just how dull the blade had gotten. I also found I had bought some small fine tooth blades that let me control the cut a little better, the new one of those went thru the sheet metal like butta!

I'm going to wind up replacing a large part of the floors as they've been bent up badly and have rust both on the edges and in various places along the center tunnel. Oh boy! s/
Next I went after the companion bins - again I thought to just drill out the spot welds and decided to just cut them out. I seriously doubt I'll be using any part of them unless it's to build some cubbies or covers somewhere.


Once those were out of the way I went ahead and trimmed up the floor, the only reason to do this at this point is to do a trial fit of the subframe......I'm almost there now. I still need to remove a few brackets and trim up some edges, then I'll see how it fits and what more needs to go.


My current plan is to fit the subby and use it to help locate the new panels and stiffen the shell as I cut metal out and replace it.
I managed to get the rest of the sheet metal cut out today, although I see I still have to do some clean up and trimming, but I decided to do a trial fit of the frame first.

It didn't go.
So next I'm going to try something different......but first I'm going to try and get ahold of Mini Tec and see how they do it.
My next attempt will be to go in thru the door cause it simply won't go from the back, unless they have some secret way of doing it that I haven't figured out yet!  I'm not keen on that cause it means removing the bracing on one door and the cross brace......I got it almost all the way up, but the forward lip of the frame is supposed to go over the top of the floor, and that wasn't happening.
Here's a pic of the pile of metal I've taken out so far.....


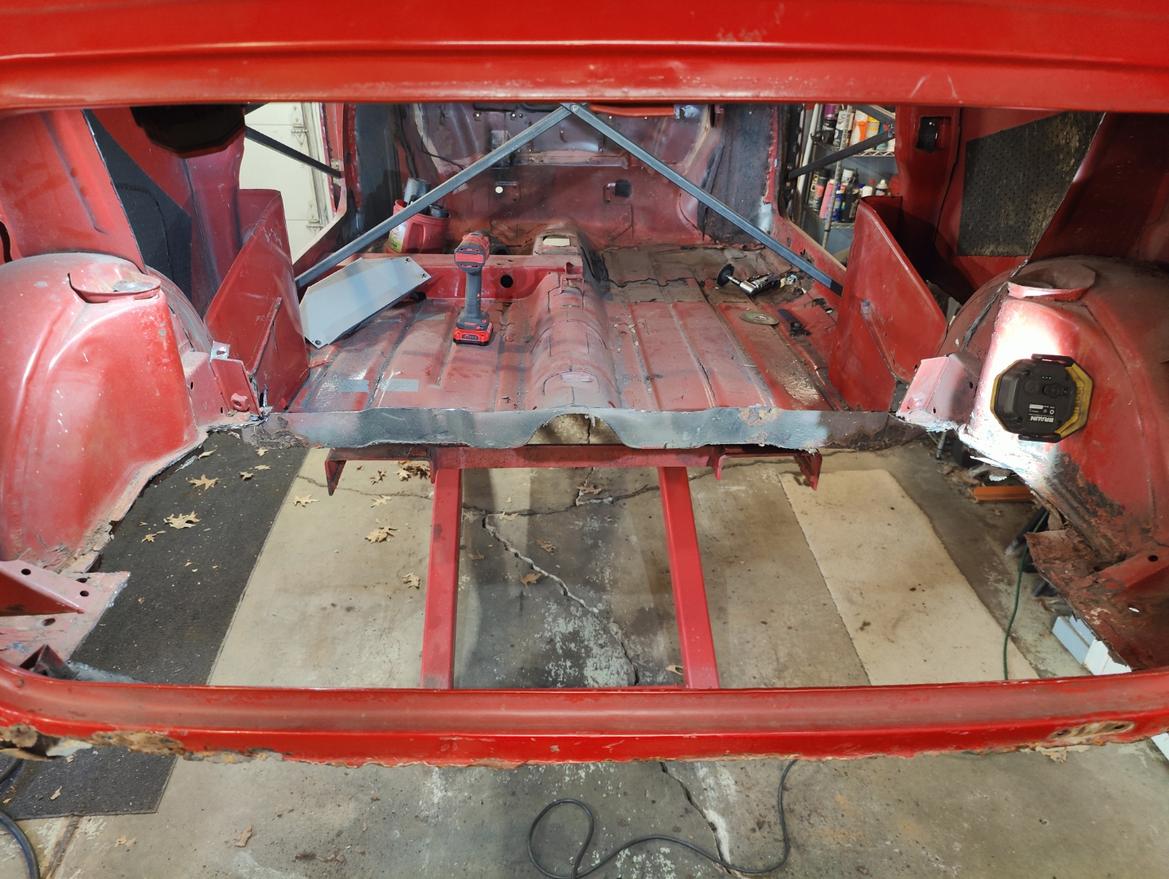
Ok, so it's in the hole!!!


I did have to carve those rear brackets out of the way, then it went in easily and everything lines up as it should. I still have to do some small trimming here and there and clean up all the sharp edges.
Next I'll start thinking about where to start the rust repairs, I'm thinking the best place would be the rear passenger side where so much metal is missing.....
Looking at the rear panel, I bought an entire new rear panel but the only place its really bad is on the bottom edge, so taking a page out of Dan's playbook maybe I'll just replace that lower couple of inches. Of course the boot floor and lower valance also go together at the same place, and I have new pieces to go there as well. I'm thinking maybe weld those two together and put them in place, then replace that lower edge. Dunno, I'll need to think about it for a bit. There's nothing there below that edge, it all rusted away.....

Nice progress, Dave!
You are very much 1., making me feel guilty/lazy, but, 2., motivating the H3LL out of me to get out into the shop and start cutting up my car....so thank you! ![]()
![]()
You're welcome......now get busy! (like you aren't already with a new wife and a houseful of projects for her!)
Actually, your threads have been an inspiration for me to keep going on this project, unfortunately I'm working with a much smaller equipment setup and budget!
Today I needed to deal with some rust - almost every post from here on out can start with that sentence! ![]()
The new subframe bolts in one place right where the old one did, and the right side was rust held together with paint and seam sealer. So I built a new piece from scratch - I had to make sure it was in exactly the right place so the subframe would be square, I'm guessing that the original pieces were - at least it all measured out good.


So I built the new piece, welded it in, cleaned up all the brackets that didn't need to be there, took off all the pointy rusty bits that were catching my back every time I went in and out of the hole and by the end of the day I put the subby back in and it bolted right up nicely. That done I went ahead and drilled the holes for the rear support in the package tray and also the holes in the floor that the lip of the subby goes over.


There are several places in the back there that will need to be patched, then I can start replacing all the rot in the floors, door step and sills, that should stiffen things up nicely. The inner wheel arch on the right side is more hole than metal, and the left isn't much better. What I do to fix all this will partly be determined by whether I wind up using the big Fortech flares or go with Sportpaks.
But before I do even that I may go ahead and reinstall the rear suspension so I can see where the wheels are going to wind up, and how far out of the body they'll protrude.

Keep on truckin! A classic Mini is on the short list of projects I'd like to tackle at some point and much like my 914, I'm sure it will inevitably involve some rust repair.
Almost guaranteed!
This one was far worse than I realized until after I got stuck well into it, or I would have found another shell. They're not plentiful but they're around. One of the best parts about a Mini is that every single part is readily available, and most are simply not that expensive.......shipping from England has gotten more spendy tho.....I have pretty much every new piece of sheet metal I need to finish this one except the wheel inner arches, and those should be here next week.
my 89 was almost rust free, it had a little in the bottom of the doors and a small patch in the right side A panel, but the floors and sills were solid. That one is currently my daily......
I'm following your 914 build too......I've owned a couple of 914's and always liked them.
So, big day today.....I bolted the suspension back in and fitted the rear shocks and wheels.
The suspension was a bitch kitty as it's held by heim joins that are fairly buried under the lip of the subframe, and of course they ride on shoulder bolts. That's not so bad but there are also a couple of spacer washers, and fitting the shoulder thru the bracket, thru the washer and into the joint, thru the other washer then thru the bracket - and get a nut and washer on the threads was......well, difficult and awkward.


After I managed to get the left one done I realized that If I swung the arms all the way down I had enough access that I could at least see what I was trying to do. So it's all bolted up and I took a few pics to see how the wheels would look in the openings. They're nicely centered, but it's going to sit pretty low it looks like. One pic at mid range of the suspension travel and one at full extension.
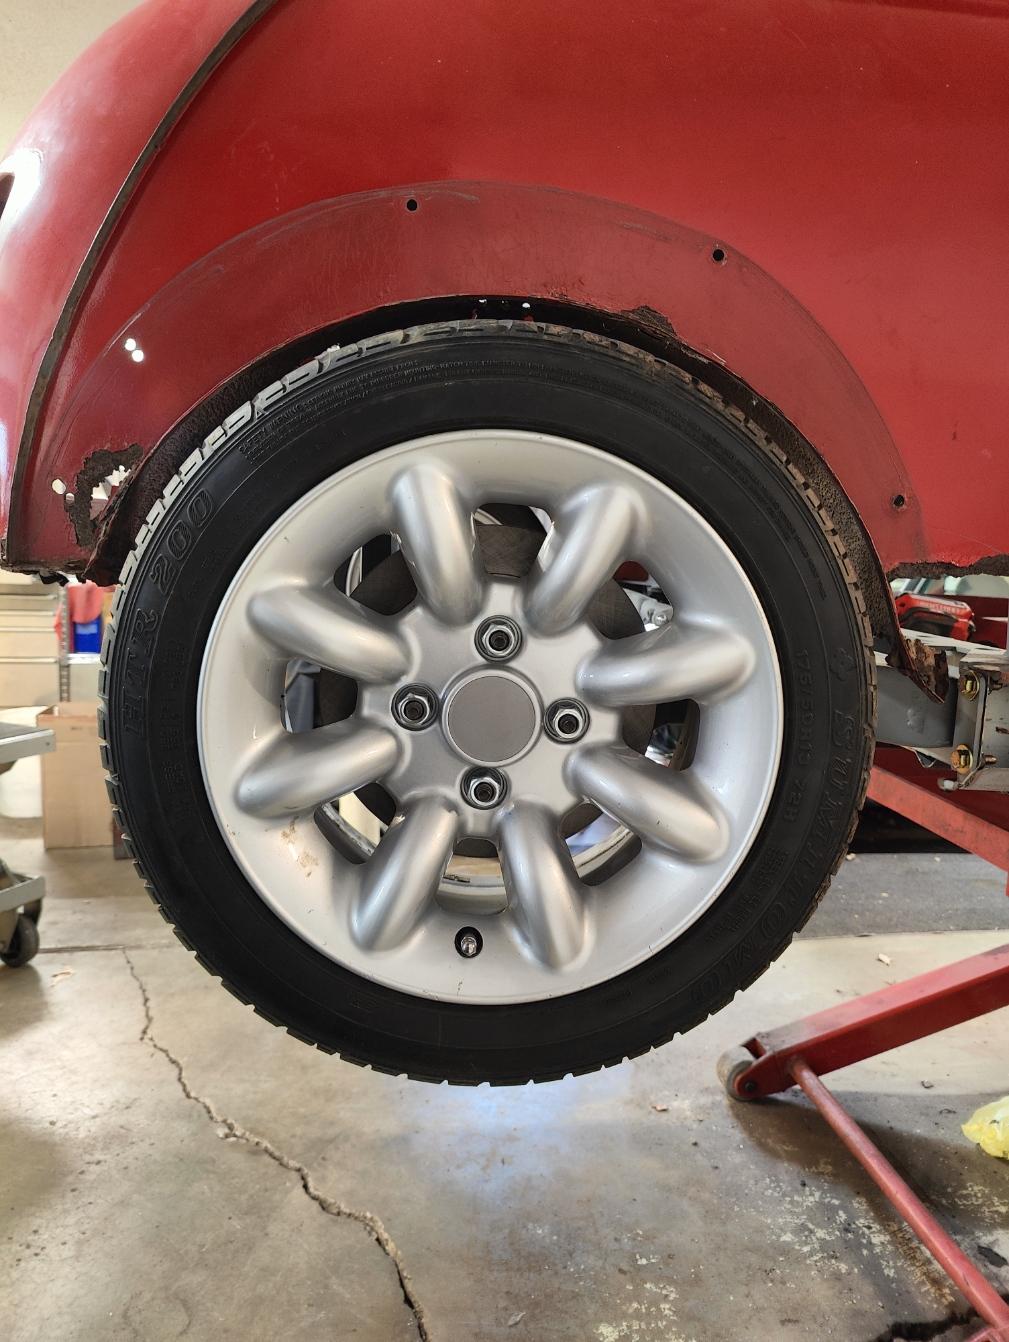

I have some new inner wheel wells that will be here next week, I may have to modify the wheel openings some. It was exciting to see it looking more like a car again!

Dave - I was scrolling marketplace last night and stumbled across this, figured you'd appreicate
That's actually a pretty good deal......it will still be a mountain of work and there is probably another $20K to spend by the time you get it all together again, including paint.
My inner wheel wells are supposed to be here tomorrow, but we had a blizzard blow thru so it won't surprise me if they're a day late - still, DHL has been pretty good about hitting their delivery dates or even being a day early. We didn't get a lot of snow, only about 2 inches, but with the cold wind it feels more like ice than snow. Lots of downed power lines, big tree branches etc. We lost power briefly several times during the night, and this morning the wind is still blowing hard.
It's interesting that we must have had enough warm days that all the concrete has not frozen over, in fact most of it is clear of ice or snow, all of that seems to be in the yards. I was concerned that the combination of ice and strong winds would down a lot more trees, and while there are some large branches down, it's not too bad.....not like storms we've had before where it sounded like shotguns going off as the trees broke.
So, back to the car......I've decided to work from the back to the front in replacing metal.....to that end I think I've figured out what to do on the wheel openings - it will require a lot of fabrication but should give me the look I'm after. Once I've got those in, I can build all the rest of the metal to them, including the rear support brackets for the subframe. According to MiniTec you're supposed to use where the original subframe bolted on at the back, but I could not get this thing to fit if those were in place, and since they were rusted down to nothing and had no strength I knew I'd be cutting them off anyway. So, I'll need to build those, but before I can I'll need to build all the sheet metal to attach them to, as there's nothing but air back there now!

I'll have to build those brackets so they can be bolted on, to let me be able to get the subframe in and out. As it sits now it goes right in with no hassle. I plan to cut the wheel openings up to within about 1/2" of the holes that the sport pak arches attach to, that should give me enough clearance for the tires. Once those are in place I can start building back all the missing sheet metal. If you look at the last pic, there's no Q panel, sill or anything attaching the inner wheel well to the rest of the car, I'll have to build all of that......there's a lot of rust right where the inner wheel well welds to the q panel, so I'll remove that in the process and I'm hopeful that I'll find good metal to weld to.


MiniDave said:That's actually a pretty good deal......it will still be a mountain of work and there is probably another $20K to spend by the time you get it all together again, including paint.
I figured it wasn't a horrible deal, but no the less, a project.
In case anyone is so inspired they can start a build of their own!

The rear trailing arms are connected like a beam axle?
You mean the little bar between them? At first I thought it might be a version of an anti-roll bar, but it's so small and flexy that I think it merely functions as a sort of spacer. The arms pivot on heim joints.

I've started cutting the new wheel well openings....

Since the right side was mostly rust and holes, I got new inner wheel wells too. I'm also moving it upward on the Q panel when I weld it back in. Although I'm not sure how much good they'll do since probably half of the tire is outside the fender (but under the Sport Pak arch)

Above pic is what's left of the right side inner wheel well.....bracket is for the rear mounted windshield washer bottle. I may take that off and remount it back in the front trunk area now.
I don't know if I'll be using all of the floor panels, but there should be enough to fix the sills and the front edge where it's attached at the bulkhead floor at least.

My next and ongoing challenge is to start getting some of this rot repaired.
My seatbelts came in too, and since I've removed the companion bins where they used to attach I bolted in a door bar to see where I can install them. I can either weld a bracket onto the door bar or build a bracket off the body, not sure which way I'll go just yet. Some of it may be determined by which set of seats I wind up using - right now I have three sets to choose from!
In reply to MiniDave : I missed that pic ...
Today was copy Binky day!
I made a tool just like they used on Project Binky to bend up the lip under the arches, and it worked! I didn't do quite as good a job of cutting out the q-panel as they did, you learn as you go, right? The other side should go better.


So once the hole was cut, I used the tool to start bending the lip up, a little at a time, till I got it the full 90*. I had to do a little trimming of some other brackets and in fact I still need to ease one of them about another 1/4" but the inner wheel well fit and lined up nicely with the new lip. Once I'm happy with the fitment of everything I'll weld 'er in place.


Then I'll do the same to the other side and bolt the wheels back on and see how the clearance looks. It should be quite a bit better as I removed about 1 1/2" of metal. Once both sides are welded in place I think the next thing is to replace the rear panel.
With that in place the boot floor lip (only about 2" of that will go back in) and lower valance can go in. That should stiffen things up all across the rear of the car. Then I'll weld in all the filler panels and build the rear braces for the subframe.
From there I'll work forward.....on the door step, floors and sills.
With those done I'll see about bolting in the rest of the cage. Once it's all welded and solid I'll put the motor in and start looking at all the other "to-do's'"
Today I wanted to assess my work before I did the same to the left side, so I took the springs off the shocks so I could move the trailing arms the full length of the shock travel. I put the tire back on and ran the suspension up as far as the shock would let it go. The first pic shows the clearance. The holes are for the attachment points of the Sport Pak arches, so it looks like they will clear ok.

The I went to the left, unmodified side. Second and third pics show the wheel won't go all the way up without hitting the lip, so I was justified in my thinking on cutting the lips up....there was still quite a bit of shock travel to take up.


Lastly, as it got up to the mid 70's today I gave the poor green Mini a bath - it hasn't been out of the garage for over three months so it was well past due for a good cleaning.


In reply to fouckhest :
Wow... that does look like a decent deal for a Mini project these days.
As far as Mini projects go, I'm not sure if rust is worse than "bent". My Mini didn't have much in the way of rust when the next owner started tearing it apart to fix my crash damage, but what he did find was the whole car had been bent pretty badly prior to me and it took a lot more work than he anticipated to straighten it out. I had attributed the terrible shut lines and gaps of the doors to it just being a Mini, but it seems there was more to it.
Great progress Dave!!
Thanks......it did take just a bit of percussive persuasion to get the subframe square and lined up properly, but I think it's going well now.
Major body work from here on,, including lots of new metal. Since I don't have an actual body jig to bolt it down to like they did with Binky, I'm having to measure everything frequently to make sure I'm not making it worse. This car had way more rust than I anticipated - Had I known it was this bad I would not have bought it, but water under the bridge now.
Part of the problem I'm having is there is so much rusted away that when I try to join two panels up there's nothing there to weld to, so I'm having to make a jig to hold it while I weld one panel in, then bring the other to it.......it's a bit of a dance.....
You'll need to log in to post.


